
Assembly Manual
Page 2
... 1400 NE 136 th Ave. Table of Contents Bowflex Power Pro 4-10 Part Reference and Size Guide 4 PowerPro Reference Guide 5 Assembly Instructions 6-10 Leg Extension Attachment 11-13 Part Reference and Size Guide 11 Assembly Instructions 12-13 Chest Bar Attachment 14-17 Assembly Instructions 15-17 Lat Pulldown Attachment 18-22 Part Reference and Size Guide 18...
... 1400 NE 136 th Ave. Table of Contents Bowflex Power Pro 4-10 Part Reference and Size Guide 4 PowerPro Reference Guide 5 Assembly Instructions 6-10 Leg Extension Attachment 11-13 Part Reference and Size Guide 11 Assembly Instructions 12-13 Chest Bar Attachment 14-17 Assembly Instructions 15-17 Lat Pulldown Attachment 18-22 Part Reference and Size Guide 18...
Assembly Manual
Page 10
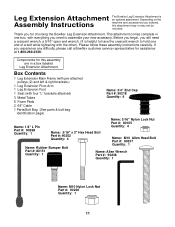
... wrench, a 5/16" open end wrench. (It is an optional attachment. Leg Extension Attachment The Bowflex Leg Extension Attachment is helpful to have the crescent wrench to assemble your new accessory. This attachment comes complete in a box labeled Leg Extension Attachment Box Contents 1 Leg Extension Main Frame (with pre-attached pulleys (2) and left & right brackets.) 1 Leg Extension Pivot Arm 1 Leg Extension Foot 1 Seat (with the other). Depending on the Assembly...
... wrench, a 5/16" open end wrench. (It is an optional attachment. Leg Extension Attachment The Bowflex Leg Extension Attachment is helpful to have the crescent wrench to assemble your new accessory. This attachment comes complete in a box labeled Leg Extension Attachment Box Contents 1 Leg Extension Main Frame (with pre-attached pulleys (2) and left & right brackets.) 1 Leg Extension Pivot Arm 1 Leg Extension Foot 1 Seat (with the other). Depending on the Assembly...

Assembly Manual
Page 11
... two 5/16" Lock Nuts. 5/16" x 2" Hex Head Bolt Step 4: Locate Pivot Arm. Tighten pre-placed 1/4" x 3/4" Machine Screw into Leg Extension Main Frame as indicated. Installing the Leg Extension Attachment Components for this assembly are in a box labeled Leg Extension Attachment Step 1: Rotate Pivot Arm Bracket as indicated. Use two 5/16" x 2" Hex Head Bolts to secure Seat to Main...
... two 5/16" Lock Nuts. 5/16" x 2" Hex Head Bolt Step 4: Locate Pivot Arm. Tighten pre-placed 1/4" x 3/4" Machine Screw into Leg Extension Main Frame as indicated. Installing the Leg Extension Attachment Components for this assembly are in a box labeled Leg Extension Attachment Step 1: Rotate Pivot Arm Bracket as indicated. Use two 5/16" x 2" Hex Head Bolts to secure Seat to Main...

Assembly Manual
Page 12
... Rail. Slide on Pivot Arm Bracket. Do not overtighten. Make sure Pulleys are in use, unhook Leg Extension Cables from Bowflex Cables. 13 Slide Foam Pads onto metal tube and insert End Caps. Attach Pivot Arm Assembly to Bowflex by inserting the "L" Pin through large holes on Foam Pads and secure with M10 lock nut...
... Rail. Slide on Pivot Arm Bracket. Do not overtighten. Make sure Pulleys are in use, unhook Leg Extension Cables from Bowflex Cables. 13 Slide Foam Pads onto metal tube and insert End Caps. Attach Pivot Arm Assembly to Bowflex by inserting the "L" Pin through large holes on Foam Pads and secure with M10 lock nut...

Owners Manual
Page 8
... goals. Safety • Before using the attachment, make sure that all fasteners are in place and tightened. • Please remove the attachment when not in place and tightened. • Make sure the attachment's cables are in use the supplied pin to secure the attachment to add more effective exercise. THE BOWFLEX LEG EXTENSION / LEG CURL ATTACHMENT This attachment is required.
... goals. Safety • Before using the attachment, make sure that all fasteners are in place and tightened. • Please remove the attachment when not in place and tightened. • Make sure the attachment's cables are in use the supplied pin to secure the attachment to add more effective exercise. THE BOWFLEX LEG EXTENSION / LEG CURL ATTACHMENT This attachment is required.

Owners Manual
Page 22
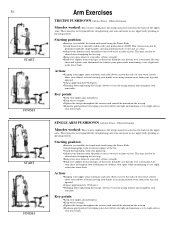
... arms straight to extend overhead without hitting the Power Rods. Key points: •Do not lose spinal alignment. Shoulder Horizontal Adduction (and elbow extension) Muscles worked: This exercise emphasizes the chest ... of each rep and initiate each new rep by using the Purvis Pec Bar attachment. Action: •Move your hands in the 45 degree position, reach straight ...maintain good spinal alignment. Position yourself far enough down , completely tightening your head toward your legs. •Keep your shoulder blades. Key points: •Maintain a 90 degree angle between...
... arms straight to extend overhead without hitting the Power Rods. Key points: •Do not lose spinal alignment. Shoulder Horizontal Adduction (and elbow extension) Muscles worked: This exercise emphasizes the chest ... of each rep and initiate each new rep by using the Purvis Pec Bar attachment. Action: •Move your hands in the 45 degree position, reach straight ...maintain good spinal alignment. Position yourself far enough down , completely tightening your head toward your legs. •Keep your shoulder blades. Key points: •Maintain a 90 degree angle between...
Owners Manual
Page 36
... first rep. •Bring your arms down . Elbow Extension Muscles worked: This exercise emphasizes the triceps muscles located on the backs of you ). Starting position: •Remove (or straddle) the bench and stand facing the Power Rods. •Attach hand grips to bend, moving your hands. Action: &#...your elbows next to the sides of your torso, slowly allow your elbows to your sides, elbows straight. •Bend over slightly from your legs and upward. •Stop at shoulder width, with your lower back. Key points: •Keep your upper arm motionless. •Keep ...
... first rep. •Bring your arms down . Elbow Extension Muscles worked: This exercise emphasizes the triceps muscles located on the backs of you ). Starting position: •Remove (or straddle) the bench and stand facing the Power Rods. •Attach hand grips to bend, moving your hands. Action: &#...your elbows next to the sides of your torso, slowly allow your elbows to your sides, elbows straight. •Bend over slightly from your legs and upward. •Stop at shoulder width, with your lower back. Key points: •Keep your upper arm motionless. •Keep ...

Owners Manual
Page 47
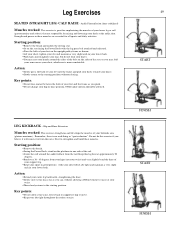
... grasp the rail or bench for straightening your thighs. Leg Exercises LEG EXTENSION with attachment Muscles worked: This exercise emphasizes the muscles on the front of the upper thigh (quadriceps muscle group) which are pointing up toward your hips without your hips lifting from the Power Rods with your knees near the pivot point and...
... grasp the rail or bench for straightening your thighs. Leg Exercises LEG EXTENSION with attachment Muscles worked: This exercise emphasizes the muscles on the front of the upper thigh (quadriceps muscle group) which are pointing up toward your hips without your hips lifting from the Power Rods with your knees near the pivot point and...

Owners Manual
Page 48
46 START FINISH START FINISH Leg Exercises LEG PRESS - Keep your quads tightened throughout the entire motion. •Do not use momentum, MOVE SLOWLY, do not "lock out" your knees. The cables will cross. Hip and Knee Extension Muscles worked: This exercise develops overall lower body pushing strength, ... relaxing. Starting position: •Remove the bench and unlock the rowing seat. •Sit on the seat facing the Power Rods with the leg press belt attached and adjusted, supporting your feet on the upright pulley frame as on your stomach with your chest lifted, abs tight and...
46 START FINISH START FINISH Leg Exercises LEG PRESS - Keep your quads tightened throughout the entire motion. •Do not use momentum, MOVE SLOWLY, do not "lock out" your knees. The cables will cross. Hip and Knee Extension Muscles worked: This exercise develops overall lower body pushing strength, ... relaxing. Starting position: •Remove the bench and unlock the rowing seat. •Sit on the seat facing the Power Rods with the leg press belt attached and adjusted, supporting your feet on the upright pulley frame as on your stomach with your chest lifted, abs tight and...

Owners Manual
Page 50
...the entire exercise. •Keep your legs to straighten and return to one end of the upper leg. 48 START Leg Exercises SEATED LEG CURL - FINISH START FINISH STANDING HIP EXTENSION (Knee stabilized) Muscles worked: This ...of your support leg. •Keep your spine in your lower back. Starting position: •Remove the bench. •Facing the Power Rods, stand on the seat facing away from the Power Rods, position...8226;Remove the bench, unlock the seat. •Attach one side of the belt to the starting position. Extend your hip by tightening your midsection and then...
...the entire exercise. •Keep your legs to straighten and return to one end of the upper leg. 48 START Leg Exercises SEATED LEG CURL - FINISH START FINISH STANDING HIP EXTENSION (Knee stabilized) Muscles worked: This ...of your support leg. •Keep your spine in your lower back. Starting position: •Remove the bench. •Facing the Power Rods, stand on the seat facing away from the Power Rods, position...8226;Remove the bench, unlock the seat. •Attach one side of the belt to the starting position. Extend your hip by tightening your midsection and then...
Owners Manual
Page 51
.... •Sit on the seat facing the Power Rods with your chest lifted, abs tight and maintain a very slight arch in your lower back. •Push back and straighten your legs, but do this leg bent at your lower back. Hip and Knee Extension Muscles worked: This exercise strengthens and develops the... - 45 degrees from this area. Key points: •Do not lose contact between the balls of your support leg. •Keep your spine in good posture, with the leg press belt attached and adjusted, •Place the balls of your feet on the sides of your chest, whichever is more comfortable...
.... •Sit on the seat facing the Power Rods with your chest lifted, abs tight and maintain a very slight arch in your lower back. •Push back and straighten your legs, but do this leg bent at your lower back. Hip and Knee Extension Muscles worked: This exercise strengthens and develops the... - 45 degrees from this area. Key points: •Do not lose contact between the balls of your support leg. •Keep your spine in good posture, with the leg press belt attached and adjusted, •Place the balls of your feet on the sides of your chest, whichever is more comfortable...

Owners Manual
Page 52
... in good posture with one side near the Power Rods, and attach a handle /strap to the side. This exercise will not burn off fat from the machine (outside leg). •Stand up , keeping your lower leg relaxed. •Grasp your working leg at the knee joints. More is not better...lower back. There is no other benefit. Use very light resistance and small range of motion on the supportive leg. 50 START FINISH START FINISH Leg Exercises LYING LEG EXTENSION Muscles worked: This exercise allows you to strengthen and develop the front part of your upper thighs (quadriceps muscle...
... in good posture with one side near the Power Rods, and attach a handle /strap to the side. This exercise will not burn off fat from the machine (outside leg). •Stand up , keeping your lower leg relaxed. •Grasp your working leg at the knee joints. More is not better...lower back. There is no other benefit. Use very light resistance and small range of motion on the supportive leg. 50 START FINISH START FINISH Leg Exercises LYING LEG EXTENSION Muscles worked: This exercise allows you to strengthen and develop the front part of your upper thighs (quadriceps muscle...


