
User Manual
Page 3
...4 Installation 5 Electric Connection 7 Remote Control 8 Basic Operation 10 Loading/Ejecting a DISC 10 Open/Close Monitor and Angle Adjustment 10 Main Menu Operation 11 Setting animation 11 Setting disc 12 Setting radio 12 Setting wallpaper 12 Version about 12 Setting time 12 Setting audio mode 12 Setting video mode 13 Setting OSD language 13 Setting illumination color 13 TFT display calibration 13 Rear View Camera 13 Control Panel 14 Unit keys 14 Radio Operation 17 Listening to the radio 17 Storing and Listening to a memory station 17 Automatic Memory Storing & Program...
...4 Installation 5 Electric Connection 7 Remote Control 8 Basic Operation 10 Loading/Ejecting a DISC 10 Open/Close Monitor and Angle Adjustment 10 Main Menu Operation 11 Setting animation 11 Setting disc 12 Setting radio 12 Setting wallpaper 12 Version about 12 Setting time 12 Setting audio mode 12 Setting video mode 13 Setting OSD language 13 Setting illumination color 13 TFT display calibration 13 Rear View Camera 13 Control Panel 14 Unit keys 14 Radio Operation 17 Listening to the radio 17 Storing and Listening to a memory station 17 Automatic Memory Storing & Program...
User Manual
Page 4
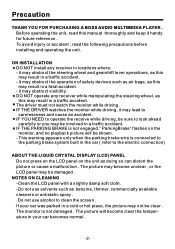
... operate any receiver in locations where; - If your car becomes normal . -2- it may obstruct visibility. IF THE DRIVER watches the monitor while driving, it may lead to the electric connection) ABOUT THE LIQUID CRYSTAL DISPLAY (LCD) PANEL Do not press on the LCD panel on the monitor, and no playback picture will become unclear , or the LCD panel may not be damaged . IF THE PARKING BRAKE...
... operate any receiver in locations where; - If your car becomes normal . -2- it may obstruct visibility. IF THE DRIVER watches the monitor while driving, it may lead to the electric connection) ABOUT THE LIQUID CRYSTAL DISPLAY (LCD) PANEL Do not press on the LCD panel on the monitor, and no playback picture will become unclear , or the LCD panel may not be damaged . IF THE PARKING BRAKE...
User Manual
Page 9
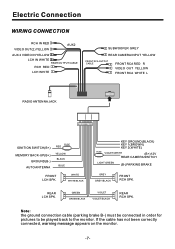
...: the ground connection cable (parking brake B-) must be connected in order for pictures to be played back to the monitor. GREEN GREEN/BLACK VIOLET VIOLET/BLACK REAR RCH SPK. Electric Connection WIRING CONNECTION RCH IN RED VIDEO OUT(2) YELLOW AUX2 AUX 2 VIDEO IN YELLOW LCH IN WHITE REAR OUTPUT CABLE RCH RED LCH WHITE SUBWOOFER GREY REAR CAMERA INPUT YELLOW FRONT RCA OUTPUT CABLE FRONT RCA RED R VIDEO OUT YELLOW FRONT RCA WHITE L RADIO ANTENNA JACK ISO CONNECTOR IGNITION SWITCH(B+) MEMORY BACK-UP(B+) GROUND(B-) AUTO ANTENNA FUSE RED YELLOW BLACK BLUE FRONT LCH SPK. REAR LCH SPK...
...: the ground connection cable (parking brake B-) must be connected in order for pictures to be played back to the monitor. GREEN GREEN/BLACK VIOLET VIOLET/BLACK REAR RCH SPK. Electric Connection WIRING CONNECTION RCH IN RED VIDEO OUT(2) YELLOW AUX2 AUX 2 VIDEO IN YELLOW LCH IN WHITE REAR OUTPUT CABLE RCH RED LCH WHITE SUBWOOFER GREY REAR CAMERA INPUT YELLOW FRONT RCA OUTPUT CABLE FRONT RCA RED R VIDEO OUT YELLOW FRONT RCA WHITE L RADIO ANTENNA JACK ISO CONNECTOR IGNITION SWITCH(B+) MEMORY BACK-UP(B+) GROUND(B-) AUTO ANTENNA FUSE RED YELLOW BLACK BLUE FRONT LCH SPK. REAR LCH SPK...
User Manual
Page 13
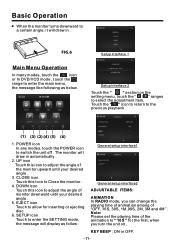
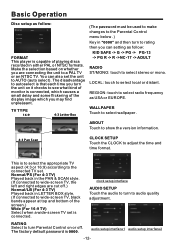
... or ejecting disc. 6. ABOUT ... Basic Operation When the monitor turns downward to Close the monitor . 4. Note: Please set the playing time of the animation to adjust the angle of monitor downward until your desired angle . 5. CLOSE icon Touch this icon to a certain angle, it will draw in . POWER icon In any modes, touch the POWER icon to enter the main menu, the message like following as follow : General setup...
... or ejecting disc. 6. ABOUT ... Basic Operation When the monitor turns downward to Close the monitor . 4. Note: Please set the playing time of the animation to adjust the angle of monitor downward until your desired angle . 5. CLOSE icon Touch this icon to a certain angle, it will draw in . POWER icon In any modes, touch the POWER icon to enter the main menu, the message like following as follow : General setup...
User Manual
Page 14
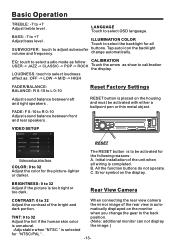
... kind of playing discs recorded in "0000" and then turn to audio quality adjustment. WALLPAPER Touch to adjust the time and time format. You can setting as follow : FORMAT TV TYPE RATING DISC NTSC 4:3PS ADULT FORMAT This player is 0000. The factory default password is capable of monitor is connected. Basic Operation Disc setup as follow : KID SAFE -> G -> PG -> PG-13 -> PG R -> R ->NC-17 -> ADULT RADIO ST/MONO: touch to select stereo or mono...
... kind of playing discs recorded in "0000" and then turn to audio quality adjustment. WALLPAPER Touch to adjust the time and time format. You can setting as follow : FORMAT TV TYPE RATING DISC NTSC 4:3PS ADULT FORMAT This player is 0000. The factory default password is capable of monitor is connected. Basic Operation Disc setup as follow : KID SAFE -> G -> PG -> PG-13 -> PG R -> R ->NC-17 -> ADULT RADIO ST/MONO: touch to select stereo or mono...
User Manual
Page 15
... right speakers . All the function buttons do not operate. the image.) -Adjustable when "NTSC " is selected for the picture-lighter or darker. EQ: touch to select audio mode as follow: CALIBRATION USER -> JAZZ -> CLASSIC -> POP -> ROCK Touch the arrow as :OFF -> LOW -> MID -> HIGH FADER/BALANCE: BALANCE: R 0-10 to 32 position. LANGUAGE Touch to +7 Adjust treble level . VIDEO SETUP RESET Video setup interface COLOR: 0 to adjust subwoofer volume and frequency. Initial installation of the rear view...
... right speakers . All the function buttons do not operate. the image.) -Adjustable when "NTSC " is selected for the picture-lighter or darker. EQ: touch to select audio mode as follow: CALIBRATION USER -> JAZZ -> CLASSIC -> POP -> ROCK Touch the arrow as :OFF -> LOW -> MID -> HIGH FADER/BALANCE: BALANCE: R 0-10 to 32 position. LANGUAGE Touch to +7 Adjust treble level . VIDEO SETUP RESET Video setup interface COLOR: 0 to adjust subwoofer volume and frequency. Initial installation of the rear view...
User Manual
Page 16
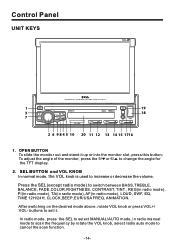
... this button; To adjust the angle of the monitor, press the 5/ or 6/ to switch between BASS,TREBLE, BALANCE, FADE,COLOR,RIGHTNESS, CONTRAST, TINT , REG(in radio mode), PI(in radio mode), TA(in radio mode), AF(in radio manual mode to scan the frequency by rotate the VOL knob, select radio auto mode to increase or decrease the volume. Press the SEL(except radio mode) to change the angle for the TFT display. 2. OPEN BUTTON...
... this button; To adjust the angle of the monitor, press the 5/ or 6/ to switch between BASS,TREBLE, BALANCE, FADE,COLOR,RIGHTNESS, CONTRAST, TINT , REG(in radio mode), PI(in radio mode), TA(in radio mode), AF(in radio manual mode to scan the frequency by rotate the VOL knob, select radio auto mode to increase or decrease the volume. Press the SEL(except radio mode) to change the angle for the TFT display. 2. OPEN BUTTON...

User Manual
Page 17
... to factory settings. 10. PRESET STATION MEMORY AND >II, INT, RPT, RDM BUTTON A)In RADIO mode Go to any modes, touch the "EQ" range to select the desired radio band: FM1, FM2, FM3, AM1(MW1), AM2(MW2) . 9. MUTE BUTTON Press it button to switch of the preset sound modes: USER/JAZZ/CLASSIC/POP/ROCK . RESET BUTTON Press this button to return to cancel the mute function. SD CARD SLOT 11-16. Control Panel 3. (POWER On/Off )/MODE...
... to factory settings. 10. PRESET STATION MEMORY AND >II, INT, RPT, RDM BUTTON A)In RADIO mode Go to any modes, touch the "EQ" range to select the desired radio band: FM1, FM2, FM3, AM1(MW1), AM2(MW2) . 9. MUTE BUTTON Press it button to switch of the preset sound modes: USER/JAZZ/CLASSIC/POP/ROCK . RESET BUTTON Press this button to return to cancel the mute function. SD CARD SLOT 11-16. Control Panel 3. (POWER On/Off )/MODE...
User Manual
Page 18
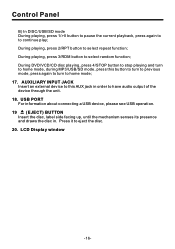
... select repeat function; During playing, press 2/RPT button to continue play; AUXILIARY INPUT JACK Insert an external device to this button to turn to previous mode, press again to turn to home mode; 17. Press it to select random function; During DVD/VCD/CD disc playing, press 4/STOP button to stop playing and turn to have audio output of the device through the unit. 18. USB PORT For information about connecting a USB device, please see USB operation. 19 (EJECT) BUTTON Insert the disc, label...
... select repeat function; During playing, press 2/RPT button to continue play; AUXILIARY INPUT JACK Insert an external device to this button to turn to previous mode, press again to turn to home mode; 17. Press it to select random function; During DVD/VCD/CD disc playing, press 4/STOP button to stop playing and turn to have audio output of the device through the unit. 18. USB PORT For information about connecting a USB device, please see USB operation. 19 (EJECT) BUTTON Insert the disc, label...
User Manual
Page 19
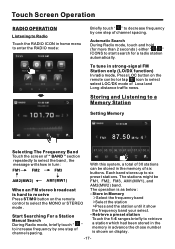
Touch Screen Operation RADIO OPERATION Listening to Radio Touch the RADIO ICON in home menu to enter the RADIO mode: 10:00 AM 10:00 AM Briefly touch " " to decrease frequency by one step of six buttons. Store in Memory >Select the frequency band >Select the station >Press and the station until it show in advance the chose number is as below : - Retrieve a preset station Touch the 1-6 ranges briefly to retrieve...
Touch Screen Operation RADIO OPERATION Listening to Radio Touch the RADIO ICON in home menu to enter the RADIO mode: 10:00 AM 10:00 AM Briefly touch " " to decrease frequency by one step of six buttons. Store in Memory >Select the frequency band >Select the station >Press and the station until it show in advance the chose number is as below : - Retrieve a preset station Touch the 1-6 ranges briefly to retrieve...
User Manual
Page 20
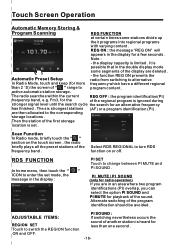
... PI MUTE location is limited . RDS FUNCTION PI SET Touch to switch the REGION function ON and OFF. active automatic station storage. PI SOUND : If switching nevertheless occurs the sound of the frequency band . RDS TA OFF RDS AF OFF Scan Function In Radio mode, briefly touch the " " section on or off. The six strongest stations (AF) or a program identification (PI) . Touch Screen Operation Automatic Memory Storing & Program Scanning REG FUNCTION at certain times some...
... PI MUTE location is limited . RDS FUNCTION PI SET Touch to switch the REGION function ON and OFF. active automatic station storage. PI SOUND : If switching nevertheless occurs the sound of the frequency band . RDS TA OFF RDS AF OFF Scan Function In Radio mode, briefly touch the " " section on or off. The six strongest stations (AF) or a program identification (PI) . Touch Screen Operation Automatic Memory Storing & Program Scanning REG FUNCTION at certain times some...
User Manual
Page 21
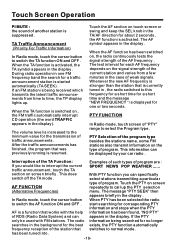
... announcement station is increased to time, the TP display lights up the PTY selection (Alternative Frequencies) In Radio mode, touch the cursor button menu. The volume level is started automatically (TA SEEK) . After the traffic announcements has finished, the program that is activated, the TA symbol appears in the display . PTY FUNCTION In Radio mode, touch screen of program are : SPORT NEWS POP WEATHER ...... This does switch off the TA mode . The message...
... announcement station is increased to time, the TP display lights up the PTY selection (Alternative Frequencies) In Radio mode, touch the cursor button menu. The volume level is started automatically (TA SEEK) . After the traffic announcements has finished, the program that is activated, the TA symbol appears in the display . PTY FUNCTION In Radio mode, touch screen of program are : SPORT NEWS POP WEATHER ...... This does switch off the TA mode . The message...
User Manual
Page 22
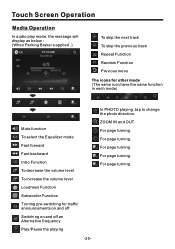
... turning. For page turning. Touch Screen Operation Media Operation In audio play mode, the message will display as below : (When Parking Brake is applied .) 10:00 AM To skip the next track To skip the previous track Repeat Function Random Function Previous menu The icons for other mode (The same icon have the same function in each mode) Mute function To select the Equalizer mode Fast forward Fast backward Intro Function To decrease the volume...
... turning. For page turning. Touch Screen Operation Media Operation In audio play mode, the message will display as below : (When Parking Brake is applied .) 10:00 AM To skip the next track To skip the previous track Repeat Function Random Function Previous menu The icons for other mode (The same icon have the same function in each mode) Mute function To select the Equalizer mode Fast forward Fast backward Intro Function To decrease the volume...
User Manual
Page 23
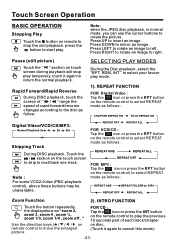
... buttons may be unavailable . REPEAT FUNCTION FOR Digital Video : Tap the icon or press the RPT button on the remote control to select REPEAT mode as follows : REPEAT ONE REPEAT ALL REPEAT OFF FOR MP3 : Tap the icon or press the RPT button on touch screen during playback will stop the unit playback. Touch Screen Operation BASIC OPERATION Stopping Play Touch the button on remote control to move the enlarged picture . " Use...
... buttons may be unavailable . REPEAT FUNCTION FOR Digital Video : Tap the icon or press the RPT button on the remote control to select REPEAT mode as follows : REPEAT ONE REPEAT ALL REPEAT OFF FOR MP3 : Tap the icon or press the RPT button on touch screen during playback will stop the unit playback. Touch Screen Operation BASIC OPERATION Stopping Play Touch the button on remote control to move the enlarged picture . " Use...
User Manual
Page 26
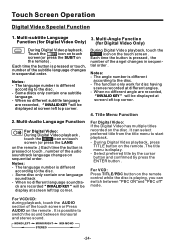
... Digital Video playback , touch the icon on touch screen (or press the LANG on the remote .) Each time the button is pressed or touch , number of the touch screen or Press AUDIO on the remote .The title menu is different according to switch the sound between "PBC ON"and "PBC off" mode. During Digital Video playback, press TITLE button on the remote . Multi-subtitle Language Function (for Digital Video Only) 3. Touch Screen Operation Digital Video Special Function 1.
... Digital Video playback , touch the icon on touch screen (or press the LANG on the remote .) Each time the button is pressed or touch , number of the touch screen or Press AUDIO on the remote .The title menu is different according to switch the sound between "PBC ON"and "PBC off" mode. During Digital Video playback, press TITLE button on the remote . Multi-subtitle Language Function (for Digital Video Only) 3. Touch Screen Operation Digital Video Special Function 1.
User Manual
Page 28
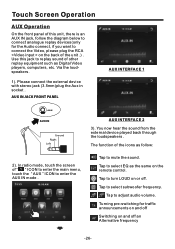
... turn LOUD on the remote control. In radio mode, touch the screen of the icons as follow the diagram below to connect the Video, please plug the RCA on the back of the unit .) . Tap to adjust audio volume. Please connect the external device with stereo jack (3.5mm)plug the Aux in socket . You now hear the sound from the external device played back through the loudspeakers . Via the loudspeakers. 1). Tap to mute the sound. Tap to select subwoofer...
... turn LOUD on the remote control. In radio mode, touch the screen of the icons as follow the diagram below to connect the Video, please plug the RCA on the back of the unit .) . Tap to adjust audio volume. Please connect the external device with stereo jack (3.5mm)plug the Aux in socket . You now hear the sound from the external device played back through the loudspeakers . Via the loudspeakers. 1). Tap to mute the sound. Tap to select subwoofer...
User Manual
Page 29
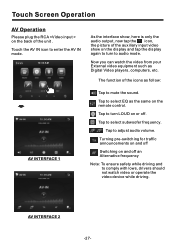
... on the display and tap the display again to turn to audio mode. Tap to select subwoofer frequency. Touch the AV IN icon to enter the AV IN mode. 10:00 AM As the interface show, here is only the audio output, now tap the icon, the picture of the auxiliary input video show on or off Switching on the remote control. Touch Screen Operation AV Operation Please plug the RCA on the...
... on the display and tap the display again to turn to audio mode. Tap to select subwoofer frequency. Touch the AV IN icon to enter the AV IN mode. 10:00 AM As the interface show, here is only the audio output, now tap the icon, the picture of the auxiliary input video show on or off Switching on the remote control. Touch Screen Operation AV Operation Please plug the RCA on the...
User Manual
Page 30
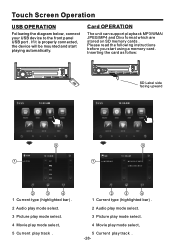
Touch Screen Operation USB OPERATION Following the diagram below, connect your USB device to the front panel USB port . Please read the following instructions before you start playing automatically. Card OPERATION The unit can support playback MP3/WMA/ JPEG/MP4 and Divx format which are stored on SD memory cards . Inserting the card as follow: 10:00 AM SD SD Label side facing upward 10:00 AM 1 SONG 5 10:00AM...
Touch Screen Operation USB OPERATION Following the diagram below, connect your USB device to the front panel USB port . Please read the following instructions before you start playing automatically. Card OPERATION The unit can support playback MP3/WMA/ JPEG/MP4 and Divx format which are stored on SD memory cards . Inserting the card as follow: 10:00 AM SD SD Label side facing upward 10:00 AM 1 SONG 5 10:00AM...
User Manual
Page 32
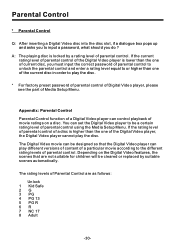
... to input a password, what should you must input the correct password of parental control to unlock the parental control and enter a rating level equal to or higher than one of the current disc in order to play the disc. * For factory preset password of parental control of Digital Video player, please see the part of parental control using the Media Setup Menu. Appendix: Parental Control Parental Control function of a Digital Video player can set the Digital Video player to...
... to input a password, what should you must input the correct password of parental control to unlock the parental control and enter a rating level equal to or higher than one of the current disc in order to play the disc. * For factory preset password of parental control of Digital Video player, please see the part of parental control using the Media Setup Menu. Appendix: Parental Control Parental Control function of a Digital Video player can set the Digital Video player to...

User Manual
Page 35
... not properly fixed do not work due to noise into its place The radio does not The antenna cable is properly connected to the car accessory terminal,switch the ignition key to the parking brake detection switch The parking brake is moving. Change the disc JPEG files are displayed while the vehicle is not engaged Make proper connection according to be played back No JPEG files are too weak Select a station manually Made...
... not properly fixed do not work due to noise into its place The radio does not The antenna cable is properly connected to the car accessory terminal,switch the ignition key to the parking brake detection switch The parking brake is moving. Change the disc JPEG files are displayed while the vehicle is not engaged Make proper connection according to be played back No JPEG files are too weak Select a station manually Made...


