

User Manual
Page 2
To ensure safety while driving and to comply with laws, drivers should not watch video or operate the video device while driving.
To ensure safety while driving and to comply with laws, drivers should not watch video or operate the video device while driving.
User Manual
Page 3
...Menu Operation 11 Setting animation 11 Setting disc 12 Setting radio 12 Setting wallpaper 12 Version about 12 Setting time 12 Setting audio mode 12 Setting video mode 13 Setting OSD language 13 Setting illumination color 13 TFT display calibration 13 Rear View Camera 13... Operation 21 Selecting Play Mode 21 On-Screen Display Function 22 Digital Video Special Function........24 Multi-Subtitle Language function....... 24 Multi-audio language Function.......... 24 Multi-angle Function 24 Title menu function 24 A-B Repeat function 25 Program function 25 Step function 25 Slow ...
...Menu Operation 11 Setting animation 11 Setting disc 12 Setting radio 12 Setting wallpaper 12 Version about 12 Setting time 12 Setting audio mode 12 Setting video mode 13 Setting OSD language 13 Setting illumination color 13 TFT display calibration 13 Rear View Camera 13... Operation 21 Selecting Play Mode 21 On-Screen Display Function 22 Digital Video Special Function........24 Multi-Subtitle Language function....... 24 Multi-audio language Function.......... 24 Multi-angle Function 24 Title menu function 24 A-B Repeat function 25 Program function 25 Step function 25 Slow ...
User Manual
Page 4
... . The monitor is not engaged." The picture will be damaged . ParkingBrake" flashes on the unit as this may obstruct visibility. Precaution THANK YOU FOR PURCHASING A BOSS AUDIO MULTIMEDIA PLAYER . it handy for future reference . DO NOT operate any receiver in a traffic accident. IF THE DRIVER watches the monitor while driving, it may...
... . The monitor is not engaged." The picture will be damaged . ParkingBrake" flashes on the unit as this may obstruct visibility. Precaution THANK YOU FOR PURCHASING A BOSS AUDIO MULTIMEDIA PLAYER . it handy for future reference . DO NOT operate any receiver in a traffic accident. IF THE DRIVER watches the monitor while driving, it may...
User Manual
Page 5
REFER SERVICING TO QUALIFIED PERSONNEL. Reverse engineering or disassembly is protected by Macrovision Corporation. HOWEVER THIS DIGITAL VIDEO PLAYER USES A VISIBLE/INVISIBLE LASER BEAM WHICH COULD CAUSE . THIS DEVICE IS INTENDED FOR CONTINUOUS OPERATION. USE OF CONTROLS OR ADJUSTMENTS OR PERFORMANCE OF PROCEDURES OTHER THAN THOSE SPECIFIED HEREIN MAY RESULT IN HAZARDOUS RADIATION EXPOSURE.DO NOT OPEN COVERS AND DO NOT REPAIR YOURSELF. Patents and other intellectual property rights owned by Macrovision Corporation and other rights owners.Use of this copyright protection technology ...
REFER SERVICING TO QUALIFIED PERSONNEL. Reverse engineering or disassembly is protected by Macrovision Corporation. HOWEVER THIS DIGITAL VIDEO PLAYER USES A VISIBLE/INVISIBLE LASER BEAM WHICH COULD CAUSE . THIS DEVICE IS INTENDED FOR CONTINUOUS OPERATION. USE OF CONTROLS OR ADJUSTMENTS OR PERFORMANCE OF PROCEDURES OTHER THAN THOSE SPECIFIED HEREIN MAY RESULT IN HAZARDOUS RADIATION EXPOSURE.DO NOT OPEN COVERS AND DO NOT REPAIR YOURSELF. Patents and other intellectual property rights owned by Macrovision Corporation and other rights owners.Use of this copyright protection technology ...
User Manual
Page 6
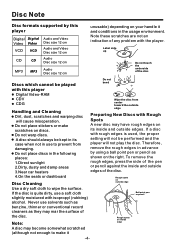
... misoperation. Do not warp discs. To remove the rough edges, press the side of the disc. Label side up CD MP3 CD MP3 Audio Disc size 12 cm Audio Disc size 12 cm Do not touch the underside of the disc Discs which cannot be played Do not bend with rough edges... scratched (although not enough to make scratches on your handle it -4- If a disc with this player Digital Digital Video Video VCD VCD Audio and Video Disc size 12 cm Audio and Video Disc size 12 cm unusable) depending on discs. Therefore, remove the rough edges in use to prevent from damaging. Never...
... misoperation. Do not warp discs. To remove the rough edges, press the side of the disc. Label side up CD MP3 CD MP3 Audio Disc size 12 cm Audio Disc size 12 cm Do not touch the underside of the disc Discs which cannot be played Do not bend with rough edges... scratched (although not enough to make scratches on your handle it -4- If a disc with this player Digital Digital Video Video VCD VCD Audio and Video Disc size 12 cm Audio and Video Disc size 12 cm unusable) depending on discs. Therefore, remove the rough edges in use to prevent from damaging. Never...

User Manual
Page 7
The use of unauthorized parts can be properly installed either from the heater, or where it does not get in the driver's way and cannot injure the passenger if there is all connected up properly and the unit and the system work properly. DIN FRONT/REAR-MOUNT This unit can cause malfunctions. Installation NOTES: Choose the mounting location where the unit will not interfere with the normal driving function of the vehicle. If installation angle exceeds 30 from horizontal, the unit might not give its optimum performance. 30 Avoid installing the unit where it would be subject to high ...
The use of unauthorized parts can be properly installed either from the heater, or where it does not get in the driver's way and cannot injure the passenger if there is all connected up properly and the unit and the system work properly. DIN FRONT/REAR-MOUNT This unit can cause malfunctions. Installation NOTES: Choose the mounting location where the unit will not interfere with the normal driving function of the vehicle. If installation angle exceeds 30 from horizontal, the unit might not give its optimum performance. 30 Avoid installing the unit where it would be subject to high ...
User Manual
Page 8
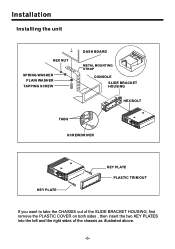
Installation Installing the unit HEX NUT SPRING WASHER PLAIN WASHER TAPPING SCREW DASH BOARD METAL MOUNTING STRAP CONSOLE SLIDE BRACKET HOUSING HEX BOLT TABS SCREWDRIVER KEY PLATE KEY PLATE PLASTIC TRIM OUT If you want to take the CHASSIS out of the SLIDE BRACKET HOUSING, first remove the PLASTIC COVER on both sides , then insert the two KEY PLATES into the left and the right sides of the chassis as illustrated above. -6-
Installation Installing the unit HEX NUT SPRING WASHER PLAIN WASHER TAPPING SCREW DASH BOARD METAL MOUNTING STRAP CONSOLE SLIDE BRACKET HOUSING HEX BOLT TABS SCREWDRIVER KEY PLATE KEY PLATE PLASTIC TRIM OUT If you want to take the CHASSIS out of the SLIDE BRACKET HOUSING, first remove the PLASTIC COVER on both sides , then insert the two KEY PLATES into the left and the right sides of the chassis as illustrated above. -6-
User Manual
Page 9
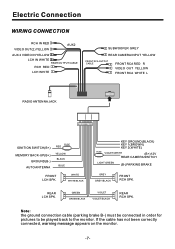
Electric Connection WIRING CONNECTION RCH IN RED VIDEO OUT(2) YELLOW AUX2 AUX 2 VIDEO IN YELLOW LCH IN WHITE REAR OUTPUT CABLE RCH RED LCH WHITE SUBWOOFER GREY REAR CAMERA INPUT YELLOW FRONT RCA OUTPUT CABLE FRONT RCA RED R VIDEO OUT YELLOW FRONT RCA WHITE L RADIO ANTENNA JACK ISO CONNECTOR IGNITION SWITCH(B+) MEMORY BACK-UP(B+) GROUND(B-) AUTO ANTENNA FUSE RED YELLOW BLACK BLUE FRONT LCH SPK. If the cable has not been correctly connected, warning message appears on the monitor. -7- WHITE WHITE/BLACK KEY GROUND(BLACK) KEY 1(BROWN) KEY 2(WHITE) FUSE VIOLET/WHITE (B+)12V ...
Electric Connection WIRING CONNECTION RCH IN RED VIDEO OUT(2) YELLOW AUX2 AUX 2 VIDEO IN YELLOW LCH IN WHITE REAR OUTPUT CABLE RCH RED LCH WHITE SUBWOOFER GREY REAR CAMERA INPUT YELLOW FRONT RCA OUTPUT CABLE FRONT RCA RED R VIDEO OUT YELLOW FRONT RCA WHITE L RADIO ANTENNA JACK ISO CONNECTOR IGNITION SWITCH(B+) MEMORY BACK-UP(B+) GROUND(B-) AUTO ANTENNA FUSE RED YELLOW BLACK BLUE FRONT LCH SPK. If the cable has not been correctly connected, warning message appears on the monitor. -7- WHITE WHITE/BLACK KEY GROUND(BLACK) KEY 1(BROWN) KEY 2(WHITE) FUSE VIOLET/WHITE (B+)12V ...
User Manual
Page 10
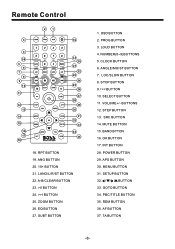
LANG/L/R/ST BUTTON 22. EQ BUTTON 27. NUMBER(0~9)BUTTONS 5. A-B/CLEAR BUTTON 23. >II BUTTON 24. >>I SUBT BUTTON 1. CLOCK BUTTON 6. I BUTTON 25. ANG BUTTON 20. 10+ BUTTON 21. RPT BUTTON 19. ZOOM BUTTON 26. ANGLE/MO/ST BUTTON 7. LOC/SLOW BUTTON 8. PROG BUTTON 3. LOUD BUTTON 4. OSD BUTTON 2. Remote Control 2 1 3 19 4 36 5 6 7 8 9 10 11 12 13 14 15 16 17 18 37 20 21 22 23 24 25 26 27 28 29 30 31 32 33 34 35 18. STOP BUTTON 9.
LANG/L/R/ST BUTTON 22. EQ BUTTON 27. NUMBER(0~9)BUTTONS 5. A-B/CLEAR BUTTON 23. >II BUTTON 24. >>I SUBT BUTTON 1. CLOCK BUTTON 6. I BUTTON 25. ANG BUTTON 20. 10+ BUTTON 21. RPT BUTTON 19. ZOOM BUTTON 26. ANGLE/MO/ST BUTTON 7. LOC/SLOW BUTTON 8. PROG BUTTON 3. LOUD BUTTON 4. OSD BUTTON 2. Remote Control 2 1 3 19 4 36 5 6 7 8 9 10 11 12 13 14 15 16 17 18 37 20 21 22 23 24 25 26 27 28 29 30 31 32 33 34 35 18. STOP BUTTON 9.
User Manual
Page 11
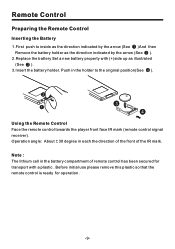
Note : The lithium cell in each the direction of the front of remote control has been secured for operation . -9- Operation angle: About 30 degree in the battery compartment of the IR mark. Before initial use please remove this plastic so that the remote control is ready for transport with (+)side up as illustrated (See 3 ). 3.Insert the battery holder. Push in the holder to inside as the direction indicated by the arrow (See 1 )And then Remove the battery holder as the direction indicated by the arrow (See 2 ). 2.Replace the battery Set a new battery property with a plastic . ...
Note : The lithium cell in each the direction of the front of remote control has been secured for operation . -9- Operation angle: About 30 degree in the battery compartment of the IR mark. Before initial use please remove this plastic so that the remote control is ready for transport with (+)side up as illustrated (See 3 ). 3.Insert the battery holder. Push in the holder to inside as the direction indicated by the arrow (See 1 )And then Remove the battery holder as the direction indicated by the arrow (See 2 ). 2.Replace the battery Set a new battery property with a plastic . ...
User Manual
Page 12
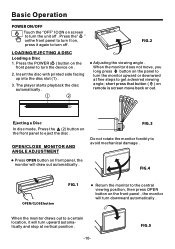
Press the POWER ( ) button on the front panel to turn upward automatically and stop at fine steps to turn downward automatically . short press that button ( ) on front panel, the monitor will draw out automatically . When the monitor draws out to a certain location, it again to turn the unit off . Insert the disc with printed side facing up into the disc slot (1) . 3. The player starts playback the disc automatically . 1 2 FIG.2 Adjusting the viewing angle . FIG.5 Basic Operation POWER ON/OFF Touch the "OFF" ICON on screen to turn off . Ejecting a Disc In disc ...
Press the POWER ( ) button on the front panel to turn upward automatically and stop at fine steps to turn downward automatically . short press that button ( ) on front panel, the monitor will draw out automatically . When the monitor draws out to a certain location, it again to turn the unit off . Insert the disc with printed side facing up into the disc slot (1) . 3. The player starts playback the disc automatically . 1 2 FIG.2 Adjusting the viewing angle . FIG.5 Basic Operation POWER ON/OFF Touch the "OFF" ICON on screen to turn off . Ejecting a Disc In disc ...
User Manual
Page 13
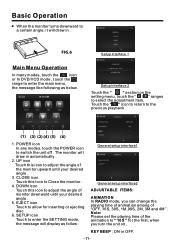
UP icon Touch this icon to adjust the angle of the monitor upward until your desired angle . 3. EJECT icon Touch to switch the unit off . KEY BEEP : ON or OFF. -11- SETUP icon Touch to enter the SETTING mode, the message will display as below. 10:00 AM IILLLLUUMMIINNAATTIIOONNCCOOLLOORR Setup interface 2 Touch the " " section on . ABOUT ... DOWN icon Touch this icon to Close the monitor . 4. POWER icon In any modes, touch the POWER icon to allow for the first, when you can change the playing time of animation among of monitor downward until your desired ...
UP icon Touch this icon to adjust the angle of the monitor upward until your desired angle . 3. EJECT icon Touch to switch the unit off . KEY BEEP : ON or OFF. -11- SETUP icon Touch to enter the SETTING mode, the message will display as below. 10:00 AM IILLLLUUMMIINNAATTIIOONNCCOOLLOORR Setup interface 2 Touch the " " section on . ABOUT ... DOWN icon Touch this icon to Close the monitor . 4. POWER icon In any modes, touch the POWER icon to allow for the first, when you can change the playing time of animation among of monitor downward until your desired ...
User Manual
Page 14
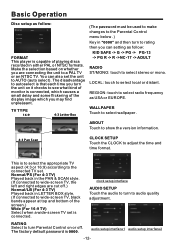
.... This is connected. RATING Select to turn to rating then you can also set . The factory default password is that each time you turn to audio quality adjustment. Make the selection based on it checks to see what kind of monitor is capable of the display image which you are cut.... (If connected to wide-screen TV, the left and right edges are connecting the unit to a PAL TV or an NTSC TV. clock setup interface AUDIO SETUP Touch the audio to turn the unit on whether you may find unpleasant. The disadvantage to autoselect is 0000. WALLPAPER Touch to select wallpaper...
.... This is connected. RATING Select to turn to rating then you can also set . The factory default password is that each time you turn to audio quality adjustment. Make the selection based on it checks to see what kind of monitor is capable of the display image which you are cut.... (If connected to wide-screen TV, the left and right edges are connecting the unit to a PAL TV or an NTSC TV. clock setup interface AUDIO SETUP Touch the audio to turn the unit on whether you may find unpleasant. The disadvantage to autoselect is 0000. WALLPAPER Touch to select wallpaper...
User Manual
Page 15
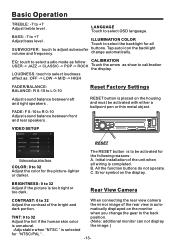
...- BRIGHTNESS: 0 to calibration the display. Adjust the tint if the human skin color (Note: additional monitor can not display is completed. EQ: touch to select audio mode as follow: CALIBRATION USER -> JAZZ -> CLASSIC -> POP -> ROCK Touch the arrow as :OFF -> LOW -> MID -> HIGH FADER/BALANCE: BALANCE: R 0-10 to R 0-10 Adjust sound...
...- BRIGHTNESS: 0 to calibration the display. Adjust the tint if the human skin color (Note: additional monitor can not display is completed. EQ: touch to select audio mode as follow: CALIBRATION USER -> JAZZ -> CLASSIC -> POP -> ROCK Touch the arrow as :OFF -> LOW -> MID -> HIGH FADER/BALANCE: BALANCE: R 0-10 to R 0-10 Adjust sound...
User Manual
Page 16
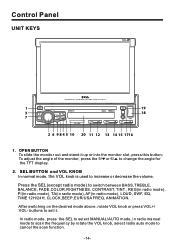
Control Panel UNIT KEYS 1 19 3 18 7 2 6 9 8 4 5 10 20 11 12 13 14 15 1716 1. buttons to cancel the scan function. -14- In radio mode, press the SEL to select MANUAL/AUTO mode, in radio mode), LOUD, SWF, EQ, TIME 12H/24H, CLOCK,BEEP,EUR/USA FREQ, ANIMATION. To adjust the angle of the monitor, press the 5/ or 6/ to switch between BASS,TREBLE, BALANCE, FADE,COLOR,RIGHTNESS, CONTRAST, TINT , REG(in radio mode), PI(in radio mode), TA(in radio mode), AF(in radio manual mode to scan the frequency by rotate the VOL knob, select radio auto mode to set it up or into the monitor ...
Control Panel UNIT KEYS 1 19 3 18 7 2 6 9 8 4 5 10 20 11 12 13 14 15 1716 1. buttons to cancel the scan function. -14- In radio mode, press the SEL to select MANUAL/AUTO mode, in radio mode), LOUD, SWF, EQ, TIME 12H/24H, CLOCK,BEEP,EUR/USA FREQ, ANIMATION. To adjust the angle of the monitor, press the 5/ or 6/ to switch between BASS,TREBLE, BALANCE, FADE,COLOR,RIGHTNESS, CONTRAST, TINT , REG(in radio mode), PI(in radio mode), TA(in radio mode), AF(in radio manual mode to scan the frequency by rotate the VOL knob, select radio auto mode to set it up or into the monitor ...

User Manual
Page 17
Briefly pressing |>| button can manually search down or up for a short period. BND BUTTON In Radio mode, press it again to cancel the mute function. continuously and long pressing |>| button can play the previous or next track; The information will be cancelled by pressing one of the 6preset station(1-6) ,if one of the loudspeakers for a your desired station beginning from the current frequency; MUTE BUTTON Press it button to switch of the preset sound modes: USER/JAZZ/CLASSIC/POP/ROCK . RESET BUTTON Press this button to return to factory settings. 10. Press it ...
Briefly pressing |>| button can manually search down or up for a short period. BND BUTTON In Radio mode, press it again to cancel the mute function. continuously and long pressing |>| button can play the previous or next track; The information will be cancelled by pressing one of the 6preset station(1-6) ,if one of the loudspeakers for a your desired station beginning from the current frequency; MUTE BUTTON Press it button to switch of the preset sound modes: USER/JAZZ/CLASSIC/POP/ROCK . RESET BUTTON Press this button to return to factory settings. 10. Press it ...
User Manual
Page 18
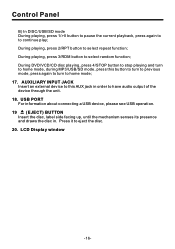
... an external device to this button to turn to previous mode, press again to turn to continue play; During playing, press 2/RPT button to have audio output of the device through the unit. 18. Press it to select random function; During playing, press 3/RDM button to eject the disc. 20. USB...
... an external device to this button to turn to previous mode, press again to turn to continue play; During playing, press 2/RPT button to have audio output of the device through the unit. 18. Press it to select random function; During playing, press 3/RDM button to eject the disc. 20. USB...
User Manual
Page 19
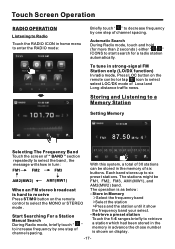
Touch Screen Operation RADIO OPERATION Listening to Radio Touch the RADIO ICON in home menu to enter the RADIO mode: 10:00 AM 10:00 AM Briefly touch " " to decrease frequency by one step of Local and Long-distance traffic news. To tune in the memory of " BAND " section repeatedly to select the band , the message will show the frequency band your select. - Start Searching For a Station Manual Search During Radio mode, briefly touch " " to increase frequency by one step of channel spacing. 87.50 90.10 98.10 87.50 107.9 100.8 With this system, a total of 30 stations can be FM1, FM2, ...
Touch Screen Operation RADIO OPERATION Listening to Radio Touch the RADIO ICON in home menu to enter the RADIO mode: 10:00 AM 10:00 AM Briefly touch " " to decrease frequency by one step of Local and Long-distance traffic news. To tune in the memory of " BAND " section repeatedly to select the band , the message will show the frequency band your select. - Start Searching For a Station Manual Search During Radio mode, briefly touch " " to increase frequency by one step of channel spacing. 87.50 90.10 98.10 87.50 107.9 100.8 With this system, a total of 30 stations can be FM1, FM2, ...
User Manual
Page 20
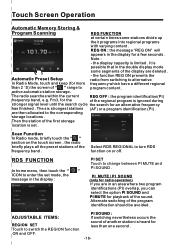
RDS FUNCTION PI SET Touch to switch the REGION function ON and OFF. It is possible that in the display for less than 2 ' S) the screen of another station is set mode, the message in the display : PI MUTE / PI SOUND (only for radio operation) ST/MONO RADIO STEREO If you are in an area where two program identifications (PI) overlap, you can select the option PI SOUND and LOCAL DX PI MUTE for playback of the frequency band . RADIO Then the station of the first storage RDS PI MUTE location is heard for a few seconds . The six ...
RDS FUNCTION PI SET Touch to switch the REGION function ON and OFF. It is possible that in the display for less than 2 ' S) the screen of another station is set mode, the message in the display : PI MUTE / PI SOUND (only for radio operation) ST/MONO RADIO STEREO If you are in an area where two program identifications (PI) overlap, you can select the option PI SOUND and LOCAL DX PI MUTE for playback of the frequency band . RADIO Then the station of the first storage RDS PI MUTE location is heard for a few seconds . The six ...
User Manual
Page 21
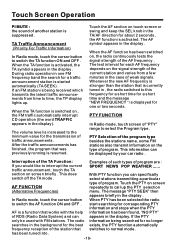
TA Traffic Announcement (Priority For Traffic Information) In Radio mode, touch the cursor button to switch the AF function ON and OFF . The AF symbol appears in the display . The message "PTY SEEK" then appears briefly in the display . AF is increased to the minimum value for a short time and the message "NEW FREQUENCY " is activated. When the TA function is switched on , the FM traffic automatically interrupt CD operation (the word TRAFFIC appears in one or two seconds. When the AF function has been switched on the type of the AF frequency . PTY Selection of the ...
TA Traffic Announcement (Priority For Traffic Information) In Radio mode, touch the cursor button to switch the AF function ON and OFF . The AF symbol appears in the display . The message "PTY SEEK" then appears briefly in the display . AF is increased to the minimum value for a short time and the message "NEW FREQUENCY " is activated. When the TA function is switched on , the FM traffic automatically interrupt CD operation (the word TRAFFIC appears in one or two seconds. When the AF function has been switched on the type of the AF frequency . PTY Selection of the ...