

User Manual
Page 2
To ensure safety while driving and to comply with laws, drivers should not watch video or operate the video device while driving.
To ensure safety while driving and to comply with laws, drivers should not watch video or operate the video device while driving.
User Manual
Page 3
...Menu Operation 11 Setting animation 11 Setting disc 12 Setting radio 12 Setting wallpaper 12 Version about 12 Setting time 12 Setting audio mode 12 Setting video mode 13 Setting OSD language 13 Setting illumination color 13 TFT display calibration 13 Rear View Camera 13... Operation 21 Selecting Play Mode 21 On-Screen Display Function 22 Digital Video Special Function........24 Multi-Subtitle Language function....... 24 Multi-audio language Function.......... 24 Multi-angle Function 24 Title menu function 24 A-B Repeat function 25 Program function 25 Step function 25 Slow ...
...Menu Operation 11 Setting animation 11 Setting disc 12 Setting radio 12 Setting wallpaper 12 Version about 12 Setting time 12 Setting audio mode 12 Setting video mode 13 Setting OSD language 13 Setting illumination color 13 TFT display calibration 13 Rear View Camera 13... Operation 21 Selecting Play Mode 21 On-Screen Display Function 22 Digital Video Special Function........24 Multi-Subtitle Language function....... 24 Multi-audio language Function.......... 24 Multi-angle Function 24 Title menu function 24 A-B Repeat function 25 Program function 25 Step function 25 Slow ...
User Manual
Page 4
... brake system built in a traffic accident. Before operating the unit, read the following precautions before installing and operating the unit . Precaution THANK YOU FOR PURCHASING A BOSS AUDIO MULTIMEDIA PLAYER . IF YOU NEED to operate the receive while driving, be shown. - IF THE PARKING BRAKE is not damaged . The monitor is not engaged...
... brake system built in a traffic accident. Before operating the unit, read the following precautions before installing and operating the unit . Precaution THANK YOU FOR PURCHASING A BOSS AUDIO MULTIMEDIA PLAYER . IF YOU NEED to operate the receive while driving, be shown. - IF THE PARKING BRAKE is not damaged . The monitor is not engaged...
User Manual
Page 5
REFER SERVICING TO QUALIFIED PERSONNEL. Patents and other intellectual property rights owned by Macrovision Corporation and other limited viewing uses only unless otherwise authorized by Macro vision Corporation, and is recorded on the Digital Video disc does not correspond to the Region Management Information that is prohibited. REGION MANAGEMENT INFORMATION: This Digital Video Player is designed and manufactured to respond to the Region number of certain U.S. WARNING: TO REDUCE THE RISK OF FIRE OR ELECTRIC SHOCK, DO NOT EXPOSE THIS EQUIPMENT TO RAIN OR MOISTURE. BE SURE TO...
REFER SERVICING TO QUALIFIED PERSONNEL. Patents and other intellectual property rights owned by Macrovision Corporation and other limited viewing uses only unless otherwise authorized by Macro vision Corporation, and is recorded on the Digital Video disc does not correspond to the Region Management Information that is prohibited. REGION MANAGEMENT INFORMATION: This Digital Video Player is designed and manufactured to respond to the Region number of certain U.S. WARNING: TO REDUCE THE RISK OF FIRE OR ELECTRIC SHOCK, DO NOT EXPOSE THIS EQUIPMENT TO RAIN OR MOISTURE. BE SURE TO...
User Manual
Page 6
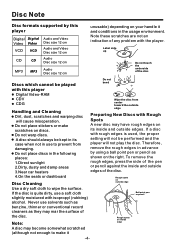
... Spots A new disc may have rough edges on your handle it -4- If a disc with this player Digital Digital Video Video VCD VCD Audio and Video Disc size 12 cm Audio and Video Disc size 12 cm unusable) depending on its case when not in its inside and outside edges. Never use a soft... CDV CDG Handling and Cleaning Dirt, dust, scratches and warping disc will not play the disc. Label side up CD MP3 CD MP3 Audio Disc size 12 cm Audio Disc size 12 cm Do not touch the underside of any problem with isopropyl (rubbing) alcohol. Note these scratches are not an indication...
... Spots A new disc may have rough edges on your handle it -4- If a disc with this player Digital Digital Video Video VCD VCD Audio and Video Disc size 12 cm Audio and Video Disc size 12 cm unusable) depending on its case when not in its inside and outside edges. Never use a soft... CDV CDG Handling and Cleaning Dirt, dust, scratches and warping disc will not play the disc. Label side up CD MP3 CD MP3 Audio Disc size 12 cm Audio Disc size 12 cm Do not touch the underside of any problem with isopropyl (rubbing) alcohol. Note these scratches are not an indication...

User Manual
Page 7
The use of unauthorized parts can be properly installed either from the heater, or where it is a sudden stop, like an emergency stop. DIN FRONT/REAR-MOUNT This unit can cause malfunctions. Installation NOTES: Choose the mounting location where the unit will not interfere with your nearest dealer if installation requires the drilling of holes or other modifications of the vehicle. For details, refer to ensure proper installation. Use only the parts included with the unit to the following illustrated installation methods. -5- Consult with the normal driving function of ...
The use of unauthorized parts can be properly installed either from the heater, or where it is a sudden stop, like an emergency stop. DIN FRONT/REAR-MOUNT This unit can cause malfunctions. Installation NOTES: Choose the mounting location where the unit will not interfere with your nearest dealer if installation requires the drilling of holes or other modifications of the vehicle. For details, refer to ensure proper installation. Use only the parts included with the unit to the following illustrated installation methods. -5- Consult with the normal driving function of ...
User Manual
Page 8
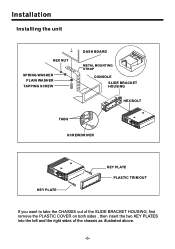
Installation Installing the unit HEX NUT SPRING WASHER PLAIN WASHER TAPPING SCREW DASH BOARD METAL MOUNTING STRAP CONSOLE SLIDE BRACKET HOUSING HEX BOLT TABS SCREWDRIVER KEY PLATE KEY PLATE PLASTIC TRIM OUT If you want to take the CHASSIS out of the SLIDE BRACKET HOUSING, first remove the PLASTIC COVER on both sides , then insert the two KEY PLATES into the left and the right sides of the chassis as illustrated above. -6-
Installation Installing the unit HEX NUT SPRING WASHER PLAIN WASHER TAPPING SCREW DASH BOARD METAL MOUNTING STRAP CONSOLE SLIDE BRACKET HOUSING HEX BOLT TABS SCREWDRIVER KEY PLATE KEY PLATE PLASTIC TRIM OUT If you want to take the CHASSIS out of the SLIDE BRACKET HOUSING, first remove the PLASTIC COVER on both sides , then insert the two KEY PLATES into the left and the right sides of the chassis as illustrated above. -6-
User Manual
Page 9
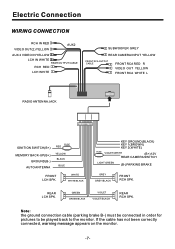
Electric Connection WIRING CONNECTION RCH IN RED VIDEO OUT(2) YELLOW AUX2 AUX 2 VIDEO IN YELLOW LCH IN WHITE REAR OUTPUT CABLE RCH RED LCH WHITE SUBWOOFER GREY REAR CAMERA INPUT YELLOW FRONT RCA OUTPUT CABLE FRONT RCA RED R VIDEO OUT YELLOW FRONT RCA WHITE L RADIO ANTENNA JACK ISO CONNECTOR IGNITION SWITCH(B+) MEMORY BACK-UP(B+) GROUND(B-) AUTO ANTENNA FUSE RED YELLOW BLACK BLUE FRONT LCH SPK. If the cable has not been correctly connected, warning message appears on the monitor. -7- WHITE WHITE/BLACK KEY GROUND(BLACK) KEY 1(BROWN) KEY 2(WHITE) FUSE VIOLET/WHITE (B+)12V ...
Electric Connection WIRING CONNECTION RCH IN RED VIDEO OUT(2) YELLOW AUX2 AUX 2 VIDEO IN YELLOW LCH IN WHITE REAR OUTPUT CABLE RCH RED LCH WHITE SUBWOOFER GREY REAR CAMERA INPUT YELLOW FRONT RCA OUTPUT CABLE FRONT RCA RED R VIDEO OUT YELLOW FRONT RCA WHITE L RADIO ANTENNA JACK ISO CONNECTOR IGNITION SWITCH(B+) MEMORY BACK-UP(B+) GROUND(B-) AUTO ANTENNA FUSE RED YELLOW BLACK BLUE FRONT LCH SPK. If the cable has not been correctly connected, warning message appears on the monitor. -7- WHITE WHITE/BLACK KEY GROUND(BLACK) KEY 1(BROWN) KEY 2(WHITE) FUSE VIOLET/WHITE (B+)12V ...
User Manual
Page 10
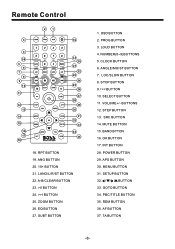
SUBT BUTTON 1. STOP BUTTON 9. I BUTTON 25. OSD BUTTON 2. Remote Control 2 1 3 19 4 36 5 6 7 8 9 10 11 12 13 14 15 16 17 18 37 20 21 22 23 24 25 26 27 28 29 30 31 32 33 34 35 18. ANG BUTTON 20. 10+ BUTTON 21. EQ BUTTON 27. NUMBER(0~9)BUTTONS 5. A-B/CLEAR BUTTON 23. >II BUTTON 24. >>I PROG BUTTON 3. LOUD BUTTON 4. LOC/SLOW BUTTON 8. LANG/L/R/ST BUTTON 22. RPT BUTTON 19. ZOOM BUTTON 26. CLOCK BUTTON 6. ANGLE/MO/ST BUTTON 7.
SUBT BUTTON 1. STOP BUTTON 9. I BUTTON 25. OSD BUTTON 2. Remote Control 2 1 3 19 4 36 5 6 7 8 9 10 11 12 13 14 15 16 17 18 37 20 21 22 23 24 25 26 27 28 29 30 31 32 33 34 35 18. ANG BUTTON 20. 10+ BUTTON 21. EQ BUTTON 27. NUMBER(0~9)BUTTONS 5. A-B/CLEAR BUTTON 23. >II BUTTON 24. >>I PROG BUTTON 3. LOUD BUTTON 4. LOC/SLOW BUTTON 8. LANG/L/R/ST BUTTON 22. RPT BUTTON 19. ZOOM BUTTON 26. CLOCK BUTTON 6. ANGLE/MO/ST BUTTON 7.
User Manual
Page 11
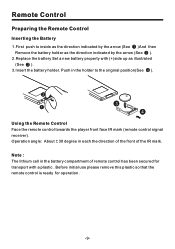
Operation angle: About 30 degree in the holder to inside as the direction indicated by the arrow (See 1 )And then Remove the battery holder as illustrated (See 3 ). 3.Insert the battery holder. Remote Control Preparing the Remote Control Inserting the Battery 1.First push to the original position(See 4 ). Push in each the direction of the front of remote control has been secured for operation . -9- Before initial use please remove this plastic so that the remote control is ready for transport with (+)side up as the direction indicated by the arrow (See 2 ). 2.Replace the ...
Operation angle: About 30 degree in the holder to inside as the direction indicated by the arrow (See 1 )And then Remove the battery holder as illustrated (See 3 ). 3.Insert the battery holder. Remote Control Preparing the Remote Control Inserting the Battery 1.First push to the original position(See 4 ). Push in each the direction of the front of remote control has been secured for operation . -9- Before initial use please remove this plastic so that the remote control is ready for transport with (+)side up as the direction indicated by the arrow (See 2 ). 2.Replace the ...
User Manual
Page 12
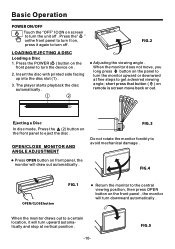
Basic Operation POWER ON/OFF Touch the "OFF" ICON on the panel to turn the monitor upward or downward at vertical position . -10- LOADING/EJECTING A DISC Loading a Disc 1. The player starts playback the disc automatically . 1 2 FIG.2 Adjusting the viewing angle . When the monitor draws out to a certain location, it again to turn the unit off . Insert the disc with printed side facing up into the disc slot (1) . 3. When the monitor does not move back or out. OPEN/CLOSE MONITOR AND ANGLE ADJUSTMENT FIG.3 Do not rotate the monitor forcibly to turn off . FIG.5 FIG.4...
Basic Operation POWER ON/OFF Touch the "OFF" ICON on the panel to turn the monitor upward or downward at vertical position . -10- LOADING/EJECTING A DISC Loading a Disc 1. The player starts playback the disc automatically . 1 2 FIG.2 Adjusting the viewing angle . When the monitor draws out to a certain location, it again to turn the unit off . Insert the disc with printed side facing up into the disc slot (1) . 3. When the monitor does not move back or out. OPEN/CLOSE MONITOR AND ANGLE ADJUSTMENT FIG.3 Do not rotate the monitor forcibly to turn off . FIG.5 FIG.4...
User Manual
Page 13
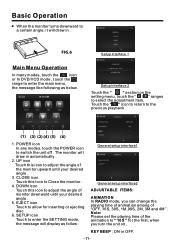
The monitor will draw in . DOWN icon Touch this icon to adjust the angle of monitor downward until your desired angle . 5. SETUP icon Touch to enter the SETTING mode, the message will display as below. 10:00 AM IILLLLUUMMIINNAATTIIOONNCCOOLLOORR Setup interface 2 Touch the " " section on . CLOSE icon Touch this icon to adjust the angle of "OFF, 10S, 30S, 1M,90S, 2M, 3M and 4M ". Note: Please set the playing time of the animation to " 10S " for inserting or ejecting disc. 6. UP icon Touch this icon to Close the monitor . 4. POWER icon In any modes, touch the POWER icon to...
The monitor will draw in . DOWN icon Touch this icon to adjust the angle of monitor downward until your desired angle . 5. SETUP icon Touch to enter the SETTING mode, the message will display as below. 10:00 AM IILLLLUUMMIINNAATTIIOONNCCOOLLOORR Setup interface 2 Touch the " " section on . CLOSE icon Touch this icon to adjust the angle of "OFF, 10S, 30S, 1M,90S, 2M, 3M and 4M ". Note: Please set the playing time of the animation to " 10S " for inserting or ejecting disc. 6. UP icon Touch this icon to Close the monitor . 4. POWER icon In any modes, touch the POWER icon to...
User Manual
Page 14
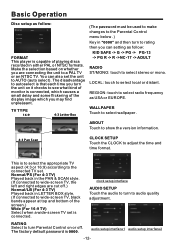
... or EUROPE. ABOUT Touch to show the version information. 4:3 Pan Scan CLOCK SETUP Touch the CLOCK to AUTO (auto select). clock setup interface AUDIO SETUP Touch the audio to audio quality adjustment. RATING Select to turn to turn Parental Control on whether you can also set the unit to adjust the time and...
... or EUROPE. ABOUT Touch to show the version information. 4:3 Pan Scan CLOCK SETUP Touch the CLOCK to AUTO (auto select). clock setup interface AUDIO SETUP Touch the audio to audio quality adjustment. RATING Select to turn to turn Parental Control on whether you can also set the unit to adjust the time and...
User Manual
Page 15
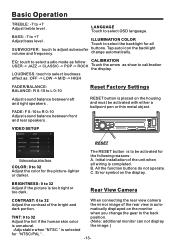
... to select loudness effect as show to L 0-10 Reset Factory Settings Adjust sound balance between front and rear speakers . dark portion. EQ: touch to select audio mode as follow: CALIBRATION USER -> JAZZ -> CLASSIC -> POP -> ROCK Touch the arrow as :OFF -> LOW -> MID -> HIGH FADER/BALANCE: BALANCE: R 0-10 to calibration the display...
... to select loudness effect as show to L 0-10 Reset Factory Settings Adjust sound balance between front and rear speakers . dark portion. EQ: touch to select audio mode as follow: CALIBRATION USER -> JAZZ -> CLASSIC -> POP -> ROCK Touch the arrow as :OFF -> LOW -> MID -> HIGH FADER/BALANCE: BALANCE: R 0-10 to calibration the display...
User Manual
Page 16
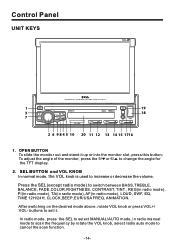
To adjust the angle of the monitor, press the 5/ or 6/ to cancel the scan function. -14- Control Panel UNIT KEYS 1 19 3 18 7 2 6 9 8 4 5 10 20 11 12 13 14 15 1716 1. In radio mode, press the SEL to select MANUAL/AUTO mode, in radio mode), LOUD, SWF, EQ, TIME 12H/24H, CLOCK,BEEP,EUR/USA FREQ, ANIMATION. SEL BUTTON and VOL KNOB In normal mode, the VOL knob is used to set it up or into the monitor slot, press this button; buttons to increase or decrease the volume. OPEN BUTTON To slide the monitor out and stand it . Press the SEL(except radio mode) to switch between BASS,...
To adjust the angle of the monitor, press the 5/ or 6/ to cancel the scan function. -14- Control Panel UNIT KEYS 1 19 3 18 7 2 6 9 8 4 5 10 20 11 12 13 14 15 1716 1. In radio mode, press the SEL to select MANUAL/AUTO mode, in radio mode), LOUD, SWF, EQ, TIME 12H/24H, CLOCK,BEEP,EUR/USA FREQ, ANIMATION. SEL BUTTON and VOL KNOB In normal mode, the VOL knob is used to set it up or into the monitor slot, press this button; buttons to increase or decrease the volume. OPEN BUTTON To slide the monitor out and stand it . Press the SEL(except radio mode) to switch between BASS,...

User Manual
Page 17
The word MUTE flashes in the monitor as follow : USER JAZZ CLASSIC ROCK POP 7. RESET BUTTON Press this button to return to cancel the mute function. In media mode, pressing |>| button can fast backwards or forwards at the following multiple of the loudspeakers for two seconds to switch the device off. MUTE BUTTON Press it button to switch of normal speed: x2, x4, x8, x20. 6. Press it again to factory settings. 10. SD CARD SLOT 11-16. continuously and long pressing |>| button can play the previous or next track; The information will be cancelled by rotating the VOL ...
The word MUTE flashes in the monitor as follow : USER JAZZ CLASSIC ROCK POP 7. RESET BUTTON Press this button to return to cancel the mute function. In media mode, pressing |>| button can fast backwards or forwards at the following multiple of the loudspeakers for two seconds to switch the device off. MUTE BUTTON Press it button to switch of normal speed: x2, x4, x8, x20. 6. Press it again to factory settings. 10. SD CARD SLOT 11-16. continuously and long pressing |>| button can play the previous or next track; The information will be cancelled by rotating the VOL ...
User Manual
Page 18
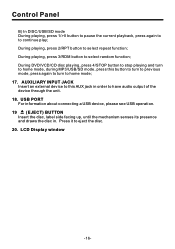
... to continue play; Control Panel B) In DISC/USB/SD mode During playing, press 1/>II button to pause the current playback, press again to to have audio output of the device through the unit. 18. LCD Display window -16- During DVD/VCD/CD disc playing, press 4/STOP button to stop playing and...
... to continue play; Control Panel B) In DISC/USB/SD mode During playing, press 1/>II button to pause the current playback, press again to to have audio output of the device through the unit. 18. LCD Display window -16- During DVD/VCD/CD disc playing, press 4/STOP button to stop playing and...
User Manual
Page 19
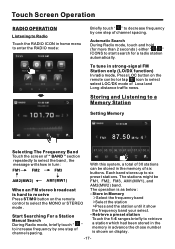
To tune in strong-signal FM Station only (LO/DX function) In radio mode, Press LOC button on display . -17- Store in Memory >Select the frequency band >Select the station >Press and the station until it show in turn : FM1 FM2 FM3 AM2(MW2) AM1(MW1) When an FM stereo broadcast is hard to receive Press ST/MO button on the remote control to select the MONO or STEREO mode . Start Searching For a Station Manual Search During Radio mode, briefly touch " " to increase frequency by one step of channel spacing. 87.50 90.10 98.10 87.50 107.9 100.8 With this system, a total of 30 stations ...
To tune in strong-signal FM Station only (LO/DX function) In radio mode, Press LOC button on display . -17- Store in Memory >Select the frequency band >Select the station >Press and the station until it show in turn : FM1 FM2 FM3 AM2(MW2) AM1(MW1) When an FM stereo broadcast is hard to receive Press ST/MO button on the remote control to select the MONO or STEREO mode . Start Searching For a Station Manual Search During Radio mode, briefly touch " " to increase frequency by one step of channel spacing. 87.50 90.10 98.10 87.50 107.9 100.8 With this system, a total of 30 stations ...
User Manual
Page 20
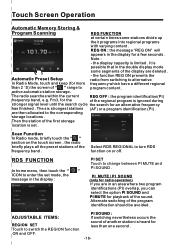
It is possible that in the display for an alternative frequency has finished . The radio searches within the current REG OFF : the program identification(PI) frequency band, e.g. RDS TA OFF RDS AF OFF Scan Function In Radio mode, briefly touch the " " section on or off. the function REG ON prevents the radio from switching to alternative In Radio Mode, touch and keep (for more frequency which have a different regional than 2 ' S) the screen of the regional program is heard for less than one second . -18- The six strongest stations (AF) or a program identification (PI)...
It is possible that in the display for an alternative frequency has finished . The radio searches within the current REG OFF : the program identification(PI) frequency band, e.g. RDS TA OFF RDS AF OFF Scan Function In Radio mode, briefly touch the " " section on or off. the function REG ON prevents the radio from switching to alternative In Radio Mode, touch and keep (for more frequency which have a different regional than 2 ' S) the screen of the regional program is heard for less than one second . -18- The six strongest stations (AF) or a program identification (PI)...
User Manual
Page 21
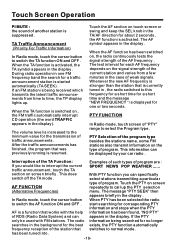
TA Traffic Announcement (Priority For Traffic Information) In Radio mode, touch the cursor button to switch the AF function ON and OFF . Touch the AF section on touch screen or swing and keep the SEL knob in the case of weak signals. The test interval for each AF frequency depends on screen repeatedly to time, the TP display lights up the PTY selection (Alternative Frequencies) In Radio mode, touch the cursor button menu. Whenever the new AF frequency is currently tuned in the background for one FM frequency band the search for corresponding PTY information and stops when the ...
TA Traffic Announcement (Priority For Traffic Information) In Radio mode, touch the cursor button to switch the AF function ON and OFF . Touch the AF section on touch screen or swing and keep the SEL knob in the case of weak signals. The test interval for each AF frequency depends on screen repeatedly to time, the TP display lights up the PTY selection (Alternative Frequencies) In Radio mode, touch the cursor button menu. Whenever the new AF frequency is currently tuned in the background for one FM frequency band the search for corresponding PTY information and stops when the ...