User Manual
Page 3
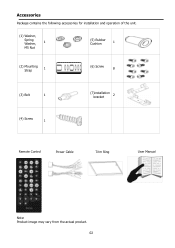
Accessories Package contains the following accessories for installation and operation of the unit. (1) Washer, Spring Washer, 1 M5 Nut (5) Rubber Cushion 1 (2) Mounting Strap 1 (6) Screw 8 (3) Bolt 1 (4) Screw 1 (7)installation bracket 2 Remote Control Power Cable Trim Ring User Manual Note: Product image may vary from the actual product. 02
Accessories Package contains the following accessories for installation and operation of the unit. (1) Washer, Spring Washer, 1 M5 Nut (5) Rubber Cushion 1 (2) Mounting Strap 1 (6) Screw 8 (3) Bolt 1 (4) Screw 1 (7)installation bracket 2 Remote Control Power Cable Trim Ring User Manual Note: Product image may vary from the actual product. 02
User Manual
Page 4
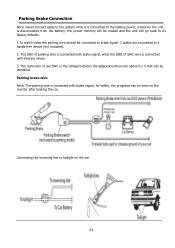
... parking wire is connected with brake signal; for safety, the programs can be seen on the car 03 The restriction of SWC wire is connected with brake signal, while the GND of use SWC is the voltage between the adjacent buttons are connected to a hands-free device (not included). 2. Parking Brake Connection Note: Never connect cable to the system while it is connected to the battery power, whenever the unit is disconnected from the battery, the preset memory...
... parking wire is connected with brake signal; for safety, the programs can be seen on the car 03 The restriction of SWC wire is connected with brake signal, while the GND of use SWC is the voltage between the adjacent buttons are connected to a hands-free device (not included). 2. Parking Brake Connection Note: Never connect cable to the system while it is connected to the battery power, whenever the unit is disconnected from the battery, the preset memory...
User Manual
Page 5
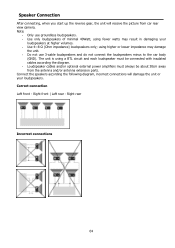
... external power amplifiers must be about 30cm away from car rear view camera. using fewer watts may damage the unit. - Connect the speakers according the following diagram, incorrect connections will receive the picture from the antenna and/or antenna extension parts. Correct connection Left front - Use 4~8 Ω (Ohm impedance) loudspeakers only; Right rear Incorrect connections 04 Right front | Left rear - The unit is using a BTL circuit and each loudspeaker must always be connected with insulated cables...
... external power amplifiers must be about 30cm away from car rear view camera. using fewer watts may damage the unit. - Connect the speakers according the following diagram, incorrect connections will receive the picture from the antenna and/or antenna extension parts. Correct connection Left front - Use 4~8 Ω (Ohm impedance) loudspeakers only; Right rear Incorrect connections 04 Right front | Left rear - The unit is using a BTL circuit and each loudspeaker must always be connected with insulated cables...
User Manual
Page 6
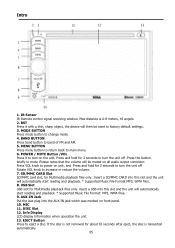
... Put the Aux plug into the AUX-IN jack which was marked on the unit. Info Display LCD display Information when operation the unit. 13. BAND BUTTON Press band button to eject a disc. briefly to increase or reduce the volume. 7. USB Slot USB slot for Multimedia playback files only. If the disc is not removed for about 10 seconds after eject, the disc is 6-8 meters, 45 angels. 2. IR Sensor IR Remote control signal receiving window...
... Put the Aux plug into the AUX-IN jack which was marked on the unit. Info Display LCD display Information when operation the unit. 13. BAND BUTTON Press band button to eject a disc. briefly to increase or reduce the volume. 7. USB Slot USB slot for Multimedia playback files only. If the disc is not removed for about 10 seconds after eject, the disc is 6-8 meters, 45 angels. 2. IR Sensor IR Remote control signal receiving window...
User Manual
Page 7
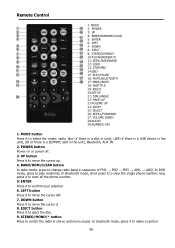
... DVD mode, press to switch the radio in stereo and mono sound. STEREO/MONO/* button Press to play randomly; UP button Press it to move the cursor d 8. LEFT button Press it to move the cursor left 7. Remote Control 1: MODE 2: POWER 3: UP 4: BAND/RANDOM/CLEAR 5: ENTER 6: LEFT 7: DOWN 8: EJECT 9: STEREO/MONO/* 10:P.SCAN/REPEAT/# 11: SEEK-/BACKWARD 12: LOUD 13: STOP/PBC 14:OSD 15: PLAY/PAUSE 16: MUTE/BLUETOOTH 17: MENU...
... DVD mode, press to switch the radio in stereo and mono sound. STEREO/MONO/* button Press to play randomly; UP button Press it to move the cursor d 8. LEFT button Press it to move the cursor left 7. Remote Control 1: MODE 2: POWER 3: UP 4: BAND/RANDOM/CLEAR 5: ENTER 6: LEFT 7: DOWN 8: EJECT 9: STEREO/MONO/* 10:P.SCAN/REPEAT/# 11: SEEK-/BACKWARD 12: LOUD 13: STOP/PBC 14:OSD 15: PLAY/PAUSE 16: MUTE/BLUETOOTH 17: MENU...
User Manual
Page 8
... Bluetooth mode (Hands free). 17. In radio mode, PS (preset scan): Press to scan all preset stations in DVD mode, long press it to select the subtitle language (Available only if the disc with a recorded DVD file or DVD disc has this button to resume playback. 16. In radio mode, press and hold button for about 5 seconds. Remote Control 10. AS (Auto Save), long press to make a # symbol. 11. / SEEK- button Frequency down. 12. In Bluetooth mode...
... Bluetooth mode (Hands free). 17. In radio mode, PS (preset scan): Press to scan all preset stations in DVD mode, long press it to select the subtitle language (Available only if the disc with a recorded DVD file or DVD disc has this button to resume playback. 16. In radio mode, press and hold button for about 5 seconds. Remote Control 10. AS (Auto Save), long press to make a # symbol. 11. / SEEK- button Frequency down. 12. In Bluetooth mode...

User Manual
Page 9
... the brightness of ambient light. If the remote is not used . In Bluetooth mode, press to input phone number,long press 0 number to make and use the remote control unit, while simultaneously operating the remote control unit of any objects between the remote control unit and the sensor on the unit. Do not drop the remote control onto the floor, it will stop select station. In radio mode, press and hold button for two seconds to activate...
... the brightness of ambient light. If the remote is not used . In Bluetooth mode, press to input phone number,long press 0 number to make and use the remote control unit, while simultaneously operating the remote control unit of any objects between the remote control unit and the sensor on the unit. Do not drop the remote control onto the floor, it will stop select station. In radio mode, press and hold button for two seconds to activate...
User Manual
Page 10
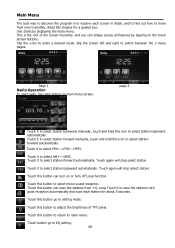
... button can turn on or turn off Local function. Slip the screen left and right to select mono sound reception. Touch it to select AM1->AM2. Touch this button to return to enter a desired mode. Touch button go to setting mode. Read this button to adjust the brightness of the screen hierarchy, and you can simply access all features by displaying the main menu. Page 1 Radio Operation To start radio, tap radio button on the touch screen buttons...
... button can turn on or turn off Local function. Slip the screen left and right to select mono sound reception. Touch it to select AM1->AM2. Touch this button to return to enter a desired mode. Touch button go to setting mode. Read this button to adjust the brightness of the screen hierarchy, and you can simply access all features by displaying the main menu. Page 1 Radio Operation To start radio, tap radio button on the touch screen buttons...
User Manual
Page 11
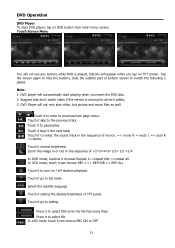
... enter to hide the buttons, slide the subtitle part of TFT panel. Touch Screen Menu You will automatically start DVD player, tap on TFT screen. Touch it choose brightness Zoom the image in or out in the sequence of ×2×3×4×5×1/2× 1/3 ×1/4 In DVD mode, touches it to pause/play video, but picture and music files as well. Touch it go to setting Press it to select...
... enter to hide the buttons, slide the subtitle part of TFT panel. Touch Screen Menu You will automatically start DVD player, tap on TFT screen. Touch it choose brightness Zoom the image in or out in the sequence of ×2×3×4×5×1/2× 1/3 ×1/4 In DVD mode, touches it to pause/play video, but picture and music files as well. Touch it go to setting Press it to select...
User Manual
Page 12
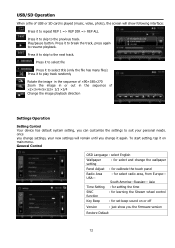
...- Play/pause button. Press it to skip to resume playback. USB/SD Operation When a file of ×2×3×4×5×1/2× 1/3 ×1/4 Change the image playback direction Settings Operation Setting Control Your device has default system setting, you can customize the settings to suit your new settings will show you change the wallpaper Panel Adjust : for calibrate the touch panel Radio Area USA- : for select and change settings, your personal needs. General Control...
...- Play/pause button. Press it to skip to resume playback. USB/SD Operation When a file of ×2×3×4×5×1/2× 1/3 ×1/4 Change the image playback direction Settings Operation Setting Control Your device has default system setting, you can customize the settings to suit your new settings will show you change the wallpaper Panel Adjust : for calibrate the touch panel Radio Area USA- : for select and change settings, your personal needs. General Control...
User Manual
Page 13
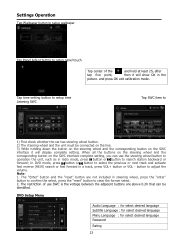
... adjust the volume. DVD Setup Menu Audio Language : for select desired language Subtitle Language : for select desired language Menu Language : for select desired language Password Rating 13 When all the buttons on the steering wheel and the corresponding button on the SWC interface it will display complete setting. The "Enter" button and the "reset" button are above 0.2V that can use the steering wheel button to operation the unit...
... adjust the volume. DVD Setup Menu Audio Language : for select desired language Subtitle Language : for select desired language Menu Language : for select desired language Password Rating 13 When all the buttons on the steering wheel and the corresponding button on the SWC interface it will display complete setting. The "Enter" button and the "reset" button are above 0.2V that can use the steering wheel button to operation the unit...
User Manual
Page 14
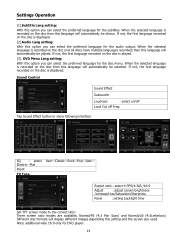
..., the first language recorded on the disc then this language will display different images depending this setting and the screen size used. Rspect ratio : select 4:3PS/4:3LB /16:9 Adjust : adjust screen brightness /contrast/Hue/Saturation/Sharpness Panel :setting backlight time Set TFT screen mode to show following interface EQ : select Electric-Flat Reset TV Type User-Classic-Rock-Pop-Jazz- DVD Menu Lang setting: With this option you can select...
..., the first language recorded on the disc then this language will display different images depending this setting and the screen size used. Rspect ratio : select 4:3PS/4:3LB /16:9 Adjust : adjust screen brightness /contrast/Hue/Saturation/Sharpness Panel :setting backlight time Set TFT screen mode to show following interface EQ : select Electric-Flat Reset TV Type User-Classic-Rock-Pop-Jazz- DVD Menu Lang setting: With this option you can select...
User Manual
Page 15
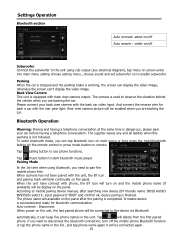
... electrical diagram), tap menu on screen enter into main menu setting choose setting menu., choose sound and set subwoofer on to enable subwoofer. According to mobile pairing device manual, after the pairing is connected and ready for back a car with the rear gear light. It means device is completed. Parking When the car is stopped and the parking brake is finished. The phone name will available on the panel after searching new device (BT friendly name: BOSS AUDIO BV9351B...
... electrical diagram), tap menu on screen enter into main menu setting choose setting menu., choose sound and set subwoofer on to enable subwoofer. According to mobile pairing device manual, after the pairing is connected and ready for back a car with the rear gear light. It means device is completed. Parking When the car is stopped and the parking brake is finished. The phone name will available on the panel after searching new device (BT friendly name: BOSS AUDIO BV9351B...
User Manual
Page 16
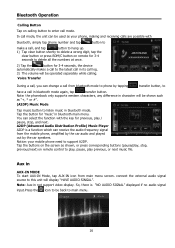
... device automatically makes a call to the latest call in its call , you can select the function with the key for 'music' in not support video display. Note: Aux-in bluetooth main menu. So, there is a function which can be shown such as your mobile phone need to this unit will display "HAVE AUDIO SINGAL". In call mode, the unit can receive the audio frequency signal from main menu screen. Note: the phonebook only supports...
... device automatically makes a call to the latest call in its call , you can select the function with the key for 'music' in not support video display. Note: Aux-in bluetooth main menu. So, there is a function which can be shown such as your mobile phone need to this unit will display "HAVE AUDIO SINGAL". In call mode, the unit can receive the audio frequency signal from main menu screen. Note: the phonebook only supports...
User Manual
Page 17
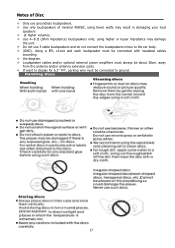
... the antenna and/or antenna extension parts. If want to display for 6.2" TFT, parking wire must always be connected to the car body. (GND). using higher or lesser impedance may damage the unit. Do not use groundless loudspeakers. Use only loudspeakers of Disc Only use 3-cable loudspeakers and do not connect the loudspeakers minus to ground. 17 Notes of minimal 40Watt, using fewer...
... the antenna and/or antenna extension parts. If want to display for 6.2" TFT, parking wire must always be connected to the car body. (GND). using higher or lesser impedance may damage the unit. Do not use groundless loudspeakers. Use only loudspeakers of Disc Only use 3-cable loudspeakers and do not connect the loudspeakers minus to ground. 17 Notes of minimal 40Watt, using fewer...
User Manual
Page 18
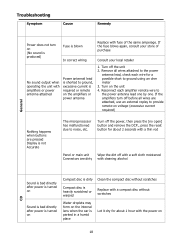
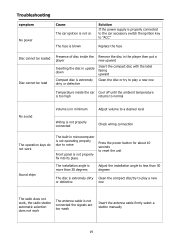
... lens when the car is required or remote on the amplifiers or power antenna Replace with fuse of purchase Consult your local retailer 1. Reconnect each wire for a possible short to the power antenna lead one by one. Turn off the power, then press the [no open] button and remove the DCP., press the reset button for about 2 seconds with a thin rod Panel or main unit Wipe the...
... lens when the car is required or remote on the amplifiers or power antenna Replace with fuse of purchase Consult your local retailer 1. Reconnect each wire for a possible short to the power antenna lead one by one. Turn off the power, then press the [no open] button and remove the DCP., press the reset button for about 2 seconds with a thin rod Panel or main unit Wipe the...
User Manual
Page 19
... Press the power button for about 10 seconds to reset the unit Sound skips The installation angle is more than 30 degrees Adjust the installation angle to less than 30 degrees The disc is extremely dirty Clean the compact disc/try to play a new or defective one The radio does not work, the radio station automatic selection does not work The antenna cable is not connected the signals are too...
... Press the power button for about 10 seconds to reset the unit Sound skips The installation angle is more than 30 degrees Adjust the installation angle to less than 30 degrees The disc is extremely dirty Clean the compact disc/try to play a new or defective one The radio does not work, the radio station automatic selection does not work The antenna cable is not connected the signals are too...
User Manual
Page 20
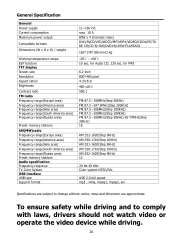
General Specification General Power supply Current consumption Maximum power output Compatible formats Dimensions (W x D x H) / weight Working temperature range ESP function TFT display Screen size Resolution Aspect ration Brightness Contrast ratio FM radio Frequency range(Europe area) Frequency range(America area) Frequency range(Asia area) Frequency range(South America area) Frequency range(Russia area) Preset memory stations AM(MW)radio Frequency range(Europe area) Frequency range(America area) Frequency...
General Specification General Power supply Current consumption Maximum power output Compatible formats Dimensions (W x D x H) / weight Working temperature range ESP function TFT display Screen size Resolution Aspect ration Brightness Contrast ratio FM radio Frequency range(Europe area) Frequency range(America area) Frequency range(Asia area) Frequency range(South America area) Frequency range(Russia area) Preset memory stations AM(MW)radio Frequency range(Europe area) Frequency range(America area) Frequency...


