User Manual
Page 2
Content Accessories ...02 Unit Installation...03 Wire Connection...03 Parking Brake Connection ...04 Speaker connection...05 Button Description...06 Remote Control...07 Main Menu...09 Radio Operation...09 USB /SD Operation...10 Settings Operation ...10 Bluetooth Operation...12 Aux-In Operation ...13 Troubleshooting ...15 General Specification...16 To ensure safety while driving and to comply with laws, drivers should not watch video or operate the video device while driving. 01
Content Accessories ...02 Unit Installation...03 Wire Connection...03 Parking Brake Connection ...04 Speaker connection...05 Button Description...06 Remote Control...07 Main Menu...09 Radio Operation...09 USB /SD Operation...10 Settings Operation ...10 Bluetooth Operation...12 Aux-In Operation ...13 Troubleshooting ...15 General Specification...16 To ensure safety while driving and to comply with laws, drivers should not watch video or operate the video device while driving. 01
User Manual
Page 3
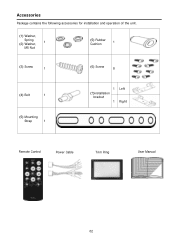
Accessories Package contains the following accessories for installation and operation of the unit. (1) Washer, Spring (2) Washer, 1 M5 Nut (5) Rubber Cushion 1 (3) Screw 1 (6) Screw 8 (4) Bolt 1 (5) Mounting Strap 1 1 (7)installation bracket 1 Left Right Remote Control Power Cable Trim Ring User Manual 02
Accessories Package contains the following accessories for installation and operation of the unit. (1) Washer, Spring (2) Washer, 1 M5 Nut (5) Rubber Cushion 1 (3) Screw 1 (6) Screw 8 (4) Bolt 1 (5) Mounting Strap 1 1 (7)installation bracket 1 Left Right Remote Control Power Cable Trim Ring User Manual 02
User Manual
Page 4
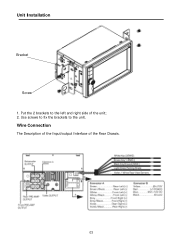
Wire Connection The Description of the Input/output Interface of the unit; 2. Unit Installation Bracket Screw 1. Put the 2 brackets to the unit. Use screws to fix the brackets to the left and right side of the Rear Chassis. 03
Wire Connection The Description of the Input/output Interface of the unit; 2. Unit Installation Bracket Screw 1. Put the 2 brackets to the unit. Use screws to fix the brackets to the left and right side of the Rear Chassis. 03
User Manual
Page 5
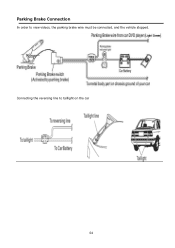
Parking Brake Connection In order to taillight on the car 04 Connecting the reversing line to view videos, the parking brake wire must be connected, and the vehicle stopped.
Parking Brake Connection In order to taillight on the car 04 Connecting the reversing line to view videos, the parking brake wire must be connected, and the vehicle stopped.
User Manual
Page 6
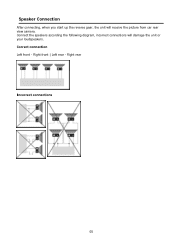
Right rear Incorrect connections 05 Connect the speakers according the following diagram, incorrect connections will receive the picture from car rear view camera. Speaker Connection After connecting, when you start up the reverse gear, the unit will damage the unit or your loudspeakers. Right front | Left rear - Correct connection Left front -
Right rear Incorrect connections 05 Connect the speakers according the following diagram, incorrect connections will receive the picture from car rear view camera. Speaker Connection After connecting, when you start up the reverse gear, the unit will damage the unit or your loudspeakers. Right front | Left rear - Correct connection Left front -
User Manual
Page 7
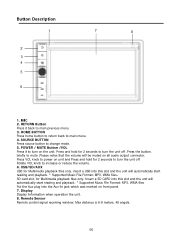
... to power on all audio output connector. MIC 2. HOME BUTTON Press home button to return back to change mode. 5. POWER / MUTE Button /VOL Press it back to turn the unit off .Press the button. insert a USB into this slot and the unit will automatically start reading and playback. * Supported Music File Format: MP3, WMA files Put the Aux plug into this slot and the unit will automatically start reading and playback. * Supported Music File Format: MP3, WMA files. Remote Sensor Remote control signal receiving...
... to power on all audio output connector. MIC 2. HOME BUTTON Press home button to return back to change mode. 5. POWER / MUTE Button /VOL Press it back to turn the unit off .Press the button. insert a USB into this slot and the unit will automatically start reading and playback. * Supported Music File Format: MP3, WMA files Put the Aux plug into this slot and the unit will automatically start reading and playback. * Supported Music File Format: MP3, WMA files. Remote Sensor Remote control signal receiving...
User Manual
Page 8
... radio mode, press and hold button for two seconds to confirm your selection. 9. DOWN button Press it to activate fast reverse (REW) search in the unit), Bluetooth, Aux-In. 3. In Bluetooth mode, press to resume volume. Mute button/Bluetooth button Short press to mute the volume output, press again to make a call after inputted a phone number or accept an incoming call. 5. UP button Press it to move the cursor left. 4. / ACCEPT In USB, SD mode, press button...
... radio mode, press and hold button for two seconds to confirm your selection. 9. DOWN button Press it to activate fast reverse (REW) search in the unit), Bluetooth, Aux-In. 3. In Bluetooth mode, press to resume volume. Mute button/Bluetooth button Short press to mute the volume output, press again to make a call after inputted a phone number or accept an incoming call. 5. UP button Press it to move the cursor left. 4. / ACCEPT In USB, SD mode, press button...

User Manual
Page 9
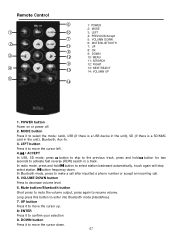
... place any other equipment; Remote Control 10. In radio mode, press and hold button for about one year although depending how often the remote control is used for an extended period of time, remove the battery to the brightness of ambient light. „ If the remote is operated near the unit, replace the battery with a new battery of the same make and use the remote control unit, while simultaneously operating the remote control unit of children, should the...
... place any other equipment; Remote Control 10. In radio mode, press and hold button for about one year although depending how often the remote control is used for an extended period of time, remove the battery to the brightness of ambient light. „ If the remote is operated near the unit, replace the battery with a new battery of the same make and use the remote control unit, while simultaneously operating the remote control unit of children, should the...
User Manual
Page 10
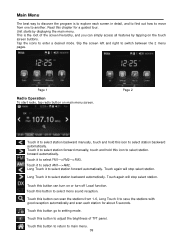
... 1 Radio Operation To start radio, tap radio button on or turn on main menu screen. Touch it to select station. Touch again will stop select station. Read this chapter for about 5 seconds. Touch it to select station backward manually, touch and hold this button can turn off Local function. Touch this icon to select station forward automatically. Slip the screen left and right to select mono sound reception. Page 2 Touch it to select station forward manually, touch...
... 1 Radio Operation To start radio, tap radio button on or turn on main menu screen. Touch it to select station. Touch again will stop select station. Read this chapter for about 5 seconds. Touch it to select station backward manually, touch and hold this button can turn off Local function. Touch this icon to select station forward automatically. Slip the screen left and right to select mono sound reception. Page 2 Touch it to select station forward manually, touch...
User Manual
Page 11
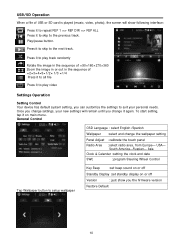
... is played (music, video, photo), the screen will remain until you the firmware version Restore Default 10 USB/SD Operation When a file of ×2×3×4×5×1/2× 1/3 ×1/4 Press it to all file Press it to play video Settings Operation Setting Control Your device has default system setting, you can customize the settings to the previous track. Once you change the wallpaper setting Panel Adjust :calibrate the touch panel Radio Area :select radio...
... is played (music, video, photo), the screen will remain until you the firmware version Restore Default 10 USB/SD Operation When a file of ×2×3×4×5×1/2× 1/3 ×1/4 Press it to all file Press it to play video Settings Operation Setting Control Your device has default system setting, you can customize the settings to the previous track. Once you change the wallpaper setting Panel Adjust :calibrate the touch panel Radio Area :select radio...
User Manual
Page 12
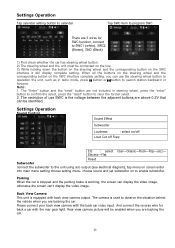
... display the video image, otherwise the screen can use SWC is equipped with back view camera output. And connect the reverse wire for SWC function, connect to SWC1 (white), SWC2 (Brown), GND (Black) 1) First check whether the car has steering wheel button. 2) The steering wheel and the unit must be identified. Settings Operation Tap calendar setting button to calendar Tap SWC item to program SWC There are 3 wires for back a car with the rear gear light. Please connect...
... display the video image, otherwise the screen can use SWC is equipped with back view camera output. And connect the reverse wire for SWC function, connect to SWC1 (white), SWC2 (Brown), GND (Black) 1) First check whether the car has steering wheel button. 2) The steering wheel and the unit must be identified. Settings Operation Tap calendar setting button to calendar Tap SWC item to program SWC There are 3 wires for back a car with the rear gear light. Please connect...
User Manual
Page 13
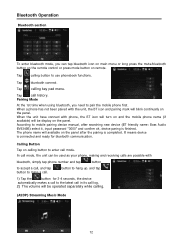
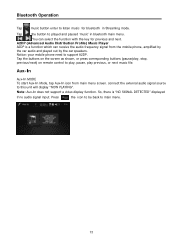
Bluetooth Operation Bluetooth section To enter bluetooth mode, you need to pair the mobile phone first. Pairing Mode At the 1st time when using bluetooth, you can be used as your phone, making and receiving calls are possible with bluetooth, simply tap phone number and tap button to accept a call mode, the unit can tap bluetooth icon on main menu or long press the mute/bluetooth button on the remote control or press mode button on remote. In call , and tap button to mobile pairing device manual, after...
Bluetooth Operation Bluetooth section To enter bluetooth mode, you need to pair the mobile phone first. Pairing Mode At the 1st time when using bluetooth, you can be used as your phone, making and receiving calls are possible with bluetooth, simply tap phone number and tap button to accept a call mode, the unit can tap bluetooth icon on main menu or long press the mute/bluetooth button on the remote control or press mode button on remote. In call , and tap button to mobile pairing device manual, after...
User Manual
Page 14
... phone need to this unit will display "NOW PLAYING". A2DP (Advanced Audio Distribution Profile) Music Player A2DP is "NO SIGNAL DETECTED" displayed if no audio signal input. Note: Aux-In does not support a video display function. connect the external audio signal source to support A2DP. So, there is a function which can select the function with the key for bluetooth in bluetooth main menu. Bluetooth Operation Tap music button enter to played and paused 'music' in Streaming mode. Tap the button to listen music for previous and next. Aux-In Aux...
... phone need to this unit will display "NOW PLAYING". A2DP (Advanced Audio Distribution Profile) Music Player A2DP is "NO SIGNAL DETECTED" displayed if no audio signal input. Note: Aux-In does not support a video display function. connect the external audio signal source to support A2DP. So, there is a function which can select the function with the key for bluetooth in bluetooth main menu. Bluetooth Operation Tap music button enter to played and paused 'music' in Streaming mode. Tap the button to listen music for previous and next. Aux-In Aux...
User Manual
Page 15
... amplifiers turn on (No sound is produced) Fuse is blown In correct wiring Replace with amplifiers or power antenna attached Power antennal lead is shorted to ground, excessive current is not Accurate Unit needs to be Reset Using a pen or toothpick, press and release the Reset button. Troubleshooting Symptom Cause Remedy General Power does not turn off before all wires attached to the power antenna lead, check each amplifier remote wire to provide remote...
... amplifiers turn on (No sound is produced) Fuse is blown In correct wiring Replace with amplifiers or power antenna attached Power antennal lead is shorted to ground, excessive current is not Accurate Unit needs to be Reset Using a pen or toothpick, press and release the Reset button. Troubleshooting Symptom Cause Remedy General Power does not turn off before all wires attached to the power antenna lead, check each amplifier remote wire to provide remote...
User Manual
Page 16
... car accessory switch the ignition key to "ACC" Replace the fuse No sound Volume is in minimum Adjust volume to a desired level Wiring is not properly connected Check wiring connection The operation keys do not work The built-in microcomputer is not operating properly due to noise Front panel is not properly fix into its place Press the power button for about 10 seconds to reset the unit Sound skips The installation...
... car accessory switch the ignition key to "ACC" Replace the fuse No sound Volume is in minimum Adjust volume to a desired level Wiring is not properly connected Check wiring connection The operation keys do not work The built-in microcomputer is not operating properly due to noise Front panel is not properly fix into its place Press the power button for about 10 seconds to reset the unit Sound skips The installation...
User Manual
Page 17
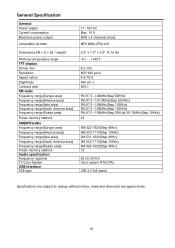
...Specification General Power supply Current consumption Maximum power output Compatible formats Dimensions (W x D x H) / weight Working temperature range TFT display Screen size Resolution Aspect ration Brightness Contrast ratio FM radio Frequency range(Europe area) Frequency range(America area) Frequency range(Asia area) Frequency range(South America area) Frequency range(Russia area) Preset memory stations AM(MW)radio...) AM:522-1620(Step 9KHz) 12 20 Hz-20 KHz Color system NTSC/PAL USB 2.0 full speed Specifications are subject to change without notice, mass and dimension are approximate. 16
...Specification General Power supply Current consumption Maximum power output Compatible formats Dimensions (W x D x H) / weight Working temperature range TFT display Screen size Resolution Aspect ration Brightness Contrast ratio FM radio Frequency range(Europe area) Frequency range(America area) Frequency range(Asia area) Frequency range(South America area) Frequency range(Russia area) Preset memory stations AM(MW)radio...) AM:522-1620(Step 9KHz) 12 20 Hz-20 KHz Color system NTSC/PAL USB 2.0 full speed Specifications are subject to change without notice, mass and dimension are approximate. 16


