Bernina Bernette 56 Support and Manuals
Get Help and Manuals for this Bernina item

View All Support Options Below
Free Bernina Bernette 56 manuals!
Problems with Bernina Bernette 56?
Ask a Question
Free Bernina Bernette 56 manuals!
Problems with Bernina Bernette 56?
Ask a Question
Most Recent Bernina Bernette 56 Questions

Instruction Manual For The Bernina Bernet 56 Not The Same As The Photo Above?
(Posted by anitafletcher 1 year ago)

Fixing Pressure Foot Of E56 Bernette Machine
how to fix picot pressure foot
how to fix picot pressure foot
(Posted by meera59 1 year ago)
How Much Is A Benette 56
(Posted by Akoala81 1 year ago)

Pressure Foot Pressure
The pressure foot pressure is stuck and won't adjust up or down
The pressure foot pressure is stuck and won't adjust up or down
(Posted by veronique3026 1 year ago)

Lost My Manual And Now I Don't Know How To Set The Buttons For Just A Straight
lost my manual and don't know how to set my machine for straight stitche
lost my manual and don't know how to set my machine for straight stitche
(Posted by jeanthornberry 1 year ago)
Popular Bernina Bernette 56 Manual Pages
Instruction Manual - Page 2

... replacement parts. Servicing double-insulated products (220V - 240V)
In a double-insulated product, two systems of insulation are being used as threading the needle, changing the needl\3, threading the bobbin, or changing the presser foot. 15. The symbol [J is being administered. 8.
Close attention is necessary when the sewing machine is not intended for use this sewing machine...
Instruction Manual - Page 5
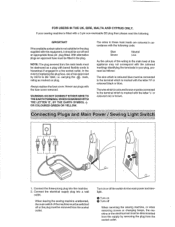
In the event of replacing the plug fuse, use plugs with a 3 pin non-rewireable BS plug then please read the following code:
Blue Brown
Neutral Live
As the colours of the wiring in the main lead of this equipment, it should be fitted in your sewing machine is marked with the letter 'N' or coloured black or blue...
Instruction Manual - Page 6

... .
USING ATTACHMENTS AND APPLICATIONS · . Zipper Inserting 61
Gathering 61
Darning 63
Appliques 64 Monogrammingand Embroidering 65
.
. .
"
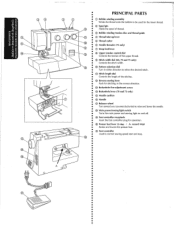
. . . PRINCIPAL PARTS 1
ACCESSORIES 3
OPERATING YOUR SEWING MACHINE 6 Connecting Plugs 6 Main Power and Sewing Light Switches 7 Foot Controller 7 Inserting the Needle 8 Checking the Needle 8 Changing the Presser Foot 9 Converting...
Instruction Manual - Page 9
• • •
PRINCIPAl PARTS
• (j) Bobbin winding assembly
• •
Winds the thread onto the bobbin to be used for the lower thread.
• ®Spool pin
• •
Holds the spool of thread.
• ® Bobbin winding tension disc and thread guide
@ Thread take-up lever
® Thread cutter ® Needle threader (75 only)
IJ) Drop feed lever
®...
Instruction Manual - Page 14
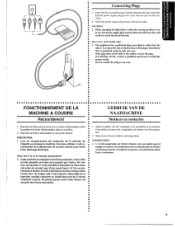
... d'a!imentation entre
• Ia pedale et Ia fiche d'alimentation dans Ia machine. •• a 2.
Brancher Ia fiche d'alimentation une prise secteur....use, the power supply plug must be disconnected from the walt
• socket to install the • proper outlet•
•• Do not modify the plug in de machine. When changing the light bulb or when the sewing machine...
Instruction Manual - Page 33

... point sur ••" pour que le modele
•• sE!Iectionne devienne un point ... stoffen of draad of fabric or thread are used or the pattern does not have ...;
A.)
Adjusting the stretch stitching The sewing machine is tijdens de fabricage zodanig ingesteld dat...MW-----
•
Stretch Stitching
Selecting a stretch stitch Setting the stitch length diat to "B" changes the selected ...
Instruction Manual - Page 36
... klospen en voer de draad om het spanningsschijfje van de spoelwinder. Trim the excess thread sticking oUt from the top of the thread, gently press on the spool pin and pass the thread around the bobbin a few times, then stop t •• the machine.
• 5. Couper le bout de fil d6passant au-dessus de Ia canette puis...
Instruction Manual - Page 38

...pin ® Thread guide (rear)
• @ Thread guide (front)
• @ Thread take -up lever • 4.
Pull the thread down and pass it to the left (fig. 0). B.) While holding the thread as shbwn in fig. Pull up the thread check • spring. (See fig. NOTE: Incorrectly feeding the thread may cause it behind the thread guide.
® Thread guide
7. Raise the presser foot...
Instruction Manual - Page 40

Using the Needle Threader
(75 only)
Turn power switch to "0".
1. Turn the balance wheel toward you {counterclockwise) until the bottom of th~ needle holder aligns with the bottom of the needlethreading-hook holder. Lower the presser foot.lever.
2.
Instruction Manual - Page 42
....
® Shuttle cover
@Slit
3.
Slide the thread down to start sewing immediately after inserting the bobbin without drawing up and
• cut it
• between the toes of the presser foot and straight toward the back of
the
upper
thread
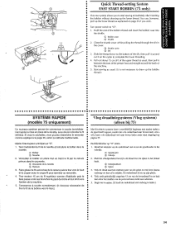
as usual. Tenir l'extrSmite du fi! Quick Thread-setting System FAST START BOBBIN (75 only)
This new system allows...
Instruction Manual - Page 53
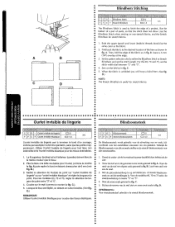
.... Mettre le s91ecteur de modele de point sur "ourlet invisible de
3. Voorde model!en 60, 70 en 75 stelt u de
point. Naai de zoom zoals getoond in fig. B. Bij bet uitvouwen van de stof ziet uw zoom eruit zeals in tussen "3" en "5". Both the upper (spool) and lower {bobbin) threads should be the satne color...
Instruction Manual - Page 60
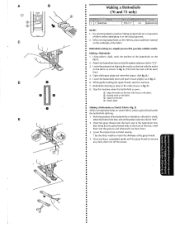
... holding the upper thread, start sewing. • * Set the stitch width to match the diameter of the buttonhole foot, • then bring the two gimp thread ends to "c::J".
•• 2. Stop the machine when the buttonhole is completed, gently pull the gimp thread to remove
any slack, then trim off the excess. lower the presser foot aligning the marks...
Instruction Manual - Page 76

... speed without thread installed for a short
time . 5. Neem de machine af en reinig eventuele overtollige of service"centrum.
68 Retirer Ia fiche d'alimentation de Ia prise de courant. •• a 2. Verwijder de stekker uit bet contact.
2.
•
Oiling
1. Verwijder de naaldplaat en de voorplaat. 3. Remove the power supply plug from your local sewing machine dealer or...
Instruction Manual - Page 78
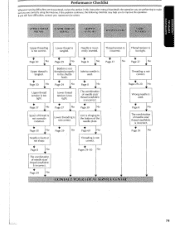
...Page 37
No
'
Spool of needle size/
thread size/fabric
..fs incorrect. Page 69
No
~
Threading is
not correctly
..installed. If the problem continues, the following checklist may help you are correctly using the machine. If you sti!! Page 29
No
~
Bobbin is used .
..
Page 8
No
~
Inferior needle is not threaded properly
in this instruction manual that details the operation...
Instruction Manual - Page 85
...: Winding the Bobbin 28 Threading 30
Threader 32 :
• z o Zigzag Stitching 44
: Zipper Inserting 61
i.
77 Threading 29, 34
Pattern Widths 12-15
Winding 28 o Performance Checklist 70-71
Bridging Stitch 12 Buttonhole Sewing 52, 54
Presser Foot Replacement 9 Principal Parts 1
Buttonhole Fine Adjustment 57
ButtC?n Sew·ing 59
Q
c
Quick Thread-setting System 34...
Bernina Bernette 56 Reviews
We have not received any reviews for Bernina yet.