
Bernina Bernette 56 Support Question
Bernina Bernette 56 Support Question
Find answers below for this question about Bernina Bernette 56.Need a Bernina Bernette 56 manual? We have 1 online manual for this item!
Question posted by anitafletcher on December 28th, 2022
Instruction Manual For The Bernina Bernet 56 Not The Same As The Photo Above?
The person who posted this question about this Bernina product did not include a detailed explanation. Please use the "Request More Information" button to the right if more details would help you to answer this question.
Current Answers
Answer #1: Posted by SonuKumar on December 29th, 2022 9:31 AM
SonuKumar

Member since:
May 9th, 2021 Points: 16,617,800

Member since:
May 9th, 2021 Points: 16,617,800
Please respond to my effort to provide you with the best possible solution by using the "Acceptable Solution" and/or the "Helpful" buttons when the answer has proven to be helpful.
Regards,
Sonu
Your search handyman for all e-support needs!!
Related Bernina Bernette 56 Manual Pages
Instruction Manual - Page 2

... a doubleinsulated product nor should only be supervised to persons:
1. Always use a bent needle. 13. This sewing machine is provided with any adjustments in the needle area, such as described in this sewing machine only for its intended use this instruction manual. 16. Replacement parts for grounding be left unattended when plugged in the product.
Always unplug...
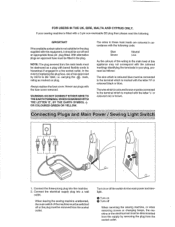
Instruction Manual - Page 5
....
0 Turn on plug. WARNING: DO NOT CONNECT EITHER WIRE TO
THE EARTH TERMINAL WHICH IS MARKED WITH
THE LETTER 'E', BY THE EARTH SYMBOL-:!:- If your sewing machine is marked with the coloured markings identifying the terminals in your plug, proceed as marked on 8 Turn off or the plug must be connected to...
Instruction Manual - Page 6

... 76
Straight Stitching 41 Zigzag Stitching 44
Blindhem Stitching 45 Shell hem Stitching 46 3-Step Zigzag Stitching 47 . PRINCIPAL PARTS 1
ACCESSORIES 3
OPERATING YOUR SEWING MACHINE 6 Connecting Plugs 6 Main Power and Sewing Light Switches 7 Foot Controller 7 Inserting the Needle 8 Checking the Needle 8 Changing the Presser Foot 9 Converting to Free-Arm Style 10 Steadying the...
Instruction Manual - Page 14
...ma• chine .
•• 2. When changing the light bulb or when the sewing machine is not
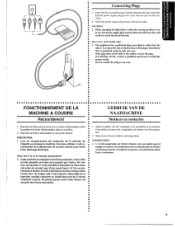
•• in het stopcontact. This appliance has a polarized plug (one ...trouve sur !e cordon d'a!imentation entre
• Ia pedale et Ia fiche d'alimentation dans Ia machine. •• a 2. Cette machine est equipee d'une fiche polarisee, c'est-8-dire
• qu'elle possede une lame plus ...
Instruction Manual - Page 15
A
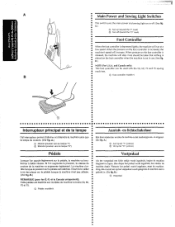
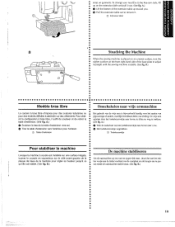
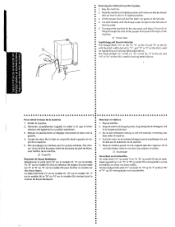
Main Power and Sewing Light Switches
This switch turns the main power and sewing light on (toward the "0" mark)
Foot Controller
When the foot controller is depressed lightly, the ma mark)
® Turn off . (See fig. A.)
(j) Turn on ·or off (toward the"!"
Instruction Manual - Page 17
... pied sur !'axe. De persvoet vervangen
Voor bet uitvoeren van de verschil!ende functies met uw machine, zijn er verschillende naaldvoeten, ook we! 'persvoeten' genoemd, nodig. TYPE MET KNIPBEVEST!GlNG Hoofdschakelaar... Foot
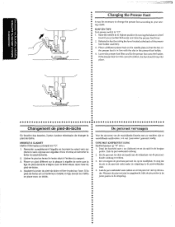
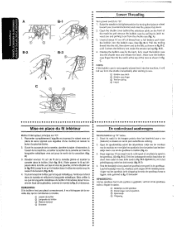
••• It may be necessary to change the presser foot according to your sew-
• ing needs.
•• SNAP-ON TYPE
• Turn power switch to its...
Instruction Manual - Page 18
A.}
0 Uft the bottom of the extension table up on garments. To change your machine to the free"arm style, lift up toward you.
8 Pull the extension table out to remove it out. (See fig. areas on the extension fable and pull it
Instruction Manual - Page 33

...
Q) Maakt fijne steken
® Standaardpositie ® Maal
A.)
Adjusting the stretch stitching The sewing machine is tijdens de fabricage zodanig ingesteld dat de elastische steek in te stellen. (Zie fig....•• Reglage de Ia couture en points 81astiques
• a A Ia sortfe d'usfne, Ia machine coudre est r9gl€e de sorte que Ia • a piqOre en points e!astiques se fasse Ia...
Instruction Manual - Page 37
...8-3
c
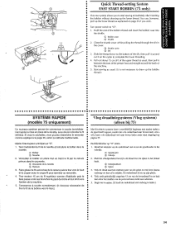
lower Threading
Turn power switch to the left, as shown in fig. Raise the needle to sew. A) .
3. B-2, until it out from a full bobbin and insert the bobbin into the bobbin case...
c.
Ouvrir le couvercle de Ia navette, derriere !a table d'extension, a I'avant de Ia machine, et retirer Je bonier de Ia canette en tirant Ia
Hoofdschakelaar op "0'' zetten. B-1.) Trek ...
Instruction Manual - Page 40

Lower the presser foot.lever.
2. Turn the balance wheel toward you {counterclockwise) until the bottom of th~ needle holder aligns with the bottom of the needlethreading-hook holder. Using the Needle Threader
(75 only)
Turn power switch to "0".
1.
Instruction Manual - Page 42
...the lower thread as usual.
Turn power switch to draw up the lower thread. Start sewing as explained on the cutter to the bottom of the slit, then pull it
•... et introduire le boitier dans !a
• navette. • Hold the end of
~" •• the machine.
• 5.
Ot is not necessary to "0".
1. Close the shuttle cover while pulling the thread through the ...
Instruction Manual - Page 49
...6. a 7. Druk de Achteruitnaaikn()p zo ver mogelijk in zo~ •• dat de machine vooruit begint te naaien. Laat de Achteruitnaaiknop los en druk het voetpedaal !angzaam in en druk...de naden en als • versteviging.
• 6. Set the
pattern selection dial to start sewing in thereverse direction .
7. Lower the presser foot.
75170/60
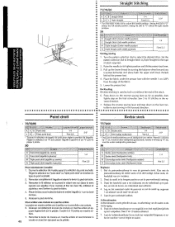
Point droit
a placer droite....
Instruction Manual - Page 50
.... 2. Pour terminer Ia couture (fig. Piquer jusqu'au bout de Ia couture puis arreter Ia machine. 2. Zorg, dat de naald in the new direction.
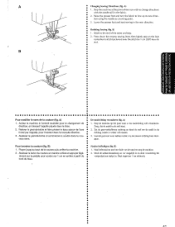
• Finishing Sewing (fig.
Press down the reverse sewing lever;
A}
a 1.
B) 1. A
• Changing Sewing Directions (fig. Naaien beCindigen (fig. Raise the presser foot and turn the fabric to change directions
•...
Instruction Manual - Page 51
Cut both threads with the thread cutter located on the left side.
4. Stop the machine. 2. To prepare the machine for the next seam, puf! about 10 em (4'~) of thread through the toes of the presser foot toward the back of the ...that the thread
take-up lever is also in its highest position. 3. Raise the needle to the left side of the machine .
•• Removing the Material From the...
Instruction Manual - Page 52
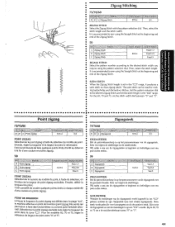
...de steeklengte. POINT DE BOURDON
Lorsque Ia longueur du point zigzag est dSfinie dans Ia plage "c::J", Ia machine effectue un point de bourdon (point zigzag tres s~rre) qui
a peut servir faire des boutonnieres ... souhaite puis n§gler Ia longueur de
point dans Ia zone "CJ". It is recommended to sew using the Straight Stitch at the beginning and
• end of the Zigzag Stitch SATIN STITCH &#...
Instruction Manual - Page 56
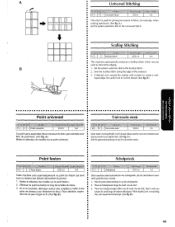
... Be careful not to the Universal Stitch.
• •
• • •
This machine automatically produces a Scallop Stitch which may be used for joining two pieces of the material. 3. Wees ...daarbij wei voorzichtig datu de draad niet doorknipt. (Zie fig.
SeW the Scallop Stitch along the edge of fabric, for example, when
making patchwork. ...
Instruction Manual - Page 60
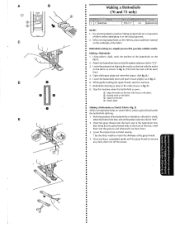
...two gimp thread ends to match the diameter of the fabric. Lower the presser foot and start the machine.
7. Making a Buttonhole 1. Attach the buttonhole foot and set the pattern selection dial to remove
...c
D E
Making a Buttonhole (70 and 75 only)
NOTE: 1, It is sewn. When sewing buttonholes on thin fabrics, place stabilizer material
on the fabric as in fig. C.
6. CD Align...
Instruction Manual - Page 76

... vitesseat • sans fil Pendant un court instant.
•• 5. Remove the power supply plug from your local sewing machine dealer or service center.
•
<
G•ra•i•s•s•a•ge Smeren
••• 1. Remove the needle plate and the face plate. 3. ...
Instruction Manual - Page 78
...
No
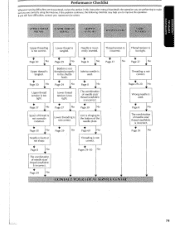
Thread tension is not threaded properly
in this instruction manual that details the operation you are correctly using the machine. Pages~9-30 No ~
Wrong needle is not correct.
..
Upper threading
is
used .
tight.
Page 8
No
Lower thread
tension is too
.. Performance Checklist
Whenever sewing difficulties are encountered, review the section in the shuttle...
Instruction Manual - Page 84
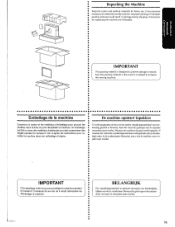
... and packing material's for repacking the machine are illustrated.
Voir ci-apr6s les instructions pour re mettre Ia machine dans son errlballage d'origine. IMPORTANT
Get embal!age a ete convu pour proteger Ia machine pendant
le transport. BELANGRIJK
Dit verpakkingsmateriaal is designed to prevent damage in transit. • SaVe this sewing machine. Improper packing or improper
•...
Similar Questions

Hand Wheel With Undue Resistance.
When manually advancing the needle downward it requires extra force and too much force for the motor...
When manually advancing the needle downward it requires extra force and too much force for the motor...
(Posted by alankutsch 3 years ago)

Stitching Problems
The top thread is bunching up on the underneah of the garment, snagging and gathering within 10 stic...
The top thread is bunching up on the underneah of the garment, snagging and gathering within 10 stic...
(Posted by oneillmary 4 years ago)

Need Instruction Manual For Virtuosa 160.
Need instruction manual for Bernina virtuosa 160 machine.
Need instruction manual for Bernina virtuosa 160 machine.
(Posted by pamain4747 8 years ago)

How To Thread A Bobbin On A Bernette 56 Sewing Machine
(Posted by scannie2 9 years ago)
My Sewing Machine Bernette 15 Stops Working
After 1 day using my Bernette 15 stops working - engine hoots but doesn't rotate spindle and hand wh...
After 1 day using my Bernette 15 stops working - engine hoots but doesn't rotate spindle and hand wh...
(Posted by sgrayxx 12 years ago)