
Bernina Bernette 56 Support Question
Bernina Bernette 56 Support Question
Find answers below for this question about Bernina Bernette 56.Need a Bernina Bernette 56 manual? We have 1 online manual for this item!
Question posted by scannie2 on June 8th, 2014
How To Thread A Bobbin On A Bernette 56 Sewing Machine
The person who posted this question about this Bernina product did not include a detailed explanation. Please use the "Request More Information" button to the right if more details would help you to answer this question.
Current Answers
Related Bernina Bernette 56 Manual Pages
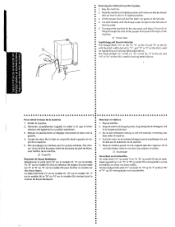
Instruction Manual - Page 2

...-insulated product, two systems of insulation are being used or where oxygen is intended for use ."
"SAVE THESE INSTRUCTIONS" "This sewing machine is being administered. 8. t!Jrer as threading the needle, changing the needl\3, threading the bobbin, or changing the presser foot. 15. Do not use as a toy; The wrong plate can cause the needle to...
Instruction Manual - Page 5
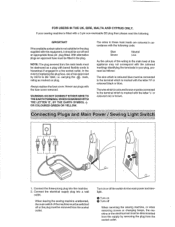
.... Turn on or off the switch for the plug supplied with this appliance may not correspond with the coloured markings identifying the terminals in your sewing machine is marked with the fuse cover removed.
The wire which is coloured brown must be connected ·to the terminal which is fitted with a 3 pin...
Instruction Manual - Page 6

... Dial (60, 70 and 75 only 26 Reverse Sewing Lever 27 Drop Feed Lever 27
THREADING THE MACHINE 28 Winding the Bobbin 28 Lower Threading 29 Upper (Needle) Threading 30 Using the Needle Threader (75 only 32 Quick Thread-setting System FAST START BOBBIN (75 only 34 Drawing Up Lower Thread (50, 60 and 70 only) ..... 35 Twin-Needle...
Instruction Manual - Page 9
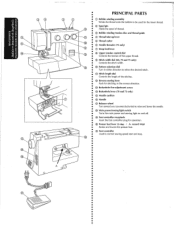
...Bobbin winding assembly
• •
Winds the thread onto the bobbin to be used for the lower thread.
• ®Spool pin
• •
Holds the spool of thread.
• ® Bobbin winding tension disc and thread guide
@ Thread take-up lever
® Thread...lower the needle.
(@·Main power/sewing light switch Turns the main power and sewing light on and off.
(@ Foot ...
Instruction Manual - Page 14
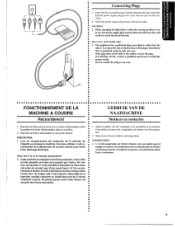
...etectrique.
•• (Pour les E.-U.
When changing the light bulb or when the sewing machine is wider than the • other). Brancher Ia fiche qui se trouve sur !e... de stekker van het voetpedaal in de aansluiting in het stopcontact. Steck nude (stroom) stekker in de machine. Brancher Ia fiche d'alimentation une prise secteur. • PRECAUTION:
•• 1. j
:
&#...
Instruction Manual - Page 17
...• 4.
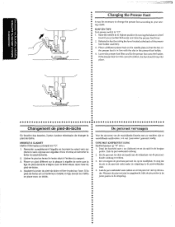
De persvoet vervangen
Voor bet uitvoeren van de verschil!ende functies met uw machine, zijn er verschillende naaldvoeten, ook we! 'persvoeten' genoemd, nodig.
Si le pied-de...the Presser Foot
••• It may be necessary to change the presser foot according to your sew-
• ing needs.
•• SNAP-ON TYPE
• Turn power switch to its highest...
Instruction Manual - Page 18
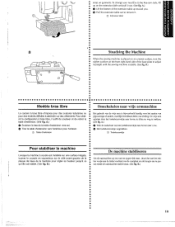
To change your machine to the free"arm style, lift up toward you.
8 Pull the extension table out to remove it out. (See fig. A.}
0 Uft the bottom of the extension table up on garments. areas on the extension fable and pull it
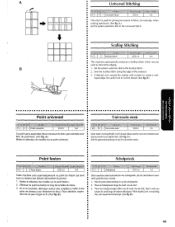
Instruction Manual - Page 33

...sewing machine is tijdens de fabricage zodanig ingesteld dat de elastische steek in een elastische steek. (Zk fig. A.) •• Reglage de Ia couture en points 81astiques
• a A Ia sortfe d'usfne, Ia machine...Q) Maakt fijne steken
® Standaardpositie ® Maal If different types of fabric or thread are used or the pattern does not have the correct shape, turn the
B
•...
Instruction Manual - Page 37
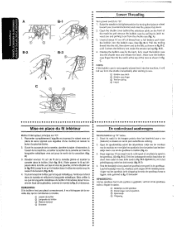
...qu'on the front of the machine and remove the bobbin case by pulling its highest position by the latch, fully insert the bobbin case into the slot, then down and to sew. Ouvrir le couvercle de Ia ... (fig. a dans Ia navette et relacher Ia languette metallique. A
B-2
8-3
c
lower Threading
Turn power switch to its latch toward you and pulling it enters the delivery eye under the...
Instruction Manual - Page 40

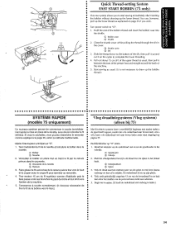
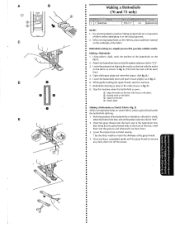
Using the Needle Threader
(75 only)
Turn power switch to "0".
1. Lower the presser foot.lever.
2. Turn the balance wheel toward you {counterclockwise) until the bottom of th~ needle holder aligns with the bottom of the needlethreading-hook holder.
Instruction Manual - Page 42
... the presser foot and straight toward the back of the bobbin thread and insert the bobbin case into the shuttle. Start sewing as explained on the cutter to start sewing immediately after inserting the bobbin without drawing up the lower thread. You can, however, pull up the lower thread as usual. Close the shuttle cover while pulling the...
Instruction Manual - Page 49
...threads behind the presser foot. 4. Backtacking
Reverse sti'tching is used to Straight Stitch or ,Triple Straight for the type
of the stitch .
6. Sew 5 to start sewing in zo~ •• dat de machine...~ en onderdraad naar achteren. •• 4. Release the reverse sewing !ever and step down on the reverse sewing lever as far as possible, then lightly step on the foot controller...
Instruction Manual - Page 51
... the presser foot toward the back of the face plate.
5. Cut both threads with the thread cutter located on the left side.
4. Stop the machine. 2. Raise the needle to the left side of the machine .
•• Removing the Material From the Machine 1. lift the presser foot and pull the fabric out gently to its...
Instruction Manual - Page 56
... met een
schaar de rand 'tangs de steken afknippen. Set the pattern selection dial to cut the thread. (See fig. 8.)
• •
• •
•
Point universe! a ... machine automatically produces a Scallop Stitch which may be used for joining two pieces of the material. 3. Deze machine naait automatisch een schelpsteek, die als decOratieve randsteek gebruikt kan worden . SeW the...
Instruction Manual - Page 60
... excess. Lower the presser foot and start the machine.
7. CD Align the marks on the foot with the marks on Stretch Fabrics (fig. While gently holding the upper thread, start sewing. • * Set the stitch width to "c::J".
•• 2. Once sewing is completed, gently pull the gimp thread to "CJ".
3. A. (The front bar tack will...
Instruction Manual - Page 67
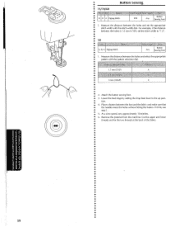
...width dial. If it hits, see
•• step 1.
• 5. Attach the button sewing foot. • 3. Place a button between
the
holes
is
1.5
mm
(1/1
611 ),
set...sew approximately 10 stitches. •• 6. • • •
Hutton Sewmg
• 75/70/60
1. Remove the material from the machine. Cut the upper and lower
• threads and tie the two threads ...
Instruction Manual - Page 76

... olie in elk van de smeerpunten die zijn aangegeven
met de pijlen. 4. Neem de machine af en reinig eventuele overtollige of oil at a fast speed without thread installed for a short
time . 5. Remove the power supply plug from your local sewing machine dealer or service center.
•
<
G•ra•i•s•s•a•ge...
Instruction Manual - Page 78
...
Threading is incor- Upper threading
is
tangled.
.
Page 30
No
Lower thread is not correct.
.. Page 29
No
~
Bobbin is too
.. t
Page 8
No
Upper thread
tension is not threaded...Page 37
No
Thread tension is incorrect.
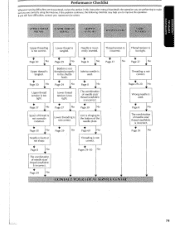
tight. Performance Checklist
Whenever sewing difficulties are encountered, review the section in the shuttle
hook. t
Pages 29-30 No
Thread tension is
too...
Instruction Manual - Page 84
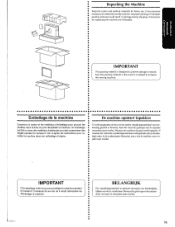
.... Instructions • for future use. IMPORTANT This packing materia!
BELANGRIJK
Dit verpakkingsmateriaal is needed to reship the sewing machine. is designed to prevent damage in transit. • SaVe this sewing machine. IMPORTANT
Get embal!age a ete convu pour proteger Ia machine pendant
le transport. Conservez-le au cas oU il serait necessaire de ctemenager Ia...
Instruction Manual - Page 85
...
Stretch Overlock (Right 50
Connecting 6 Operati rtg 7 Free-Arm Sewing 10
o
• • •
Stretch Stitching 25
T
G
Gathering 61
•• 3-Step Zigzag Stitching 47
0 Threading
! •
Bobbin 29, 34 Needle 30, 32
L
o Thread Tension 37
• Topstitching 43
Light Bu Ib Replacement 67 Lower Thread ing 29
•
0
o
l in·p 1e Tn·p 1e...
Similar Questions


The Needle On My Bernina Bernette 56 Does Not Move Up And Down.
The needle desends one time into the fabric and does not come back up on its own. There are not any ...
The needle desends one time into the fabric and does not come back up on its own. There are not any ...
(Posted by midwifmom 6 years ago)


How To Sew A Stright Line On Abernina Bernette 56
What is the tension on all 3 dials for the B.B. 56 to sew a striaght line
What is the tension on all 3 dials for the B.B. 56 to sew a striaght line
(Posted by catakuhata 10 years ago)