
Bernina Bernette 56 Support Question
Bernina Bernette 56 Support Question
Find answers below for this question about Bernina Bernette 56.Need a Bernina Bernette 56 manual? We have 1 online manual for this item!
Question posted by catakuhata on July 28th, 2013
How To Sew A Stright Line On Abernina Bernette 56
What is the tension on all 3 dials for the B.B. 56 to sew a striaght line
Current Answers
Related Bernina Bernette 56 Manual Pages
Instruction Manual - Page 2

... as described in . Young children should be added to the symbol "0" position which represents off , symbol "0" position when making any adjustments in this sewing machine. "SAVE THESE INSTRUCTIONS" "This sewing machine is intended for Servicing Double Insulated appliances. 17. Always unplug before using." Replace bulb with double insulation. WARN ING - Use this manual. Return...
Instruction Manual - Page 5
...
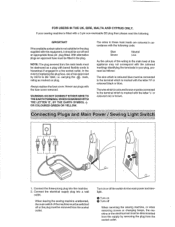
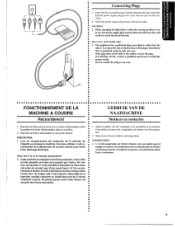
Connect the three-prong plug into a wall
outlet.
When leaving the sewing machine unattended, the main switch ofthe machine must be connected to BS 1362, i.e. Turn on or off the switch...with the coloured markings identifying the terminals in the main lead of the wiring in your sewing machine is marked with the letter 'N' or coloured black or blue. With alternative plugs an ...
Instruction Manual - Page 6

...Machine 10
VARIOUS CONTROLS 11 Pattern Selection Dial 11 RECOMMENDED WIDTHS AND LENGTHS FOR STITCHES 12 Stitch Length Dial 24 Stretch Stitching 25 Stitch Width Dial (60, 70 and 75 only 26 Reverse Sewing Lever 27 Drop Feed Lever 27
THREADING THE MACHINE... only) ..... 35 Twin-Needle Sewing (60, 70 and 75 only 36 Thread Tension 37 CHART OF SEWING FABRICS, NEEDLES AND THREAD COMBINATIONS 39...
Instruction Manual - Page 9
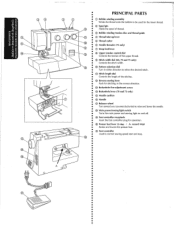
...) Drop feed lever
® Upper tension control dial
Controls the tension of the upper thread.
® Stitch width dial (60, 70 and 75 only)
Controls the stitch width.
(@ Pattern selection dial Turn in either direction to select the desired stitch.
@ Stitch length dial Controls the length of the stitches.
@ Reverse sewing lever Push for stitching in the...
Instruction Manual - Page 14
...Ia prise, essayer dans • !'autre sens.
When changing the light bulb or when the sewing machine is not
•• in het stopcontact. et le Canada uniquement)
•• 2.... fit, contact a qualified electrician to avoid electrical hazards.
••• (for U.S.A. Cette machine est equipee d'une fiche polarisee, c'est-8-dire
• qu'elle possede une lame plus grande ...
Instruction Manual - Page 15
A
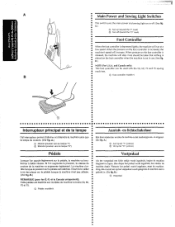
Main Power and Sewing Light Switches
This switch turns the main power and sewing light on (toward the "0" mark)
Foot Controller
When the foot controller is depressed lightly, the ma mark)
® Turn off . (See fig. A.)
(j) Turn on ·or off (toward the"!"
Instruction Manual - Page 17
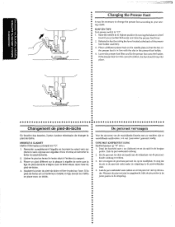
...It may be necessary to change the presser foot according to your sew-
• ing needs.
•• SNAP-ON TYPE
&#...so that the bar on • the presser foot is in line with the slot in de persvoethouder staat. 4. Lower the presser foot... persvoet vervangen
Voor bet uitvoeren van de verschil!ende functies met uw machine, zijn er verschillende naaldvoeten, ook we! 'persvoeten' genoemd, nodig....
Instruction Manual - Page 18
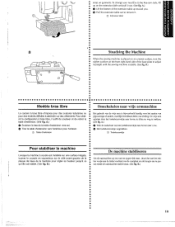
To change your machine to remove it out. (See fig. A.}
0 Uft the bottom of the extension table up toward you.
8 Pull the extension table out to the free"arm style, lift up on garments. areas on the extension fable and pull it
Instruction Manual - Page 33

A.)
Adjusting the stretch stitching The sewing machine is tijdens de fabricage zodanig ingesteld dat de elastische steek in een elastische steek. (Zk fig. not forcefully turn the
B
• stitch length dial out of fabric or thread are used or the pattern does not have the correct shape, turn the dial toward either"+" or"-" to a stretch...
Instruction Manual - Page 37
...Laat het hendeltje weer los, waarbij u moet zorgen dat de metalen positie~
ressort de tension (fig. 8-3).
a dans Ia navette et relacher Ia languette metallique.
REMAROUE: Si Je ...achter bet afneembare vakje aan de voorkant van.de machine en verwijder bet spoelhuis door het geheel aan het ... finger fits into the slot, then down and to sew. Holding the bobbin case by the latch, fully insert...
Instruction Manual - Page 40

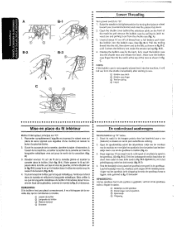
Lower the presser foot.lever.
2. Using the Needle Threader
(75 only)
Turn power switch to "0".
1. Turn the balance wheel toward you {counterclockwise) until the bottom of th~ needle holder aligns with the bottom of the needlethreading-hook holder.
Instruction Manual - Page 42
...up the lower thread as explained on the cutter to start sewing immediately after inserting the bobbin without drawing up the lower thread. Start sewing as
usual,
then
pull
it up the bobbin
• ...between the toes of the presser foot and straight toward the back of
~" •• the machine.
• 5. Close the shuttle cover while pulling the thread through the slit in
the cover....
Instruction Manual - Page 45
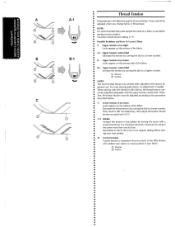
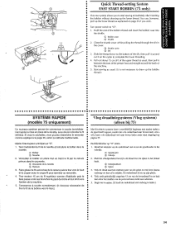
... a higher number.
NOTE: It is too loose.
1
locks appear on your stitches. Thread Tension
Thread tension will affect the quality of the fabric . B~1 Upper tension control dial
Increase the tension by turning the dial to be made on a fabric scrap before sewing on the reverse side of the fabric . Possible Problems and How To Correct Them
A Upper...
Instruction Manual - Page 49
... tegelijkertijd Iicht
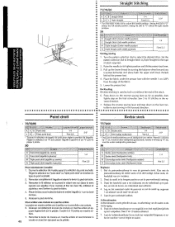
• op bet voetpedaal. Turn the pattern selection dial to 10 stitches in the forward direction.
75/70/60
Rechte steek
; Raise the need!~ to start sewing in thereverse direction .
7. Release the reverse sewing !ever and step down on the reverse sewing lever as far as possible, then lightly step on the...
Instruction Manual - Page 50
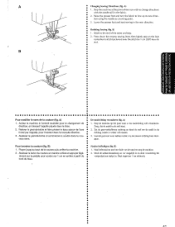
... appuyer IBge- Zet de persvoethefboom omhoog en draai de stof om de naald in the new direction.
• Finishing Sewing (fig. A
• Changing Sewing Directions (fig. Press down the reverse sewing lever; Arreter Ia machine I'endroit souhaite pour le changement de
direction, en laissant l'aiguille plqu6e dans le tissu. 2.
gaan . Druk de achteruitnaaiknop zo...
Instruction Manual - Page 51
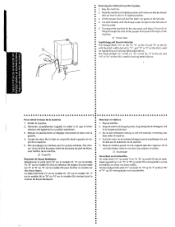
...-up lever is also in its highest position. 3. Raise the needle to the left side of the machine .
•• Cut both threads with the thread cutter located on the left side.
4. To prepare the machine for the next seam, puf! about 10 em (4'~) of thread through the toes of the presser...
Instruction Manual - Page 52
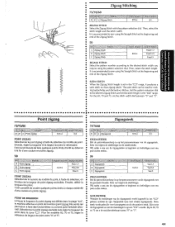
... range, it produces a • satin stitch (a close zigzag stitch). Set the pattern selection dial •• to sew using the Straight Stitch at the beginning and
• end of the Zigzag Stitch SATIN STITCH .... POINT DE BOURDON
Lorsque Ia longueur du point zigzag est dSfinie dans Ia plage "c::J", Ia machine effectue un point de bourdon (point zigzag tres s~rre) qui
a peut servir faire des ...
Instruction Manual - Page 62
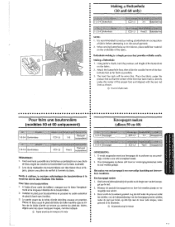
When sewing buttonholes on thin fabrics, place stabilizer material
• •
on the underside of the fabric .
•• ...•• 1. Attach the buttonhole foot, then slide the outside frame of the presser foot and aligned with the two red
• lines as possible.
•• 3. Place the fabric under the center of the but-
~ • tonhole foot as far back as ...
Instruction Manual - Page 63

... pr9-d9finie a Ia craie. 3. lower the presser foot and sew 5 to "4". 2. Mettre !e s9!ecteur de modele sur 1. 2. Set the pattern selection dial to "2". 2. Turn the pattern selection dial to "1 ". 2. Stop the machine when the needle is at the right side of the tailor's chalk line. 3. a 2. Arreter Ia machine !orsque l'algui!!e se trouve a droite des points et...
Instruction Manual - Page 85
...Machine 10 Stitch Length Dial 24
Fagoting Stitch 49
Stitch Width Dial 26
Feed Dog
Straight Stitching 41
CIeaning 69
•
0
Stretch Blindfi1em 45
Lever 27 0 Stretch Material Sewing...70-71
0 Twin-Needle Sewing 36
Main Power Switch 7 •
: u Monogramming 65
M Stitch 12
N
Needle Inspection 8
Universal Stitching 48 Upper Tension Control Dial 37 Upper Threading 30
w...
Similar Questions


How Do You Thread A Bobbin On A Bernette 56 Bernina
(Posted by morsmobre 9 years ago)

How To Thread A Bobbin On A Bernette 56 Sewing Machine
(Posted by scannie2 9 years ago)

Does Bernette 56 Have Speed Control Adjustment Other Than The Foot Control?
(Posted by dpregler 11 years ago)
