
Bernina Bernette 56 Support Question
Bernina Bernette 56 Support Question
Find answers below for this question about Bernina Bernette 56.Need a Bernina Bernette 56 manual? We have 1 online manual for this item!
Question posted by dpregler on December 20th, 2012
Does Bernette 56 Have Speed Control Adjustment Other Than The Foot Control?
The person who posted this question about this Bernina product did not include a detailed explanation. Please use the "Request More Information" button to the right if more details would help you to answer this question.
Current Answers
Related Bernina Bernette 56 Manual Pages
Instruction Manual - Page 2

..., electrical or mechanical adjustment. 4. Always unplug before using." WARN ING - Close attention is necessary when the sewing machine is provided with this machine to be used as... this sewing machine from the accumulation of the sewing machine and foot controller free from the electrical outlet immediately after using and before cleaning.
2.
Return the sewing machine to the...
Instruction Manual - Page 6

... ATTACHMENTS AND APPLICATIONS · . PRINCIPAL PARTS 1
ACCESSORIES 3
OPERATING YOUR SEWING MACHINE 6 Connecting Plugs 6 Main Power and Sewing Light Switches 7 Foot Controller 7 Inserting the Needle 8 Checking the Needle 8 Changing the Presser Foot 9 Converting to Free-Arm Style 10 Steadying the Machine 10
VARIOUS CONTROLS 11 Pattern Selection Dial 11 RECOMMENDED WIDTHS AND LENGTHS...
Instruction Manual - Page 9
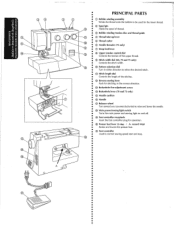
...wheel
Turn toward you (counterclockwise) to raise and lower the needle.
(@·Main power/sewing light switch Turns the main power and sewing light on and off.
(@ Foot controller receptacle Insert the foot controller plug for operation.
® Presser foot lever (2-step I A: second step)
Raises and lowers the presser foot.
@ Foot controller Used to control sewing speed start and stop .
.,
Instruction Manual - Page 14
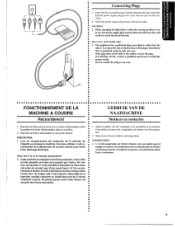
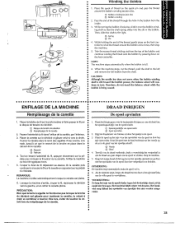
... pedale et Ia fiche d'alimentation dans Ia machine. •• a 2. Stekkers en contacten
J.
Insert the foot controller plug, located between the foot controller • and the power supply plug on the cord, into an electrical outlet •• CAUTION: • 1. When changing the light bulb or when the sewing machine is intended to avoid electrical hazards.
•...
Instruction Manual - Page 15
A
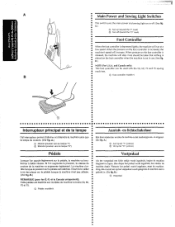
Main Power and Sewing Light Switches
This switch turns the main power and sewing light on (toward the "0" mark)
Foot Controller
When the foot controller is depressed lightly, the ma A.)
(j) Turn on ·or off (toward the"!" mark)
® Turn off . (See fig.
Instruction Manual - Page 16

... 6.
Remove the power supply plug from the electrical outlet.
2. lower the presser foot 4.
Replace the needle if it by loosening .the needle
damp with a coin... zakken. 4. Raise the needle bar to "0". 1. A.)
5. Resserrer Ia fixation. The sewing needle must always be straight and sharp for smooth
sewing.
0 ':-": ",-.
.:'' ,
1
2. To check if the needle is bent or dull...
Instruction Manual - Page 18
A.}
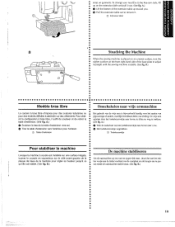
0 Uft the bottom of the extension table up toward you.
8 Pull the extension table out to the free"arm style, lift up on garments. areas on the extension fable and pull it To change your machine to remove it out. (See fig.
Instruction Manual - Page 33

... used or the pattern does not have the correct shape, turn the
B
• stitch length dial out of in te stellen. (Zie fig. A.)
Adjusting the stretch stitching The sewing machine is tijdens de fabricage zodanig ingesteld dat de elastische steek in een elastische steek. (Zk fig.
A.) •• Reglage de Ia couture en...
Instruction Manual - Page 36
... full bobbin from the top of thread on
•• the foot controller.
•• NOTE:
• The machine stops automatically when the bobbin is . While holding the end of...• tinue to the fight. •• ® Spring • @Slit
• 4. Arr6ter Ia machine • au bout de qyetques tours.
•• 5. Q) · Spanningsschijfje van spoelwinder
® Spoel ...
Instruction Manual - Page 38

... Spool pin ® Thread guide (rear)
• @ Thread guide (front)
• @ Thread take -up lever and around the upper tension control dial
•• from
front
to "0". 1.
Raise the presser foot lever and turn the balance wheel toward you
(counterclockwise) to raise the .thread take -up lever
6. Guide the thread to the...
Instruction Manual - Page 40

Turn the balance wheel toward you {counterclockwise) until the bottom of th~ needle holder aligns with the bottom of the needlethreading-hook holder. Lower the presser foot.lever.
2. Using the Needle Threader
(75 only)
Turn power switch to "0".
1.
Instruction Manual - Page 45
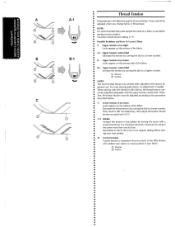
... appear on the surface of the fabric . A~1 Upper tension cOntrol dial
Decrease the tension by turning the dial to a lower number. B~1 Upper tension control dial
Increase the tension by turning the dial to a higher ...fabric scrap before sewing on your stitches. locks appear on the reverse side of the fabric . B Upper tension is recommended that a test sample be adjusted when you change...
Instruction Manual - Page 49
...•• 4. Druk de Achteruitnaaikn()p zo ver mogelijk in zo~ •• dat de machine vooruit begint te naaien. Regier !e selecteur sur "point droit" ou ''triple point droif' en ...versteviging.
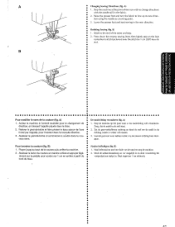
• 6. Release the reverse sewing !ever and step down on the reverse sewing lever as far as possible, then lightly step on the foot controller to Straight Stitch or ,Triple Straight for ...
Instruction Manual - Page 50
... de naald in the new direction.
• Finishing Sewing (fig. lower the presser foot and start sewing in de stof staat. 2.
Pour terminer Ia couture ...machine. 2. Naai helemaal tot aan het einde van de naad en stop .
2. Druk de achteruitnaaiknop zo ver mogelijk in en druk voorzichtig bet
voetpedaal een stukje in de nieuwe richting kunt door- then lightly step on the foot controller...
Instruction Manual - Page 63

... bar tack)
_,
Step 2 (Left side)
[
Step 3 (Back bar tack)
Step 4 (Right side)
1. lower the presser foot and sew 5 to "1 ". 2. l. Mettre !e se!ecteur de modele sur 3 (meme position que 1). Set the pattern selection dial to 6 stitches. 3. Stop the machine when the needle is at the right side of the stitch,
then raise the needle...
Instruction Manual - Page 67
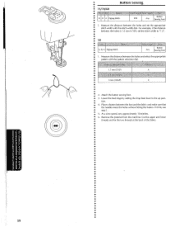
... drop feed lever to
"1
.5" .
50
1. Remove the material from the machine. For example, if the distance
• between the holes and select the appropriate
• pattern with the stitch width dial. At a slow speed, sew approximately 10 stitches. •• 6. Attach the button sewing foot. • 3. • • •
Hutton Sewmg
• 75/70/60...
Instruction Manual - Page 69

... the right or left or right side of zippers and can cause the needle to sew various types of the
zipper foot.
•• 5. The zipper foot is used to break.
1. Lower the presser foot lever and attach the presser foot holder to the Straight Stitch. • 2. Se~ from the bottom of the zipper toward...
Instruction Manual - Page 76

.... deur ou dans u? Remove the power supply plug from your local sewing machine dealer or service center.
•
<
G•ra•i•s•s•a•ge Smeren
••• 1.
Neem de machine af en reinig eventuele overtollige of oil at a fast speed without thread installed for a short
time . 5. •
Oiling
1. Giet 2 tot 3 druppels...
Instruction Manual - Page 79
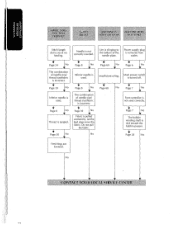
Lint is clinging to the bottom of needle size/
thread size/fabric is not used .
Foot controller is incorrect.
Page 30 No
Page 39
No
Fabric is tangled.
Page 8
No
Thread is pulled excessively. Stitch length dial is not correctly inserted.
Needle ...
Instruction Manual - Page 85
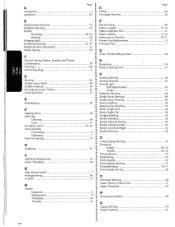
... : Oiling 68
Appliques 64 o Overedge Stitching 50
B
Balancing the Machine 10 Blindhem Stitching 45
0
p
Patchworking 49 Pattern Lengths 12-15
Bobbin
o Pattern Selection Dial 11
! Finishing a Seam 42-43 • Stretch Overlock (Left 50
Foot Controller
Stretch Overlock (Right 50
Connecting 6 Operati rtg 7 Free-Arm Sewing 10
o
• • •
Stretch Stitching 25...
Similar Questions


Switch Between Foot Pedal And Machine Not Making Contact....
Switch between foot pedal and machine not working
Switch between foot pedal and machine not working
(Posted by iverson 5 years ago)

How To Thread A Bobbin On A Bernette 56 Sewing Machine
(Posted by scannie2 9 years ago)

How To Sew A Stright Line On Abernina Bernette 56
What is the tension on all 3 dials for the B.B. 56 to sew a striaght line
What is the tension on all 3 dials for the B.B. 56 to sew a striaght line
(Posted by catakuhata 10 years ago)

Have A 817 With No Speed Control
Why does it just go fast and doesn't stop?
Why does it just go fast and doesn't stop?
(Posted by chuckstoa 11 years ago)