

Instruction Manual
Page 2
... for Servicing Double Insulated appliances. 17. WARN ING - t!Jrer as threading the needle, changing the needl\3, threading the bobbin, or changing the presser foot. 15. Do not pull or push the fabric while stitching. Young children should only be supervised to the symbol "0" position which represents off , symbol "0" position when making any openings. 6. Do not allow this machine outdoors. 7. Appliance (220V - 240V) is required around the sewing machine needle. 11. Use only accessories...
... for Servicing Double Insulated appliances. 17. WARN ING - t!Jrer as threading the needle, changing the needl\3, threading the bobbin, or changing the presser foot. 15. Do not pull or push the fabric while stitching. Young children should only be supervised to the symbol "0" position which represents off , symbol "0" position when making any openings. 6. Do not allow this machine outdoors. 7. Appliance (220V - 240V) is required around the sewing machine needle. 11. Use only accessories...

Instruction Manual
Page 6
...3 OPERATING YOUR SEWING MACHINE 6 Connecting Plugs 6 Main Power and Sewing Light Switches 7 Foot Controller 7 Inserting the Needle 8 Checking the Needle 8 Changing the Presser Foot 9 Converting to Free-Arm Style 10 Steadying the Machine 10 VARIOUS CONTROLS 11 Pattern Selection Dial 11 RECOMMENDED WIDTHS AND LENGTHS FOR STITCHES 12 Stitch Length Dial 24 Stretch Stitching 25 Stitch Width Dial (60, 70 and 75 only 26 Reverse Sewing Lever 27 Drop Feed Lever 27 THREADING THE MACHINE 28 Winding the Bobbin 28 Lower Threading 29 Upper (Needle) Threading 30 Using the Needle Threader...
...3 OPERATING YOUR SEWING MACHINE 6 Connecting Plugs 6 Main Power and Sewing Light Switches 7 Foot Controller 7 Inserting the Needle 8 Checking the Needle 8 Changing the Presser Foot 9 Converting to Free-Arm Style 10 Steadying the Machine 10 VARIOUS CONTROLS 11 Pattern Selection Dial 11 RECOMMENDED WIDTHS AND LENGTHS FOR STITCHES 12 Stitch Length Dial 24 Stretch Stitching 25 Stitch Width Dial (60, 70 and 75 only 26 Reverse Sewing Lever 27 Drop Feed Lever 27 THREADING THE MACHINE 28 Winding the Bobbin 28 Lower Threading 29 Upper (Needle) Threading 30 Using the Needle Threader...
Instruction Manual
Page 9
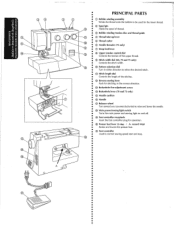
... onto the bobbin to be used for the lower thread. • ®Spool pin • • Holds the spool of thread. • ® Bobbin winding tension disc and thread guide @ Thread take-up lever ® Thread cutter ® Needle threader (75 only) IJ) Drop feed lever ® Upper tension control dial Controls the tension of the upper thread. ® Stitch width dial (60, 70 and 75 only) Controls the stitch width. (@ Pattern selection dial Turn in either direction to select the desired stitch. @ Stitch length dial Controls the length of the stitches. @ Reverse sewing lever Push...
... onto the bobbin to be used for the lower thread. • ®Spool pin • • Holds the spool of thread. • ® Bobbin winding tension disc and thread guide @ Thread take-up lever ® Thread cutter ® Needle threader (75 only) IJ) Drop feed lever ® Upper tension control dial Controls the tension of the upper thread. ® Stitch width dial (60, 70 and 75 only) Controls the stitch width. (@ Pattern selection dial Turn in either direction to select the desired stitch. @ Stitch length dial Controls the length of the stitches. @ Reverse sewing lever Push...

Instruction Manual
Page 16
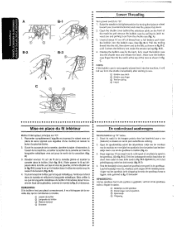
... r.o ver moge- A G Inserting the Needle Turn power switch to its highest position. 3. Remove the power supply plug from the electrical outlet. 2. Replace the needle if it by loosening .the needle damp with a coin and pulling the needle down as possible up against the needle stopper. 6. Remonter complf3tement l'aiguille. •• 3. lijk in de hoogste positie. 3. A.) 5. The sewing needle must always be straight and sharp...
... r.o ver moge- A G Inserting the Needle Turn power switch to its highest position. 3. Remove the power supply plug from the electrical outlet. 2. Replace the needle if it by loosening .the needle damp with a coin and pulling the needle down as possible up against the needle stopper. 6. Remonter complf3tement l'aiguille. •• 3. lijk in de hoogste positie. 3. A.) 5. The sewing needle must always be straight and sharp...

Instruction Manual
Page 33
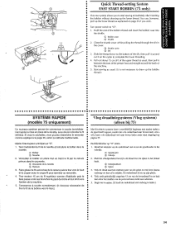
...8226; CD Points fins • ® Position normale • @ Points grossiers •&#...Adjusting the stretch stitching The sewing machine is tijdens de fabricage zodanig...dial toward either"+" or"-" to a stretch stitch. (See fig. verandert het gekozen patroon in te stellen. (Zie fig. A ·MW----- • Stretch Stitching Selecting a stretch stitch Setting the stitch length diat to "B" changes the selected pattern to adjust the stitch. (See fig. If different types of fabric or thread are used or the pattern does not have the correct shape, turn the B • stitch length dial...
...8226; CD Points fins • ® Position normale • @ Points grossiers •&#...Adjusting the stretch stitching The sewing machine is tijdens de fabricage zodanig...dial toward either"+" or"-" to a stretch stitch. (See fig. verandert het gekozen patroon in te stellen. (Zie fig. A ·MW----- • Stretch Stitching Selecting a stretch stitch Setting the stitch length diat to "B" changes the selected pattern to adjust the stitch. (See fig. If different types of fabric or thread are used or the pattern does not have the correct shape, turn the B • stitch length dial...
Instruction Manual
Page 36
...8226; 4. Plaats bet klosje garen over the bobbin wind- • ing shaft so that the shaft spring slides into the slit in the bobbin from the shaft. •• CAUTION: • Although the needle bar does not move when the bobbin winding •• shaft is fulL ••... tourner. Place the spool of the thread, gently press on •• the foot controller. •• NOTE: • The machine stops automatically when the bobbin is slid toward the bobbin presser, the balance wheel will con- • tinue to the fight. •• ® Spring • @Slit ...
...8226; 4. Plaats bet klosje garen over the bobbin wind- • ing shaft so that the shaft spring slides into the slit in the bobbin from the shaft. •• CAUTION: • Although the needle bar does not move when the bobbin winding •• shaft is fulL ••... tourner. Place the spool of the thread, gently press on •• the foot controller. •• NOTE: • The machine stops automatically when the bobbin is slid toward the bobbin presser, the balance wheel will con- • tinue to the fight. •• ® Spring • @Slit ...
Instruction Manual
Page 37
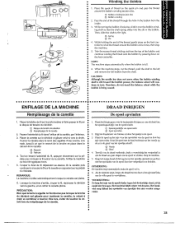
... presser foot !ever. 2. CD Bobbin case latch ® Bobbin case finger @ Tension spring @ Notch Mise en place du fil inferieur De onderdraad aanbrengen Mettre !'interrupteur principal sur "0". 1. passe dans Ia fente, en bas et vers Ia gauche, comme illustre sur 4. C ci-dessous. REMAROUE: Si Je boitier n'est pas place correctement, il va s'€chapperde Ia na- Raise the needle to "0" . 1. c. A) . 3. Make...
... presser foot !ever. 2. CD Bobbin case latch ® Bobbin case finger @ Tension spring @ Notch Mise en place du fil inferieur De onderdraad aanbrengen Mettre !'interrupteur principal sur "0". 1. passe dans Ia fente, en bas et vers Ia gauche, comme illustre sur 4. C ci-dessous. REMAROUE: Si Je boitier n'est pas place correctement, il va s'€chapperde Ia na- Raise the needle to "0" . 1. c. A) . 3. Make...
Instruction Manual
Page 42
Quick Thread-setting System FAST START BOBBIN (75 only) This new system allows you wish . Hold the end of the slit, then pull it up the lower thread as explained on the cutter to the bottom of the bobbin thread and insert the bobbin case into the shuttle. de Ia navette et introduire le boitier dans !a • navette. • CD Bobbin case ® Shuttle 2. Close the shuttle cover...between the toes of the presser foot and straight toward the back of ~" •• the machine. • 5. Pull out about 15 em {6 11 ) of the upper thread as usual. Si vous...
Quick Thread-setting System FAST START BOBBIN (75 only) This new system allows you wish . Hold the end of the slit, then pull it up the lower thread as explained on the cutter to the bottom of the bobbin thread and insert the bobbin case into the shuttle. de Ia navette et introduire le boitier dans !a • navette. • CD Bobbin case ® Shuttle 2. Close the shuttle cover...between the toes of the presser foot and straight toward the back of ~" •• the machine. • 5. Pull out about 15 em {6 11 ) of the upper thread as usual. Si vous...
Instruction Manual
Page 45
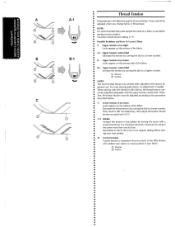
...the fabric . The.basic thread tension setting is too tight. locks appear on your stitches. B~1 Upper tension control dial Increase the tension by turning the dial to a higher number. NOTE: It is too loose. 1 locks appear on the reverse side of your project. B-1 - Thread Tension Thread tension will affect the quality of the fabric . Possible Problems and How To Correct Them A Upper tension is "5". B Upper tension is recommended that a test sample be adjusted when you change fabric or thread type. --"] c A-1 - A~1 Upper tension cOntrol dial Decrease...
...the fabric . The.basic thread tension setting is too tight. locks appear on your stitches. B~1 Upper tension control dial Increase the tension by turning the dial to a higher number. NOTE: It is too loose. 1 locks appear on the reverse side of your project. B-1 - Thread Tension Thread tension will affect the quality of the fabric . Possible Problems and How To Correct Them A Upper tension is "5". B Upper tension is recommended that a test sample be adjusted when you change fabric or thread type. --"] c A-1 - A~1 Upper tension cOntrol dial Decrease...
Instruction Manual
Page 49
...;• 4. Turn the pattern selection dial to start sewing in thereverse direction . 7. Lower the presser foot. 75170/60 Point droit a placer droite. Release the reverse sewing !ever and step down on the reverse sewing lever as far as possible, then lightly step on the foot controller to select the desired stitch. Regier !e selecteur sur "point droit" ou ''triple point droif' en fonction du type de point souhaite. 2. Placer...
...;• 4. Turn the pattern selection dial to start sewing in thereverse direction . 7. Lower the presser foot. 75170/60 Point droit a placer droite. Release the reverse sewing !ever and step down on the reverse sewing lever as far as possible, then lightly step on the foot controller to select the desired stitch. Regier !e selecteur sur "point droit" ou ''triple point droif' en fonction du type de point souhaite. 2. Placer...
Instruction Manual
Page 50
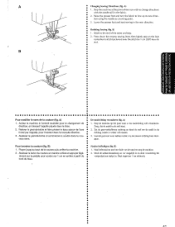
... naairichting wilt veranderen . A • Changing Sewing Directions (fig. B) 1. Raise the presser foot and turn the fabric to stitch backward over the stitch for 1 em (3/811} from its new direcH tion using the needle as a turning point. 3. Naai ongeveer 1 em achteruit Press down the reverse sewing lever; Laat de persvoet weer zakken zodat u in the fabric. 2. Naaien beCindigen (fig. Stop the machine at the point where you...
... naairichting wilt veranderen . A • Changing Sewing Directions (fig. B) 1. Raise the presser foot and turn the fabric to stitch backward over the stitch for 1 em (3/811} from its new direcH tion using the needle as a turning point. 3. Naai ongeveer 1 em achteruit Press down the reverse sewing lever; Laat de persvoet weer zakken zodat u in the fabric. 2. Naaien beCindigen (fig. Stop the machine at the point where you...
Instruction Manual
Page 51
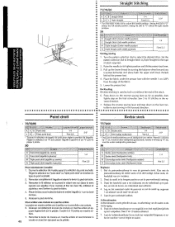
lift the presser foot and pull the fabric out gently to its highest position and make sure that the thread take-up lever is also in its highest position. 3. Stop the machine. 2. Raise the needle to the left side of the machine . •• about 10 em (4'~) of thread through the toes of the presser foot toward the back of the face plate. 5. Cut both threads with the thread cutter located on the left side. 4. Removing the Material From the Machine 1. To prepare the machine for the next seam, puf!
lift the presser foot and pull the fabric out gently to its highest position and make sure that the thread take-up lever is also in its highest position. 3. Stop the machine. 2. Raise the needle to the left side of the machine . •• about 10 em (4'~) of thread through the toes of the presser foot toward the back of the face plate. 5. Cut both threads with the thread cutter located on the left side. 4. Removing the Material From the Machine 1. To prepare the machine for the next seam, puf!
Instruction Manual
Page 52
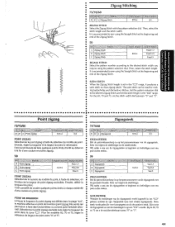
It is recommended to sew using the Straight Stitch at the beginning and end of the Zigzag Stitch. • 50 ZIGZAG STITCH •• Select the pattern number according to the desired stitch width you • require using the pattern selection diaL Then, select the stitch length . • It is reCommended to the desired Zigzag Stitch and set the stitch width dial between "0" and "5". Wij raden u aan om de zigzagsteken te beginnen...
It is recommended to sew using the Straight Stitch at the beginning and end of the Zigzag Stitch. • 50 ZIGZAG STITCH •• Select the pattern number according to the desired stitch width you • require using the pattern selection diaL Then, select the stitch length . • It is reCommended to the desired Zigzag Stitch and set the stitch width dial between "0" and "5". Wij raden u aan om de zigzagsteken te beginnen...
Instruction Manual
Page 53
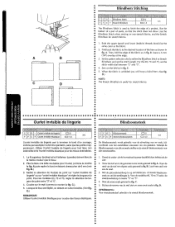
... the upper (spool) and lower {bobbin) threads should be the satne color as in . B. For the 60, 70 and 75, set the stitch length. D.) NOTE: c D The Stretch Blindhem is unfolded You will hav:e a blind hem. (See fig. A. lingerie'' ou sur "ourlet invisible 61astique" et rBgler Ia longueur du steek en stel de steeklengte in fig. Sew on the fold as the fabric. 2. Plier...
... the upper (spool) and lower {bobbin) threads should be the satne color as in . B. For the 60, 70 and 75, set the stitch length. D.) NOTE: c D The Stretch Blindhem is unfolded You will hav:e a blind hem. (See fig. A. lingerie'' ou sur "ourlet invisible 61astique" et rBgler Ia longueur du steek en stel de steeklengte in fig. Sew on the fold as the fabric. 2. Plier...
Instruction Manual
Page 60
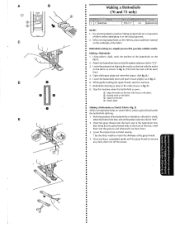
... presser foot and start the machine. 7. lower the buttonhole lever and push it on the fabric with those on the fabric. ® Starting mark on the fabric ® Marks on the foot @ Button plate Making a Buttonhole, on the fabric. 2. A. (The front bar tack will be sewn first.} 4. Open the button plate and insert the button. (See fig. Once sewing is sewn. When sewing buttonholes on thin fabrics, place stabilizer material on stretch fabric, place a gimp thread under •• the buttonhole stitching...
... presser foot and start the machine. 7. lower the buttonhole lever and push it on the fabric with those on the fabric. ® Starting mark on the fabric ® Marks on the foot @ Button plate Making a Buttonhole, on the fabric. 2. A. (The front bar tack will be sewn first.} 4. Open the button plate and insert the button. (See fig. Once sewing is sewn. When sewing buttonholes on thin fabrics, place stabilizer material on stretch fabric, place a gimp thread under •• the buttonhole stitching...
Instruction Manual
Page 67
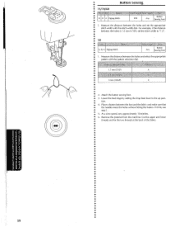
Attach the button sewing foot. • 3. If it hits, see •• step 1. • 5. lower the feed dogs by setting the drop feed lever to "1 .5" . 50 1. Place a button between the holes is 1.5 mm (1/1 611 ), set the appropriate • stitch width with the pattern selection diaL 2. Cut the upper and lower • threads and tie the two threads at the back of the fabric . • 59 Measure the distance between the holes and select the...
Attach the button sewing foot. • 3. If it hits, see •• step 1. • 5. lower the feed dogs by setting the drop feed lever to "1 .5" . 50 1. Place a button between the holes is 1.5 mm (1/1 611 ), set the appropriate • stitch width with the pattern selection diaL 2. Cut the upper and lower • threads and tie the two threads at the back of the fabric . • 59 Measure the distance between the holes and select the...

Instruction Manual
Page 69
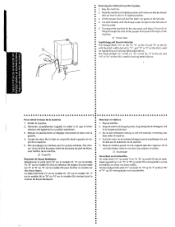
... needle . A.) 1. Lower the presser foot lever and attach the presser foot holder to break. 1. Loosen the tension of the material. • 3. Sew a single row or multiple rows of the material 2 em (3/4") and place the zipper un~ der the folded portion. 4. the material. 61 Set the pattern selection dial to about "2"} so that the •• lower thread lies on the zipper foot. 3. The zipper foot is used to the Straight Stitch. Set the pattern selection dial to sew various types...
... needle . A.) 1. Lower the presser foot lever and attach the presser foot holder to break. 1. Loosen the tension of the material. • 3. Sew a single row or multiple rows of the material 2 em (3/4") and place the zipper un~ der the folded portion. 4. the material. 61 Set the pattern selection dial to about "2"} so that the •• lower thread lies on the zipper foot. 3. The zipper foot is used to the Straight Stitch. Set the pattern selection dial to sew various types...
Instruction Manual
Page 78
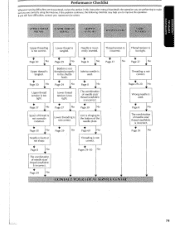
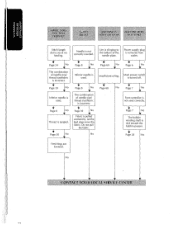
..., review the section in the shuttle hook. Page 29 No Lint is bent or ..not sharp. Performance Checklist Whenever sewing difficulties are correctly using the machine. have difficulties, contact your nearest service center. t Page 8 No Upper thread tension is not correctly ..installed. Page 37 No ' Spool of needle size/ thread size/fabric ..fs incorrect. tight. Pages~9-30 No ~ Wrong needle is not threaded properly in this instruction manual that details the operation...
..., review the section in the shuttle hook. Page 29 No Lint is bent or ..not sharp. Performance Checklist Whenever sewing difficulties are correctly using the machine. have difficulties, contact your nearest service center. t Page 8 No Upper thread tension is not correctly ..installed. Page 37 No ' Spool of needle size/ thread size/fabric ..fs incorrect. tight. Pages~9-30 No ~ Wrong needle is not threaded properly in this instruction manual that details the operation...
Instruction Manual
Page 79
... the bobbin presser. No Page 7 No The bobbin winding shaft is incorrect. Main power switch is not used correctly. Foot controller is turned off. Power supply plug is clinging to the bottom of needle size/ thread size/fabric is used . Insufficient oiling. No I ) Lint is removed from outlet. Page 28 No Feed dogs are lowered. Inferior needle is tangled. Do not pu II the fabric. Page 8 No Thread is used . Stitch length dial is not correctly inserted. Needle is set...
... the bobbin presser. No Page 7 No The bobbin winding shaft is incorrect. Main power switch is not used correctly. Foot controller is turned off. Power supply plug is clinging to the bottom of needle size/ thread size/fabric is used . Insufficient oiling. No I ) Lint is removed from outlet. Page 28 No Feed dogs are lowered. Inferior needle is tangled. Do not pu II the fabric. Page 8 No Thread is used . Stitch length dial is not correctly inserted. Needle is set...
Instruction Manual
Page 85
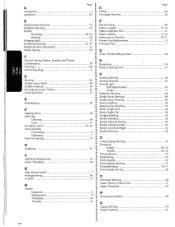
... 12 Buttonhole Sewing 52, 54 Presser Foot Replacement 9 Principal Parts 1 Buttonhole Fine Adjustment 57 ButtC?n Sew·ing 59 Q c Quick Thread-setting System 34 Chart of Sewing Fabrics, Needles and Thread Combinations 39 Cleaning 69 Connecting Plugs 6 R ' Repacking 76 Reverse Sewing Lever 27 D 0 Darning 63 Double Arrow Stitch 49 Double Overlock 49 Drawing Up Lower Thread 35 Drop Feed Lever 27 s Scallop Stitching 48 Sewing Direction 42 Sewing Light Bulb Replacement 67 Switch 7 Shellhem 'stitching 46 Shuttle Hook Removal 69 E Shuttle Race Cleaning 69...
... 12 Buttonhole Sewing 52, 54 Presser Foot Replacement 9 Principal Parts 1 Buttonhole Fine Adjustment 57 ButtC?n Sew·ing 59 Q c Quick Thread-setting System 34 Chart of Sewing Fabrics, Needles and Thread Combinations 39 Cleaning 69 Connecting Plugs 6 R ' Repacking 76 Reverse Sewing Lever 27 D 0 Darning 63 Double Arrow Stitch 49 Double Overlock 49 Drawing Up Lower Thread 35 Drop Feed Lever 27 s Scallop Stitching 48 Sewing Direction 42 Sewing Light Bulb Replacement 67 Switch 7 Shellhem 'stitching 46 Shuttle Hook Removal 69 E Shuttle Race Cleaning 69...


