

Instruction Manual
Page 2
... using and before using the sewing machine, basic safety precautions should only be used or where oxygen is not intended for use as threading the needle, changing the needl\3, threading the bobbin, or changing the presser foot. 15. Use only identical replacement parts. To reduce the risk of the air openings blocked...
... using and before using the sewing machine, basic safety precautions should only be used or where oxygen is not intended for use as threading the needle, changing the needl\3, threading the bobbin, or changing the presser foot. 15. Use only identical replacement parts. To reduce the risk of the air openings blocked...

Instruction Manual
Page 6
...only 26 Reverse Sewing Lever 27 Drop Feed Lever 27 THREADING THE MACHINE 28 Winding the Bobbin 28 Lower Threading 29 Upper (Needle) Threading 30 Using the Needle Threader (75 only 32 Quick Thread-setting System FAST START BOBBIN (75 only 34 Drawing Up Lower Thread (50, 60 and 70 only) ..... 35 Twin-...Needle Sewing (60, 70 and 75 only 36 Thread Tension 37 CHART OF SEWING FABRICS, NEEDLES AND THREAD COMBINATIONS 39 Making a Buttonhole (70 and 75 only 52 Making a Buttonhole (50 and 60 only 54 Buttonhole Fine Adjustment 57 Button Sewfng 59 , . ...
...only 26 Reverse Sewing Lever 27 Drop Feed Lever 27 THREADING THE MACHINE 28 Winding the Bobbin 28 Lower Threading 29 Upper (Needle) Threading 30 Using the Needle Threader (75 only 32 Quick Thread-setting System FAST START BOBBIN (75 only 34 Drawing Up Lower Thread (50, 60 and 70 only) ..... 35 Twin-...Needle Sewing (60, 70 and 75 only 36 Thread Tension 37 CHART OF SEWING FABRICS, NEEDLES AND THREAD COMBINATIONS 39 Making a Buttonhole (70 and 75 only 52 Making a Buttonhole (50 and 60 only 54 Buttonhole Fine Adjustment 57 Button Sewfng 59 , . ...
Instruction Manual
Page 9
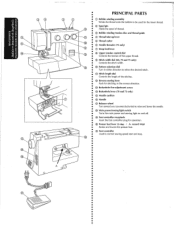
... (j) Bobbin winding assembly • • Winds the thread onto the bobbin to be used for the lower thread. • ®Spool pin • • Holds the spool of thread. • ® Bobbin winding tension disc and thread guide @ Thread take-up lever ® Thread cutter ® Needle threader (75 only) IJ) Drop ...feed lever ® Upper tension control dial Controls the tension of the upper thread. ® Stitch width dial (60, 70 and 75 only) Controls the stitch width. (@ Pattern selection dial Turn in either direction to select ...
... (j) Bobbin winding assembly • • Winds the thread onto the bobbin to be used for the lower thread. • ®Spool pin • • Holds the spool of thread. • ® Bobbin winding tension disc and thread guide @ Thread take-up lever ® Thread cutter ® Needle threader (75 only) IJ) Drop ...feed lever ® Upper tension control dial Controls the tension of the upper thread. ® Stitch width dial (60, 70 and 75 only) Controls the stitch width. (@ Pattern selection dial Turn in either direction to select ...

Instruction Manual
Page 33
.... If different types of naar "-"om de steek in - dien het patroon niet de juiste vonn heeft, draait u de knop of naar "+" of fabric or thread are used or the pattern does not have the correct shape, turn the B • stitch length dial out of in te stellen. (Zie fig.
.... If different types of naar "-"om de steek in - dien het patroon niet de juiste vonn heeft, draait u de knop of naar "+" of fabric or thread are used or the pattern does not have the correct shape, turn the B • stitch length dial out of in te stellen. (Zie fig.
Instruction Manual
Page 36
... que Ia barre aiguille ne fonctionne pas lorsque Ia broche raakt. lant lors du remplissage de Ia canette. 28 Place the spool of the thread, gently press on the foot con• troller to the fight. •• ® Spring • @Slit • 4. While holding the ...winden. While turning the bobbin clockwise, slide it over de horizontale klospen en voer de draad om het spanningsschijfje van de spoelwinder. Trim the excess thread sticking oUt from the shaft. •• CAUTION: • Although the needle bar does not move when the bobbin winding •• shaft...
... que Ia barre aiguille ne fonctionne pas lorsque Ia broche raakt. lant lors du remplissage de Ia canette. 28 Place the spool of the thread, gently press on the foot con• troller to the fight. •• ® Spring • @Slit • 4. While holding the ...winden. While turning the bobbin clockwise, slide it over de horizontale klospen en voer de draad om het spanningsschijfje van de spoelwinder. Trim the excess thread sticking oUt from the shaft. •• CAUTION: • Although the needle bar does not move when the bobbin winding •• shaft...
Instruction Manual
Page 37
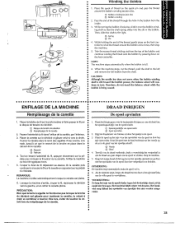
... soi pour le sortir de Ia coursiere. (fig. REMAROUE: Si Je boitier n'est pas place correctement, il va s'€chapperde Ia na- A B-2 8-3 c lower Threading Turn power switch to the left, as shown in fig. B-3) . 4. Ouvrir le couvercle de Ia navette, derriere !a table d'extension, a I 'encoche en haut ... position by the latch, fully insert the bobbin case into the notch at the top of thread from a full bobbin and insert the bobbin into the bobbin case. (See fig. 8-1.) Pull the trailing thread into the m.;tchine, it will fall out from the shuttle race (fig. I. B-1.) Trek...
... soi pour le sortir de Ia coursiere. (fig. REMAROUE: Si Je boitier n'est pas place correctement, il va s'€chapperde Ia na- A B-2 8-3 c lower Threading Turn power switch to the left, as shown in fig. B-3) . 4. Ouvrir le couvercle de Ia navette, derriere !a table d'extension, a I 'encoche en haut ... position by the latch, fully insert the bobbin case into the notch at the top of thread from a full bobbin and insert the bobbin into the bobbin case. (See fig. 8-1.) Pull the trailing thread into the m.;tchine, it will fall out from the shuttle race (fig. I. B-1.) Trek...

Instruction Manual
Page 38
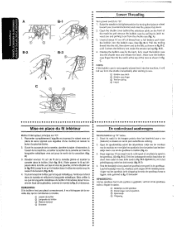
... pass it toward you and into the ey,elet. E. Pass the thread through the slit by pulling it behind the thread guide. ® Thread guide 7. Bring the thread through both thread guides: the rear one first, then the front one. (See fig. Bring the thread down and around •• to back and pull out about...
... pass it toward you and into the ey,elet. E. Pass the thread through the slit by pulling it behind the thread guide. ® Thread guide 7. Bring the thread through both thread guides: the rear one first, then the front one. (See fig. Bring the thread down and around •• to back and pull out about...

Instruction Manual
Page 40
Using the Needle Threader (75 only) Turn power switch to "0". 1. Turn the balance wheel toward you {counterclockwise) until the bottom of th~ needle holder aligns with the bottom of the needlethreading-hook holder. Lower the presser foot.lever. 2.
Using the Needle Threader (75 only) Turn power switch to "0". 1. Turn the balance wheel toward you {counterclockwise) until the bottom of th~ needle holder aligns with the bottom of the needlethreading-hook holder. Lower the presser foot.lever. 2.
Instruction Manual
Page 42
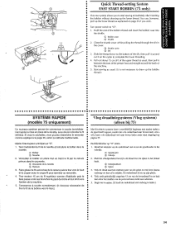
... • between the toes of the presser foot and straight toward the back of the slit, then pull it up the bobbin • thread.) SYSTEME RAPIDE •• (modele 75 uniquement) a ••• Ce nouveau systeme permet de commencer coudre i.mm8diate- • ment...Ia navette et introduire le boitier dans !a • navette. • You can, however, pull up the lower thread. Ot is not necessary to complete the lower threading . • 4. Quick Thread-setting System FAST START BOBBIN (75 only) This new system allows you wish . Pull out about 15 em {6...
... • between the toes of the presser foot and straight toward the back of the slit, then pull it up the bobbin • thread.) SYSTEME RAPIDE •• (modele 75 uniquement) a ••• Ce nouveau systeme permet de commencer coudre i.mm8diate- • ment...Ia navette et introduire le boitier dans !a • navette. • You can, however, pull up the lower thread. Ot is not necessary to complete the lower threading . • 4. Quick Thread-setting System FAST START BOBBIN (75 only) This new system allows you wish . Pull out about 15 em {6...

Instruction Manual
Page 43
...turn the balance wheel toward you and ~he lower thread will come • up again to their highest positions. 2. The upper •• thread should have caught the lower thread in a large loop . • 4. • • Drawing Up lower Thread (50, 60 and 70 only) 1. Pull ...out about 15 em (6~') of both threads and place them toward you (counterclockwise) until the needle...
...turn the balance wheel toward you and ~he lower thread will come • up again to their highest positions. 2. The upper •• thread should have caught the lower thread in a large loop . • 4. • • Drawing Up lower Thread (50, 60 and 70 only) 1. Pull ...out about 15 em (6~') of both threads and place them toward you (counterclockwise) until the needle...
Instruction Manual
Page 45
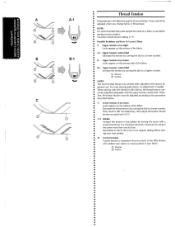
... number. Possible Problems and How To Correct Them A Upper tension is "5". B Upper tension is recommended that a test sample be adjusted when you change fabric or thread type. NOTE: It is too loose. 1 locks appear on the surface of your project...
... number. Possible Problems and How To Correct Them A Upper tension is "5". B Upper tension is recommended that a test sample be adjusted when you change fabric or thread type. NOTE: It is too loose. 1 locks appear on the surface of your project...

Instruction Manual
Page 47
... enrobe de eaton SSiectionner selon le tableau ci-dessus Ia tame de fil et le calibre d'aiguille adequats. 2. Use the same size thread for the upper (spool) and lower {bobbin) threads. #90/14 Cotton-Wrapped Polyester TABLEAU DES COMBINAISONS TISSUIAIGUILLE/FIL TRICOTS Tricot simple, double, jersey, tricot en general #90/14 REMARQUE...
... enrobe de eaton SSiectionner selon le tableau ci-dessus Ia tame de fil et le calibre d'aiguille adequats. 2. Use the same size thread for the upper (spool) and lower {bobbin) threads. #90/14 Cotton-Wrapped Polyester TABLEAU DES COMBINAISONS TISSUIAIGUILLE/FIL TRICOTS Tricot simple, double, jersey, tricot en general #90/14 REMARQUE...
Instruction Manual
Page 49
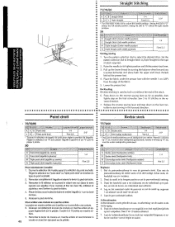
Raise the need!~ to Jock or reinforce the end of stitch required . 2. Pull up the .lower thread by turning the balance wheel toward you (counterclockwise) and place both the upper and lower threads behind the presser foot. 4. Remonter comph3tement !'aiguille et re!ev€r !e levier du pied-de-biche. 3. Pour arreter une couture...
Raise the need!~ to Jock or reinforce the end of stitch required . 2. Pull up the .lower thread by turning the balance wheel toward you (counterclockwise) and place both the upper and lower threads behind the presser foot. 4. Remonter comph3tement !'aiguille et re!ev€r !e levier du pied-de-biche. 3. Pour arreter une couture...
Instruction Manual
Page 51
Cut both threads with the thread cutter located on the left side. 4. Raise the needle to the left side of the machine . •• Removing the Material From the Machine 1. about 10 em (4'~) of thread through the toes of the presser foot toward the back of the face plate. 5. To prepare the machine for the next seam, puf! lift the presser foot and pull the fabric out gently to its highest position and make sure that the thread take-up lever is also in its highest position. 3. Stop the machine. 2.
Cut both threads with the thread cutter located on the left side. 4. Raise the needle to the left side of the machine . •• Removing the Material From the Machine 1. about 10 em (4'~) of thread through the toes of the presser foot toward the back of the face plate. 5. To prepare the machine for the next seam, puf! lift the presser foot and pull the fabric out gently to its highest position and make sure that the thread take-up lever is also in its highest position. 3. Stop the machine. 2.
Instruction Manual
Page 53
Both the upper (spool) and lower {bobbin) threads should be the satne color as shown in fig. For the 60, 70 and 75, set the stitch length. C. 5. Voorde model!en 60, 70 en ...
Both the upper (spool) and lower {bobbin) threads should be the satne color as shown in fig. For the 60, 70 and 75, set the stitch length. C. 5. Voorde model!en 60, 70 en ...
Instruction Manual
Page 56
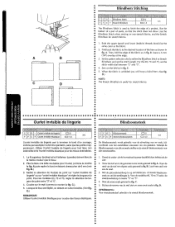
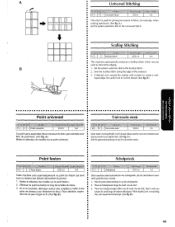
... pour festonner le tissu. Wees daarbij wei voorzichtig datu de draad niet doorknipt. (Zie fig. A HII... .IIIL. A.) Set the pattern selection dial to cut the thread. (See fig. 8.) • • • • • Point universe! Set the pattern selection dial to create a seal~ loped edge. lf desired, trim around the scallop...
... pour festonner le tissu. Wees daarbij wei voorzichtig datu de draad niet doorknipt. (Zie fig. A HII... .IIIL. A.) Set the pattern selection dial to cut the thread. (See fig. 8.) • • • • • Point universe! Set the pattern selection dial to create a seal~ loped edge. lf desired, trim around the scallop...
Instruction Manual
Page 60
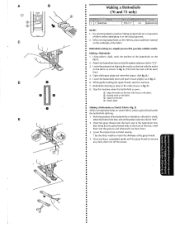
... of the foot, insert • them into the grooves and temporarily tie them there. •• 3. Once sewing is completed, gently pull the gimp thread to "CJ". 3. A. (The front bar tack will be sewn first.} 4. Lower the presser foot and start the machine. 7. Attach the buttonhole foot ... the pattern selection dial to the front of the fabric. When sewing buttonholes on thin fabrics, place stabilizer material on stretch fabric, place a gimp thread under •• the buttonhole stitching. • 1. CD Align the marks on the foot with those on the fabric. ® Starting mark...
... of the foot, insert • them into the grooves and temporarily tie them there. •• 3. Once sewing is completed, gently pull the gimp thread to "CJ". 3. A. (The front bar tack will be sewn first.} 4. Lower the presser foot and start the machine. 7. Attach the buttonhole foot ... the pattern selection dial to the front of the fabric. When sewing buttonholes on thin fabrics, place stabilizer material on stretch fabric, place a gimp thread under •• the buttonhole stitching. • 1. CD Align the marks on the foot with those on the fabric. ® Starting mark...
Instruction Manual
Page 67
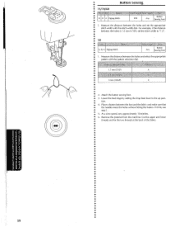
... the foot and the fabric and make sure that • the needle enters the holes without hitting the button. Cut the upper and lower • threads and tie the two threads at the back of the fabric . • 59
... the foot and the fabric and make sure that • the needle enters the holes without hitting the button. Cut the upper and lower • threads and tie the two threads at the back of the fabric . • 59

Instruction Manual
Page 69
... the stitch width dial to the Straight Stitch. • 2. Set the pattern selection dial to adjustthe needle position. the material. 61 Pull the lower thread{s) to select the B center needle position. When sewing the left or right pin on the zipper foot. (See fig. Lower the presser foot lever ...and attach the presser foot holder to about "2"} so that the •• lower thread lies on the zipper side of the foot for • best results. (See fig. B.) •• 6. Sew a single row or multiple rows of...
... the stitch width dial to the Straight Stitch. • 2. Set the pattern selection dial to adjustthe needle position. the material. 61 Pull the lower thread{s) to select the B center needle position. When sewing the left or right pin on the zipper foot. (See fig. Lower the presser foot lever ...and attach the presser foot holder to about "2"} so that the •• lower thread lies on the zipper side of the foot for • best results. (See fig. B.) •• 6. Sew a single row or multiple rows of...

Instruction Manual
Page 76
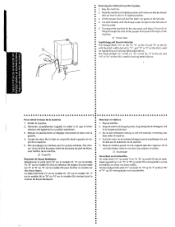
... machine coudre chez votre reven- Verwijder de stekker uit bet contact. 2. Neem de machine af en reinig eventuele overtollige of oil at a fast speed without thread installed for a short time . 5. OPMERKING: Indien de machine meer dan een uur per dag wordt gebruikt, dan dient deze eenmaal per week te worden gesmeerd...
... machine coudre chez votre reven- Verwijder de stekker uit bet contact. 2. Neem de machine af en reinig eventuele overtollige of oil at a fast speed without thread installed for a short time . 5. OPMERKING: Indien de machine meer dan een uur per dag wordt gebruikt, dan dient deze eenmaal per week te worden gesmeerd...


