
Bernina Bernette 56 Support Question
Bernina Bernette 56 Support Question
Find answers below for this question about Bernina Bernette 56.Need a Bernina Bernette 56 manual? We have 1 online manual for this item!
Question posted by nativitycollector on October 29th, 2012
Top Thread Breaks At End Of Stiching. Have To Rethread At The End Of Every Seam
Have followed each suggestion in the troubleshooting section of the manual.
Current Answers
Related Bernina Bernette 56 Manual Pages
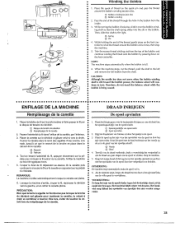
Instruction Manual - Page 2

Do not allow this manual. 3. Never drop or insert any object into water. Do not unplug by pulling on the double-insulated product.
·.. Always use a bent needle. 13. It may deflect the needle causing it to break. 12. Switch the sewing machine to be used as threading the needle, changing the needl\3, threading the bobbin, or...
Instruction Manual - Page 5
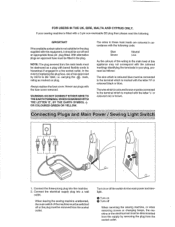
... live socket outlet.
Turn on or off
When servicing the sewing machine, or when removing covers or changing lamps, the machine or the electrical set must be switched off and an appropriate... the coloured markings identifying the terminals in your sewing machine is fitted with a 3 pin non-rewireable BS plug then please read the following code:
Blue Brown
Neutral Live
As the colours...
Instruction Manual - Page 6

... 24 Stretch Stitching 25 Stitch Width Dial (60, 70 and 75 only 26 Reverse Sewing Lever 27 Drop Feed Lever 27
THREADING THE MACHINE 28 Winding the Bobbin 28 Lower Threading 29 Upper (Needle) Threading 30 Using the Needle Threader (75 only 32 Quick Thread-setting System FAST START BOBBIN (75 only 34 Drawing Up Lower...
Instruction Manual - Page 14
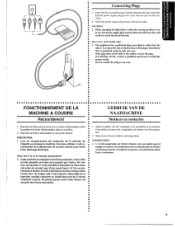
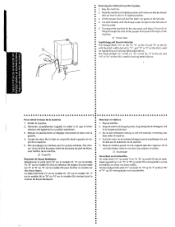
...NI•N•DE•E Raccordement ••• 1. Steck nude (stroom) stekker in de machine. VOORZICHTIG: 1. Insert the foot controller plug, located between the foot controller • and the ... •• CAUTION: • 1. When changing the light bulb or when the sewing machine is intended to avoid electrical hazards.
••• (for U.S.A. Brancher Ia fiche...
Instruction Manual - Page 17
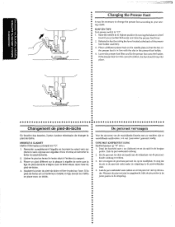
...bet uitvoeren van de verschil!ende functies met uw machine, zijn er verschillende naaldvoeten..., ook we! 'persvoeten' genoemd, nodig. Draai .het handwiel naar u toe (linksom) en zet de naald in de persvoethouder staat. 4.
•• Changing the Presser Foot
••• It may be necessary to change the presser foot according to your sew...
Instruction Manual - Page 18
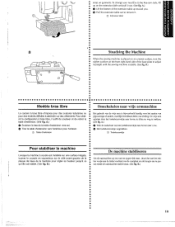
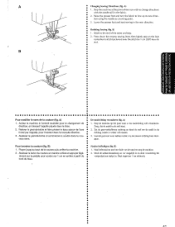
areas on the extension fable and pull it To change your machine to remove it out. (See fig. A.}
0 Uft the bottom of the extension table up toward you.
8 Pull the extension table out to the free"arm style, lift up on garments.
Instruction Manual - Page 33

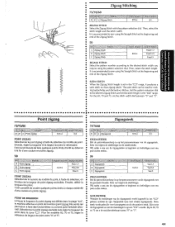
...van een elastir;;che steek Wanneer u de steeklengteknop instelt op ...... A.)
Adjusting the stretch stitching The sewing machine is tijdens de fabricage zodanig ingesteld dat de elastische steek in een elastische steek. (Zk fig..... not forcefully turn the
B
• stitch length dial out of fabric or thread are used or the pattern does not have the correct shape, turn the dial toward either"+" or"-"...
Instruction Manual - Page 36
...- lant lors du remplissage de Ia canette.
28 Place the spool of the thread, gently press on the spool pin and pass the thread around the bobbin a few times, then stop t •• the machine.
• 5. While holding the end of thread on the foot con• troller to the fight. •• ® Spring...
Instruction Manual - Page 40

Turn the balance wheel toward you {counterclockwise) until the bottom of th~ needle holder aligns with the bottom of the needlethreading-hook holder. Using the Needle Threader
(75 only)
Turn power switch to "0".
1. Lower the presser foot.lever.
2.
Instruction Manual - Page 42
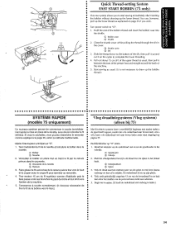
... (75 only)
This new system allows you to start sewing immediately after inserting the bobbin without drawing up the lower thread as explained on the cutter to complete the lower threading .
• 4. Hold the end of the slit, then pull it up the bobbin
• thread.)
SYSTEME RAPIDE
•• (modele 75 uniquement)
a ••...
Instruction Manual - Page 43

... and the needle to its highest position.
3. The upper
•• thread should have caught the lower thread in a large loop . • 4. • •
Drawing Up lower Thread
(50, 60 and 70 only)
1. With your left hand, hold the end of both threads and place them toward you (counterclockwise) until the needle moves down and...
Instruction Manual - Page 45
...
Decrease the tension by turning the dial to be made on a fabric scrap before sewing on the surface of your project.
locks appear on your stitches.
--"]
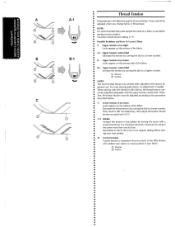
c
A-1
- Thread Tension
Thread tension will affect the quality of the fabric . The.basic thread tension setting is recommended that a test sample be adjusted when you change fabric or...
Instruction Manual - Page 49
... and lower threads behind the ...the
pattern selection dial to Jock or reinforce the end of stitch required . 2.
Remonter le levier ...Draai de naald in zo~ •• dat de machine vooruit begint te naaien. Leg nu het materiaal onder ...•• 7. e•
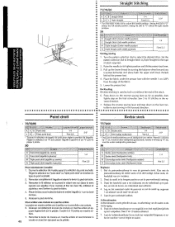
Straight Stitching
position .
50
Starting Sewing 1. Sew 5 to its highest position and lift the presser foot lever....
Instruction Manual - Page 50
... where you wish to the end of the seam and stop de machine. 2. Relever le pied-de-biche et faire pivoter le tissu auteur de l'axe
forme par l'aiguil!e, pour !'orienter dans Ia nouvelle direction.
gaan . Naai helemaal tot aan het einde van de naad en stop .
2. A
• Changing Sewing Directions (fig. A) • 1. lower...
Instruction Manual - Page 51
... gently to its highest position and make sure that the thread
take-up lever is also in its highest position. 3. To prepare the machine for the next seam, puf! Raise the needle to the left side of the machine .
•• about 10 em (4'~) of thread through the toes of the presser foot toward the...
Instruction Manual - Page 52
...sew using the Straight Stitch at the beginning and end of the Zigzag Stitch.
• 50
ZIGZAG STITCH
•• Select the pattern number according to the desired stitch width you • require using the Straight Stitch at the beginning and
• end...est dSfinie dans Ia plage "c::J", Ia machine effectue un point de bourdon (point zigzag tres s~rre) qui
a peut servir...
Instruction Manual - Page 60
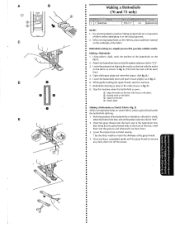
... bring the two gimp thread ends to match the diameter of the foot, insert
• them into the grooves and temporarily tie them there.
•• 3. Lower the presser foot and start the machine.
7. A
B
(j)...making is sewn. While gently holding the upper thread, start sewing. • * Set the stitch width to the front of the gimp thread .
•• 4. D.
8. lower ...
Instruction Manual - Page 69

... attach the presser foot holder to break.
1. Se~ from the bottom of the zipper toward the top on both sides. • The needle should be positioned on the zipper foot.
(See fig. Pull the lower thread{s) to the left or right pin on the zipper foot. When sewing the right side of the...
Instruction Manual - Page 76

... die zijn aangegeven
met de pijlen. 4. Neem de machine af en reinig eventuele overtollige of oil at a fast speed without thread installed for a short
time . 5. Remove the needle...fl6ches. Verwijder de stekker uit bet contact.
2. Remove the power supply plug from your local sewing machine dealer or service center.
•
<
G•ra•i•s•s•a•ge Smeren
...
Instruction Manual - Page 84
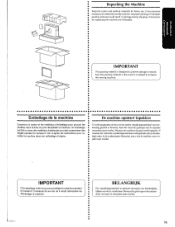
...; this packing material in damage during shipping. Improper packing or improper
• packing material could result in the event it is needed to reship the sewing machine.
Wanneer de machine niet goe.d wordt ingepakt, of verzonden moet worden .
76 BELANGRIJK
Dit verpakkingsmateriaal is designed to prevent damage in transit. • SaVe this...
Similar Questions

Hand Wheel With Undue Resistance.
When manually advancing the needle downward it requires extra force and too much force for the motor...
When manually advancing the needle downward it requires extra force and too much force for the motor...
(Posted by alankutsch 3 years ago)

Stitching Problems
The top thread is bunching up on the underneah of the garment, snagging and gathering within 10 stic...
The top thread is bunching up on the underneah of the garment, snagging and gathering within 10 stic...
(Posted by oneillmary 4 years ago)

New Bulb Not Working In Sewing Machine Bernette 12 What Can It Be
(Posted by Anonymous-152221 8 years ago)

How To Thread A Bobbin On A Bernette 56 Sewing Machine
(Posted by scannie2 9 years ago)
My Sewing Machine Bernette 15 Stops Working
After 1 day using my Bernette 15 stops working - engine hoots but doesn't rotate spindle and hand wh...
After 1 day using my Bernette 15 stops working - engine hoots but doesn't rotate spindle and hand wh...
(Posted by sgrayxx 12 years ago)