
Bernina Bernette 56 Support Question
Bernina Bernette 56 Support Question
Find answers below for this question about Bernina Bernette 56.Need a Bernina Bernette 56 manual? We have 1 online manual for this item!
Question posted by veronique3026 on July 21st, 2022
Pressure Foot Pressure
The pressure foot pressure is stuck and won't adjust up or down
Current Answers
Answer #1: Posted by SonuKumar on July 21st, 2022 8:21 AM
SonuKumar

Member since:
May 9th, 2021 Points: 16,622,780

Member since:
May 9th, 2021 Points: 16,622,780
https://www.manualslib.com/manual/389102/Bernina-Bernette-56.html?page=77#manual
follow cleaning process can help you
Please respond to my effort to provide you with the best possible solution by using the "Acceptable Solution" and/or the "Helpful" buttons when the answer has proven to be helpful.
Regards,
Sonu
Your search handyman for all e-support needs!!
Related Bernina Bernette 56 Manual Pages
Instruction Manual - Page 2

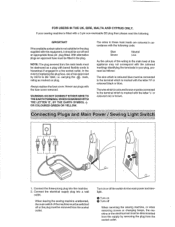
...intended use ." Never operate this sewing machine only for household use as contained in . Keep the ventilation openings of the sewing machine and foot controller free from the accumulation of ...pulling on the cord. Return the sewing machine to the symbol "0" position which represents off , symbol "0" position when making any adjustments in this machine outdoors. 7. To disconnect, turn the...
Instruction Manual - Page 5
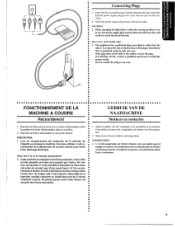
...with the following . Connect the electrical supply plug into the machine. 2. When leaving the sewing machine unattended, the main switch ofthe machine must be switched off or the plug must be connected to... this appliance may not correspond with the coloured markings identifying the terminals in your sewing machine is hazardous if engaged in the plug.
The wire which is marked with bared...
Instruction Manual - Page 6

...SEWING MACHINE 6 Connecting Plugs 6 Main Power and Sewing Light Switches 7 Foot Controller 7 Inserting the Needle 8 Checking the Needle 8 Changing the Presser Foot 9 Converting to Free-Arm Style 10 Steadying the Machine... Reverse Sewing Lever 27 Drop Feed Lever 27
THREADING THE MACHINE 28 Winding...Twin-Needle Sewing (60, 70 and 75 only 36 Thread Tension 37 CHART OF SEWING FABRICS, NEEDLES...
Instruction Manual - Page 14
...aansluiting in het stopcontact. Steck nude (stroom) stekker in de machine.
When changing the light bulb or when the sewing machine is wider than the • other). et le Canada ...etectrique.
•• (Pour les E.-U. Stekkers en contacten
J. Insert the foot controller plug, located between the foot controller • and the power supply plug on the cord, into an electrical...
Instruction Manual - Page 15
mark)
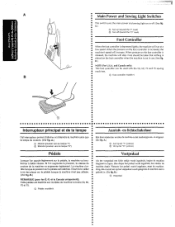
® Turn off . (See fig. A.)
(j) Turn on ·or off (toward the"!" A
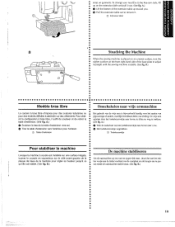
Main Power and Sewing Light Switches
This switch turns the main power and sewing light on (toward the "0" mark)
Foot Controller
When the foot controller is depressed lightly, the ma
Instruction Manual - Page 17
...persvoet vervangen
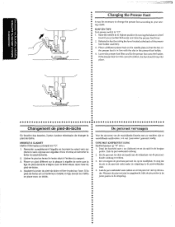
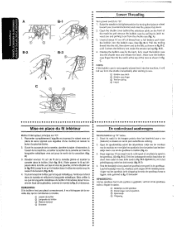
Voor bet uitvoeren van de verschil!ende functies met uw machine, zijn er verschillende naaldvoeten, ook we! 'persvoeten' genoemd, ...foot is in line with the slot in the presser'foot holder.
• 4.
Trek d~ persvoethendel omhoog. 2. •• Changing the Presser Foot
••• It may be necessary to change the presser foot according to your sew...
Instruction Manual - Page 18
A.}
0 Uft the bottom of the extension table up on garments. To change your machine to the free"arm style, lift up toward you.
8 Pull the extension table out to remove it out. (See fig. areas on the extension fable and pull it
Instruction Manual - Page 33

... •• Reglage de Ia couture en points 81astiques
• a A Ia sortfe d'usfne, Ia machine coudre est r9gl€e de sorte que Ia • a piqOre en points e!astiques se fasse Ia...toward either"+" or"-" to a stretch stitch. (See fig.
Do; A.)
Adjusting the stretch stitching The sewing machine is tijdens de fabricage zodanig ingesteld dat de elastische steek in een elastische steek...
Instruction Manual - Page 37
...(counterclockwise) and raise the presser foot !ever.
2.
Remonter comp19tement l'aiguille...
liggen, zoals getoond in fig.
A
B-2
8-3
c
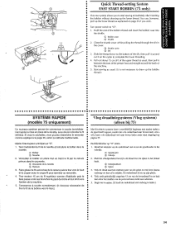
lower Threading
Turn power switch to sew. A) .
3. A)
3. a dans Ia navette et relacher Ia languette metallique. c....hieronder. C ci-dessous. B-3) .
4. I 'avant de Ia machine, et retirer Je bonier de Ia canette en tirant Ia
Hoofdschakelaar ...
Instruction Manual - Page 40

Turn the balance wheel toward you {counterclockwise) until the bottom of th~ needle holder aligns with the bottom of the needlethreading-hook holder. Lower the presser foot.lever.
2. Using the Needle Threader
(75 only)
Turn power switch to "0".
1.
Instruction Manual - Page 42
...Slit
3. Pull
out
about
15
em
{6
11 )
of
~" •• the machine.
• 5. Tenir l'extrSmite du fi! You can, however, pull up and
• cut it
• between ...the toes of the presser foot and straight toward the back of
the
upper
thread
as
usual,
then
pull
it on page 35 if you to start sewing immediately after inserting the bobbin without drawing...
Instruction Manual - Page 49
... for the type
of the stitch .
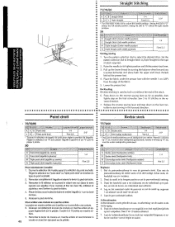
6. Backtacking
Reverse sti'tching is used to start sewing in thereverse direction .
7. Remonter le fil inf€rieur en toumant le volant vers soi...biche.
3.
a 7. Draai de naald in zo~ •• dat de machine vooruit begint te naaien. Lower the presser foot.
75170/60
Point droit
a placer droite.
Pull up the .lower thread by ...
Instruction Manual - Page 50
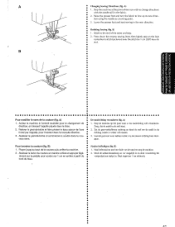
...; 1. lower the presser foot and start sewing in de nieuwe richting kunt door- B)
1. Piquer jusqu'au bout de Ia couture puis arreter Ia machine. 2. A) L Stop de machine op het punt waar u...voetpedaal een stukje in the fabric.
2. A}
a 1.
A
• Changing Sewing Directions (fig.
Stop the machine at the point where you wish to line up its end .
••...
Instruction Manual - Page 51
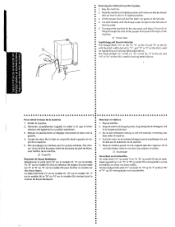
...threads with the thread cutter located on the left side.
4. Stop the machine. 2. lift the presser foot and pull the fabric out gently to its highest position and make sure ... of thread through the toes of the presser foot toward the back of the face plate.
5. To prepare the machine for the next seam, puf! Removing the Material From the Machine 1. Raise the needle to the left side of...
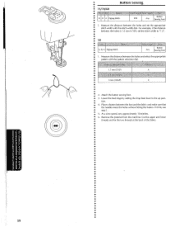
Instruction Manual - Page 60
...will be sewn
first.}
4. Stop the machine when the buttonhole is recommended to remove
any slack, then trim off the excess. CD Align the marks on the foot with the marks on the actual garment.... process that provides reliable results. C.
6. Once sewing is done in the order shown in fig. While gently holding the upper thread, start sewing. • * Set the stitch width to the...
Instruction Manual - Page 62
...sewing buttonholes on thin fabrics, place stabilizer material
• •
on the fabric .
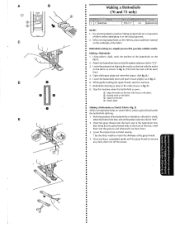
• 2. Making a Buttonhole (50 and 60 only)
NOTE:
•• 1. Attach the buttonhole foot, then slide the outside frame of the but-
~ • tonhole foot.... Place the fabric under the
• • •
presser foot so that the center of the front bar tack mark is a simple...
Instruction Manual - Page 63

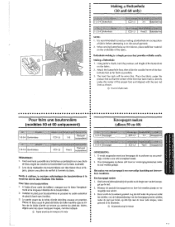
... of the stitch,
then raise the needle from the material.
1. Turn the pattern selection dial to "4". 2. Arreter Ia machine !orsque l'algui!!e se trouve a droite des points et !ever l'aiguille du tissu.
1. lower the presser foot and sew 5 to "2". 2. Sew the predetermined length of the stitches,
then raise the needle from the material.
1. Stop the...
Instruction Manual - Page 67
... between the foot and the fabric and make sure that • the needle enters the holes without hitting the button. Remove the material from the machine. At a slow speed, sew approximately 10 ... the appropriate
• stitch width with the pattern selection diaL
2. Attach the button sewing foot. • 3. lower the feed dogs by setting the drop feed lever to
"1
.5" .
50
1....
Instruction Manual - Page 76

... snelheid draaien zonder dat
er een draad is verkrijgbaar bij uw plaatselijke Jeverancier of service"centrum.
68
l. Remove the needle plate and the face plate. 3. Sewing machine oil is 'used more than one hour a day. Giet 2 tot 3 druppels olie in elk van de smeerpunten die zijn aangegeven
met de pijlen. 4. Apn&s le...
Instruction Manual - Page 84
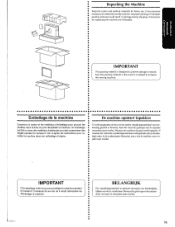
... verkeerde verpakkingsmateriaal wOrdt gebruikt, kan ze beschadigd raken.ln de onderstaande illustraties ziet u, hoe de machine weer verpakt moet worden. It may become •• necessary to prevent damage in transit. • SaVe this sewing machine.
Emballage de Ia machine ••• ConseiVer !e carton et les materiaux d'emballage pour pouvoir les
• reutiliser...
Similar Questions

My Material Stopped Feeding The Fabric Through.
(Posted by themoores0819 3 years ago)

Hand Wheel With Undue Resistance.
When manually advancing the needle downward it requires extra force and too much force for the motor...
When manually advancing the needle downward it requires extra force and too much force for the motor...
(Posted by alankutsch 3 years ago)

New Bulb Not Working In Sewing Machine Bernette 12 What Can It Be
(Posted by Anonymous-152221 8 years ago)

How To Thread A Bobbin On A Bernette 56 Sewing Machine
(Posted by scannie2 9 years ago)
My Sewing Machine Bernette 15 Stops Working
After 1 day using my Bernette 15 stops working - engine hoots but doesn't rotate spindle and hand wh...
After 1 day using my Bernette 15 stops working - engine hoots but doesn't rotate spindle and hand wh...
(Posted by sgrayxx 12 years ago)