
Bernina Bernette 56 Support Question
Bernina Bernette 56 Support Question
Find answers below for this question about Bernina Bernette 56.Need a Bernina Bernette 56 manual? We have 1 online manual for this item!
Question posted by Akoala81 on October 26th, 2022
How Much Is A Benette 56
The person who posted this question about this Bernina product did not include a detailed explanation. Please use the "Request More Information" button to the right if more details would help you to answer this question.
Current Answers
Answer #1: Posted by SonuKumar on October 27th, 2022 9:36 AM
SonuKumar

Member since:
May 9th, 2021 Points: 16,596,890

Member since:
May 9th, 2021 Points: 16,596,890
This item can only be purchased locally at our retail locations.
https://www.sewingmachinesplus.com/bernette_56.php
Note : - Do not prefer ebay mostly issue with the products not working properly found on ebay
Please respond to my effort to provide you with the best possible solution by using the "Acceptable Solution" and/or the "Helpful" buttons when the answer has proven to be helpful.
Regards,
Sonu
Your search handyman for all e-support needs!!
Answer #2: Posted by HelpHero on October 26th, 2022 11:45 PM
HelpHero

Member since:
September 3rd, 2022 Points: 523,390
Member since:
September 3rd, 2022 Points: 523,390
It is 125 dollar at
https://www.ebay.com/itm/384711475841
I hope this is helpful? PLEASE "ACCEPT" and mark it "HELPFUL" to complement my little effort. Hope to bring you more detailed answers.
Helphero
Related Bernina Bernette 56 Manual Pages
Instruction Manual - Page 2

... aerosol (spray) products are provided instead of the system and should a means for Servicing Double Insulated appliances. 17. Do not operate this sewing machine. Do not use this sewing machine from outlet. 9. Replacement parts for examination, repair, electrical or mechanical adjustment. 4.
Use only accessories recommended by qualified service personnel. Keep the ventilation...
Instruction Manual - Page 5
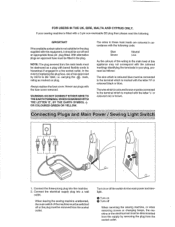
....
OR COLOURED GREEN OR YELLOW.
-
The wire which is coloured brown must be destroyed as a plug with the coloured markings identifying the terminals in your sewing machine is fitted with this appliance may not correspond with bared flexible cords is marked with the fuse cover removed. carrying the ~ mark, rating as follows...
Instruction Manual - Page 6

...76
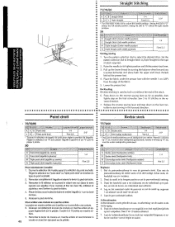
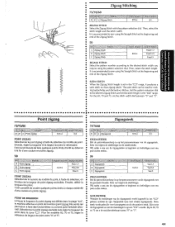
Straight Stitching 41 Zigzag Stitching 44
Blindhem Stitching 45 Shell hem Stitching 46 3-Step Zigzag Stitching 47 .
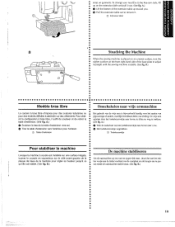
PRINCIPAL PARTS 1
ACCESSORIES 3
OPERATING YOUR SEWING MACHINE 6 Connecting Plugs 6 Main Power and Sewing Light Switches 7 Foot Controller 7 Inserting the Needle 8 Checking the Needle 8 Changing the Presser Foot 9 Converting to Free-Arm Style 10 Steadying the...
Instruction Manual - Page 14
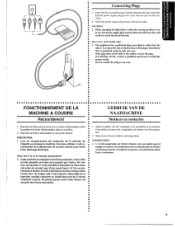
...Ia prise. VOORZICHTIG: 1. Steck nude (stroom) stekker in de machine. Ne jamais passer outre cette mesure de • securite des ...machine. •• a 2. Deze stekker zit tussen bet voetpedaal en de stekker voor het stopcontact.
2. Brancher Ia fiche d'alimentation une prise secteur. • PRECAUTION:
•• 1. When changing the light bulb or when the sewing machine...
Instruction Manual - Page 15
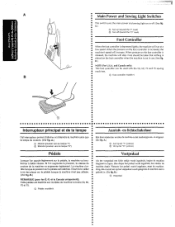
mark)
® Turn off . (See fig. A.)
(j) Turn on ·or off (toward the"!" A
Main Power and Sewing Light Switches
This switch turns the main power and sewing light on (toward the "0" mark)
Foot Controller
When the foot controller is depressed lightly, the ma
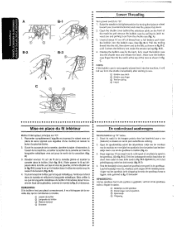
Instruction Manual - Page 17
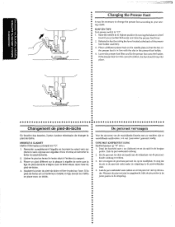
... du pied-de-blche.
4. De persvoet vervangen
Voor bet uitvoeren van de verschil!ende functies met uw machine, zijn er verschillende naaldvoeten, ook we! 'persvoeten' genoemd, nodig. TYPE MET KNIPBEVEST!GlNG Hoofdschakelaar op ... Foot
••• It may be necessary to change the presser foot according to your sew-
• ing needs.
•• SNAP-ON TYPE
• Turn power switch to ...
Instruction Manual - Page 18
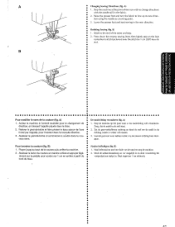
areas on the extension fable and pull it To change your machine to remove it out. (See fig. A.}
0 Uft the bottom of the extension table up toward you.
8 Pull the extension table out to the free"arm style, lift up on garments.
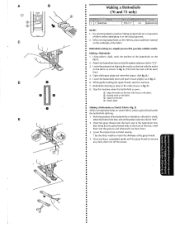
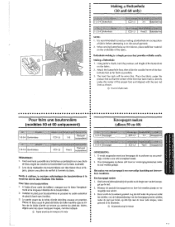
Instruction Manual - Page 33

...;• Reglage de Ia couture en points 81astiques
• a A Ia sortfe d'usfne, Ia machine coudre est r9gl€e de sorte que Ia • a piqOre en points e!astiques se fasse...verschillende stoffen of draad of naar "-"om de steek in - A.)
Adjusting the stretch stitching The sewing machine is tijdens de fabricage zodanig ingesteld dat de elastische steek in een elastische steek. (Zk fig...
Instruction Manual - Page 37
...fig.
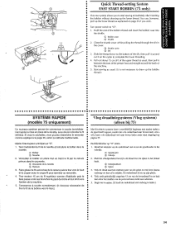
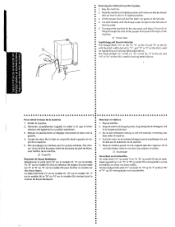
a dans Ia navette et relacher Ia languette metallique. a vette des qu'on the front of the machine and remove the bobbin case by turning the balance wheel toward you (counterclockwise) and raise the presser foot !ever...case by the latch, fully insert the bobbin case into the slot, then down and to sew. D€vider environ 10 em de fil de Ia canette pleine et ins9rer Ia
sleuf, ...
Instruction Manual - Page 40

Using the Needle Threader
(75 only)
Turn power switch to "0".
1. Turn the balance wheel toward you {counterclockwise) until the bottom of th~ needle holder aligns with the bottom of the needlethreading-hook holder. Lower the presser foot.lever.
2.
Instruction Manual - Page 42
... the toes of the presser foot and straight toward the back of
~" •• the machine.
• 5.
Hold the end of
the
upper
thread
as usual. de Ia navette et ...introduire le boitier dans !a
• navette. • Turn power switch to start sewing immediately after inserting the bobbin without drawing up the bobbin
• thread.)
SYSTEME RAPIDE
•&#...
Instruction Manual - Page 49
... de drievoudige rechte steek, af¥ • hankelijk van uw voorkeur. • 2. Backtacking
Reverse sti'tching is used to start sewing in thereverse direction .
7. Pour arreter une couture en marche arribre
a a La piqOre en marche arriere sert arreter au consolider une couture... stitch.
Stel de patroonkeuze·knop in zo~ •• dat de machine vooruit begint te naaien.
Instruction Manual - Page 50
... foot and turn the fabric to change directions
• with the needle still in the new direction.
• Finishing Sewing (fig. veau sens. Piquer jusqu'au bout de Ia couture puis arreter Ia machine. 2.
Naai helemaal tot aan het einde van de naad en stop .
2. then lightly step on the foot controller...
Instruction Manual - Page 51
... make sure that the thread
take-up lever is also in its highest position. 3. Raise the needle to the left side of the machine .
•• To prepare the machine for the next seam, puf! about 10 em (4'~) of thread through the toes of the presser foot toward the back of the...
Instruction Manual - Page 52
...CJ"-waarde. Kies vervolgens de steeklengte. Satijnsteek (een zeer smalle zigzagsteek). It is recommended to sew using the Straight Stitch at the beginning and end of the Zigzag Stitch.
• 50
.... POINT DE BOURDON
Lorsque Ia longueur du point zigzag est dSfinie dans Ia plage "c::J", Ia machine effectue un point de bourdon (point zigzag tres s~rre) qui
a peut servir faire des ...
Instruction Manual - Page 56
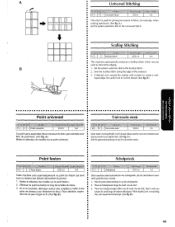
...Set the pattern selection dial to create a seal~
loped edge. SeW the Scallop Stitch along the edge of fabric, for joining two ... trim around the scallop with scissors to the Universal Stitch.
• •
• • •
This machine automatically produces a Scallop Stitch which may be used for example, when
making patchwork. {See fig. Wees daarbij wei voorzichtig ...
Instruction Manual - Page 60
...Lower the presser foot and start the machine.
7. Making a Buttonhole 1. Buttonhole stitching is sewn. Stop the machine when the buttonhole is done in the order shown in fig. E) When sewing buttonholes on the actual garment. 2. ....
•• 4. B.)
5. While gently holding the upper thread, start sewing. • * Set the stitch width to remove
any slack, then trim off...
Instruction Manual - Page 62
... recommended to practice making is directly under the
• • •
presser foot so that provides reliable results.
•• Making a Buttonhole
•• 1. When sewing buttonholes on thin fabrics, place stabilizer material
• •
on the underside of the fabric .
•• Buttonhole-making a buttonhole on the fabric .
• 2. Place...
Instruction Manual - Page 76

... hoge snelheid draaien zonder dat
er een draad is verkrijgbaar bij uw plaatselijke Jeverancier of gemorste olie.
Remove the power supply plug from your local sewing machine dealer or service center.
•
<
G•ra•i•s•s•a•ge Smeren
••• 1. Bij nog intensiever gebruik van de...
Instruction Manual - Page 84
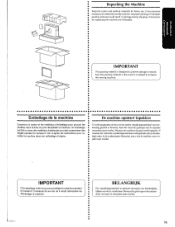
...;• necessary to transport
tJ • this packing material in damage during shipping. IMPORTANT This packing materia! BELANGRIJK
Dit verpakkingsmateriaal is needed to reship the sewing machine. Bewaar het goed ingeval de naaimachine vervoerd of wanneer het verkeerde verpakkingsmateriaal wOrdt gebruikt, kan ze beschadigd raken.ln de onderstaande illustraties ziet u, hoe de...
Similar Questions


New Bulb Not Working In Sewing Machine Bernette 12 What Can It Be
(Posted by Anonymous-152221 8 years ago)

How To Thread A Bobbin On A Bernette 56 Sewing Machine
(Posted by scannie2 9 years ago)

How To Sew A Stright Line On Abernina Bernette 56
What is the tension on all 3 dials for the B.B. 56 to sew a striaght line
What is the tension on all 3 dials for the B.B. 56 to sew a striaght line
(Posted by catakuhata 10 years ago)

My Sewing Machine Bernette 15 Stops Working
After 1 day using my Bernette 15 stops working - engine hoots but doesn't rotate spindle and hand wh...
After 1 day using my Bernette 15 stops working - engine hoots but doesn't rotate spindle and hand wh...
(Posted by sgrayxx 12 years ago)