
Bernina Bernette 56 Support Question
Bernina Bernette 56 Support Question
Find answers below for this question about Bernina Bernette 56.Need a Bernina Bernette 56 manual? We have 1 online manual for this item!
Question posted by meera59 on November 4th, 2022
Fixing Pressure Foot Of E56 Bernette Machine
how to fix picot pressure foot
Current Answers
Answer #1: Posted by SonuKumar on November 4th, 2022 6:39 AM
SonuKumar

Member since:
May 9th, 2021 Points: 16,598,000

Member since:
May 9th, 2021 Points: 16,598,000
https://www.manualslib.com/manual/389102/Bernina-Bernette-56.html
follow - Table of content
Please respond to my effort to provide you with the best possible solution by using the "Acceptable Solution" and/or the "Helpful" buttons when the answer has proven to be helpful.
Regards,
Sonu
Your search handyman for all e-support needs!!
Related Bernina Bernette 56 Manual Pages
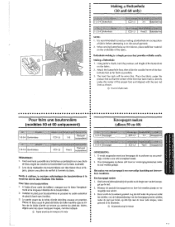
Instruction Manual - Page 2

... following:
"Read all moving parts. Keep the ventilation openings of the sewing machine and foot controller free from the electrical outlet immediately after using and before using the sewing machine, basic safety precautions should always be identical to break. 14. "SAVE THESE INSTRUCTIONS" "This sewing machine is marked on a doubleinsulated product nor should be added to the...
Instruction Manual - Page 5
... cover removed.
IMPORTANT
If the available socket outlet is fitted with this appliance may not correspond with the coloured markings identifying the terminals in your sewing machine is not suitable for the main power and sewlight.
0 Turn on plug. carrying the ~ mark, rating as a plug with bared flexible cords is marked with...
Instruction Manual - Page 6

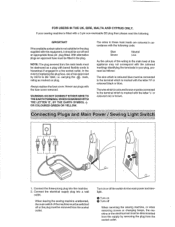
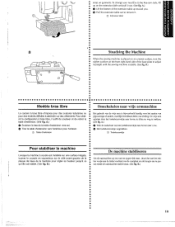
USING ATTACHMENTS AND APPLICATIONS · . PRINCIPAL PARTS 1
ACCESSORIES 3
OPERATING YOUR SEWING MACHINE 6 Connecting Plugs 6 Main Power and Sewing Light Switches 7 Foot Controller 7 Inserting the Needle 8 Checking the Needle 8 Changing the Presser Foot 9 Converting to Free-Arm Style 10 Steadying the Machine 10
VARIOUS CONTROLS 11 Pattern Selection Dial 11 RECOMMENDED WIDTHS AND ...
Instruction Manual - Page 14
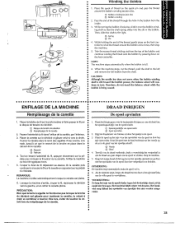
... Ia prise.
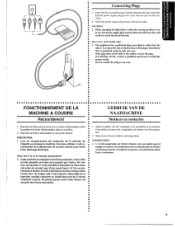
Insert the foot controller plug, located between the foot controller • and the power supply plug on the ma• chine .
•• 2. Cette machine est equipee d'une fiche ...;• Connecting Plugs ••• 1. When changing the light bulb or when the sewing machine is wider than the • other). To reduce the risk of wanneer de naaimachine niet wordt...
Instruction Manual - Page 15
A
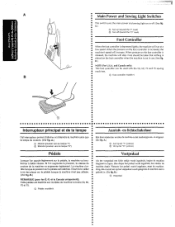
Main Power and Sewing Light Switches
This switch turns the main power and sewing light on (toward the "0" mark)
Foot Controller
When the foot controller is depressed lightly, the ma mark)
® Turn off . (See fig. A.)
(j) Turn on ·or off (toward the"!"
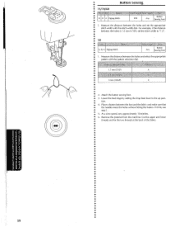
Instruction Manual - Page 17
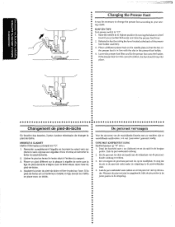
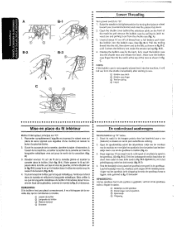
...Voor bet uitvoeren van de verschil!ende functies met uw machine, zijn er verschillende naaldvoeten, ook we! 'persvoeten' genoemd.... Lower the presser foot lifter and fix the presser foot onto the holder.
•• lf the presser foot is in de uitsparing...8226; Changing the Presser Foot
••• It may be necessary to change the presser foot according to your sew-
• ing needs....
Instruction Manual - Page 18
To change your machine to remove it out. (See fig. A.}
0 Uft the bottom of the extension table up toward you.
8 Pull the extension table out to the free"arm style, lift up on garments. areas on the extension fable and pull it
Instruction Manual - Page 33

...A.) •• Reglage de Ia couture en points 81astiques
• a A Ia sortfe d'usfne, Ia machine coudre est r9gl€e de sorte que Ia • a piqOre en points e!astiques se fasse Ia position ...selected pattern to adjust the stitch. (See fig. A.)
Adjusting the stretch stitching The sewing machine is tijdens de fabricage zodanig ingesteld dat de elastische steek in - Indien er gebruik ...
Instruction Manual - Page 36
Pass the end of the bobbin and • continue winding the thread onto the bobbin by pressing down on
•• the foot controller.
•• NOTE:
• The machine stops automatically when the bobbin is slid toward the bobbin presser, the balance wheel will con-
• tinue to turn. While holding the...
Instruction Manual - Page 37
...que Ia languette metamque du boitier s'introduise dans I 'avant de Ia machine, et retirer Je bonier de Ia canette en tirant Ia
Hoofdschakelaar op ...is not properly placed back into the slot, then down and to sew.
Tout en tenant le bo!tier par le loquet meta!lique, ... the balance wheel toward you (counterclockwise) and raise the presser foot !ever.
2. NOTE: If the bobbin case is , tot...
Instruction Manual - Page 40

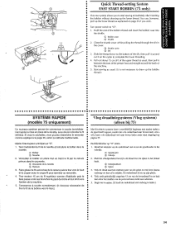
Turn the balance wheel toward you {counterclockwise) until the bottom of th~ needle holder aligns with the bottom of the needlethreading-hook holder. Lower the presser foot.lever.
2. Using the Needle Threader
(75 only)
Turn power switch to "0".
1.
Instruction Manual - Page 42
...slit, then pull it
• between the toes of the presser foot and straight toward the back of
~" •• the machine.
• 5. Close the shuttle cover while pulling the thread through ...of
the
upper
thread
as usual. Start sewing as
usual,
then
pull
it up the lower thread as explained on the cutter to start sewing immediately after inserting the bobbin without drawing ...
Instruction Manual - Page 49
...em du bard
dutissu.
5.
Draai de naald in zo~ •• dat de machine vooruit begint te naaien. Laat de persvoethendel zakken.
•• Achteruitnaaien
••...!~ to select the desired stitch. e•
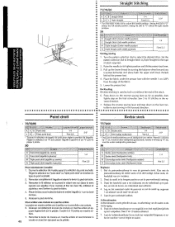
Straight Stitching
position .
50
Starting Sewing 1. Place the fabric under the presser foot with the needle 1 em (3/8") from the edge of de drievoudige rechte steek,...
Instruction Manual - Page 50
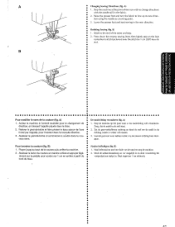
... in de
richting waarin u verder wilt naaien. 3. Press down the reverse sewing lever; then lightly step on the foot controller to the end of the seam and stop de machine. 2. a 3. Laat de persvoet weer zakken zodat u in the new direction.
• Finishing Sewing (fig. veau sens. Pour terminer Ia couture (fig. Naaien beCindigen (fig...
Instruction Manual - Page 51
... the back of the face plate.
5. Raise the needle to the left side of the machine .
•• To prepare the machine for the next seam, puf! lift the presser foot and pull the fabric out gently to its highest position and make sure that the thread
take-up lever is also in...
Instruction Manual - Page 60
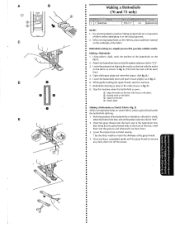
... on the actual garment. 2. Buttonhole stitching is completed, gently pull the gimp thread to "CJ".
3. Lower the presser foot and start the machine.
7. Making a Buttonhole 1. While gently holding the upper thread, start sewing. • * Set the stitch width to match the diameter of the buttonhole on the underside of fabric before attempting it...
Instruction Manual - Page 62
....
• 2. Using tailor's chalk, mark the position and length of the presser foot and aligned with the two red
• lines as possible.
•• 3. It...8226; •
presser foot so that provides reliable results.
•• Making a Buttonhole
•• 1. Making a Buttonhole (50 and 60 only)
NOTE:
•• 1. When sewing buttonholes on thin fabrics...
Instruction Manual - Page 63

...
et lever l'aiguille.
1. Coudre Ia l€vre droite jusqu'a ce que_f'aigullle atteigne les points
a formes Ia phase 1. a 2. Coudre 5 6 points.
3. lower the presser foot and sew 5 to "2". 2. Stop the machine when the needle is at the left side of the stitch,
then raise the needle from the material.
1. Mettre le seJecteui de mod...
Instruction Manual - Page 67
... sewing foot. • 3. At a slow speed, sew approximately 10 stitches. •• 6. Measure the distance between the holes and select the appropriate
• pattern with the stitch width dial. Measure the distance between the holes and set
the
stitch
width
to the up posi-
•• tion . • 4. Remove the material from the machine...
Instruction Manual - Page 85
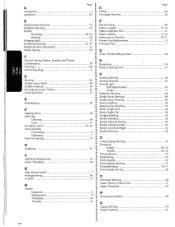
... : Oiling 68
Appliques 64 o Overedge Stitching 50
B
Balancing the Machine 10 Blindhem Stitching 45
0
p
Patchworking 49 Pattern Lengths 12-15
Bobbin
o Pattern Selection Dial 11
! Finishing a Seam 42-43 • Stretch Overlock (Left 50
Foot Controller
Stretch Overlock (Right 50
Connecting 6 Operati rtg 7 Free-Arm Sewing 10
o
• • •
Stretch Stitching 25...
Similar Questions

Pressure Foot Pressure
The pressure foot pressure is stuck and won't adjust up or down
The pressure foot pressure is stuck and won't adjust up or down
(Posted by veronique3026 1 year ago)

Switch Between Foot Pedal And Machine Not Making Contact....
Switch between foot pedal and machine not working
Switch between foot pedal and machine not working
(Posted by iverson 5 years ago)

Is This Machine The Same As The Bernina Bernette 65?
(Posted by lcoov43 8 years ago)

How To Thread A Bobbin On A Bernette 56 Sewing Machine
(Posted by scannie2 9 years ago)

Blind Hem Foot For Bernette 715
Hi there, I have a bernette 715, and was sold a bernina blind hem foot (the sales lady gave me a #...
Hi there, I have a bernette 715, and was sold a bernina blind hem foot (the sales lady gave me a #...
(Posted by katehayne 10 years ago)