User Guide
Page 1
... this sewing computer. Never operate the sewing computer with any possible damage as threading or changing the needle, threading the bobbin or changing the presser foot etc. 10. Keep ventilation openings of the sewing computer. 17. Always use only. Turn power switch to break. 9. Use only identical replacement parts. No grounding means is required around the sewing needle. 6. may deflect the needle, causing it has fallen into any openings on behalf of BERNINA for servicing...
... this sewing computer. Never operate the sewing computer with any possible damage as threading or changing the needle, threading the bobbin or changing the presser foot etc. 10. Keep ventilation openings of the sewing computer. 17. Always use only. Turn power switch to break. 9. Use only identical replacement parts. No grounding means is required around the sewing needle. 6. may deflect the needle, causing it has fallen into any openings on behalf of BERNINA for servicing...
User Guide
Page 5
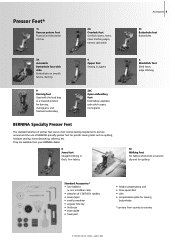
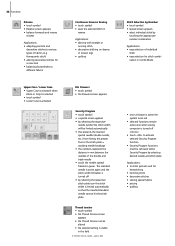
... foot Blind hems, edge stitching 50 Walking foot For fabrics which stick or tend to slip and for quilting Standard Accessories* • four bobbins (+ one in a lowered position for darning, monograms, and freehand embroidery 20C Open embroidery foot Embroidery, appliqué, satin stitch seams, monograms BERNINA Specialty Presser Feet The standard selection of presser feet covers most normal sewing requirements, but we recommend the use of 130/705 H needles • seam ripper • small screwdriver • angular Torx key • lint brush • seam guide •...
... foot Blind hems, edge stitching 50 Walking foot For fabrics which stick or tend to slip and for quilting Standard Accessories* • four bobbins (+ one in a lowered position for darning, monograms, and freehand embroidery 20C Open embroidery foot Embroidery, appliqué, satin stitch seams, monograms BERNINA Specialty Presser Feet The standard selection of presser feet covers most normal sewing requirements, but we recommend the use of 130/705 H needles • seam ripper • small screwdriver • angular Torx key • lint brush • seam guide •...
User Guide
Page 13
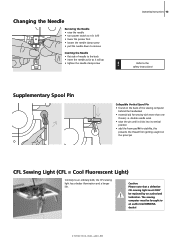
... needle clamp screw ! The sewing computer must ONLY be brought to an authorized BERNINA dealer! Operating Instructions 13 Refer to the safety instructions! Caution: Please note that a defective CFL sewing light must be replaced by an authorized technician. Changing the Needle Removing the Needle • raise the needle • turn power switch to «0» (off) • lower the presser foot • loosen the needle clamp screw • pull the needle down to remove Inserting the Needle...
... needle clamp screw ! The sewing computer must ONLY be brought to an authorized BERNINA dealer! Operating Instructions 13 Refer to the safety instructions! Caution: Please note that a defective CFL sewing light must be replaced by an authorized technician. Changing the Needle Removing the Needle • raise the needle • turn power switch to «0» (off) • lower the presser foot • loosen the needle clamp screw • pull the needle down to remove Inserting the Needle...

User Guide
Page 23
... («0»). The basic settings are automatically saved. zig-zag) • alter the stitch width and stitch length with the external knobs • alter the needle position with the external buttons • touch the Stitch Altering Area (light blue) are always visible. Presser Foot Indicator • the recommended presser foot for the selected stitch is displayed by BERNINA can be changed and stored in blue (a number of your choice •...
... («0»). The basic settings are automatically saved. zig-zag) • alter the stitch width and stitch length with the external knobs • alter the needle position with the external buttons • touch the Stitch Altering Area (light blue) are always visible. Presser Foot Indicator • the recommended presser foot for the selected stitch is displayed by BERNINA can be changed and stored in blue (a number of your choice •...
User Guide
Page 32
... Continuous Reverse Sewing • touch symbol • sews the selected stitch in reverse Applications: • darning with straight or running stitch • decorative stitching on • touch «OK» to activate selected Security Program function • Security Program functions must be limited automatically • this prevents the inserted special needle (double needle, etc.) from hitting the presser foot or the stitch plate = avoiding needle breakage • the numbers represent...
... Continuous Reverse Sewing • touch symbol • sews the selected stitch in reverse Applications: • darning with straight or running stitch • decorative stitching on • touch «OK» to activate selected Security Program function • Security Program functions must be limited automatically • this prevents the inserted special needle (double needle, etc.) from hitting the presser foot or the stitch plate = avoiding needle breakage • the numbers represent...

User Guide
Page 38
... Straight Stitch Stitch: Needle: Thread: Feed dog: Presser foot: Straight stitch No. 1 size and type suitable for the fabric selected cotton or polyester up (sewing position) Reverse pattern foot No. 1C or Jeans foot No. 8 (optional accessory) Open Seam • durable seam for firm and densely woven fabrics such as denim and corduroy • reinforced seam subject to hard wear Adjust the stitch length to suit the fabric For example use a longer stitch length (approximately 3 - 4mm) with denim, a shorter length (2 2.5mm) with the activated straight stitch...
... Straight Stitch Stitch: Needle: Thread: Feed dog: Presser foot: Straight stitch No. 1 size and type suitable for the fabric selected cotton or polyester up (sewing position) Reverse pattern foot No. 1C or Jeans foot No. 8 (optional accessory) Open Seam • durable seam for firm and densely woven fabrics such as denim and corduroy • reinforced seam subject to hard wear Adjust the stitch length to suit the fabric For example use a longer stitch length (approximately 3 - 4mm) with denim, a shorter length (2 2.5mm) with the activated straight stitch...
User Guide
Page 41
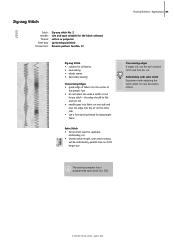
Embroidery with satin stitch Experiment with adjusting the stitch width for the fabric selected cotton or polyester up (sewing position) Reverse pattern foot No. 1C Practical Stitches - The sewing computer has a programmed satin stitch: No. 354 Zig-zag Stitch Stitch: Needle: Thread: Feed dog: Presser foot: Zig-zag stitch No. 2 size and type suitable for new decorative effects. the edge should lie flat and not roll • needle goes into fabric on one side and over the edge into the center of the presser foot •...
Embroidery with satin stitch Experiment with adjusting the stitch width for the fabric selected cotton or polyester up (sewing position) Reverse pattern foot No. 1C Practical Stitches - The sewing computer has a programmed satin stitch: No. 354 Zig-zag Stitch Stitch: Needle: Thread: Feed dog: Presser foot: Zig-zag stitch No. 2 size and type suitable for new decorative effects. the edge should lie flat and not roll • needle goes into fabric on one side and over the edge into the center of the presser foot •...

User Guide
Page 43
... • use the slide-on bottom, move the darning hoop smoothly by hand • work from left to cover the hole (not too close for the fabric selected darning thread down (darning position) Darning foot No. 9 Darning Holes or Worn Areas Replaces both lengthways and crossways threads in same direction as this prevents holes and thread breakage) • work in irregular lengths • turn work by a quarter turn - 180° 3. Manual Darning Stitch: Needle: Thread: Feed dog: Presser foot: Straight stitch No. 1 size and type suitable...
... • use the slide-on bottom, move the darning hoop smoothly by hand • work from left to cover the hole (not too close for the fabric selected darning thread down (darning position) Darning foot No. 9 Darning Holes or Worn Areas Replaces both lengthways and crossways threads in same direction as this prevents holes and thread breakage) • work in irregular lengths • turn work by a quarter turn - 180° 3. Manual Darning Stitch: Needle: Thread: Feed dog: Presser foot: Straight stitch No. 1 size and type suitable...

User Guide
Page 44
...) Presser Foot Pressure • soft, loose knits can damage knits and cause holes when the garment is washed When Basting, Use a Darning Thread • very lightweight (80 weight) darning thread is easier to remove once the seam is complete Sew a Test if Necessary • the elasticity of today's knit fabrics varies greatly • adjust basic settings to suit the fabric, the seam should be as elastic as the fabric • for greater elasticity use...
...) Presser Foot Pressure • soft, loose knits can damage knits and cause holes when the garment is washed When Basting, Use a Darning Thread • very lightweight (80 weight) darning thread is easier to remove once the seam is complete Sew a Test if Necessary • the elasticity of today's knit fabrics varies greatly • adjust basic settings to suit the fabric, the seam should be as elastic as the fabric • for greater elasticity use...

User Guide
Page 49
... needle Zipper Stitch: Needle: Thread: Feed dog: Presser foot: Needle position: Straight stitch No. 1 size and type suitable for the fabric selected cotton or polyester up (sewing position) Zipper foot No. 4 or Zipper foot with guide No. 14 (optional accessory) far right or far left Preparation • baste seam closed and clean finish the seam allowance • baste or pin zipper in place so that fabric folded edges meet over the center of the zipper Sewing • open zipper a little • start sewing in the fabric, raise the presser foot. Open zipper, pulling...
... needle Zipper Stitch: Needle: Thread: Feed dog: Presser foot: Needle position: Straight stitch No. 1 size and type suitable for the fabric selected cotton or polyester up (sewing position) Zipper foot No. 4 or Zipper foot with guide No. 14 (optional accessory) far right or far left Preparation • baste seam closed and clean finish the seam allowance • baste or pin zipper in place so that fabric folded edges meet over the center of the zipper Sewing • open zipper a little • start sewing in the fabric, raise the presser foot. Open zipper, pulling...

User Guide
Page 50
... Stitches - Applications Blind Hem Stitch: Needle: Thread: Feed dog: Presser foot: Blindstitch wide No. 9, Blindstitch narrow No. 29 size and type suitable for the fabric selected cotton, polyester, silk or monofilament up (sewing position) Blindstitch foot No. 5 Blind hem wide Blind Hem Wide No. 9 • for invisible hems in medium to heavy fabrics Blind Hem Narrow No. 29 • for invisible hems in batiste Preparation • finish the raw edges as desired • fold the hem...
... Stitches - Applications Blind Hem Stitch: Needle: Thread: Feed dog: Presser foot: Blindstitch wide No. 9, Blindstitch narrow No. 29 size and type suitable for the fabric selected cotton, polyester, silk or monofilament up (sewing position) Blindstitch foot No. 5 Blind hem wide Blind Hem Wide No. 9 • for invisible hems in medium to heavy fabrics Blind Hem Narrow No. 29 • for invisible hems in batiste Preparation • finish the raw edges as desired • fold the hem...
User Guide
Page 74
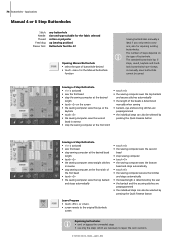
...» • screen reverts to the original Buttonhole screen Repairing buttonholes • omit or bypass the unneeded steps • use only the steps which are preprogrammed • the individual steps can also be saved. 74 Buttonholes - Applications Manual 4 or 6 Step Buttonholes Stitch: Needle: Thread: Feed dog: Presser foot: any buttonhole size and type suitable for the fabric selected cotton or polyester up (sewing position) Buttonhole foot No. 3C Opening Manual Buttonhole • select the type of buttonhole.
...» • screen reverts to the original Buttonhole screen Repairing buttonholes • omit or bypass the unneeded steps • use only the steps which are preprogrammed • the individual steps can also be saved. 74 Buttonholes - Applications Manual 4 or 6 Step Buttonholes Stitch: Needle: Thread: Feed dog: Presser foot: any buttonhole size and type suitable for the fabric selected cotton or polyester up (sewing position) Buttonhole foot No. 3C Opening Manual Buttonhole • select the type of buttonhole.

User Guide
Page 79
... automatically set • Increase upper thread tension to form the design of your choice Stipple Quilting • technique covers the entire surface of the fabric • the lines of stitching are rounded without any needle position Freehand Quilting Stitch: Needle: Thread: feed dog: Presser foot: Straight stitch No. 1 size and type suitable for the fabric selected monofilament or cotton down and pivot the work • when pivoting make sure that the fabric does not become distorted Monofilament breaks • sew...
... automatically set • Increase upper thread tension to form the design of your choice Stipple Quilting • technique covers the entire surface of the fabric • the lines of stitching are rounded without any needle position Freehand Quilting Stitch: Needle: Thread: feed dog: Presser foot: Straight stitch No. 1 size and type suitable for the fabric selected monofilament or cotton down and pivot the work • when pivoting make sure that the fabric does not become distorted Monofilament breaks • sew...

User Guide
Page 80
Applications Freehand Quilting With BSR (BERNINA Stitch Regulator) optional Stitch: Needle: Thread: Feed dog: Presser foot: Straight stitch No. 1 or Zig-zag stitch No. 2 size and type suitable for free-motion quilting (sewing) using the straight stitch and a pre-selected stitch length (up to accelerate • through the continuous needle movement securing in the Setup Program or directly on or off in the same position is possible without the sewing computer being switched off . If the fabric is moved too fast an acoustic...
Applications Freehand Quilting With BSR (BERNINA Stitch Regulator) optional Stitch: Needle: Thread: Feed dog: Presser foot: Straight stitch No. 1 or Zig-zag stitch No. 2 size and type suitable for free-motion quilting (sewing) using the straight stitch and a pre-selected stitch length (up to accelerate • through the continuous needle movement securing in the Setup Program or directly on or off in the same position is possible without the sewing computer being switched off . If the fabric is moved too fast an acoustic...
User Guide
Page 104
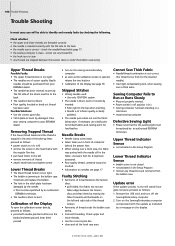
... upper and lower threads. • Use the correct spool disc. • clean and oil the hook race area Cannot Sew Thick Fabric • Needle/thread combination is not correct (the thread is of thread • attach head frame and tighten screw Lower Thread Breaks • The lower thread tension is too tight. • The bobbin is jamming in the bobbin case: • Remove and replace the bobbin. • The hole in the fabric; Remove the USB stick and turn on the sewing and embroidery...
... upper and lower threads. • Use the correct spool disc. • clean and oil the hook race area Cannot Sew Thick Fabric • Needle/thread combination is not correct (the thread is of thread • attach head frame and tighten screw Lower Thread Breaks • The lower thread tension is too tight. • The bobbin is jamming in the bobbin case: • Remove and replace the bobbin. • The hole in the fabric; Remove the USB stick and turn on the sewing and embroidery...
User Guide
Page 114
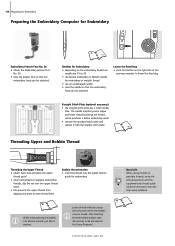
... spool pin and the supplementary thread guide (optional accessory) may also help avoid problems. 13 114 Preparing for Embroidery Preparing the Embroidery Computer for Embroidery Embroidery Presser Foot No. 26 • attach the Embroidery presser foot No. 26 • raise the presser foot so that the embroidery hoop can be attached Lower the Feed Dog • press the button on the right side of the sewing computer to 90 • use special embroidery or Metafil needle for embroidery. 10 While embroidering the bobbin...
... spool pin and the supplementary thread guide (optional accessory) may also help avoid problems. 13 114 Preparing for Embroidery Preparing the Embroidery Computer for Embroidery Embroidery Presser Foot No. 26 • attach the Embroidery presser foot No. 26 • raise the presser foot so that the embroidery hoop can be attached Lower the Feed Dog • press the button on the right side of the sewing computer to 90 • use special embroidery or Metafil needle for embroidery. 10 While embroidering the bobbin...
User Guide
Page 150
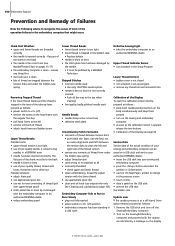
... both needle position buttons on the body simultaneously and keep them pressed • turn off ) position • embroidery computer has been standing in a cold room Defective Sewing Light • take -up lever, proceed as indicated by a BERNINA Technician Skipped Stitches • incorrect needle used Needle Breaks • needle clamp screw is too loose • defective stitch plate Unsatisfactory Stitch Formation • remnants of thread between tension discs: • pull folded thin fabric (use the fold...
... both needle position buttons on the body simultaneously and keep them pressed • turn off ) position • embroidery computer has been standing in a cold room Defective Sewing Light • take -up lever, proceed as indicated by a BERNINA Technician Skipped Stitches • incorrect needle used Needle Breaks • needle clamp screw is too loose • defective stitch plate Unsatisfactory Stitch Formation • remnants of thread between tension discs: • pull folded thin fabric (use the fold...
User Guide
Page 165
...; Pattern End • Quick Reverse Button on Head Frame • Automatic Thread Cutter • Securing Function • Slide Speed Control • Start-Stop Button 40 163-173 129-130 116-117 117 119 103 28 28 28 28 28 28 28, 128 28, 128 F Fabric, Needle, Thread 15 Feed Dog • Feed Dog and Fabric Feed 19-20 • Feed Dog Up/Down 19 • Lowered Feed Dog 23 • Sewing Corners 20 Flat Joining Seam 47 Foot Control 8 Free...
...; Pattern End • Quick Reverse Button on Head Frame • Automatic Thread Cutter • Securing Function • Slide Speed Control • Start-Stop Button 40 163-173 129-130 116-117 117 119 103 28 28 28 28 28 28 28, 128 28, 128 F Fabric, Needle, Thread 15 Feed Dog • Feed Dog and Fabric Feed 19-20 • Feed Dog Up/Down 19 • Lowered Feed Dog 23 • Sewing Corners 20 Flat Joining Seam 47 Foot Control 8 Free...
User Guide
Page 166
...;BSR» Screen 82 • Using Functions in the BSR Mode 81 R Important Embroidery Information 117-118 Important Facts about Thread and Needles 16 Inserting the Bobbin 11 K Key to Signs 3 M Main Category Buttons • Alphabets • Buttonholes • Decorative Stitches • Embroidery Mode/ Sewing Mode • Personal Program • Practical Stitches • Quilt Stitches • Setup Program • Tutorial for Embroidery Manual Darning 25-27 25 26 25...
...;BSR» Screen 82 • Using Functions in the BSR Mode 81 R Important Embroidery Information 117-118 Important Facts about Thread and Needles 16 Inserting the Bobbin 11 K Key to Signs 3 M Main Category Buttons • Alphabets • Buttonholes • Decorative Stitches • Embroidery Mode/ Sewing Mode • Personal Program • Practical Stitches • Quilt Stitches • Setup Program • Tutorial for Embroidery Manual Darning 25-27 25 26 25...

User Guide
Page 167
... 98 Upper Thread Tension 33 • Sewing Settings 94 • Text in Welcome Screen 93 • Touch (Screen Sensibility) 96 V • Update 99-100 • Version Information 99 Vari Overlock Seam 45 Sewing Light-CFL 13 Sewing on Elastic, Shirring Elastic/Cord 52 W Slide-on Bobbin Winder 10 Thread Tension 33, 114 Thread, Needle, Fabric 15 Threading the Bobbin Thread 114 Threading the Upper Thread 11, 114 • Double Needle, Triple Needle 14 Triple Straight Stitch 38 Trouble Shooting 104, 150 Tutorial (only for Embroidery...
... 98 Upper Thread Tension 33 • Sewing Settings 94 • Text in Welcome Screen 93 • Touch (Screen Sensibility) 96 V • Update 99-100 • Version Information 99 Vari Overlock Seam 45 Sewing Light-CFL 13 Sewing on Elastic, Shirring Elastic/Cord 52 W Slide-on Bobbin Winder 10 Thread Tension 33, 114 Thread, Needle, Fabric 15 Threading the Bobbin Thread 114 Threading the Upper Thread 11, 114 • Double Needle, Triple Needle 14 Triple Straight Stitch 38 Trouble Shooting 104, 150 Tutorial (only for Embroidery...


