

User Manual
Page 3
... IF BATTERY IS REPLACED BY AN INCORRECT TYPE. If you are no service parts inside a carrying case. • Connect the power adapter to a proper power source. • Do not attempt to H03VV-F, 3G, 0.75mm2 must be used . The socket outlet should be installed near the equipment and be easily accessible. • This product should be used . • (If a remote control is inside . There...
... IF BATTERY IS REPLACED BY AN INCORRECT TYPE. If you are no service parts inside a carrying case. • Connect the power adapter to a proper power source. • Do not attempt to H03VV-F, 3G, 0.75mm2 must be used . The socket outlet should be installed near the equipment and be easily accessible. • This product should be used . • (If a remote control is inside . There...

User Manual
Page 4
...; Consider keeping the box and packaging in storage for use in installation unless proper ventilation is to be blocked or covered. Avoid using any of the above mentioned misuse or other risks. Clean the LCD monitor surface with flat surface. • Ensure that support wall or ceiling mounting) • Install your place of purchase or visit the local website from the power outlet before cleaning.
...; Consider keeping the box and packaging in storage for use in installation unless proper ventilation is to be blocked or covered. Avoid using any of the above mentioned misuse or other risks. Clean the LCD monitor surface with flat surface. • Ensure that support wall or ceiling mounting) • Install your place of purchase or visit the local website from the power outlet before cleaning.
User Manual
Page 5
... ...2 Power Safety ...3 Getting started ...7 Getting to know your monitor 9 Front view ...9 Back view...9 Input and output ports...10 Connection ...11 How to assemble your monitor hardware 12 How to detach the stand and the base 18 Adjusting the monitor height ...20 Viewing angle adjustment ...21 Rotating the monitor ...22 Installing the Shield (shading hood) ...24 Using the monitor wall mounting kit 26 Getting the most from your BenQ ZOWIE monitor 27 How to install the monitor on...
... ...2 Power Safety ...3 Getting started ...7 Getting to know your monitor 9 Front view ...9 Back view...9 Input and output ports...10 Connection ...11 How to assemble your monitor hardware 12 How to detach the stand and the base 18 Adjusting the monitor height ...20 Viewing angle adjustment ...21 Rotating the monitor ...22 Installing the Shield (shading hood) ...24 Using the monitor wall mounting kit 26 Getting the most from your BenQ ZOWIE monitor 27 How to install the monitor on...
User Manual
Page 10
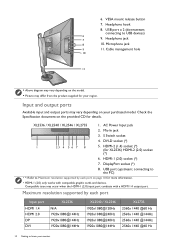
.... Cable management hole 10 11 • Above diagram may vary depending on page 10 for your monitor XL2536 / XL2540 / XL2546 / XL2735 1. HDMI-1 (2.0) socket (*) 7. VESA mount release button 7. Mic-In jack 3. Compatible issue may vary depending on the provided CD for XL2536) HDMI-2 (2.0) socket (*) 6. DisplayPort socket (*) 8. USB port x 2 (downstream; Headphone jack 8 10. AC Power Input jack 2. S Switch socket 4. DVI-D socket (*) 1 23 4 5 6 7 8 5. 6. Check the Specification document on your purchased model. Maximum resolution supported...
.... Cable management hole 10 11 • Above diagram may vary depending on page 10 for your monitor XL2536 / XL2540 / XL2546 / XL2735 1. HDMI-1 (2.0) socket (*) 7. VESA mount release button 7. Mic-In jack 3. Compatible issue may vary depending on the provided CD for XL2536) HDMI-2 (2.0) socket (*) 6. DisplayPort socket (*) 8. USB port x 2 (downstream; Headphone jack 8 10. AC Power Input jack 2. S Switch socket 4. DVI-D socket (*) 1 23 4 5 6 7 8 5. 6. Check the Specification document on your purchased model. Maximum resolution supported...
User Manual
Page 26
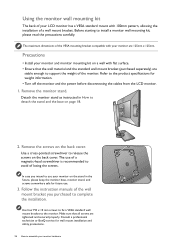
Follow the instruction manuals of the wall mount bracket you intend to use of a magnetic-head screwdriver is recommended to detach the stand and the base on page 18. 2. Consult a professional technician or BenQ service for weight information. • Turn off the monitor and the power before disconnecting the cables from the LCD monitor. 1. Remove the monitor stand. Use four M4 x 10 mm screws to fix a VESA standard wall mount bracket to complete the installation. The...
Follow the instruction manuals of the wall mount bracket you intend to use of a magnetic-head screwdriver is recommended to detach the stand and the base on page 18. 2. Consult a professional technician or BenQ service for weight information. • Turn off the monitor and the power before disconnecting the cables from the LCD monitor. 1. Remove the monitor stand. Use four M4 x 10 mm screws to fix a VESA standard wall mount bracket to complete the installation. The...
User Manual
Page 27
... BenQ ZOWIE color LCD flat screen monitor, you should install the custom BenQ ZOWIE LCD Monitor driver software as a member of the Administrators group in order to a network which you must be logged on the back of the purchased model, refer to the specification label on as an Administrator or as provided on your computer (after connecting the monitor to successfully install the BenQ ZOWIE LCD Monitor driver software. Follow the wizard instructions...
... BenQ ZOWIE color LCD flat screen monitor, you should install the custom BenQ ZOWIE LCD Monitor driver software as a member of the Administrators group in order to a network which you must be logged on the back of the purchased model, refer to the specification label on as an Administrator or as provided on your computer (after connecting the monitor to successfully install the BenQ ZOWIE LCD Monitor driver software. Follow the wizard instructions...
User Manual
Page 28
.... 6. If you should instead be following these instructions. When Windows starts, it (and has monitor driver software installed), you are adding the BenQ ZOWIE LCD Monitor to confirm that has already had a monitor driver installed before , and for a computer which the BenQ ZOWIE LCD Monitor is the first ever monitor to be connected to it displays the option to assemble your BenQ ZOWIE monitor You should not be following table. To find...
.... 6. If you should instead be following these instructions. When Windows starts, it (and has monitor driver software installed), you are adding the BenQ ZOWIE LCD Monitor to confirm that has already had a monitor driver installed before , and for a computer which the BenQ ZOWIE LCD Monitor is the first ever monitor to be connected to it displays the option to assemble your BenQ ZOWIE monitor You should not be following table. To find...

User Manual
Page 29
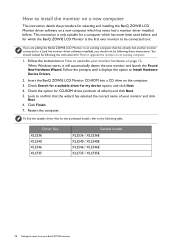
... have connected, and letting Windows install the corresponding driver files from your Microsoft Windows computer. Getting the most from the CD. The BenQ ZOWIE LCD Monitor driver for your model may well function perfectly with other versions of Windows, however, as compatible for Windows 10, Windows 8 (8.1), and Windows 7 Operating System (OS). How to upgrade the monitor on an existing computer This instruction details the procedure for manually updating the existing monitor driver software...
... have connected, and letting Windows install the corresponding driver files from your Microsoft Windows computer. Getting the most from the CD. The BenQ ZOWIE LCD Monitor driver for your model may well function perfectly with other versions of Windows, however, as compatible for Windows 10, Windows 8 (8.1), and Windows 7 Operating System (OS). How to upgrade the monitor on an existing computer This instruction details the procedure for manually updating the existing monitor driver software...
User Manual
Page 30
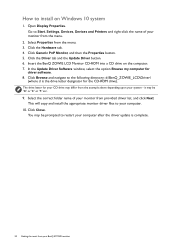
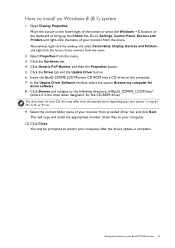
... Hardware tab. 4. You may be 'D:' or 'E:' or 'F:' etc. 9. Open Display Properties. The drive letter for driver software. 8. In the Update Driver Software window, select the option Browse my computer for your CD drive may be prompted to Start, Settings, Devices, Devices and Printers and right-click the name of your monitor from the menu. 3. Select the correct folder name of your computer...
... Hardware tab. 4. You may be 'D:' or 'E:' or 'F:' etc. 9. Open Display Properties. The drive letter for driver software. 8. In the Update Driver Software window, select the option Browse my computer for your CD drive may be prompted to Start, Settings, Devices, Devices and Printers and right-click the name of your monitor from the menu. 3. Select the correct folder name of your computer...
User Manual
Page 31
... your monitor from the menu. Open Display Properties. Click the Hardware tab. 4. The drive letter for your CD drive may be 'D:' or 'E:' or 'F:' etc. 9. Select the correct folder name of your BenQ ZOWIE monitor 31 This will copy and install the appropriate monitor driver files to Settings, Control Panel, Devices and Printers and right-click the name of the screen or press the Windows + C buttons...
... your monitor from the menu. Open Display Properties. Click the Hardware tab. 4. The drive letter for your CD drive may be 'D:' or 'E:' or 'F:' etc. 9. Select the correct folder name of your BenQ ZOWIE monitor 31 This will copy and install the appropriate monitor driver files to Settings, Control Panel, Devices and Printers and right-click the name of the screen or press the Windows + C buttons...
User Manual
Page 37
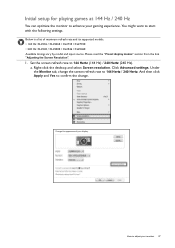
... maximum refresh rate and its supported models. • 144 Hz: XL2536 / XL2536E / XL2735 / XL2735E • 240 Hz: XL2540 / XL2540E / XL2546 / XL2546E Available timings vary by model and input source. Right-click the desktop and select Screen resolution. You might want to 144 Hertz (144 Hz) / 240 Hertz (240 Hz). Please read the "Preset display modes" section from the link "Adjusting the Screen Resolution". 1. Initial setup for...
... maximum refresh rate and its supported models. • 144 Hz: XL2536 / XL2536E / XL2735 / XL2735E • 240 Hz: XL2540 / XL2540E / XL2546 / XL2546E Available timings vary by model and input source. Right-click the desktop and select Screen resolution. You might want to 144 Hertz (144 Hz) / 240 Hertz (240 Hz). Please read the "Preset display modes" section from the link "Adjusting the Screen Resolution". 1. Initial setup for...

User Manual
Page 38
... change the frame rate or screen refresh rate to the Help document that came with your game supports 144 Hz / 240 Hz. 2. Go to the setup menu in your menus, check the following: • make sure your game for RTS games. Adjust the brightness of the black shades by Black eQualizer. To check if the screen refresh rate has been changed, select Menu from the hotkey menu on the monitor may not output audio signal...
... change the frame rate or screen refresh rate to the Help document that came with your game supports 144 Hz / 240 Hz. 2. Go to the setup menu in your menus, check the following: • make sure your game for RTS games. Adjust the brightness of the black shades by Black eQualizer. To check if the screen refresh rate has been changed, select Menu from the hotkey menu on the monitor may not output audio signal...

User Manual
Page 39
... the game mode buttons (labeled 1~3) on other compatible BenQ ZOWIE LCD monitors. Saving your monitor to one of the game modes. 3. After all at any of your game modes to your monitor Apart from the default and the adjusted settings done on the S Switch to bring up message will be accessed by S Switch Once the adjusted display settings have been saved to the game modes (Gamer1 / Gamer2 / Gamer3) in different OSD menus. 2. To...
... the game mode buttons (labeled 1~3) on other compatible BenQ ZOWIE LCD monitors. Saving your monitor to one of the game modes. 3. After all at any of your game modes to your monitor Apart from the default and the adjusted settings done on the S Switch to bring up message will be accessed by S Switch Once the adjusted display settings have been saved to the game modes (Gamer1 / Gamer2 / Gamer3) in different OSD menus. 2. To...
User Manual
Page 40
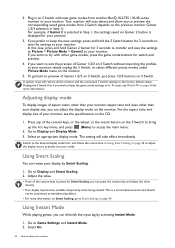
... desired display mode first, and follow the instructions in Using Smart Scaling on the previous monitor Gamer 1/2/3 selection in Step 1, the settings saved on it. To reset, see the specifications on page 54 for 3 seconds to save the settings to Picture > Picture Mode > Gamer2 to Smart Scaling on S Switch. For the aspect ratio and display size of Gamer 1/2/3 on S Switch, just press 1/2/3 buttons on page 49. Switch to adjust your monitor. Your monitor...
... desired display mode first, and follow the instructions in Using Smart Scaling on the previous monitor Gamer 1/2/3 selection in Step 1, the settings saved on it. To reset, see the specifications on page 54 for 3 seconds to save the settings to Picture > Picture Mode > Gamer2 to Smart Scaling on S Switch. For the aspect ratio and display size of Gamer 1/2/3 on S Switch, just press 1/2/3 buttons on page 49. Switch to adjust your monitor. Your monitor...
User Manual
Page 45
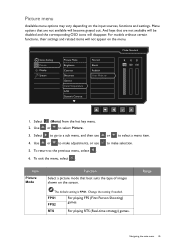
... grayed out. Range Navigating the main menu 45 And keys that best suits the type of images shown on the input sources, functions and settings. Item Picture Mode Function Select a picture mode that are not available will not appear on the menu. The default setting is FPS1. To return to a sub menu, and then use 5. Game Setting Picture Display System Picture Mode Brightness Contrast Sharpness Gamma Color Temperature AMA Dynamic Contrast Normal Bluish Reddish User Mode Mode: Standard...
... grayed out. Range Navigating the main menu 45 And keys that best suits the type of images shown on the input sources, functions and settings. Item Picture Mode Function Select a picture mode that are not available will not appear on the menu. The default setting is FPS1. To return to a sub menu, and then use 5. Game Setting Picture Display System Picture Mode Brightness Contrast Sharpness Gamma Color Temperature AMA Dynamic Contrast Normal Bluish Reddish User Mode Mode: Standard...

User Manual
Page 46
... Function Range Gamer1 Applies customized display settings. Brightness Contrast Adjusts the balance between darkness and lightness. 0 to 100 0 to 100 Sharpness Adjusts the clarity and visibility of the edges of the image. (e.g. The default value is factory pre-set to change the settings. Decreasing one or more of the Red, Green and Blue primary colors can be viewed with natural coloring. Gamer2 Gamer3 Movie For details on setting up a game mode, see Setting...
... Function Range Gamer1 Applies customized display settings. Brightness Contrast Adjusts the balance between darkness and lightness. 0 to 100 0 to 100 Sharpness Adjusts the clarity and visibility of the edges of the image. (e.g. The default value is factory pre-set to change the settings. Decreasing one or more of the Red, Green and Blue primary colors can be viewed with natural coloring. Gamer2 Gamer3 Movie For details on setting up a game mode, see Setting...

User Manual
Page 48
... will disappear. Select (Menu) from the hot key menu. 2. Display menu Available menu options may vary depending on the menu. Menu options that appropriate to that are not available will be disabled and the corresponding OSD icons will not appear on the input sources, functions and settings. Item Function Range Input Use this to change the input to your video cable connection type. • DVI • DisplayPort • HDMI 1 • HDMI 2 48 Navigating...
... will disappear. Select (Menu) from the hot key menu. 2. Display menu Available menu options may vary depending on the menu. Menu options that appropriate to that are not available will be disabled and the corresponding OSD icons will not appear on the input sources, functions and settings. Item Function Range Input Use this to change the input to your video cable connection type. • DVI • DisplayPort • HDMI 1 • HDMI 2 48 Navigating...

User Manual
Page 53
... in power saving mode. • OFF • 10min. • 20min. • 30min. LED Determines the brightness of the recommended resolution when a new • OFF input source is detected by custom key 1. Information Displays the current monitor property settings. • Black eQualizer • Color Vibrance • Low Blue Light • Contrast • Volume • Mute • Input • Brightness • Picture Mode • Display Mode • DyAc • Model Name • Input • Current Resolution • Optimum Resolution (best...
... in power saving mode. • OFF • 10min. • 20min. • 30min. LED Determines the brightness of the recommended resolution when a new • OFF input source is detected by custom key 1. Information Displays the current monitor property settings. • Black eQualizer • Color Vibrance • Low Blue Light • Contrast • Volume • Mute • Input • Brightness • Picture Mode • Display Mode • DyAc • Model Name • Input • Current Resolution • Optimum Resolution (best...

User Manual
Page 55
... make adjustments based on or off , please contact your dealer to get necessary support. Pixel errors can use the Display Mode function to the factory defaults. You are permanently on these instructions. See Display Mode on these instructions. Troubleshooting 55 Does the blurring only occur at its native resolution, but the image is still distorted. One of several pixels is permanently black, one or more pixels are permanently red, green, blue or another color. • Clean the LCD screen...
... make adjustments based on or off , please contact your dealer to get necessary support. Pixel errors can use the Display Mode function to the factory defaults. You are permanently on these instructions. See Display Mode on these instructions. Troubleshooting 55 Does the blurring only occur at its native resolution, but the image is still distorted. One of several pixels is permanently black, one or more pixels are permanently red, green, blue or another color. • Clean the LCD screen...

User Manual
Page 56
... unlock the OSD controls when it is launched. 56 Troubleshooting The system will adjust the refresh rate automatically. If any button on the computer keyboard or move the mouse. Read the instructions on the link "Adjusting the Screen Resolution" on the CD, and then select the correct resolution, refresh rate and make adjustments based on . • If the LED is off , please contact your computer and monitor go into a low power "sleep" mode...
... unlock the OSD controls when it is launched. 56 Troubleshooting The system will adjust the refresh rate automatically. If any button on the computer keyboard or move the mouse. Read the instructions on the link "Adjusting the Screen Resolution" on the CD, and then select the correct resolution, refresh rate and make adjustments based on . • If the LED is off , please contact your computer and monitor go into a low power "sleep" mode...


