

Quick Start Guide
Page 14
http://www.benq.com/welcome 13 Optical Resolution 1920 (H) x 1080 (V) Display system 1-CHIP DMD Lens F = 2.6 ~ 2.78, f = 10.2 ~ 12.24 mm Lamp 240 W lamp Electrical Power supply AC100-240V, 3.5 A, 50-60 Hz (Automatic) Power consumption 320 W (Max); < 0.5 W (Standby) Mechanical Weight 2.7 Kg (5.95 lbs) Output terminals RGB output D-Sub 15-...
http://www.benq.com/welcome 13 Optical Resolution 1920 (H) x 1080 (V) Display system 1-CHIP DMD Lens F = 2.6 ~ 2.78, f = 10.2 ~ 12.24 mm Lamp 240 W lamp Electrical Power supply AC100-240V, 3.5 A, 50-60 Hz (Automatic) Power consumption 320 W (Max); < 0.5 W (Standby) Mechanical Weight 2.7 Kg (5.95 lbs) Output terminals RGB output D-Sub 15-...

Quick Start Guide
Page 30
... m, 0°C-30°C 20°C-60 10%-90% RH 30°C@ 0~12,200 m http://www.benq.com/welcome 29 (KO) 사양 해상도 1920 (H) x 1080 (V) 1-CHIP DMD 렌즈 F = 2.6 ~ 2.78, f = 10.2 ~ 12.24 mm Lamp 240 W 램프 전기 AC100-240 V, 3.5 A, 50-60 Hz ( 자동 ) 320 W 0.5 W ( 대기...
... m, 0°C-30°C 20°C-60 10%-90% RH 30°C@ 0~12,200 m http://www.benq.com/welcome 29 (KO) 사양 해상도 1920 (H) x 1080 (V) 1-CHIP DMD 렌즈 F = 2.6 ~ 2.78, f = 10.2 ~ 12.24 mm Lamp 240 W 램프 전기 AC100-240 V, 3.5 A, 50-60 Hz ( 자동 ) 320 W 0.5 W ( 대기...

User Manual
Page 3
... Shutting down the projector ...26 Direct power off ...26 Menu operation ...27 Basic menu ...27 Advanced menu ...30 Maintenance ...38 Care of the projector ...38 Lamp information ...38 Troubleshooting ...44 Specifications ...45 Projector specifications ...45 Dimensions ...46 Timing chart...47 Table of Contents 3
... Shutting down the projector ...26 Direct power off ...26 Menu operation ...27 Basic menu ...27 Advanced menu ...30 Maintenance ...38 Care of the projector ...38 Lamp information ...38 Troubleshooting ...44 Specifications ...45 Projector specifications ...45 Dimensions ...46 Timing chart...47 Table of Contents 3
User Manual
Page 4
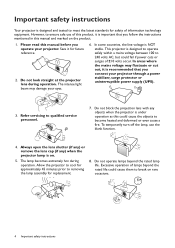
... of information technology equipment. This projector is recommended that you follow the instructions mentioned in this product, it for safety of lamps beyond the rated lamp life. The lamp becomes extremely hot during operation. Please read this could fail if power cuts or surges of this manual and marked on rare... to become heated and deformed or even cause a fire. In areas where the mains voltage may damage your projector. To temporarily turn off the lamp, use of ±10 volts occur. Always open the lens shutter (if any) or remove the lens cap (if any objects when the ...
... of information technology equipment. This projector is recommended that you follow the instructions mentioned in this product, it for safety of lamps beyond the rated lamp life. The lamp becomes extremely hot during operation. Please read this could fail if power cuts or surges of this manual and marked on rare... to become heated and deformed or even cause a fire. In areas where the mains voltage may damage your projector. To temporarily turn off the lamp, use of ±10 volts occur. Always open the lens shutter (if any) or remove the lens cap (if any objects when the ...
User Manual
Page 5
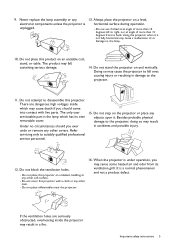
...other covers. Using the projector when it . There are seriously obstructed, overheating inside which has its ventilation grill. Refer servicing only to , the lamp. 10. Do not block the ventilation holes. - Important safety instructions 5 Do not place this projector on a blanket, bedding or any other ...upon it is unplugged. 13. The product may sense some heated air and odor from its own removable cover. It is the lamp which may cause the projector to the projector. 11. If the ventilation holes are dangerous high voltages inside the projector may result ...
...other covers. Using the projector when it . There are seriously obstructed, overheating inside which has its ventilation grill. Refer servicing only to , the lamp. 10. Do not block the ventilation holes. - Important safety instructions 5 Do not place this projector on a blanket, bedding or any other ...upon it is unplugged. 13. The product may sense some heated air and odor from its own removable cover. It is the lamp which may cause the projector to the projector. 11. If the ventilation holes are dangerous high voltages inside the projector may result ...

User Manual
Page 6
... where excessive humidity, dust, or cigarette smoke may become wet, disconnect it to have the projector serviced. 20. This product is poorly ventilated or confined. Lamp contains mercury. Do not place liquids near fire alarms - Do not place this projector in accordance with all windows rolled up. - Manage in any of... where the altitudes are higher than 3000 m (10000 feet). 19. 17. Allow at least 50 cm clearance from the power supply's power outlet and call BenQ to fail.
... where excessive humidity, dust, or cigarette smoke may become wet, disconnect it to have the projector serviced. 20. This product is poorly ventilated or confined. Lamp contains mercury. Do not place liquids near fire alarms - Do not place this projector in accordance with all windows rolled up. - Manage in any of... where the altitudes are higher than 3000 m (10000 feet). 19. 17. Allow at least 50 cm clearance from the power supply's power outlet and call BenQ to fail.
User Manual
Page 7
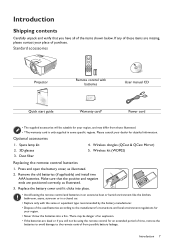
... the remote control from possible battery leakage. Replace the battery cover until it clicks into a fire. Press and open the battery cover, as illustrated. 3. Spare lamp kit 4. If any of purchase. Please consult your dealer for your place of these items are missing, please contact your region. • Never throw the...
... the remote control from possible battery leakage. Replace the battery cover until it clicks into a fire. Press and open the battery cover, as illustrated. 3. Spare lamp kit 4. If any of purchase. Please consult your dealer for your place of these items are missing, please contact your region. • Never throw the...

User Manual
Page 8
... port 12. RGB (PC) signal input jack 15. Wall mount holes 8 Introduction Adjuster feet 4. Audio input jack Audio output jack 11. USB Mini-B port 18. Lamp cover 8. HDMI 2/MHL-input port (for HDMI dongle) 13. Kensington anti-theft lock slot 20. IR remote sensor 6. RS-232 control port 17. AC power...
... port 12. RGB (PC) signal input jack 15. Wall mount holes 8 Introduction Adjuster feet 4. Audio input jack Audio output jack 11. USB Mini-B port 18. Lamp cover 8. HDMI 2/MHL-input port (for HDMI dongle) 13. Kensington anti-theft lock slot 20. IR remote sensor 6. RS-232 control port 17. AC power...
User Manual
Page 9
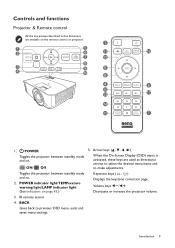
... on . Keystone keys ( , ) Displays the keystone correction page. Introduction 9 ON/ Off Toggles the projector between standby mode and on . 2. POWER indicator light/TEMPerature warning light/LAMP indicator light (See Indicators on the remote control or projector. 1 1 2 5 6 11 16 7 12 8 3 4 9 5 10 8 4 6 10 13 17 14 15 7 1. Arrow keys ( , , , ) When the On-Screen...
... on . Keystone keys ( , ) Displays the keystone correction page. Introduction 9 ON/ Off Toggles the projector between standby mode and on . 2. POWER indicator light/TEMPerature warning light/LAMP indicator light (See Indicators on the remote control or projector. 1 1 2 5 6 11 16 7 12 8 3 4 9 5 10 8 4 6 10 13 17 14 15 7 1. Arrow keys ( , , , ) When the On-Screen...

User Manual
Page 15
Do not look into the lens while the lamp is not placed on . Positioning your eyes. The strong light from the lamp may cause damage to fine-tune the horizontal angle. You can screw the adjuster feet to your projector 15 Adjusting the projected image Adjusting the projection angle If the projector is on a flat surface or the screen and the projector are not perpendicular to each other, the projected image becomes trapezoidal. To retract the feet, screw the adjuster feet in a reverse direction.
Do not look into the lens while the lamp is not placed on . Positioning your eyes. The strong light from the lamp may cause damage to fine-tune the horizontal angle. You can screw the adjuster feet to your projector 15 Adjusting the projected image Adjusting the projection angle If the projector is on a flat surface or the screen and the projector are not perpendicular to each other, the projected image becomes trapezoidal. To retract the feet, screw the adjuster feet in a reverse direction.
User Manual
Page 20
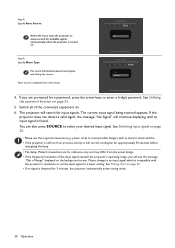
The projector will run the cooling fan for approximately 90 seconds before energizing the lamp. • The Setup Wizard screenshots are prompted for 3 minutes, the projector automatically enters saving mode. 20 Operation The current input signal being scanned appears. If ...
The projector will run the cooling fan for approximately 90 seconds before energizing the lamp. • The Setup Wizard screenshots are prompted for 3 minutes, the projector automatically enters saving mode. 20 Operation The current input signal being scanned appears. If ...
User Manual
Page 21
... 10 Mute Off Fast Mode Off 3D Mode 3D Off 3D Sync Invert Press OK Settings Press OK Wall Color Off Auto Source Off Reset Lamp Timer Projector Position Front Menu Type Basic Reset All Settings Test Pattern Off HDMI Range Auto Information If you use the projector (after finishing the...
... 10 Mute Off Fast Mode Off 3D Mode 3D Off 3D Sync Invert Press OK Settings Press OK Wall Color Off Auto Source Off Reset Lamp Timer Projector Position Front Menu Type Basic Reset All Settings Test Pattern Off HDMI Range Auto Information If you use the projector (after finishing the...

User Manual
Page 26
... process finishes, the power indicator becomes a steady orange and fans stop and the power indicator turns orange. Shutting down . To protect the lamp, wait about 10 minutes before re-starting the projector. Disconnect the power cord from the power outlet. • To protect the...on environmental conditions and usage. In such cases, press or the fans stop . again to start the projector, the fans may shorten lamp life. • Lamp life results will appear prompting you attempt to cool down the projector 1. Press on the projector or on the remote control and a confirmation...
... process finishes, the power indicator becomes a steady orange and fans stop and the power indicator turns orange. Shutting down . To protect the lamp, wait about 10 minutes before re-starting the projector. Disconnect the power cord from the power outlet. • To protect the...on environmental conditions and usage. In such cases, press or the fans stop . again to start the projector, the fans may shorten lamp life. • Lamp life results will appear prompting you attempt to cool down the projector 1. Press on the projector or on the remote control and a confirmation...
User Manual
Page 29
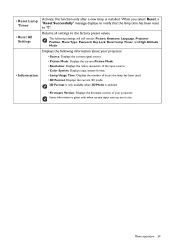
Displays the following settings will still remain: Picture, Keystone, Language, Projector Position, Menu Type, Password, Key Lock, Reset Lamp Timer, and High Altitude Mode. Some information is enabled. • Firmware Version: Displays the firmware version of your projector. • Source...• Resolution: Displays the native resolution of the input source. • Color System: Displays input system format. • Lamp Usage Time: Displays the number of hours the lamp has been used. • 3D Format: Displays the current 3D mode. 3D Format is only available when 3D Mode is ...
Displays the following settings will still remain: Picture, Keystone, Language, Projector Position, Menu Type, Password, Key Lock, Reset Lamp Timer, and High Altitude Mode. Some information is enabled. • Firmware Version: Displays the firmware version of your projector. • Source...• Resolution: Displays the native resolution of the input source. • Color System: Displays input system format. • Lamp Usage Time: Displays the number of hours the lamp has been used. • 3D Format: Displays the current 3D mode. 3D Format is only available when 3D Mode is ...

User Manual
Page 31
... environment. Use this to set the peak white level after you have previously adjusted the Brightness setting to the signal type selected. • Lamp Native: With the lamp's original color temperature and higher brightness. This setting is suitable for environments where high brightness is too high, colors on the image will be...
... environment. Use this to set the peak white level after you have previously adjusted the Brightness setting to the signal type selected. • Lamp Native: With the lamp's original color temperature and higher brightness. This setting is suitable for environments where high brightness is too high, colors on the image will be...

User Manual
Page 35
... automatically once the power is hidden. Renames the current input source to prevent unnecessary waste of lamp life. System Setup : Advanced Lamp Settings • Reset Lamp Timer: See Resetting the lamp timer on page 12. When done, press OK to enjoy the 3D movies, videos, and.... System Setup : Basic Language Sets the language for the projector. Projector Position See Choosing a location on page 42. • Lamp Timer: Displays the number of 3D glasses to automatically choose an appropriate 3D format when detecting 3D contents, select Auto. Auto Source ...
... automatically once the power is hidden. Renames the current input source to prevent unnecessary waste of lamp life. System Setup : Advanced Lamp Settings • Reset Lamp Timer: See Resetting the lamp timer on page 12. When done, press OK to enjoy the 3D movies, videos, and.... System Setup : Basic Language Sets the language for the projector. Projector Position See Choosing a location on page 42. • Lamp Timer: Displays the number of 3D glasses to automatically choose an appropriate 3D format when detecting 3D contents, select Auto. Auto Source ...
User Manual
Page 37
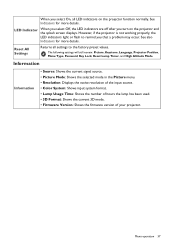
...the projector function normally. The following settings will still remain: Picture, Keystone, Language, Projector Position, Menu Type, Password, Key Lock, Reset Lamp Timer, and High Altitude Mode. When you select On, all settings to remind you that a problem may occur. See also Indicators for ...8226; Resolution: Displays the native resolution of the input source. • Color System: Shows input system format. • Lamp Usage Time: Shows the number of hours the lamp has been used. • 3D Format: Shows the current 3D mode. • Firmware Version: Shows the firmware version ...
...the projector function normally. The following settings will still remain: Picture, Keystone, Language, Projector Position, Menu Type, Password, Key Lock, Reset Lamp Timer, and High Altitude Mode. When you select On, all settings to remind you that a problem may occur. See also Indicators for ...8226; Resolution: Displays the native resolution of the input source. • Color System: Shows input system format. • Lamp Usage Time: Shows the number of hours the lamp has been used. • 3D Format: Shows the current 3D mode. • Firmware Version: Shows the firmware version ...
User Manual
Page 38
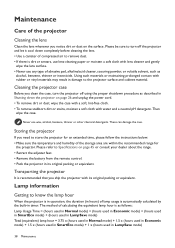
... of the projector Cleaning the lens Clean the lens whenever you notice dirt or dust on the surface. Transporting the projector It is as follows: Lamp Usage Time = (hours used in Normal mode) + (hours used in Economic mode) + (hours used in SmartEco mode) + (hours used in LampSave ...mode) Total (equivalent) lamp hour = 3.75 x (hours used in Normal mode) + 1.5 x (hours used in Economic mode) + 1.5 x (hours used in SmartEco mode) + 1 x (hours used in Shutting down...
... of the projector Cleaning the lens Clean the lens whenever you notice dirt or dust on the surface. Transporting the projector It is as follows: Lamp Usage Time = (hours used in Normal mode) + (hours used in Economic mode) + (hours used in SmartEco mode) + (hours used in LampSave ...mode) Total (equivalent) lamp hour = 3.75 x (hours used in Normal mode) + 1.5 x (hours used in Economic mode) + 1.5 x (hours used in SmartEco mode) + 1 x (hours used in Shutting down...

User Manual
Page 39
...the content brightness level while offering a longer lamp life • Setting Auto Off This function allows the projector to Advanced Menu - Go to Advanced Menu - Order Replacement Lamp Lamp>XXXX Hours Order a new lamp at www.benq.com OK Install a new lamp for 45 minutes. Go to Advanced Menu -... Timing of replacing the lamp When the Lamp indicator lights up after a set Auto Off, go to prevent...
...the content brightness level while offering a longer lamp life • Setting Auto Off This function allows the projector to Advanced Menu - Go to Advanced Menu - Order Replacement Lamp Lamp>XXXX Hours Order a new lamp at www.benq.com OK Install a new lamp for 45 minutes. Go to Advanced Menu -... Timing of replacing the lamp When the Lamp indicator lights up after a set Auto Off, go to prevent...
User Manual
Page 40
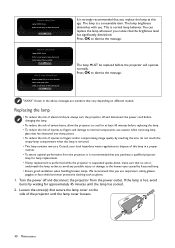
... recommend that you notice that secure the lamp cover on different models. The lamp is normal lamp behavior. Loosen the screw(s) that the brightness level has significantly diminished. Replace Lamp Soon Lamp>XXXX Hours Order a new lamp at www.benq.com OK Replace Lamp Now Lamp>XXXX Hours Order a new lamp at www.benq.com Lamp usage time exceeded OK Out of...
... recommend that you notice that secure the lamp cover on different models. The lamp is normal lamp behavior. Loosen the screw(s) that the brightness level has significantly diminished. Replace Lamp Soon Lamp>XXXX Hours Order a new lamp at www.benq.com OK Replace Lamp Now Lamp>XXXX Hours Order a new lamp at www.benq.com Lamp usage time exceeded OK Out of...

