
User Manual
Page 4
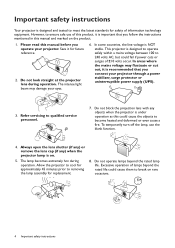
... safety instructions Your projector is designed and tested to meet the latest standards for safety of this product, it is important that you operate your eyes. 6. Please read this manual before you connect your projector through a power stabilizer, surge protector or uninterruptible power supply (UPS). 3. Do not look straight at the projector lens during operation. Always open the lens shutter (if any) or remove the lens...
... safety instructions Your projector is designed and tested to meet the latest standards for safety of this product, it is important that you operate your eyes. 6. Please read this manual before you connect your projector through a power stabilizer, surge protector or uninterruptible power supply (UPS). 3. Do not look straight at the projector lens during operation. Always open the lens shutter (if any) or remove the lens...
User Manual
Page 9
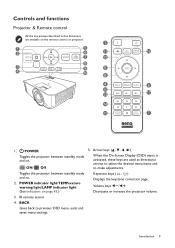
POWER indicator light/TEMPerature warning light/LAMP indicator light (See Indicators on . Keystone keys ( , ) Displays the keystone correction page. Arrow keys ( , , , ) When the On-Screen Display (OSD) menu is activated, these keys are available on . 2. Introduction 9 POWER Toggles the projector between standby mode and on the remote control or projector. 1 1 2 5 6 11 16 7 12 8 3 4 9 5 10 8 4 6 10 13 17 14 15 7 1. Volume keys / Decreases or increase the projector volume. ON/ Off Toggles the projector between standby mode and on page...
POWER indicator light/TEMPerature warning light/LAMP indicator light (See Indicators on . Keystone keys ( , ) Displays the keystone correction page. Arrow keys ( , , , ) When the On-Screen Display (OSD) menu is activated, these keys are available on . 2. Introduction 9 POWER Toggles the projector between standby mode and on the remote control or projector. 1 1 2 5 6 11 16 7 12 8 3 4 9 5 10 8 4 6 10 13 17 14 15 7 1. Volume keys / Decreases or increase the projector volume. ON/ Off Toggles the projector between standby mode and on page...
User Manual
Page 12
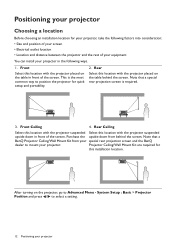
... the projector for this location with the projector suspended upside-down from your special rear projection screen and the BenQ dealer to Advanced Menu - Note that a BenQ Projector Ceiling/Wall Mount Kit from behind the screen. Rear Select this location with the projector placed on the projector, go to mount your projector. Front Ceiling 4. Front Select this installation location. Note that a special rear projection screen is the most common way to select a setting. 12...
... the projector for this location with the projector suspended upside-down from your special rear projection screen and the BenQ dealer to Advanced Menu - Note that a BenQ Projector Ceiling/Wall Mount Kit from behind the screen. Rear Select this location with the projector placed on the projector, go to mount your projector. Front Ceiling 4. Front Select this installation location. Note that a special rear projection screen is the most common way to select a setting. 12...
User Manual
Page 14
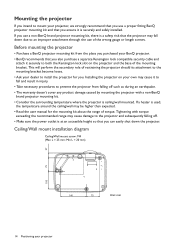
... the surrounding temperature where the projector is a safety risk that you can easily shut down due to an improper attachment through the use of the wrong gauge or length screws. Mounting the projector If you intend to mount your projector, we strongly recommend that you use a proper fitting BenQ projector mounting kit and that you also purchase a separate Kensington lock compatible security cable and attach...
... the surrounding temperature where the projector is a safety risk that you can easily shut down due to an improper attachment through the use of the wrong gauge or length screws. Mounting the projector If you intend to mount your projector, we strongly recommend that you use a proper fitting BenQ projector mounting kit and that you also purchase a separate Kensington lock compatible security cable and attach...
User Manual
Page 19
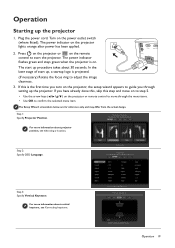
... on to adjust the image clearness. 3. If you turn on the remote control to confirm the selected menu item. For more information about vertical keystone, see Choosing a location. Step 1: Specify Projector Position. Plug the power cord. In the later stage of start up the projector 1. Step 2: Specify OSD Language. The power indicator flashes green and stays green when the projector is projected. (If necessary) Rotate the focus ring to step 5. • Use the...
... on to adjust the image clearness. 3. If you turn on the remote control to confirm the selected menu item. For more information about vertical keystone, see Choosing a location. Step 1: Specify Projector Position. Plug the power cord. In the later stage of start up the projector 1. Step 2: Specify OSD Language. The power indicator flashes green and stays green when the projector is projected. (If necessary) Rotate the focus ring to step 5. • Use the...
User Manual
Page 20
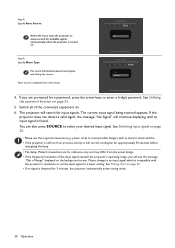
... see Using the menus. power cord) to enter a 6-digit password. Step 4: Specify Auto Source. If you are for a password, press the arrow keys to avoid possible dangers such as electric shock and fire. • If the projector is compatible with the projector's resolution or set the input signal to select your desired input signal. Switch all of the input signal exceeds the projector's operating range, you 've completed the initial setup. 4. See...
... see Using the menus. power cord) to enter a 6-digit password. Step 4: Specify Auto Source. If you are for a password, press the arrow keys to avoid possible dangers such as electric shock and fire. • If the projector is compatible with the projector's resolution or set the input signal to select your desired input signal. Switch all of the input signal exceeds the projector's operating range, you 've completed the initial setup. 4. See...
User Manual
Page 21
... of the Basic OSD menu. • Input signal connected • No input signal connected Picture Mode Vivid TV Sound Mode Standard Volume 10 Mute Off Fast Mode Off 3D Mode 3D Off 3D Sync Invert Press OK Settings Press OK Wall Color Off Auto Source Off Reset Lamp Timer Projector Position Front Menu Type Basic Reset All Settings Test Pattern Off HDMI Range Auto Information If you use the projector (after finishing the initial setup), Basic OSD menu displays. The OSD screenshots below...
... of the Basic OSD menu. • Input signal connected • No input signal connected Picture Mode Vivid TV Sound Mode Standard Volume 10 Mute Off Fast Mode Off 3D Mode 3D Off 3D Sync Invert Press OK Settings Press OK Wall Color Off Auto Source Off Reset Lamp Timer Projector Position Front Menu Type Basic Reset All Settings Test Pattern Off HDMI Range Auto Information If you use the projector (after finishing the initial setup), Basic OSD menu displays. The OSD screenshots below...
User Manual
Page 23
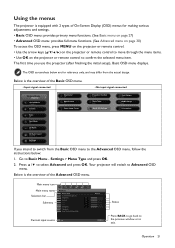
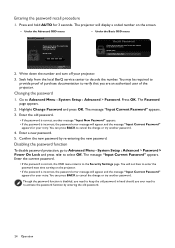
... password If you enter the wrong password, the password error message will display as the Kensington lock, to secure the projector. See Entering the password recall procedure on -screen. The Password page appears. 2. Input Back the password again. • The digits being input will appear, and the Input Current Password message follows. Press OK. Securing the projector Using a security cable lock The projector has to be used unless the correct password is entered every time the projector...
... password If you enter the wrong password, the password error message will display as the Kensington lock, to secure the projector. See Entering the password recall procedure on -screen. The Password page appears. 2. Input Back the password again. • The digits being input will appear, and the Input Current Password message follows. Press OK. Securing the projector Using a security cable lock The projector has to be used unless the correct password is entered every time the projector...
User Manual
Page 24
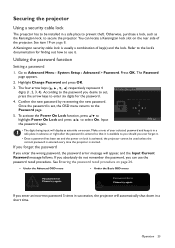
... authorized user of the projector. The message "Input Current Password" appears. You can press BACK to enter the password next time turning on the screen. • Under the Advanced OSD menu • Under the Basic OSD menu Recall Password Please write down the number and turn off your retry. Seek help from the local BenQ service center to Advanced Menu - Changing the password 1. Confirm the new password by entering the old password. 24 Operation...
... authorized user of the projector. The message "Input Current Password" appears. You can press BACK to enter the password next time turning on the screen. • Under the Advanced OSD menu • Under the Basic OSD menu Recall Password Please write down the number and turn off your retry. Seek help from the local BenQ service center to Advanced Menu - Changing the password 1. Confirm the new password by entering the old password. 24 Operation...
User Manual
Page 27
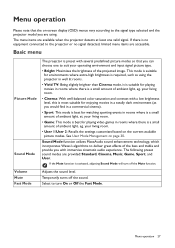
... projector model you are provided: Standard, Cinema, Music, Game, Sport, and User. Menu operation Please note that the on-screen display (OSD) menus vary according to deliver great effects of the bass and treble and provide you with several predefined picture modes so that you can choose one valid signal. If there is activated, adjusting Sound Mode will turn On or Off the Fast Mode...
... projector model you are provided: Standard, Cinema, Music, Game, Sport, and User. Menu operation Please note that the on-screen display (OSD) menus vary according to deliver great effects of the bass and treble and provide you with several predefined picture modes so that you can choose one valid signal. If there is activated, adjusting Sound Mode will turn On or Off the Fast Mode...

User Manual
Page 28
... the projected image decreases. • The Picture Mode cannot be adjusted. • The Vertical Keystone can be installed on a ceiling or behind a screen, or with 3D channel), and so on to view 3D contents. Sets whether the projector searches automatically for input sources until it acquires a signal. Select On to • Auto Source enable the projector to scan for input sources. See below for comfortable 3D viewing experience. 3D Mode This projector supports playing...
... the projected image decreases. • The Picture Mode cannot be adjusted. • The Vertical Keystone can be installed on a ceiling or behind a screen, or with 3D channel), and so on to view 3D contents. Sets whether the projector searches automatically for input sources until it acquires a signal. Select On to • Auto Source enable the projector to scan for input sources. See below for comfortable 3D viewing experience. 3D Mode This projector supports playing...
User Manual
Page 29
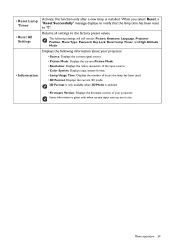
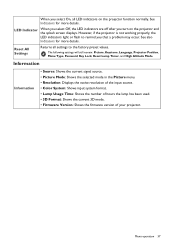
... signal source. • Picture Mode: Displays the current Picture Mode. • Resolution: Displays the native resolution of the input source. • Color System: Displays input system format. • Lamp Usage Time: Displays the number of hours the lamp has been used. • 3D Format: Displays the current 3D mode. 3D Format is only available when 3D Mode is enabled. • Firmware Version: Displays the firmware version of your projector. • Reset Lamp Timer • Reset All Settings • Information Activate this function only after a new lamp...
... signal source. • Picture Mode: Displays the current Picture Mode. • Resolution: Displays the native resolution of the input source. • Color System: Displays input system format. • Lamp Usage Time: Displays the number of hours the lamp has been used. • 3D Format: Displays the current 3D mode. 3D Format is only available when 3D Mode is enabled. • Firmware Version: Displays the firmware version of your projector. • Reset Lamp Timer • Reset All Settings • Information Activate this function only after a new lamp...
User Manual
Page 32
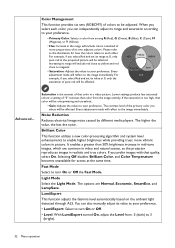
.... Light Mode Select the Light Mode. If the saturation is the amount of that quality, select On. If you select will be affected. Every adjustment made will include colors consisted of more vibrant colors in a video picture. Saturation is too high, that color from among R (Red), G (Green), B (Blue), C (Cyan), M (Magenta), or Y (Yellow). • Hue: Increase in the range will reflect to the image immediately. Lower settings produce...
.... Light Mode Select the Light Mode. If the saturation is the amount of that quality, select On. If you select will be affected. Every adjustment made will include colors consisted of more vibrant colors in a video picture. Saturation is too high, that color from among R (Red), G (Green), B (Blue), C (Cyan), M (Magenta), or Y (Yellow). • Hue: Increase in the range will reflect to the image immediately. Lower settings produce...

User Manual
Page 35
... projected image will decrease. • The following settings cannot be adjusted: Picture Mode, Reference Mode. • The Keystone can only be displayed during projector start-up. Projector Position See Choosing a location on page 42. • Lamp Timer: Displays the number of lamp life. Auto Source Allows the projector to set period of time to prevent unnecessary waste of hours the lamp has been used. Source Rename On the Source Rename window, use / / / to automatically search for the connected source item. System Setup : Advanced Lamp Settings • Reset Lamp Timer...
... projected image will decrease. • The following settings cannot be adjusted: Picture Mode, Reference Mode. • The Keystone can only be displayed during projector start-up. Projector Position See Choosing a location on page 42. • Lamp Timer: Displays the number of lamp life. Auto Source Allows the projector to set period of time to prevent unnecessary waste of hours the lamp has been used. Source Rename On the Source Rename window, use / / / to automatically search for the connected source item. System Setup : Advanced Lamp Settings • Reset Lamp Timer...
User Manual
Page 36
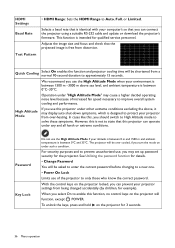
... between 0 m and 1500 m and ambient temperature is designed to enable this function, no control keys on under any and all harsh or extreme conditions. This function is free from over cooled, if you can connect the projector using a suitable RS-232 cable and update or download the projector's firmware. Adjusts the image size and focus and check that the projected image is intended for example). Quick Cooling Select...
... between 0 m and 1500 m and ambient temperature is designed to enable this function, no control keys on under any and all harsh or extreme conditions. This function is free from over cooled, if you can connect the projector using a suitable RS-232 cable and update or download the projector's firmware. Adjusts the image size and focus and check that the projected image is intended for example). Quick Cooling Select...
User Manual
Page 37
... the firmware version of your projector. When you that a problem may occur. See Indicators for more details. However, if the projector is not working properly, the LED indicators light or flash to the factory preset values. LED Indicator When you select Off, the LED indicators are off after you turn on the projector function normally. The following settings will still remain: Picture, Keystone, Language, Projector Position, Menu Type, Password, Key Lock, Reset Lamp Timer, and High Altitude Mode. Menu operation 37...
... the firmware version of your projector. When you that a problem may occur. See Indicators for more details. However, if the projector is not working properly, the LED indicators light or flash to the factory preset values. LED Indicator When you select Off, the LED indicators are off after you turn on the projector function normally. The following settings will still remain: Picture, Keystone, Language, Projector Position, Menu Type, Password, Key Lock, Reset Lamp Timer, and High Altitude Mode. Menu operation 37...
User Manual
Page 38
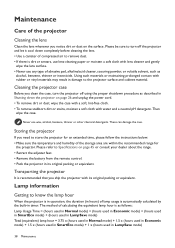
...: Lamp Usage Time = (hours used in Normal mode) + (hours used in Economic mode) + (hours used in SmartEco mode) + (hours used in LampSave mode) Total (equivalent) lamp hour = 3.75 x (hours used in Normal mode) + 1.5 x (hours used in Economic mode) + 1.5 x (hours used in SmartEco mode) + 1 x (hours used in LampSave mode) 38 Maintenance Cleaning the projector case Before you notice dirt or dust on page 45 or consult your dealer about the range. • Retract the adjuster feet. • Remove the battery from the remote control. •...
...: Lamp Usage Time = (hours used in Normal mode) + (hours used in Economic mode) + (hours used in SmartEco mode) + (hours used in LampSave mode) Total (equivalent) lamp hour = 3.75 x (hours used in Normal mode) + 1.5 x (hours used in Economic mode) + 1.5 x (hours used in SmartEco mode) + 1 x (hours used in LampSave mode) 38 Maintenance Cleaning the projector case Before you notice dirt or dust on page 45 or consult your dealer about the range. • Retract the adjuster feet. • Remove the battery from the remote control. •...

User Manual
Page 39
... LAMP indicator light and TEMPerature warning light will light up or a message appears suggesting it is time to replace the lamp, please consult your dealer. Order Replacement Lamp Lamp>XXXX Hours Order a new lamp at www.benq.com OK Install a new lamp for 45 minutes. Maintenance 39 To obtain the lamp hour information: 1. Select a suitable lamp power from the provided modes. An old lamp may cause a malfunction in the projector and in Economic, SmartEco or LampSave mode extends lamp life. The Lamp Timer...
... LAMP indicator light and TEMPerature warning light will light up or a message appears suggesting it is time to replace the lamp, please consult your dealer. Order Replacement Lamp Lamp>XXXX Hours Order a new lamp at www.benq.com OK Install a new lamp for 45 minutes. Maintenance 39 To obtain the lamp hour information: 1. Select a suitable lamp power from the provided modes. An old lamp may cause a malfunction in the projector and in Economic, SmartEco or LampSave mode extends lamp life. The Lamp Timer...
User Manual
Page 40
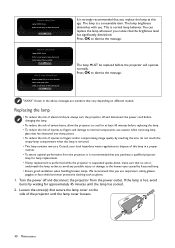
... www.benq.com OK Replace Lamp Now Lamp>XXXX Hours Order a new lamp at www.benq.com Lamp usage time exceeded OK Out of Lamp Usage Time Replace lamp (Refer to user manual) Then reset lamp timer Order a new lamp at www.benq.com OK It is strongly recommended that you use respirators, safety glasses, goggles or face shield and wear protective clothing such as gloves. 1. You can replace the lamp whenever you purchase a qualified projector lamp...
... www.benq.com OK Replace Lamp Now Lamp>XXXX Hours Order a new lamp at www.benq.com Lamp usage time exceeded OK Out of Lamp Usage Time Replace lamp (Refer to user manual) Then reset lamp timer Order a new lamp at www.benq.com OK It is strongly recommended that you use respirators, safety glasses, goggles or face shield and wear protective clothing such as gloves. 1. You can replace the lamp whenever you purchase a qualified projector lamp...
User Manual
Page 44
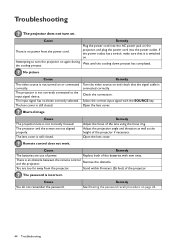
... picture Cause The video source is still closed . Open the lens cover. The lens cover is not turned on or connected correctly. Remedy Adjust the focus of the projector. Cause Remedy The batteries are too far away from the power cord. Replace both of the batteries with the SOURCE key. Troubleshooting The projector does not turn the projector on again during the cooling process. Select the correct input signal with new ones. Remote control does not work...
... picture Cause The video source is still closed . Open the lens cover. The lens cover is not turned on or connected correctly. Remedy Adjust the focus of the projector. Cause Remedy The batteries are too far away from the power cord. Replace both of the batteries with the SOURCE key. Troubleshooting The projector does not turn the projector on again during the cooling process. Select the correct input signal with new ones. Remote control does not work...


