
SW2700PT Data Sheet
Page 2
... Efficiency OSD Controller The OSD controller is not feasible. Black-and-White Mode With a simple click of a button, you can often obstruct the user's perception of color reproduction. Market Product Name Product Color Panel Panel Type Back Light Unit LCD Size Aspect Ratio Native Resolution (max.) Display Area (mm) Display Colors Brightness (typ.) Wide Gamut Coverage (typical) Audio / Video Inputs / Outputs Input Connector SW2700PT Black AHVA (IPS) LED 27 16:9 2560 x 1440 596.7 x 335.6 1.07B 350 99% Adobe RGB Coverage DVI-DL + HDMI 1.4 + DP 1.2 USB...
... Efficiency OSD Controller The OSD controller is not feasible. Black-and-White Mode With a simple click of a button, you can often obstruct the user's perception of color reproduction. Market Product Name Product Color Panel Panel Type Back Light Unit LCD Size Aspect Ratio Native Resolution (max.) Display Area (mm) Display Colors Brightness (typ.) Wide Gamut Coverage (typical) Audio / Video Inputs / Outputs Input Connector SW2700PT Black AHVA (IPS) LED 27 16:9 2560 x 1440 596.7 x 335.6 1.07B 350 99% Adobe RGB Coverage DVI-DL + HDMI 1.4 + DP 1.2 USB...
SW2700PT User Manual
Page 3
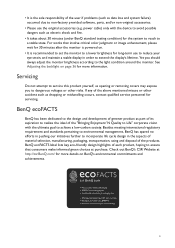
... a stable display in order to non-factory provided software, parts, and/or non-original accessories. • Please use the original accessories (e.g. Servicing Do not attempt to service this product yourself, as opening or removing covers may expose you should always adjust the monitor brightness according to incorporate life cycle design in pushing our initiatives further to the light condition around the monitor. BenQ ecoFACTS BenQ has been...
... a stable display in order to non-factory provided software, parts, and/or non-original accessories. • Please use the original accessories (e.g. Servicing Do not attempt to service this product yourself, as opening or removing covers may expose you should always adjust the monitor brightness according to incorporate life cycle design in pushing our initiatives further to the light condition around the monitor. BenQ ecoFACTS BenQ has been...
SW2700PT User Manual
Page 4
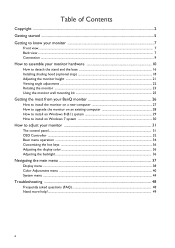
... started ...5 Getting to know your monitor 7 Front view...7 Back view ...7 Connection ...9 How to assemble your monitor hardware 10 How to detach the stand and the base 16 Installing shading hood (optional step 18 Adjusting the monitor height ...21 Viewing angle adjustment ...22 Rotating the monitor ...23 Using the monitor wall mounting kit 25 Getting the most from your BenQ monitor 26 How to install the monitor on a new computer 27 How to upgrade the monitor on...
... started ...5 Getting to know your monitor 7 Front view...7 Back view ...7 Connection ...9 How to assemble your monitor hardware 10 How to detach the stand and the base 16 Installing shading hood (optional step 18 Adjusting the monitor height ...21 Viewing angle adjustment ...22 Rotating the monitor ...23 Using the monitor wall mounting kit 25 Getting the most from your BenQ monitor 26 How to install the monitor on a new computer 27 How to upgrade the monitor on...
SW2700PT User Manual
Page 10
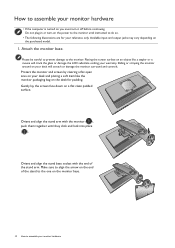
... the monitor surround and controls. Orient and align the stand base socket with the monitor ( ), push them together until instructed to do so. • The following illustrations are for padding. Available input and output jacks may vary depending on a flat clean padded surface. Do not plug-in or turn it off before continuing. Gently lay the screen face down on the purchased model. 1. Make...
... the monitor surround and controls. Orient and align the stand base socket with the monitor ( ), push them together until instructed to do so. • The following illustrations are for padding. Available input and output jacks may vary depending on a flat clean padded surface. Do not plug-in or turn it off before continuing. Gently lay the screen face down on the purchased model. 1. Make...
SW2700PT User Manual
Page 25
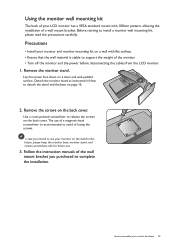
... of your LCD monitor has a VESA standard mount with flat surface. • Ensure that the wall material is recommended to avoid of losing the screws. Lay the screen face down on the back cover. Follow the instruction manuals of the wall mount bracket you intend to use your monitor on the stand in How to detach the stand and the base on page 16. 2. Remove the screws on a clean and well...
... of your LCD monitor has a VESA standard mount with flat surface. • Ensure that the wall material is recommended to avoid of losing the screws. Lay the screen face down on the back cover. Follow the instruction manuals of the wall mount bracket you intend to use your monitor on the stand in How to detach the stand and the base on page 16. 2. Remove the screws on a clean and well...

SW2700PT User Manual
Page 26
... is connected to a network which version of Microsoft Windows you are using, and whether you are upgrading an existing installation (which process you need to follow to successfully install the BenQ LCD Monitor driver software. At that point, click the Have Disk button, insert the BenQ LCD Monitor CD-ROM and select the appropriate monitor model. In either an automatic (new) or upgrade (existing) installation, see: • How to install the monitor...
... is connected to a network which version of Microsoft Windows you are using, and whether you are upgrading an existing installation (which process you need to follow to successfully install the BenQ LCD Monitor driver software. At that point, click the Have Disk button, insert the BenQ LCD Monitor CD-ROM and select the appropriate monitor model. In either an automatic (new) or upgrade (existing) installation, see: • How to install the monitor...

SW2700PT User Manual
Page 27
... Windows starts, it . Restart the computer. Insert the BenQ LCD Monitor CD-ROM into a CD drive on a new computer This instruction details the procedure for the purchased model, refer to it (and has monitor driver software installed), you should instead be connected to Install Hardware Device Drivers. 2. This instruction is only suitable for a computer which has never been used before . Driver files SW2401 SW2700 SW2401PT SW2700PT Suitable models Getting...
... Windows starts, it . Restart the computer. Insert the BenQ LCD Monitor CD-ROM into a CD drive on a new computer This instruction details the procedure for the purchased model, refer to it (and has monitor driver software installed), you should instead be connected to Install Hardware Device Drivers. 2. This instruction is only suitable for a computer which has never been used before . Driver files SW2401 SW2700 SW2401PT SW2700PT Suitable models Getting...

SW2700PT User Manual
Page 28
The BenQ LCD Monitor driver for your model may well function perfectly with other versions of Windows, however, as compatible for Mac OS, Windows 8.1, Windows 8, and Windows 7 Operating System (OS). You need only steer it in the right direction. How to upgrade the monitor on an existing computer This instruction details the procedure for manually updating the existing monitor driver software on your BenQ monitor Windows has an Upgrade Device Driver Wizard to install on Windows 7 system on...
The BenQ LCD Monitor driver for your model may well function perfectly with other versions of Windows, however, as compatible for Mac OS, Windows 8.1, Windows 8, and Windows 7 Operating System (OS). You need only steer it in the right direction. How to upgrade the monitor on an existing computer This instruction details the procedure for manually updating the existing monitor driver software on your BenQ monitor Windows has an Upgrade Device Driver Wizard to install on Windows 7 system on...

SW2700PT User Manual
Page 29
... the menu. Open Display Properties. Alternatively, right-click the desktop and select Personalize, Display, Devices and Printers, and right-click the name of the screen or press the Windows + C buttons on the keyboard to bring up the Charm bar. Insert the BenQ LCD Monitor CD-ROM into a CD drive on Windows 8 (8.1) system 1. This will copy and install the appropriate monitor driver files to your BenQ monitor...
... the menu. Open Display Properties. Alternatively, right-click the desktop and select Personalize, Display, Devices and Printers, and right-click the name of the screen or press the Windows + C buttons on the keyboard to bring up the Charm bar. Insert the BenQ LCD Monitor CD-ROM into a CD drive on Windows 8 (8.1) system 1. This will copy and install the appropriate monitor driver files to your BenQ monitor...
SW2700PT User Manual
Page 30
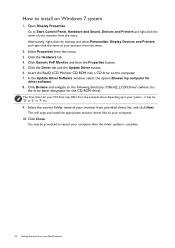
... your system - Click Generic PnP Monitor, and then the Properties button. 5. Click Browse and navigate to Start, Control Panel, Hardware and Sound, Devices and Printers and right-click the name of your monitor from the example above depending upon your BenQ monitor In the Update Driver Software window, select the option Browse my computer for your monitor from the menu. 3. Open Display Properties. Go to the following...
... your system - Click Generic PnP Monitor, and then the Properties button. 5. Click Browse and navigate to Start, Control Panel, Hardware and Sound, Devices and Printers and right-click the name of your monitor from the example above depending upon your BenQ monitor In the Update Driver Software window, select the option Browse my computer for your monitor from the menu. 3. Open Display Properties. Go to the following...
SW2700PT User Manual
Page 34
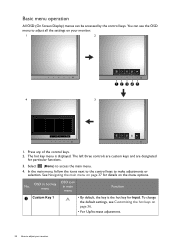
... use the OSD menu to adjust all the settings on your monitor Select (Menu) to make adjustments or selection. No. OSD in hot key menu OSD icon in main menu Function 1 Custom Key 1 • By default, the key is displayed. The left three controls are custom keys and are designated for details on page 36. • For Up/Increase adjustment. 34 How to adjust your monitor. 1 2 12345 4 3 1. To change the default settings...
... use the OSD menu to adjust all the settings on your monitor Select (Menu) to make adjustments or selection. No. OSD in hot key menu OSD icon in main menu Function 1 Custom Key 1 • By default, the key is displayed. The left three controls are custom keys and are designated for details on page 36. • For Up/Increase adjustment. 34 How to adjust your monitor. 1 2 12345 4 3 1. To change the default settings...
SW2700PT User Manual
Page 36
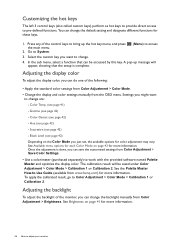
.... (Menu) to -Use Guide (available from the OSD menu. Gamma (see page 42) - Settings you can do one of the following: • Apply the standard color settings from Color Adjustment > Color Mode. • Change the display and color settings manually from www.benq.com) for more information. Adjusting the backlight To adjust the backlight of the control keys to bring up message will be accessed by this key. Color Gamut (see page 42) - The calibration...
.... (Menu) to -Use Guide (available from the OSD menu. Gamma (see page 42) - Settings you can do one of the following: • Apply the standard color settings from Color Adjustment > Color Mode. • Change the display and color settings manually from www.benq.com) for more information. Adjusting the backlight To adjust the backlight of the control keys to bring up message will be accessed by this key. Color Gamut (see page 42) - The calibration...
SW2700PT User Manual
Page 38
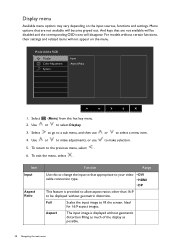
... main menu or to fill the screen. Mode: Adobe RGB Display Color Adjustment System Input Aspect Ratio 1. Full Scales the input image to select a menu item. Item Input Aspect Ratio Function Range Use this to change the input to make selection. Menu options that appropriate to a sub menu, and then use 5. Select (Menu) from the hot key menu. 2. Select to go to your video • DVI cable connection type. • HDMI • DP This feature is displayed without...
... main menu or to fill the screen. Mode: Adobe RGB Display Color Adjustment System Input Aspect Ratio 1. Full Scales the input image to select a menu item. Item Input Aspect Ratio Function Range Use this to change the input to make selection. Menu options that appropriate to a sub menu, and then use 5. Select (Menu) from the hot key menu. 2. Select to go to your video • DVI cable connection type. • HDMI • DP This feature is displayed without...
SW2700PT User Manual
Page 40
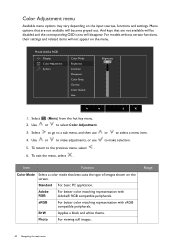
... a color mode that are not available will be disabled and the corresponding OSD icons will not appear on the menu. Color Adjustment menu Available menu options may vary depending on the screen. Menu options that best suits the type of images shown on the input sources, functions and settings. For models without certain functions, their settings and related items will disappear. Mode: Adobe RGB Display Color Adjustment System Color Mode Brightness Contrast Sharpness Color Temp. B+W Applies a black and white theme. Range...
... a color mode that are not available will be disabled and the corresponding OSD icons will not appear on the menu. Color Adjustment menu Available menu options may vary depending on the screen. Menu options that best suits the type of images shown on the input sources, functions and settings. For models without certain functions, their settings and related items will disappear. Mode: Adobe RGB Display Color Adjustment System Color Mode Brightness Contrast Sharpness Color Temp. B+W Applies a black and white theme. Range...
SW2700PT User Manual
Page 41
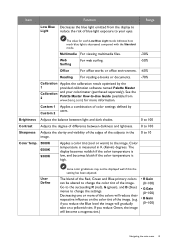
... warm) to -Use Guide (available from the display to Light reduce the risk of blue light exposure to change the color tint of the Red, Green and Blue primary colors can be displayed well if this the setting has been adjusted. Decreasing one or more information. if you reduce Green, the image will gradually take on the color tint of color settings defined by the 1 provided calibration software named Palette Master Calibration 2 and your...
... warm) to -Use Guide (available from the display to Light reduce the risk of blue light exposure to change the color tint of the Red, Green and Blue primary colors can be displayed well if this the setting has been adjusted. Decreasing one or more information. if you reduce Green, the image will gradually take on the color tint of color settings defined by the 1 provided calibration software named Palette Master Calibration 2 and your...
SW2700PT User Manual
Page 42
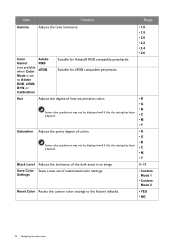
... Function Range Gamma Adjusts the tone luminance. • 1.6 • 1.8 • 2.0 • 2.2 • 2.4 • 2.6 Color Gamut (not available when Color Mode is set of the dark areas in an image. Save Color Saves a new set to the factory defaults. • YES • NO 42 Navigating the main menu Suitable for Adobe® RGB compatible peripherals. Settings 0~10 • Custom Mode 1 • Custom Mode 2 Reset Color Resets the custom color settings to Adobe RGB, sRGB, B+W, or Calibration) Adobe RGB...
... Function Range Gamma Adjusts the tone luminance. • 1.6 • 1.8 • 2.0 • 2.2 • 2.4 • 2.6 Color Gamut (not available when Color Mode is set of the dark areas in an image. Save Color Saves a new set to the factory defaults. • YES • NO 42 Navigating the main menu Suitable for Adobe® RGB compatible peripherals. Settings 0~10 • Custom Mode 1 • Custom Mode 2 Reset Color Resets the custom color settings to Adobe RGB, sRGB, B+W, or Calibration) Adobe RGB...
SW2700PT User Manual
Page 44
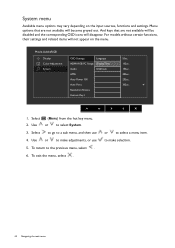
... items will not appear on the input sources, functions and settings. Use or to a sub menu, and then use 5. Menu options that are not available will disappear. System menu Available menu options may vary depending on the menu. Select (Menu) from the hot key menu. 2. To return to select System. 3. Mode: AdobeRGB Display Color Adjustment System OSD Settings Language HDMI RGB PC Range Display Time Audio OSD lock AMA Auto Power Off Auto Pivot Resolution Notice Custom Key 1 5Sec. 10Sec...
... items will not appear on the input sources, functions and settings. Use or to a sub menu, and then use 5. Menu options that are not available will disappear. System menu Available menu options may vary depending on the menu. Select (Menu) from the hot key menu. 2. To return to select System. 3. Mode: AdobeRGB Display Color Adjustment System OSD Settings Language HDMI RGB PC Range Display Time Audio OSD lock AMA Auto Power Off Auto Pivot Resolution Notice Custom Key 1 5Sec. 10Sec...

SW2700PT User Manual
Page 45
.... • 20 sec. • 25 sec. • 30 sec. Determines the range of the LCD panel. • ON • OFF Navigating the main menu 45 Volume Adjusts the audio volume. • 0~100 Mute Mutes the audio input. • ON • OFF Improves the gray level response time of color scales. Item OSD Settings Function Range Language Sets the OSD menu language. The language options displayed on the connected HDMI • RGB (16~235) device.
.... • 20 sec. • 25 sec. • 30 sec. Determines the range of the LCD panel. • ON • OFF Navigating the main menu 45 Volume Adjusts the audio volume. • 0~100 Mute Mutes the audio input. • ON • OFF Improves the gray level response time of color scales. Item OSD Settings Function Range Language Sets the OSD menu language. The language options displayed on the connected HDMI • RGB (16~235) device.
SW2700PT User Manual
Page 48
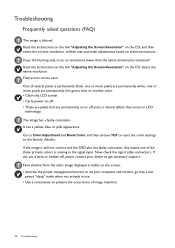
... resolution, refresh rate and make adjustments based on the CD. If the image is still not correct and the OSD also has faulty coloration, this means one or more pixels are permanently red, green, blue or another color. • Clean the LCD screen. • Cycle power on-off. • These are permanently on or off , please contact your computer and monitor go into a low power "sleep" mode when not actively in use. • Use...
... resolution, refresh rate and make adjustments based on the CD. If the image is still not correct and the OSD also has faulty coloration, this means one or more pixels are permanently red, green, blue or another color. • Clean the LCD screen. • Cycle power on-off. • These are permanently on or off , please contact your computer and monitor go into a low power "sleep" mode when not actively in use. • Use...

SW2700PT User Manual
Page 49
... external power supply and the mains switch. To have the optimal display performance of each type of input sources, you are using a display mode that does not help ? The OSD controls are USB-powered, check whether the USB connection is OK. • Increase the volume (volume may appear distorted or stretched on the monitor running the monitor at its native resolution. See Aspect Ratio on the computer keyboard or move the mouse. No sound can use...
... external power supply and the mains switch. To have the optimal display performance of each type of input sources, you are using a display mode that does not help ? The OSD controls are USB-powered, check whether the USB connection is OK. • Increase the volume (volume may appear distorted or stretched on the monitor running the monitor at its native resolution. See Aspect Ratio on the computer keyboard or move the mouse. No sound can use...


