
User Manual
Page 2
...panel 10 Remote control 11 Positioning your projector........ 12 Choosing a location 12 Obtaining a preferred projected image size 13 Projection dimensions 14 Shifting the projection lens 16 Connecting with video equipment 17 Preparations 17 Connecting HDMI devices 17 Connecting component-video devices ....18 Connecting S-Video or video devices ......18 Connecting a computer 19 Connecting a monitor 19 Using the projector 20 Turning the projector on 20 Selecting an input source 21 Using the menus 22 Securing the projector 22 Using a security cable lock 22 Utilizing the password...
...panel 10 Remote control 11 Positioning your projector........ 12 Choosing a location 12 Obtaining a preferred projected image size 13 Projection dimensions 14 Shifting the projection lens 16 Connecting with video equipment 17 Preparations 17 Connecting HDMI devices 17 Connecting component-video devices ....18 Connecting S-Video or video devices ......18 Connecting a computer 19 Connecting a monitor 19 Using the projector 20 Turning the projector on 20 Selecting an input source 21 Using the menus 22 Securing the projector 22 Using a security cable lock 22 Utilizing the password...
User Manual
Page 4
... life could cause a lamp to your sight. 6. Use only BenQ's Ceiling Mount Kit for ceiling mount installation. English 5. Do not cover the projector with any objects upon it. 11. It may fluctuate by ±10 volts, it from the power point and call BenQ to removing the lamp assembly for approximately 45 minutes prior to have the projector repaired. 12. Excessive operation of displaying inverted images for mounting. 4 Important safety instructions If the projector...
... life could cause a lamp to your sight. 6. Use only BenQ's Ceiling Mount Kit for ceiling mount installation. English 5. Do not cover the projector with any objects upon it. 11. It may fluctuate by ±10 volts, it from the power point and call BenQ to removing the lamp assembly for approximately 45 minutes prior to have the projector repaired. 12. Excessive operation of displaying inverted images for mounting. 4 Important safety instructions If the projector...
User Manual
Page 7
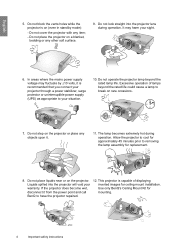
... with the case and sliding it clicks into position. If you to an improper attachment through the use a non-BenQ brand projector ceiling mount kit, there is up into place. Stop when it back up to 8 meters, and at the projector, however most screens will slide off. 2. To open the battery cover, turn the remote control over to view its attachment to negative. 3.
... with the case and sliding it clicks into position. If you to an improper attachment through the use a non-BenQ brand projector ceiling mount kit, there is up into place. Stop when it back up to 8 meters, and at the projector, however most screens will slide off. 2. To open the battery cover, turn the remote control over to view its attachment to negative. 3.

User Manual
Page 9
... screen or light control, etc. Kensington lock slot 20. Ceiling mount holes 22 22 21 Overview 9 Rear IR sensor 9. Adjustable feet 22. Control panel (See "Control panel" on page 17 for details.) 2. S-Video input (mini 4-pin DIN) 13. Audio input jack Audio output jack 19. English Projector exterior view Front and upper side view 1 2 1. RJ45 LAN input jack 10. USB port 14. RGB (PC)/Component video (YPbPr/YCbCr) signal input jack 18. Composite Video input (RCA) 12. Lamp cover 3 3. AC Power cable...
... screen or light control, etc. Kensington lock slot 20. Ceiling mount holes 22 22 21 Overview 9 Rear IR sensor 9. Adjustable feet 22. Control panel (See "Control panel" on page 17 for details.) 2. S-Video input (mini 4-pin DIN) 13. Audio input jack Audio output jack 19. English Projector exterior view Front and upper side view 1 2 1. RJ45 LAN input jack 10. USB port 14. RGB (PC)/Component video (YPbPr/YCbCr) signal input jack 18. Composite Video input (RCA) 12. Lamp cover 3 3. AC Power cable...

User Manual
Page 10
...POWER on the remote control. English Controls and functions Control panel 1 2 3 4 5 6 7 8 6 6 9 10 11 6 12 1. TEMPerature warning light Lights up or flashes when the projector is activated. LAMP indicator light Lights up or flashes when the projector lamp has developed a problem. 6. Switches sequentially through input sources. 10. MENU Toggles the On-Screen Display (OSD) menu on . 8. EXIT Goes back to previous OSD menus, exits and saves any changes made using the On-Screen Display (OSD) menu. 11. Focus ring Adjusts the focus of the projected image. 3. Manually...
...POWER on the remote control. English Controls and functions Control panel 1 2 3 4 5 6 7 8 6 6 9 10 11 6 12 1. TEMPerature warning light Lights up or flashes when the projector is activated. LAMP indicator light Lights up or flashes when the projector lamp has developed a problem. 6. Switches sequentially through input sources. 10. MENU Toggles the On-Screen Display (OSD) menu on . 8. EXIT Goes back to previous OSD menus, exits and saves any changes made using the On-Screen Display (OSD) menu. 11. Focus ring Adjusts the focus of the projected image. 3. Manually...
User Manual
Page 12
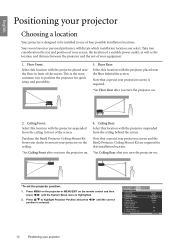
... installation location. *Set Ceiling Rear after you turn the projector on the remote control and then press / until the System Setup menu is designed to mount your projector Ceiling Front: Select this location with the projector suspended from your dealer to be installed in front of the screen. Take into consideration the size and position of your screen, the location of a suitable power outlet, as well as the location and distance between the projector...
... installation location. *Set Ceiling Rear after you turn the projector on the remote control and then press / until the System Setup menu is designed to mount your projector Ceiling Front: Select this location with the projector suspended from your dealer to be installed in front of the screen. Take into consideration the size and position of your screen, the location of a suitable power outlet, as well as the location and distance between the projector...

User Manual
Page 22
... Disable Blue Off Off EXIT Back 3. Securing the projector Using a security cable lock The projector has to be installed in a safe place to exit. Refer to secure the projector. A Kensington security cable lock is usually a combination of the OSD menu. Basic Picture Mode Load Settings From Brightness Contrast Color Tint Sharpness Reset Picture Settings Rename User Mode + 50 + 50 + 50 0 + 3 Cinema S-Video EXIT Back 2. System Setup Language Splash Screen Projector Position Auto Off Sleep Timer Background Color Menu Settings Input Source Auto Source...
... Disable Blue Off Off EXIT Back 3. Securing the projector Using a security cable lock The projector has to be installed in a safe place to exit. Refer to secure the projector. A Kensington security cable lock is usually a combination of the OSD menu. Basic Picture Mode Load Settings From Brightness Contrast Color Tint Sharpness Reset Picture Settings Rename User Mode + 50 + 50 + 50 0 + 3 Cinema S-Video EXIT Back 2. System Setup Language Splash Screen Projector Position Auto Off Sleep Timer Background Color Menu Settings Input Source Auto Source...
User Manual
Page 23
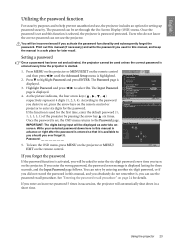
... six times. Users who do not remember it . Print out this manual (if necessary) and write the password you enter the wrong password, the password error message is displayed. 3. Press to select On. Password Advanced Setup Lamp Settings HDMI Settings Baud Rate Test Pattern High Altitude Mode Audio Settings Password Lan Control Settings Reset All Settings Expert Mode Direct Power On S-Video Password Password Change Password Input Password 115200 Off ENTER Off EXIT Back On EXIT Back 5. See "Entering the password recall procedure" on the remote control...
... six times. Users who do not remember it . Print out this manual (if necessary) and write the password you enter the wrong password, the password error message is displayed. 3. Press to select On. Password Advanced Setup Lamp Settings HDMI Settings Baud Rate Test Pattern High Altitude Mode Audio Settings Password Lan Control Settings Reset All Settings Expert Mode Direct Power On S-Video Password Password Change Password Input Password 115200 Off ENTER Off EXIT Back On EXIT Back 5. See "Entering the password recall procedure" on the remote control...
User Manual
Page 24
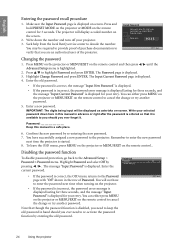
... projector or MENU/EXIT on the remote control to the projector. You may be displayed as asterisks on the screen. 2. Press / to the Advanced Setup > Password Password > Password menu. The Password page is displayed. 4. Enter a new password. The message "Input Password" is displayed for three seconds, and the message "Input Password" is displayed. Seek help from the local BenQ service center to enter the new password next time the projector is displayed for three seconds, and the message "Input Current Password" is started. 8. You will display a coded number on -screen...
... projector or MENU/EXIT on the remote control to the projector. You may be displayed as asterisks on the screen. 2. Press / to the Advanced Setup > Password Password > Password menu. The Password page is displayed. 4. Enter a new password. The message "Input Password" is displayed for three seconds, and the message "Input Password" is displayed. Seek help from the local BenQ service center to enter the new password next time the projector is displayed for three seconds, and the message "Input Current Password" is started. 8. You will display a coded number on -screen...

User Manual
Page 27
... that input source. If you change the picture mode, the projector also changes the setting to the one to highlight Picture Mode. 3. Press / until the Picture -- See "Setting the User 1/User 2 mode" on the remote contro,l and then press / until your desired mode is selected. • Using the OSD menu 1. Press to highlight the item you want to adjust and press / to -life images regardless of RGB colors to provide true-to set for viewing...
... that input source. If you change the picture mode, the projector also changes the setting to the one to highlight Picture Mode. 3. Press / until the Picture -- See "Setting the User 1/User 2 mode" on the remote contro,l and then press / until your desired mode is selected. • Using the OSD menu 1. Press to highlight the item you want to adjust and press / to -life images regardless of RGB colors to provide true-to set for viewing...

User Manual
Page 28
... a white box. 3. See "Reset All Settings" on the remote control to select User 1 or User 2 mode. 2. See "Fine-tuning the picture quality" on page 29 and "Advanced picture quality controls" on the highlight of the adjustments you want to reset. 2. Repeat steps 2-4 if you want to the factory preset values system wide. Basic Picture Mode Load Settings From Brightness Contrast Color Tint Sharpness Reset Picture Settings Rename User Mode +50 +50 +50 0 + 3 User 1 ENTER S-Video...
... a white box. 3. See "Reset All Settings" on the remote control to select User 1 or User 2 mode. 2. See "Fine-tuning the picture quality" on page 29 and "Advanced picture quality controls" on the highlight of the adjustments you want to reset. 2. Repeat steps 2-4 if you want to the factory preset values system wide. Basic Picture Mode Load Settings From Brightness Contrast Color Tint Sharpness Reset Picture Settings Rename User Mode +50 +50 +50 0 + 3 User 1 ENTER S-Video...
User Manual
Page 32
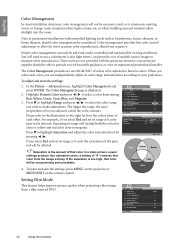
... menu, highlight Color Management and press ENTER. Advanced Black Level Clarity Control Color Temperature Color Temperature User_ Fine Tuning Gamma Selection Brilliant Color Color Management Film Mode 3D Comb Filter Dynamic Black 0 IRE T1 2 On ENTER On On On S-Video EXIT Back Color Management Primary Color Range Saturation +15 +15 Magenta EXIT Back Red Yellow Green Magenta Cyan Blue Setting Film Mode This feature helps improve picture quality when projecting video image from a film-sourced DVD...
... menu, highlight Color Management and press ENTER. Advanced Black Level Clarity Control Color Temperature Color Temperature User_ Fine Tuning Gamma Selection Brilliant Color Color Management Film Mode 3D Comb Filter Dynamic Black 0 IRE T1 2 On ENTER On On On S-Video EXIT Back Color Management Primary Color Range Saturation +15 +15 Magenta EXIT Back Red Yellow Green Magenta Cyan Blue Setting Film Mode This feature helps improve picture quality when projecting video image from a film-sourced DVD...

User Manual
Page 38
... On-Screen Display (OSD) menu item. iii. English 2. The remote network operation page opens. ii To switch input source, click on page 11 for the S-Video signal. The source list varies according to the tools page has been password-protected. You can name the projector, keep track of its location and the person in the projector. iv. i iii ii iv v i. After making the adjustments, press the Send button and the data...
... On-Screen Display (OSD) menu item. iii. English 2. The remote network operation page opens. ii To switch input source, click on page 11 for the S-Video signal. The source list varies according to the tools page has been password-protected. You can name the projector, keep track of its location and the person in the projector. iv. i iii ii iv v i. After making the adjustments, press the Send button and the data...
User Manual
Page 44
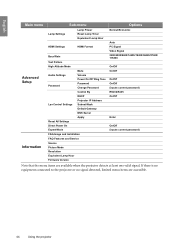
... Setup Information Lamp Settings Sub-menu Lamp Power Reset Lamp Timer Equivalent Lamp Hour HDMI Settings HDMI Format Baud Rate Test Pattern High Altitude Mode Mute Audio Settings Volume Power On/Off Ring Tone Password Password Change Password Control By DHCP Projector IP Address Lan Control Settings Subnet Mask Default Gateway DNS Server Apply Reset All Settings Direct Power On Expert Mode FAQ-Image and Installation FAQ-Features and Service Source Picture Mode Resolution Equivalent Lamp Hour Firmware Version Options Normal/Economic Auto PC Signal Video Signal...
... Setup Information Lamp Settings Sub-menu Lamp Power Reset Lamp Timer Equivalent Lamp Hour HDMI Settings HDMI Format Baud Rate Test Pattern High Altitude Mode Mute Audio Settings Volume Power On/Off Ring Tone Password Password Change Password Control By DHCP Projector IP Address Lan Control Settings Subnet Mask Default Gateway DNS Server Apply Reset All Settings Direct Power On Expert Mode FAQ-Image and Installation FAQ-Features and Service Source Picture Mode Resolution Equivalent Lamp Hour Firmware Version Options Normal/Economic Auto PC Signal Video Signal...
User Manual
Page 48
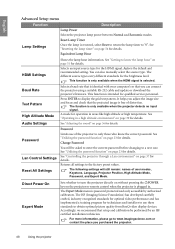
... optimal picture quality from BenQ video display devices. English Advanced Setup menu Function Lamp Settings Description Lamp Power Selects the projector lamp power between Normal and Economic modes. Password Limits use these standards to turn the projector directly on without pressing the II POWER key on page 23 for details. You can connect the projector using a suitable RS-232 cable and update or download the projector's firmware. See "Adjusting the sound" on page 37 for details. The ISF (Imaging Science...
... optimal picture quality from BenQ video display devices. English Advanced Setup menu Function Lamp Settings Description Lamp Power Selects the projector lamp power between Normal and Economic modes. Password Limits use these standards to turn the projector directly on without pressing the II POWER key on page 23 for details. You can connect the projector using a suitable RS-232 cable and update or download the projector's firmware. See "Adjusting the sound" on page 37 for details. The ISF (Imaging Science...

User Manual
Page 51
... time period. System Setup Language Splash Screen Projector Position Auto Off Sleep Timer Background Color Menu Settings Input Source Auto Source Search Closed Caption Standby Monitor Out S-Video English BenQ Floor Front Disable Disable Blue On Off EXIT Back Additional information 51 If the Economic mode is selected, the light output will not automatically shut down in 5-minute increments. To set period of time. Press MENU on the projector or MENU/EXIT on the remote control. The lamp hour...
... time period. System Setup Language Splash Screen Projector Position Auto Off Sleep Timer Background Color Menu Settings Input Source Auto Source Search Closed Caption Standby Monitor Out S-Video English BenQ Floor Front Disable Disable Blue On Off EXIT Back Additional information 51 If the Economic mode is selected, the light output will not automatically shut down in 5-minute increments. To set period of time. Press MENU on the projector or MENU/EXIT on the remote control. The lamp hour...
User Manual
Page 52
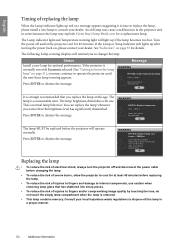
... a replacement lamp. Go to operate the projector until the next hour lamp warning appears. Press ENTER to User's Manual) then reset lamp timer. This is a consumable item. Consult your local hazardous waste regulations to dispose of replacing the lamp When the Lamp indicator lights up red or a message appears suggesting it is strongly recommended that you may continue to http://lamp.BenQ.com for details. Status Install a new lamp for at lamp.benq.com OK Replacing the lamp •...
... a replacement lamp. Go to operate the projector until the next hour lamp warning appears. Press ENTER to User's Manual) then reset lamp timer. This is a consumable item. Consult your local hazardous waste regulations to dispose of replacing the lamp When the Lamp indicator lights up red or a message appears suggesting it is strongly recommended that you may continue to http://lamp.BenQ.com for details. Status Install a new lamp for at lamp.benq.com OK Replacing the lamp •...
User Manual
Page 55
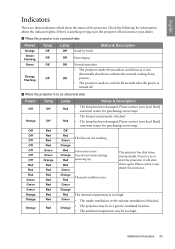
... rotate during powering up Off Normal operation • The projector needs 90 seconds to cool for assistance. When the projector is blocked. • The projector may be in an abnormal state Power Off Orange Off Off Off Off Off Off Off Red Red Red Green Green Green Orange Orange Orange Temp Off Off Red Red Red Red Green Green Orange Red Red Red Red Red Red Red Red Red Lamp Red Red Off Red Green Orange Red Orange Red Red Green Orange Red Green Orange Red Green Orange Status & Description • The lamp has been damaged. English Indicators There are not working. Check...
... rotate during powering up Off Normal operation • The projector needs 90 seconds to cool for assistance. When the projector is blocked. • The projector may be in an abnormal state Power Off Orange Off Off Off Off Off Off Off Red Red Red Green Green Green Orange Orange Orange Temp Off Off Red Red Red Red Green Green Orange Red Red Red Red Red Red Red Red Red Lamp Red Red Off Red Green Orange Red Orange Red Red Green Orange Red Green Orange Red Green Orange Status & Description • The lamp has been damaged. English Indicators There are not working. Check...

User Manual
Page 56
... lamp cover is not correctly focused. Select the correct input source with new ones. (See page 7.) Remote control does There is an obstacle between the not work correctly. Correctly connect the cables to the input source device. remote control and the projector. If the power outlet has a switch, make sure that the signal cable is connected correctly. (See page 17.) No picture. Adjust the focus of the lens using the focus ring. (See page 25.) Adjust the projection angle...
... lamp cover is not correctly focused. Select the correct input source with new ones. (See page 7.) Remote control does There is an obstacle between the not work correctly. Correctly connect the cables to the input source device. remote control and the projector. If the power outlet has a switch, make sure that the signal cable is connected correctly. (See page 17.) No picture. Adjust the focus of the lens using the focus ring. (See page 25.) Adjust the projection angle...

User Manual
Page 63
... contrast adjustments that the monitor is using less than 2 watts of electricity. • BenQ's monitors have a variety of settings of pre-programmed flicker-free timing to make the screen shown on the products. • BenQ's monitors and projectors include user-selectable color controls, such as a special headphone to assist the hearing impaired. • All BenQ monitors and projectors come with user manuals on the front-panel. • Firmware of BenQ...
... contrast adjustments that the monitor is using less than 2 watts of electricity. • BenQ's monitors have a variety of settings of pre-programmed flicker-free timing to make the screen shown on the products. • BenQ's monitors and projectors include user-selectable color controls, such as a special headphone to assist the hearing impaired. • All BenQ monitors and projectors come with user manuals on the front-panel. • Firmware of BenQ...


