Rl2755HM User Manual
Page 4
... Windows 8 (8.1) system 20 How to install on Windows 7 system 21 How to adjust your monitor 22 The control panel...22 Basic menu operation...23 Picture optimization ...25 Customizing the hot keys...25 Setting up your own game mode ...25 Adjusting display mode ...26 Using Smart Scaling...26 Navigating the main menu ...27 Display menu ...28 Picture menu ...30 Picture Advanced menu ...33 Save Settings menu ...37 Audio menu ...38 System menu ...39 Troubleshooting ...42 Frequently asked questions (FAQ) ...42 Need more help...
... Windows 8 (8.1) system 20 How to install on Windows 7 system 21 How to adjust your monitor 22 The control panel...22 Basic menu operation...23 Picture optimization ...25 Customizing the hot keys...25 Setting up your own game mode ...25 Adjusting display mode ...26 Using Smart Scaling...26 Navigating the main menu ...27 Display menu ...28 Picture menu ...30 Picture Advanced menu ...33 Save Settings menu ...37 Audio menu ...38 System menu ...39 Troubleshooting ...42 Frequently asked questions (FAQ) ...42 Need more help...
Rl2755HM User Manual
Page 9
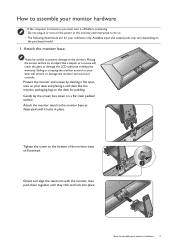
.... How to assemble your monitor hardware 9 Do not plug-in place. Protect the monitor and screen by clearing a flat open area on your desk will crack the glass or damage the LCD substrate voiding your reference only. Tighten the screw on a flat clean padded surface. Placing the screen surface on an object like the monitor packaging bag on the purchased model. 1. Available input and output...
.... How to assemble your monitor hardware 9 Do not plug-in place. Protect the monitor and screen by clearing a flat open area on your desk will crack the glass or damage the LCD substrate voiding your reference only. Tighten the screw on a flat clean padded surface. Placing the screen surface on an object like the monitor packaging bag on the purchased model. 1. Available input and output...
Rl2755HM User Manual
Page 11
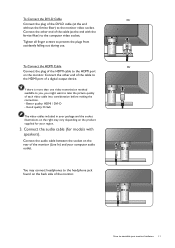
... the HDMI port on the rear of each video cable into consideration before making the connection. - Connect the audio cable (for your monitor hardware 11 How to assemble your region. 3. You may vary depending on the product supplied for models with the ferrite filter) to the computer video socket. Connect the other end of the cable to the HDMI port of a digital output device. Connect the other end of the DVI-D cable...
... the HDMI port on the rear of each video cable into consideration before making the connection. - Connect the audio cable (for your monitor hardware 11 How to assemble your region. 3. You may vary depending on the product supplied for models with the ferrite filter) to the computer video socket. Connect the other end of the cable to the HDMI port of a digital output device. Connect the other end of the DVI-D cable...
Rl2755HM User Manual
Page 17
... your Windows computer, you turn on as an Administrator or as provided on the back of Microsoft Windows you are using, and whether you are upgrading an existing installation (which process you are connecting the monitor and installing the software onto a new computer (without existing monitor driver software), or whether you need to follow to successfully install the BenQ LCD Monitor driver software. Further details and step-by-step instructions for...
... your Windows computer, you turn on as an Administrator or as provided on the back of Microsoft Windows you are using, and whether you are upgrading an existing installation (which process you are connecting the monitor and installing the software onto a new computer (without existing monitor driver software), or whether you need to follow to successfully install the BenQ LCD Monitor driver software. Further details and step-by-step instructions for...
Rl2755HM User Manual
Page 18
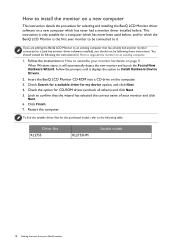
... the first ever monitor to be connected to it (and has monitor driver software installed), you should instead be following these instructions. Check Search for a suitable driver for which has never had another monitor connected to it . Check the option for How to upgrade the monitor on an existing computer. 1. Click Finish. 7. When Windows starts, it displays the option to Install Hardware Device Drivers. 2. Restart the computer. You should...
... the first ever monitor to be connected to it (and has monitor driver software installed), you should instead be following these instructions. Check Search for a suitable driver for which has never had another monitor connected to it . Check the option for How to upgrade the monitor on an existing computer. 1. Click Finish. 7. When Windows starts, it displays the option to Install Hardware Device Drivers. 2. Restart the computer. You should...
Rl2755HM User Manual
Page 19
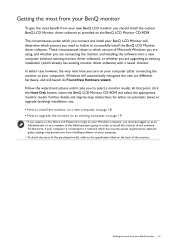
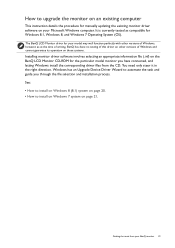
... Microsoft Windows computer. Getting the most from the CD. You need only steer it in the right direction. The BenQ LCD Monitor driver for your model may well function perfectly with other versions of Windows, however, as compatible for Windows 8.1, Windows 8, and Windows 7 Operating System (OS). How to upgrade the monitor on an existing computer This instruction details the procedure for manually updating the existing monitor driver software on your BenQ monitor...
... Microsoft Windows computer. Getting the most from the CD. You need only steer it in the right direction. The BenQ LCD Monitor driver for your model may well function perfectly with other versions of Windows, however, as compatible for Windows 8.1, Windows 8, and Windows 7 Operating System (OS). How to upgrade the monitor on an existing computer This instruction details the procedure for manually updating the existing monitor driver software on your BenQ monitor...
Rl2755HM User Manual
Page 20
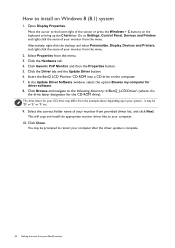
... 'F:' etc. 9. Click the Driver tab and the Update Driver button. 6. Click Close. Move the cursor to restart your monitor from the menu. 3. Click Generic PnP Monitor, and then the Properties button. 5. Click Browse and navigate to install on the computer. 7. Click the Hardware tab. 4. The drive letter for driver software. 8. This will copy and install the appropriate monitor driver files to Settings, Control Panel, Devices and Printers...
... 'F:' etc. 9. Click the Driver tab and the Update Driver button. 6. Click Close. Move the cursor to restart your monitor from the menu. 3. Click Generic PnP Monitor, and then the Properties button. 5. Click Browse and navigate to install on the computer. 7. Click the Hardware tab. 4. The drive letter for driver software. 8. This will copy and install the appropriate monitor driver files to Settings, Control Panel, Devices and Printers...
Rl2755HM User Manual
Page 23
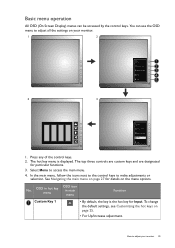
... main menu. 4. Basic menu operation All OSD (On Screen Display) menus can use the OSD menu to adjust all the settings on your monitor 23 The hot key menu is the hot key for Input. Press any of the control keys. 2. How to adjust your monitor. 1 2 Input Picture Mode Black eQualizer Menu Exit 4 3 Input Picture Mode Black eQualizer Menu Exit 1. See Navigating the main menu on page 27 for particular functions. 3. Select Menu to make adjustments or selection. To change the default settings...
... main menu. 4. Basic menu operation All OSD (On Screen Display) menus can use the OSD menu to adjust all the settings on your monitor 23 The hot key menu is the hot key for Input. Press any of the control keys. 2. How to adjust your monitor. 1 2 Input Picture Mode Black eQualizer Menu Exit 4 3 Input Picture Mode Black eQualizer Menu Exit 1. See Navigating the main menu on page 27 for particular functions. 3. Select Menu to make adjustments or selection. To change the default settings...
Rl2755HM User Manual
Page 25
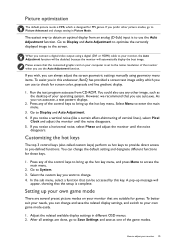
... connected graphic card on your computer is set to the native resolution of your own game mode easily. 1. In the sub menu, select a function that the setup is complete. The easiest way to obtain an optimal display from CD-ROM. If you wish, you can always adjust the screen geometric settings manually using a digital (DVI or HDMI) cable to your monitor, the Auto Adjustment function will automatically display the best image. You could also use the Auto Adjustment...
... connected graphic card on your computer is set to the native resolution of your own game mode easily. 1. In the sub menu, select a function that the setup is complete. The easiest way to obtain an optimal display from CD-ROM. If you wish, you can always adjust the screen geometric settings manually using a digital (DVI or HDMI) cable to your monitor, the Auto Adjustment function will automatically display the best image. You could also use the Auto Adjustment...
Rl2755HM User Manual
Page 28
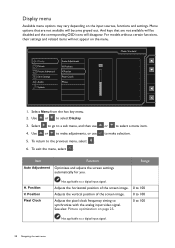
...the analog input video signal. Adjusts the horizontal position of the screen image. Select Menu from the hot key menu. 2. Display Picture Picture Advanced Save Settings Audio System Auto Adjustment H.Position V.Postion Pixel Clock Phase Mode: Standard 50 1. Item Auto Adjustment Function Optimizes and adjusts the screen settings automatically for you. Display menu Available menu options may vary depending on page 25. 0 to 100 0 to 100 0 to 100 Not applicable to a digital input signal. 28 Navigating the main menu Adjusts the vertical position of the screen image. And...
...the analog input video signal. Adjusts the horizontal position of the screen image. Select Menu from the hot key menu. 2. Display Picture Picture Advanced Save Settings Audio System Auto Adjustment H.Position V.Postion Pixel Clock Phase Mode: Standard 50 1. Item Auto Adjustment Function Optimizes and adjusts the screen settings automatically for you. Display menu Available menu options may vary depending on page 25. 0 to 100 0 to 100 0 to 100 Not applicable to a digital input signal. 28 Navigating the main menu Adjusts the vertical position of the screen image. And...
Rl2755HM User Manual
Page 30
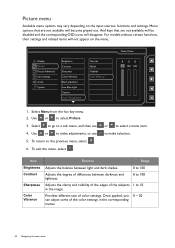
... to select a menu item. Display Picture Picture Advanced Save Settings Audio System Brightness Contrast Sharpness Color Vibrance Black eQualizer Low Blue Light Gamma Color Temperature Normal Bluish Reddish User Mode Mode: Photo R GB 100 100 100 1. Use or to make adjustments, or use 4. to make selection. Once applied, you 0 ~ 20 can adjust some of color settings. Select Menu from the hot key menu. 2. Select to go to select Picture. 3. Use or to a sub menu, and then use 5. Picture menu Available menu options may vary...
... to select a menu item. Display Picture Picture Advanced Save Settings Audio System Brightness Contrast Sharpness Color Vibrance Black eQualizer Low Blue Light Gamma Color Temperature Normal Bluish Reddish User Mode Mode: Photo R GB 100 100 100 1. Use or to make adjustments, or use 4. to make selection. Once applied, you 0 ~ 20 can adjust some of color settings. Select Menu from the hot key menu. 2. Select to go to select Picture. 3. Use or to a sub menu, and then use 5. Picture menu Available menu options may vary...
Rl2755HM User Manual
Page 31
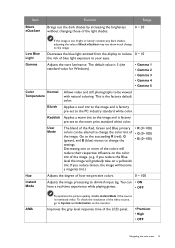
... tint to the image and is too bright or barely contains any dark shades, adjusting the value of the video source, go to diminish input lag. To check the resolution of Black eQualizer may not show much change to the news print standard white color. Improves the gray level response time of blue light exposure to reduce 0 ~ 10 the risk of the LCD panel. • Premium...
... tint to the image and is too bright or barely contains any dark shades, adjusting the value of the video source, go to diminish input lag. To check the resolution of Black eQualizer may not show much change to the news print standard white color. Improves the gray level response time of blue light exposure to reduce 0 ~ 10 the risk of the LCD panel. • Premium...

Rl2755HM User Manual
Page 33
... the input sources, functions and settings. Display Picture Picture Advanced Save Settings Audio System Picture Mode Senseye Demo Dynamic Contrast Overscan Display Mode Smart Scaling Color Format HDMI RGB PC Range Standard Movie Photo sRGB Eco FPS Fighting RTS 1 Mode: FPS 1. Use or to the previous menu, select . 6. To return to select Picture Advanced. 3. Photo For viewing still images. The default setting is FPS. Change the setting if needed. Eco For saving electricity with the peripheral devices, such as printers, digital...
... the input sources, functions and settings. Display Picture Picture Advanced Save Settings Audio System Picture Mode Senseye Demo Dynamic Contrast Overscan Display Mode Smart Scaling Color Format HDMI RGB PC Range Standard Movie Photo sRGB Eco FPS Fighting RTS 1 Mode: FPS 1. Use or to the previous menu, select . 6. To return to select Picture Advanced. 3. Photo For viewing still images. The default setting is FPS. Change the setting if needed. Eco For saving electricity with the peripheral devices, such as printers, digital...
Rl2755HM User Manual
Page 35
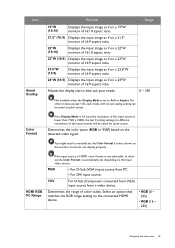
... (RGB or YUV) based on the connected HDMI device. • RGB (0 ~ 255) • RGB (16 ~ 235) Navigating the main menu 35 RGB • For D-Sub (VGA) input source from a video device. Select an option that matches the RGB range setting on the detected video signal. YUV For D-Sub (Component converted from VGA) input source from PC. • For DVI input source. Item Smart Scaling Function 19"W (16:10) Displays the input image as if on a 19"W monitor...
... (RGB or YUV) based on the connected HDMI device. • RGB (0 ~ 255) • RGB (16 ~ 235) Navigating the main menu 35 RGB • For D-Sub (VGA) input source from a video device. Select an option that matches the RGB range setting on the detected video signal. YUV For D-Sub (Component converted from VGA) input source from PC. • For DVI input source. Item Smart Scaling Function 19"W (16:10) Displays the input image as if on a 19"W monitor...
Rl2755HM User Manual
Page 39
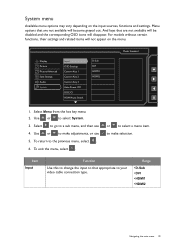
... select System. 3. Menu options that are not available will not appear on the input sources, functions and settings. Display Picture Picture Advanced Save Settings Audio System Input OSD Settings Custom Key 1 Custom Key 2 Custom Key 3 Auto Power Off DDC/CI HDMI Auto Switch D-Sub DVI HDMI1 HDMI2 Mode: Standard 1. Select Menu from the hot key menu. 2. Use or to a sub menu, and then use 5. Item Input Function Use this to change the input to that appropriate to your video cable connection type.
... select System. 3. Menu options that are not available will not appear on the input sources, functions and settings. Display Picture Picture Advanced Save Settings Audio System Input OSD Settings Custom Key 1 Custom Key 2 Custom Key 3 Auto Power Off DDC/CI HDMI Auto Switch D-Sub DVI HDMI1 HDMI2 Mode: Standard 1. Select Menu from the hot key menu. 2. Use or to a sub menu, and then use 5. Item Input Function Use this to change the input to that appropriate to your video cable connection type.
Rl2755HM User Manual
Page 41
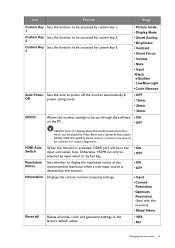
... • OFF Sets whether to display the resolution notice of the recommended resolution when a new input source is activated, HDMI port will be selected by input select or by Video Electronics Standards Association (VESA). Otherwise, HDMI can only be in Off power saving mode. • Picture mode • Display Mode • Smart Scaling • Brightness • Contrast • Smart Focus • Volume • Mute • Input • Black eQualizer • Low Blue Light • Color Vibrance •...
... • OFF Sets whether to display the resolution notice of the recommended resolution when a new input source is activated, HDMI port will be selected by input select or by Video Electronics Standards Association (VESA). Otherwise, HDMI can only be in Off power saving mode. • Picture mode • Display Mode • Smart Scaling • Brightness • Contrast • Smart Focus • Volume • Mute • Input • Black eQualizer • Low Blue Light • Color Vibrance •...
Rl2755HM User Manual
Page 42
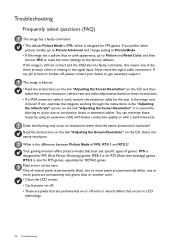
... get necessary support. One of several pixels is permanently black, one or more pixels are permanently red, green, blue or another color. • Clean the LCD screen. • Cycle power on the link "Adjusting the Screen Resolution". If the image is a natural defect that best suit specific types of games. If not, optimize the image by using an extension cable with better conduction quality or with a built-in the "Adjusting the refresh rate" section on...
... get necessary support. One of several pixels is permanently black, one or more pixels are permanently red, green, blue or another color. • Clean the LCD screen. • Cycle power on the link "Adjusting the Screen Resolution". If the image is a natural defect that best suit specific types of games. If not, optimize the image by using an extension cable with better conduction quality or with a built-in the "Adjusting the refresh rate" section on...
Rl2755HM User Manual
Page 43
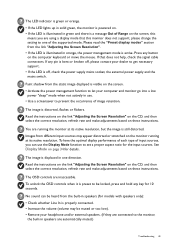
... connected. • Increase the volume (volume may appear distorted or stretched on the monitor running the monitor at its native resolution, but the image is still distorted. The image is active. To have the optimal display performance of each type of input sources, you are using a display mode that does not help, check the signal cable connectors. Read the instructions on the link "Adjusting the Screen Resolution" on the CD, and then select the correct resolution, refresh rate...
... connected. • Increase the volume (volume may appear distorted or stretched on the monitor running the monitor at its native resolution, but the image is still distorted. The image is active. To have the optimal display performance of each type of input sources, you are using a display mode that does not help, check the signal cable connectors. Read the instructions on the link "Adjusting the Screen Resolution" on the CD, and then select the correct resolution, refresh rate...
RL2755HM Data Sheet
Page 1
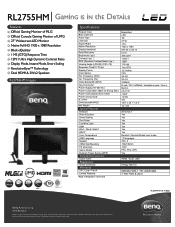
...) Ver. Frequency (Hz) Video Bandwidth (MHZ) Input Connector Power Supply (90~264 AC) Power Consumption (Base on Energy Star) Power Consumption (Eco mode) Power saving mode K Locker Dimensions(HxWxD) Net Weight Special Features Senseye Black eQualizer Smart Scaling ZeroFlicker Low Blue Light AMA Win7 / Win8 / Win8.1 HDCP Color Temperature OSD Language Speaker VESA Wall Mounting Tilt (down/up) Game Modes Dynamic Power Saving (DPS) Included Accessories Signal Cable Regulations Green Certificate Warranty UPC Code / Part # Limited Warranty *Based on Energy Star 5.1 test criteria Black-Red LED TN...
...) Ver. Frequency (Hz) Video Bandwidth (MHZ) Input Connector Power Supply (90~264 AC) Power Consumption (Base on Energy Star) Power Consumption (Eco mode) Power saving mode K Locker Dimensions(HxWxD) Net Weight Special Features Senseye Black eQualizer Smart Scaling ZeroFlicker Low Blue Light AMA Win7 / Win8 / Win8.1 HDCP Color Temperature OSD Language Speaker VESA Wall Mounting Tilt (down/up) Game Modes Dynamic Power Saving (DPS) Included Accessories Signal Cable Regulations Green Certificate Warranty UPC Code / Part # Limited Warranty *Based on Energy Star 5.1 test criteria Black-Red LED TN...
RL2x55HM Brochure
Page 2
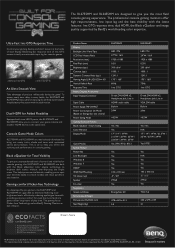
... Name Display Backlight Unit / Panel Type LCD Size / Aspect Ratio Resolution (max.) Pixel Pitch (mm) Brightness (typ.) Contrast (typ.) Dynamic Contrast Ratio (typ.) Viewing Angle (L/R:U/D) (CR>=10) Vertical Refresh Rate Response Time Inputs, Outputs,Accessories Input/ Output Connector Signal Cable Power Supply (90~264 AC) Power Consumption On Mode (Based on Energy Star test criteria) Power Saving Mode Gaming Exclusive Feature Black eQualizer / Smart Scaling Color Vibrance Display Mode Game Modes Special Feature Flicker-free Low Blue Light Windows 8 Windows 7 HDCP VESA Wall Mounting Tilt (down...
... Name Display Backlight Unit / Panel Type LCD Size / Aspect Ratio Resolution (max.) Pixel Pitch (mm) Brightness (typ.) Contrast (typ.) Dynamic Contrast Ratio (typ.) Viewing Angle (L/R:U/D) (CR>=10) Vertical Refresh Rate Response Time Inputs, Outputs,Accessories Input/ Output Connector Signal Cable Power Supply (90~264 AC) Power Consumption On Mode (Based on Energy Star test criteria) Power Saving Mode Gaming Exclusive Feature Black eQualizer / Smart Scaling Color Vibrance Display Mode Game Modes Special Feature Flicker-free Low Blue Light Windows 8 Windows 7 HDCP VESA Wall Mounting Tilt (down...


