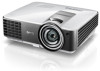
- PRJ Networking Operation Guide
Page 2
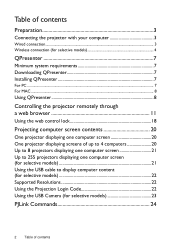
... computer 3 Wired connection...3 Wireless connection (for selective models 4 QPresenter 7 Minimum system requirements 7 Downloading QPresenter 7 Installing QPresenter 7 For PC ...7 For MAC ...8 Using QPresenter 8 Controlling the projector remotely through a web browser 11 Using the web control lock 18 Projecting computer screen contents 20 One projector displaying one computer screen 20 One projector displaying...
... computer 3 Wired connection...3 Wireless connection (for selective models 4 QPresenter 7 Minimum system requirements 7 Downloading QPresenter 7 Installing QPresenter 7 For PC ...7 For MAC ...8 Using QPresenter 8 Controlling the projector remotely through a web browser 11 Using the web control lock 18 Projecting computer screen contents 20 One projector displaying one computer screen 20 One projector displaying...

- PRJ Networking Operation Guide
Page 3
... your computer to the RJ45 LAN input jack of your ITS administrator. Preparation 3 Do one end to the projector for information on the remote control. Press to highlight DHCP and press / to select Off. 3. Press to highlight DHCP and press / to select On. 6. ...your ITS administrator for projection using a web browser when they are in a non-DHCP environment: 1. Repeat steps 1-4 above. 2. Preparation Your BenQ projector is highlighted. Take a RJ45 cable and connect one of the following: • Press NETWORK SETTING on the IP Address, Subnet Mask...
... your computer to the RJ45 LAN input jack of your ITS administrator. Preparation 3 Do one end to the projector for information on the remote control. Press to highlight DHCP and press / to select Off. 3. Press to highlight DHCP and press / to select On. 6. ...your ITS administrator for projection using a web browser when they are in a non-DHCP environment: 1. Repeat steps 1-4 above. 2. Preparation Your BenQ projector is highlighted. Take a RJ45 cable and connect one of the following: • Press NETWORK SETTING on the IP Address, Subnet Mask...

- PRJ Networking Operation Guide
Page 4
..., your computer. 4 Preparation Do one of the projector. In this specific wireless LAN. 1. The default SSID is displayed. 3. Make sure the BenQ wireless dongle (optional) is Connect. 5. Search for selective models) 1. 4. Make sure the Status is plugged to modify and press MODE/ENTER. ...Network Display to select AP or Infrastructure. 8. If you want to highlight Network Settings and press MODE/ENTER. Depending on the remote control. The default SSID is now connected to your local area network and ready to this mode, the projector establishes a wireless...
..., your computer. 4 Preparation Do one of the projector. In this specific wireless LAN. 1. The default SSID is displayed. 3. Make sure the BenQ wireless dongle (optional) is Connect. 5. Search for selective models) 1. 4. Make sure the Status is plugged to modify and press MODE/ENTER. ...Network Display to select AP or Infrastructure. 8. If you want to highlight Network Settings and press MODE/ENTER. Depending on the remote control. The default SSID is now connected to your local area network and ready to this mode, the projector establishes a wireless...

- PRJ Networking Operation Guide
Page 9
...click Pause. • If there are multiple computers connected to the projector, you want to the projector OSD menu SYSTEM SETUP: Advanced > Network Settings > Remote Desktop, and enter Account (the name for your computer) and Password, and highlight Connect, press MODE/ENTER. Type the name and password for your computer... Full Screen. • To display a partial screen, click Selectable. The Special Feature page provides some advanced functions to configure QPresenter. • To activate Remote Desktop function, click Yes. A square appears on your screen. QPresenter 9
...click Pause. • If there are multiple computers connected to the projector, you want to the projector OSD menu SYSTEM SETUP: Advanced > Network Settings > Remote Desktop, and enter Account (the name for your computer) and Password, and highlight Connect, press MODE/ENTER. Type the name and password for your computer... Full Screen. • To display a partial screen, click Selectable. The Special Feature page provides some advanced functions to configure QPresenter. • To activate Remote Desktop function, click Yes. A square appears on your screen. QPresenter 9

- PRJ Networking Operation Guide
Page 11
... See "Installing QPresenter" on your browser and press Enter. 2. The main page of functions with a simple click. 3. Controlling the projector remotely through a web browser 11 Click Download to control the projector. • Make sure you are using Microsoft Internet Explorer version 7.0 or ...8.0. • The screenshots in this manual are for details. Controlling the projector remotely through a web browser This function is not available when the broadcasting function is activated. Enter the address of the projector in ...
... See "Installing QPresenter" on your browser and press Enter. 2. The main page of functions with a simple click. 3. Controlling the projector remotely through a web browser 11 Click Download to control the projector. • Make sure you are using Microsoft Internet Explorer version 7.0 or ...8.0. • The screenshots in this manual are for details. Controlling the projector remotely through a web browser This function is not available when the broadcasting function is activated. Enter the address of the projector in ...
- PRJ Networking Operation Guide
Page 12
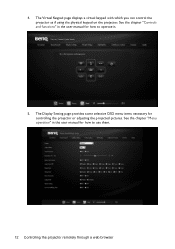
The Virtual Keypad page displays a virtual keypad with which you can control the projector as if using the physical keypad on the projector. See the chapter "Menu operation" in the user manual for how to use them. 12 Controlling the projector remotely through a web browser 4. See the chapter "Controls and functions" in the user manual for controlling the projector or adjusting the projected pictures. The Display Setting page provides some selective OSD menu items necessary for how to operate it. 5.
The Virtual Keypad page displays a virtual keypad with which you can control the projector as if using the physical keypad on the projector. See the chapter "Menu operation" in the user manual for how to use them. 12 Controlling the projector remotely through a web browser 4. See the chapter "Controls and functions" in the user manual for controlling the projector or adjusting the projected pictures. The Display Setting page provides some selective OSD menu items necessary for how to operate it. 5.

- PRJ Networking Operation Guide
Page 13
See the chapter "Menu Operation" in the PICTURE menu for how to use them. 7. The Picture Setting page provides all the OSD menu items in the user manual for adjusting the projected pictures. 6. Controlling the projector remotely through a web browser 13 The Information page displays the information about the projector status, network status.
See the chapter "Menu Operation" in the PICTURE menu for how to use them. 7. The Picture Setting page provides all the OSD menu items in the user manual for adjusting the projected pictures. 6. Controlling the projector remotely through a web browser 13 The Information page displays the information about the projector status, network status.
- PRJ Networking Operation Guide
Page 14
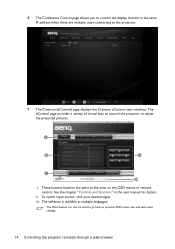
... you to the projector. 9. The eControl page provides a variety of virtual keys to previous OSD menu, exit and save menu settings. 14 Controlling the projector remotely through a web browser The Menu button can also be used to go back to control the projector or adjust the projected pictures. See the chapter.... i ii i i iii i. The Crestron (eControl) page displays the Crestron eControl user interface. These buttons function the same as the ones on the OSD menus or remote control. ii. 8. The software is available in multiple languages.
... you to the projector. 9. The eControl page provides a variety of virtual keys to previous OSD menu, exit and save menu settings. 14 Controlling the projector remotely through a web browser The Menu button can also be used to go back to control the projector or adjust the projected pictures. See the chapter.... i ii i i iii i. The Crestron (eControl) page displays the Crestron eControl user interface. These buttons function the same as the ones on the OSD menus or remote control. ii. 8. The software is available in multiple languages.

- PRJ Networking Operation Guide
Page 15
... will be saved in charge of its location and the person in the projector. Press Exit to go back to the remote network operation page. Controlling the projector remotely through a web browser 15 v. For more information, visit http://www.crestron.com & www.crestron.com/ getroomview. ii.... You can adjust the Network Settings. The info page displays the information and status of remote network operation on this projector has been password-protected. The tools page allows you to manage the projector, configure the LAN control settings and...
... will be saved in charge of its location and the person in the projector. Press Exit to go back to the remote network operation page. Controlling the projector remotely through a web browser 15 v. For more information, visit http://www.crestron.com & www.crestron.com/ getroomview. ii.... You can adjust the Network Settings. The info page displays the information and status of remote network operation on this projector has been password-protected. The tools page allows you to manage the projector, configure the LAN control settings and...

- PRJ Networking Operation Guide
Page 16
To have access to the Admin page, you want to change the password and set the maximum number of connected computer may affect the network display performance.You can also adjust the Broadcasting, Projection Log In Code, AMX Device Discovery and USB Camera settings here. 16 Controlling the projector remotely through a web browser The page provides more network settings. The Basic page allows you to enter a password. The number of connected computers. If you need to change the password, enter the Basic page. 10. The default password is "0000".
To have access to the Admin page, you want to change the password and set the maximum number of connected computer may affect the network display performance.You can also adjust the Broadcasting, Projection Log In Code, AMX Device Discovery and USB Camera settings here. 16 Controlling the projector remotely through a web browser The page provides more network settings. The Basic page allows you to enter a password. The number of connected computers. If you need to change the password, enter the Basic page. 10. The default password is "0000".

- PRJ Networking Operation Guide
Page 17
The maximum length for SSID is supported. The Wireless LAN page allows you to adjust the Wireless LAN settings. The Wired LAN page allows you to adjust the Wired LAN settings. Only WEP encryption is 16 bytes. Please use different SSID when more than two projectors are connecting through a web browser 17 Controlling the projector remotely through wireless LAN.
The maximum length for SSID is supported. The Wireless LAN page allows you to adjust the Wireless LAN settings. The Wired LAN page allows you to adjust the Wired LAN settings. Only WEP encryption is 16 bytes. Please use different SSID when more than two projectors are connecting through a web browser 17 Controlling the projector remotely through wireless LAN.

- PRJ Networking Operation Guide
Page 18
... Display System. 3. These quick buttons are always provided on the web page for you to send alert e-mail to this function: 18 Controlling the projector remotely through the Projector Network Display System. Go to operate the projector. Using the web control lock This function is connected to prevent unauthorized people from...
... Display System. 3. These quick buttons are always provided on the web page for you to send alert e-mail to this function: 18 Controlling the projector remotely through the Projector Network Display System. Go to operate the projector. Using the web control lock This function is connected to prevent unauthorized people from...

- PRJ Networking Operation Guide
Page 19
The message "INPUT PASSWORD" appears. Press to highlight Web Control Lock and press / to the SYSTEM SETUP: Advanced > Security Settings > Change Security Settings menu after opening the OSD menu system. Go to select On or Off. If the password is correct, the OSD menu returns to the Security Settings page. 1. Enter the current password. 2. Controlling the projector remotely through a web browser 19 Press MODE/ ENTER.
The message "INPUT PASSWORD" appears. Press to highlight Web Control Lock and press / to the SYSTEM SETUP: Advanced > Security Settings > Change Security Settings menu after opening the OSD menu system. Go to select On or Off. If the password is correct, the OSD menu returns to the Security Settings page. 1. Enter the current password. 2. Controlling the projector remotely through a web browser 19 Press MODE/ ENTER.

MX816ST User Manual
Page 2
... 21 Switching input signal 24 Magnifying and searching for details ...25 Selecting the aspect ratio 25 Optimizing the image 27 Setting the presentation timer 30 Remote paging operations 31 Freezing the image 31 Hiding the image 31 Locking control keys 31 Operating in a high altitude environment 32 Adjusting the sound 32...
... 21 Switching input signal 24 Magnifying and searching for details ...25 Selecting the aspect ratio 25 Optimizing the image 27 Setting the presentation timer 30 Remote paging operations 31 Freezing the image 31 Hiding the image 31 Locking control keys 31 Operating in a high altitude environment 32 Adjusting the sound 32...

MX816ST User Manual
Page 3
... the product. This projector is designed and tested to qualified service personnel. 6. To temporarily turn off the lamp, press ECO BLANK on the projector or remote control. 4. Save it is NOT stable. Do not look straight at the projector lens during operation. The intense light beam may fluctuate or cut out...
... the product. This projector is designed and tested to qualified service personnel. 6. To temporarily turn off the lamp, press ECO BLANK on the projector or remote control. 4. Save it is NOT stable. Do not look straight at the projector lens during operation. The intense light beam may fluctuate or cut out...

MX816ST User Manual
Page 8
Projector Power cord VGA cable Quick start guide User manual CD Warranty card* Remote control with battery Pull the tab before using the remote control. Please consult your dealer for your place of the items shown below. Wall mount kit 8 Introduction 3. Standard accessories The supplied accessories will be suitable ...
Projector Power cord VGA cable Quick start guide User manual CD Warranty card* Remote control with battery Pull the tab before using the remote control. Please consult your dealer for your place of the items shown below. Wall mount kit 8 Introduction 3. Standard accessories The supplied accessories will be suitable ...

MX816ST User Manual
Page 9
...Controls and functions" on page 10 for details.) Vent (heated air exhaust) Quick-release button Focus ring Vent (cool air intake) Speaker grill Front IR remote sensor Projection lens Lens cap AC power jack Rear adjuster foot Ceiling mount holes Front adjuster foot RS232 control port RJ45 LAN input jack USB... port Rear IR remote sensor HDMI-input port RGB signal output jack RGB (PC)/Component Video (YPbPr/ YCbCr) signal input jack S-Video input jack Video input jack Audio ...
...Controls and functions" on page 10 for details.) Vent (heated air exhaust) Quick-release button Focus ring Vent (cool air intake) Speaker grill Front IR remote sensor Projection lens Lens cap AC power jack Rear adjuster foot Ceiling mount holes Front adjuster foot RS232 control port RJ45 LAN input jack USB... port Rear IR remote sensor HDMI-input port RGB signal output jack RGB (PC)/Component Video (YPbPr/ YCbCr) signal input jack S-Video input jack Video input jack Audio ...
MX816ST User Manual
Page 11
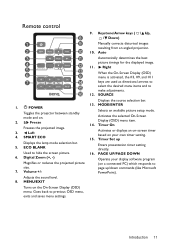
... commands (like Microsoft 7. Digital Zoom (+, -) Operate your own timer setting. 15. PowerPoint). Goes back to make adjustments. 16 12. Left 4. Volume +/- Adjusts the sound level. 8. Remote control 9. Keystone/Arrow keys ( / Up, 8 / Down) 1 9 Manually corrects distorted images resulting from an angled projection. 2 10 10. SOURCE Displays the source selection bar. 1. PAGE UP...
... commands (like Microsoft 7. Digital Zoom (+, -) Operate your own timer setting. 15. PowerPoint). Goes back to make adjustments. 16 12. Left 4. Volume +/- Adjusts the sound level. 8. Remote control 9. Keystone/Arrow keys ( / Up, 8 / Down) 1 9 Manually corrects distorted images resulting from an angled projection. 2 10 10. SOURCE Displays the source selection bar. 1. PAGE UP...

MX816ST User Manual
Page 12
... sensors should face outward. 3. Note the positive polarity should not exceed 8 meters (~ 26 feet). Pull out the battery holder. The distance between the remote control and the IR sensors on the projector that there are located on the front and back of the used battery according to the battery... manufacturer's instructions. • Never throw a battery into the remote control. • Avoid excessive heat and humidity. • There may be battery damage if the battery is dead or if you will not be...
... sensors should face outward. 3. Note the positive polarity should not exceed 8 meters (~ 26 feet). Pull out the battery holder. The distance between the remote control and the IR sensors on the projector that there are located on the front and back of the used battery according to the battery... manufacturer's instructions. • Never throw a battery into the remote control. • Avoid excessive heat and humidity. • There may be battery damage if the battery is dead or if you will not be...

MX816ST User Manual
Page 17
...up , a startup logo is still hot from previous activity, it will start the projector. Press POWER on the projector or ON on the remote control to start to adjust the image clearness. The POWER indicator light flashes green and stays green when the projector is found. If the ... projector 1. You can also press SOURCE on page 24 for details. Please use the original accessories (e.g. See "Switching input signal" on the projector or remote control to enter a six-digit password. See "Timing chart" on a blank screen. In the later stage of Range" displayed on page 56 for details...
...up , a startup logo is still hot from previous activity, it will start the projector. Press POWER on the projector or ON on the remote control to start to adjust the image clearness. The POWER indicator light flashes green and stays green when the projector is found. If the ... projector 1. You can also press SOURCE on page 24 for details. Please use the original accessories (e.g. See "Switching input signal" on the projector or remote control to enter a six-digit password. See "Timing chart" on a blank screen. In the later stage of Range" displayed on page 56 for details...

