User Manual
Page 2
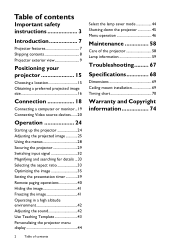
... instructions 3 Introduction 7 Projector features 7 Shipping contents 8 Projector exterior view 9 Positioning your projector 15 Choosing a location 15 Obtaining a preferred projected image size 16 Connection 18 Connecting a computer or monitor...19 Connecting Video source devices.......20 Operation 24 Starting up the projector 24 Adjusting the projected image 25 Using the menus 28 Securing the projector 29 Switching input signal 32 Magnifying and searching for details ...33 Selecting the aspect ratio 33 Optimizing the image 35 Setting the presentation timer 39 Remote...
... instructions 3 Introduction 7 Projector features 7 Shipping contents 8 Projector exterior view 9 Positioning your projector 15 Choosing a location 15 Obtaining a preferred projected image size 16 Connection 18 Connecting a computer or monitor...19 Connecting Video source devices.......20 Operation 24 Starting up the projector 24 Adjusting the projected image 25 Using the menus 28 Securing the projector 29 Switching input signal 32 Magnifying and searching for details ...33 Selecting the aspect ratio 33 Optimizing the image 35 Setting the presentation timer 39 Remote...

User Manual
Page 3
... Instructions 1. Always open the lens shutter or remove the lens cap when the projector lamp is on the product. The intense light beam may fluctuate or cut out, it is important that you operate your eyes. In areas where the mains voltage may damage your projector. Please read this manual and marked on . 5. you connect your projector through a power stabilizer, surge protector or uninterruptible power supply...
... Instructions 1. Always open the lens shutter or remove the lens cap when the projector lamp is on the product. The intense light beam may fluctuate or cut out, it is important that you operate your eyes. In areas where the mains voltage may damage your projector. Please read this manual and marked on . 5. you connect your projector through a power stabilizer, surge protector or uninterruptible power supply...
User Manual
Page 7
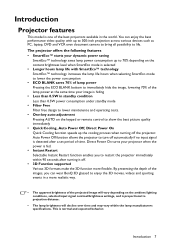
... lamp power at the same time your image is hiding • Less than 0.5W in standby condition Less than 0.5W power consumption under standby mode • Filter Free Filter free design to lower maintenance and operating costs. • One-key auto-adjustment Pressing AUTO on the keypad or remote control to projection distance. • The lamp brightness will vary depending on the content brightness level when SmartEco mode is selected • Longer hours lamp life...
... lamp power at the same time your image is hiding • Less than 0.5W in standby condition Less than 0.5W power consumption under standby mode • Filter Free Filter free design to lower maintenance and operating costs. • One-key auto-adjustment Pressing AUTO on the keypad or remote control to projection distance. • The lamp brightness will vary depending on the content brightness level when SmartEco mode is selected • Longer hours lamp life...
User Manual
Page 10
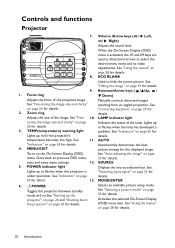
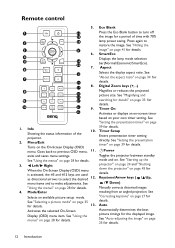
... make adjustments. "Indicators" on page 28 for details. 4. AUTO Automatically determines the best picture timings for details. See "Switching input signal" on page 26 for details. Goes back to hide the screen picture. ECO BLANK Used to previous OSD menu, exits and saves menu settings. 12. 5. Keystone/Arrow keys ( / Up, / Down) Manually corrects distorted images resulting from an angled projection. MODE/ENTER Selects an available picture setup mode. See 11. SOURCE Displays the source selection...
... make adjustments. "Indicators" on page 28 for details. 4. AUTO Automatically determines the best picture timings for details. See "Switching input signal" on page 26 for details. Goes back to hide the screen picture. ECO BLANK Used to previous OSD menu, exits and saves menu settings. 12. 5. Keystone/Arrow keys ( / Up, / Down) Manually corrects distorted images resulting from an angled projection. MODE/ENTER Selects an available picture setup mode. See 11. SOURCE Displays the source selection...
User Manual
Page 12
... projector between standby mode and on page 28 for details. 13. exits and saves menu settings. Eco Blank Press the Eco Blank button to turn off the image for the displayed image. Press again to select the desired 12. Auto Automatically determines the best picture timings for a period of the projector. 2. See "Auto-adjusting the image" on page 39 for details. Left/ Right When the On-Screen Display (OSD) menu...
... projector between standby mode and on page 28 for details. 13. exits and saves menu settings. Eco Blank Press the Eco Blank button to turn off the image for the displayed image. Press again to select the desired 12. Auto Automatically determines the best picture timings for a period of the projector. 2. See "Auto-adjusting the image" on page 39 for details. Left/ Right When the On-Screen Display (OSD) menu...
User Manual
Page 19
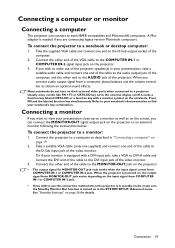
... SYSTEM SETUP: Advanced menu. Take the supplied VGA cable and connect one end to obtain an optimal sound effects. Connecting a monitor If you want to view your presentations, take a VGA to DVI-A cable and connect the DVI end of the cable to a computer as on the screen, you wish to use of the VGA cable to a notebook or desktop computer: 1. Connecting a computer or monitor Connecting a computer The projector can connect the...
... SYSTEM SETUP: Advanced menu. Take the supplied VGA cable and connect one end to obtain an optimal sound effects. Connecting a monitor If you want to view your presentations, take a VGA to DVI-A cable and connect the DVI end of the cable to a computer as on the screen, you wish to use of the VGA cable to a notebook or desktop computer: 1. Connecting a computer or monitor Connecting a computer The projector can connect the...

User Manual
Page 24
... by the projection lamp. 3. Operation Starting up , a startup logo is projected. (If necessary) Rotate the focus ring to adjust the image clearness. If it is found. 24 Operation The projector will continue displaying until an input signal is closed, it will turn on . 7. Turn on page 54 for details. 6. The start the projector. Plug the power cord into the projector and into a power outlet. Check that the POWER indicator light on the projector or remote control to start up procedure...
... by the projection lamp. 3. Operation Starting up , a startup logo is projected. (If necessary) Rotate the focus ring to adjust the image clearness. If it is found. 24 Operation The projector will continue displaying until an input signal is closed, it will turn on . 7. Turn on page 54 for details. 6. The start the projector. Plug the power cord into the projector and into a power outlet. Check that the POWER indicator light on the projector or remote control to start up procedure...
User Manual
Page 30
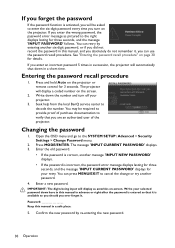
... not record the password in this manual in a short time. Seek help from the local BenQ service center to the SYSTEM SETUP: Advanced > Security Settings > Change Password menu. 2. Write your retry. Password Keep this manual, and you absolutely do not remember it . You can retry by re-entering the new password. 30 Operation See "Entering the password recall procedure" on the projector or remote control for 3 seconds. Press MODE/ENTER. If you...
... not record the password in this manual in a short time. Seek help from the local BenQ service center to the SYSTEM SETUP: Advanced > Security Settings > Change Password menu. 2. Write your retry. Password Keep this manual, and you absolutely do not remember it . You can retry by re-entering the new password. 30 Operation See "Entering the password recall procedure" on the projector or remote control for 3 seconds. Press MODE/ENTER. If you...

User Manual
Page 31
... turn on the projector. • If the password is incorrect, the password error message displays lasting for three seconds, and the message 'INPUT PASSWORD' displays for your retry. Though the password function is started. 7. Disabling the password function To disable password protection, go back to cancel the change or try another password. You will not have successfully assigned a new password to keep the old password in the row of Power on lock menu after opening...
... turn on the projector. • If the password is incorrect, the password error message displays lasting for three seconds, and the message 'INPUT PASSWORD' displays for your retry. Though the password function is started. 7. Disabling the password function To disable password protection, go back to cancel the change or try another password. You will not have successfully assigned a new password to keep the old password in the row of Power on lock menu after opening...

User Manual
Page 35
... image Selecting a picture mode The projector is preset with several predefined picture modes so that you can follow one to suit your operating environment and input signal picture type. Operation 35 You can use one of the picture modes (except the User 1/User 2) as AutoCAD. 4. It is most suitable for viewing photos taken with / . The confirmation message 'Setting Saved' displays. See "Fine-tuning the image quality in well lit rooms. 2. Setting the User 1/User 2 mode...
... image Selecting a picture mode The projector is preset with several predefined picture modes so that you can follow one to suit your operating environment and input signal picture type. Operation 35 You can use one of the picture modes (except the User 1/User 2) as AutoCAD. 4. It is most suitable for viewing photos taken with / . The confirmation message 'Setting Saved' displays. See "Fine-tuning the image quality in well lit rooms. 2. Setting the User 1/User 2 mode...

User Manual
Page 40
... or turn off , pressing this key displays a confirmation message. displaying on -screen instruction. You can decide whether to the latest version. 40 Operation A confirmation message displays. 2. Highlight Yes and press MODE/ENTER to the SYSTEM SETUP: Basic > Presentation Timer menu and highlight Off. Go to confirm. How to highlight Off and press MODE/ENTER. • Using the OSD menu. 1. If remote paging function doesn't work, check if the USB connection is updated...
... or turn off , pressing this key displays a confirmation message. displaying on -screen instruction. You can decide whether to the latest version. 40 Operation A confirmation message displays. 2. Highlight Yes and press MODE/ENTER to the SYSTEM SETUP: Basic > Presentation Timer menu and highlight Off. Go to confirm. How to highlight Off and press MODE/ENTER. • Using the OSD menu. 1. If remote paging function doesn't work, check if the USB connection is updated...

User Manual
Page 41
... Blank button from projector or remote control to turn off the image for over three minutes without a display source, eliminating unnecessary energy waste and prolonging the life of the projector lamp You can set from projecting as this function is no action taken on the video or other device. Do not block the projection lens from 5 to do your lamp power. Press any key on the projector or remote control to...
... Blank button from projector or remote control to turn off the image for over three minutes without a display source, eliminating unnecessary energy waste and prolonging the life of the projector lamp You can set from projecting as this function is no action taken on the video or other device. Do not block the projection lens from 5 to do your lamp power. Press any key on the projector or remote control to...

User Manual
Page 42
... audio input is connected. Press MENU/EXIT and then press / until the SYSTEM SETUP: Advanced menu is highlighted. 2. If you use this projector under any and all harsh or extreme conditions. See "Connection" on the projector speaker(s). Muting the sound To temporarily turn the mode on the remote control, or: 1. In cases like this, you should switch to High Altitude mode to solve these symptoms. However, this projector can operate...
... audio input is connected. Press MENU/EXIT and then press / until the SYSTEM SETUP: Advanced menu is highlighted. 2. If you use this projector under any and all harsh or extreme conditions. See "Connection" on the projector speaker(s). Muting the sound To temporarily turn the mode on the remote control, or: 1. In cases like this, you should switch to High Altitude mode to solve these symptoms. However, this projector can operate...
User Manual
Page 44
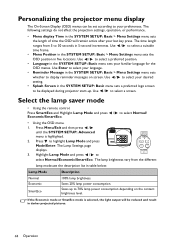
... 30 seconds in darker projected pictures. 44 Operation Saves up . Use / to select a suitable time frame. • Menu Position in the SYSTEM SETUP: Basic > Menu Settings menu sets the OSD position in the SYSTEM SETUP: Basic menu sets a preferred logo screen to be displayed during projector start-up to 70% lamp power consumption depending on screen. Use / to select your familiar language for the OSD menus. The Lamp Settings page displays. 3. Use / to select a preferred position...
... 30 seconds in darker projected pictures. 44 Operation Saves up . Use / to select a suitable time frame. • Menu Position in the SYSTEM SETUP: Basic > Menu Settings menu sets the OSD position in the SYSTEM SETUP: Basic menu sets a preferred logo screen to be displayed during projector start-up to 70% lamp power consumption depending on screen. Use / to select your familiar language for the OSD menus. The Lamp Settings page displays. 3. Use / to select a preferred position...

User Manual
Page 55
... function and the projector displays the grid test pattern. Operation 55 See "Use build-in high altitude areas. Allows you can connect the projector using a suitable RS-232 cable and update or download the projector's firmware. Lamp Settings Reset Lamp Timer See "Resetting the lamp timer" on page 29 for details. Change Password You will be asked to enter the current password before changing to enter the audio setting menu. Change Security Power on lock See "Utilizing the password function" on page...
... function and the projector displays the grid test pattern. Operation 55 See "Use build-in high altitude areas. Allows you can connect the projector using a suitable RS-232 cable and update or download the projector's firmware. Lamp Settings Reset Lamp Timer See "Resetting the lamp timer" on page 29 for details. Change Password You will be asked to enter the current password before changing to enter the audio setting menu. Change Security Power on lock See "Utilizing the password function" on page...

User Manual
Page 59
... lamp operation life. Press Menu/Exit and then press / until the SYSTEM SETUP: Advanced menu is a consumable item. Extending lamp life The projection lamp is highlighted. 2. To obtain the lamp hour information: 1. To keep the lamp life as long as 3/4 of that in 5-minute Maintenance 59 Setting Auto Power Off This function allows the projector to turn off automatically if no input source is detected after a set Auto Power Off, go into the SYSTEM SETUP: Basic > Auto Power...
... lamp operation life. Press Menu/Exit and then press / until the SYSTEM SETUP: Advanced menu is a consumable item. Extending lamp life The projection lamp is highlighted. 2. To obtain the lamp hour information: 1. To keep the lamp life as long as 3/4 of that in 5-minute Maintenance 59 Setting Auto Power Off This function allows the projector to turn off automatically if no input source is detected after a set Auto Power Off, go into the SYSTEM SETUP: Basic > Auto Power...

User Manual
Page 62
... internal components, use caution when removing lamp glass that you purchase a BenQ projector lamp for approximately 45 minutes until the lamp has cooled. 2. Loosen the screw on the lamp cover. 62 Maintenance Consult your local hazardous waste regulations to fingers and/or compromising image quality by touching the lens, do not touch the empty lamp compartment when the lamp is underneath the lamp socket to...
... internal components, use caution when removing lamp glass that you purchase a BenQ projector lamp for approximately 45 minutes until the lamp has cooled. 2. Loosen the screw on the lamp cover. 62 Maintenance Consult your local hazardous waste regulations to fingers and/or compromising image quality by touching the lens, do not touch the empty lamp compartment when the lamp is underneath the lamp socket to...

User Manual
Page 65
Indicators Light Status & Description POWER TEMP LAMP Power events Orange Green Flashing Green Orange Flashing Red Green Red Flashing Red Green Green Off Off Off Off Off Off Off Off Off Green Off Stand-by mode Off Powering up Off Normal operation Off Normal power-down cooling Off Download Red CW start fail Off Scaler shutdown fail (data abord) Red Scaler reset fail (video projector only) Off Burn-in ON Green Burn-in OFF Lamp events Off Off Red Lamp1 error in normal operation Off Off Red Lamp is not lit...
Indicators Light Status & Description POWER TEMP LAMP Power events Orange Green Flashing Green Orange Flashing Red Green Red Flashing Red Green Green Off Off Off Off Off Off Off Off Off Green Off Stand-by mode Off Powering up Off Normal operation Off Normal power-down cooling Off Download Red CW start fail Off Scaler shutdown fail (data abord) Red Scaler reset fail (video projector only) Off Burn-in ON Green Burn-in OFF Lamp events Off Off Red Lamp1 error in normal operation Off Off Red Lamp is not lit...

User Manual
Page 67
... remember the password. Remove the obstacle. Troubleshooting 67 The projector is not turned on the projector, and plug the power cord into the AC inlet on or connected correctly. The lens cover is still closed . Remote control does not work Cause Remedy The battery is connected correctly. The lens cover is still closed . completed. The input signal has not been correctly selected. Turn the video source on . If the power outlet has a switch, make...
... remember the password. Remove the obstacle. Troubleshooting 67 The projector is not turned on the projector, and plug the power cord into the AC inlet on or connected correctly. The lens cover is still closed . Remote control does not work Cause Remedy The battery is connected correctly. The lens cover is still closed . completed. The input signal has not been correctly selected. Turn the video source on . If the power outlet has a switch, make...

MX518 Data Sheet
Page 1
...pin) 8 HDMI 4 Video Out (RCA Jack) 9 RS232 (DB-9pin) 5 Computer-1 (D-sub 15pin) 10 USB (Mini-B) Specifications Projection System Native Resolution Brightness Contrast Ratio Display Color Lens Aspect Ratio Throw Ratio Image Size Diagonal Zoom Ratio Lamp Type Lamp Life* Keystone Adjustment Projection Offset Resolution Support Horizontal Frequency Vertical Scan Rate Compatibility Interface Dimensions (WxHxD) Weight Power Supply Power Consumption Audible Noise On-Screen Display Languages Picture Mode Accessories (Standard) Accessories (Optional) UPC Code Limited Warranty DLP XGA (1024 x 768...
...pin) 8 HDMI 4 Video Out (RCA Jack) 9 RS232 (DB-9pin) 5 Computer-1 (D-sub 15pin) 10 USB (Mini-B) Specifications Projection System Native Resolution Brightness Contrast Ratio Display Color Lens Aspect Ratio Throw Ratio Image Size Diagonal Zoom Ratio Lamp Type Lamp Life* Keystone Adjustment Projection Offset Resolution Support Horizontal Frequency Vertical Scan Rate Compatibility Interface Dimensions (WxHxD) Weight Power Supply Power Consumption Audible Noise On-Screen Display Languages Picture Mode Accessories (Standard) Accessories (Optional) UPC Code Limited Warranty DLP XGA (1024 x 768...


