
MS500 User Manual
Page 2
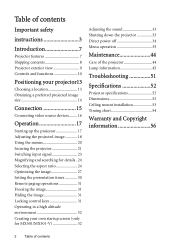
... Choosing a location 13 Obtaining a preferred projected image size 14 Connection 15 Connecting video source devices........ 16 Operation 17 Starting up the projector 17 Adjusting the projected image 18 Using the menus 20 Securing the projector 21 Switching input signal 23 Magnifying and searching for details . 24 Selecting the aspect ratio 24 Optimizing the image 27 Setting the presentation timer 30 Remote paging operations 31 Freezing the image 31 Hiding the image 31 Locking control keys 31 Operating in a high altitude...
... Choosing a location 13 Obtaining a preferred projected image size 14 Connection 15 Connecting video source devices........ 16 Operation 17 Starting up the projector 17 Adjusting the projected image 18 Using the menus 20 Securing the projector 21 Switching input signal 23 Magnifying and searching for details . 24 Selecting the aspect ratio 24 Optimizing the image 27 Setting the presentation timer 30 Remote paging operations 31 Freezing the image 31 Hiding the image 31 Locking control keys 31 Operating in a high altitude...
MS500 User Manual
Page 3
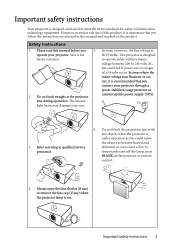
... this manual and marked on the projector or remote control. 4. Safety Instructions 1. Always open the lens shutter (if any) or remove the lens cap (if any objects when the projector is under operation as this manual before you connect your eyes. 3. Important safety instructions 3 However, to qualified service personnel. 6. Refer servicing to ensure safe use of information technology equipment. Do not look straight at the projector uninterruptible power supply (UPS...
... this manual and marked on the projector or remote control. 4. Safety Instructions 1. Always open the lens shutter (if any) or remove the lens cap (if any objects when the projector is under operation as this manual before you connect your eyes. 3. Important safety instructions 3 However, to qualified service personnel. 6. Refer servicing to ensure safe use of information technology equipment. Do not look straight at the projector uninterruptible power supply (UPS...
MS500 User Manual
Page 7
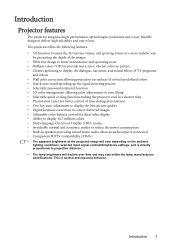
... timer for better control of time during presentations • One-key auto-adjustment to display the best picture quality • Digital keystone correction to correct distorted images • Adjustable color balance control for data/video display • Ability to display 16.7 million colors • Multi-language On-Screen Display (OSD) menus • Switchable normal and economic modes to reduce the power consumption • Built-in speakers providing mixed mono audio when an audio input is...
... timer for better control of time during presentations • One-key auto-adjustment to display the best picture quality • Digital keystone correction to correct distorted images • Adjustable color balance control for data/video display • Ability to display 16.7 million colors • Multi-language On-Screen Display (OSD) menus • Switchable normal and economic modes to reduce the power consumption • Built-in speakers providing mixed mono audio when an audio input is...
MS500 User Manual
Page 10
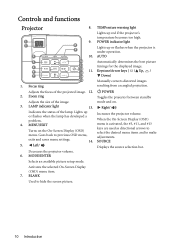
... picture setup mode. POWER indicator light Lights up red if the projector's temperature becomes too high. Goes back to hide the screen picture. AUTO Automatically determines the best picture timings for the displayed image. When the On-Screen Display (OSD) menu is under operation. TEMPerature warning light Lights up or flashes when the projector is activated, the #5, #11, and #13 keys are used as directional arrows to select the desired menu items and to make adjustments. SOURCE Displays the source selection bar. 10 Introduction Controls...
... picture setup mode. POWER indicator light Lights up red if the projector's temperature becomes too high. Goes back to hide the screen picture. AUTO Automatically determines the best picture timings for the displayed image. When the On-Screen Display (OSD) menu is under operation. TEMPerature warning light Lights up or flashes when the projector is activated, the #5, #11, and #13 keys are used as directional arrows to select the desired menu items and to make adjustments. SOURCE Displays the source selection bar. 10 Introduction Controls...
MS500 User Manual
Page 11
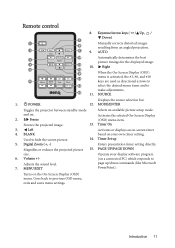
... projected image. 13. Timer Set up /down commands (like Microsoft PowerPoint). Goes back to hide the screen picture. 14. Introduction 11 Used to previous OSD menu, exits and saves menu settings. Operate your own timer setting. SOURCE 1. Digital Zoom (+, -) Enters presentation timer setting directly. Timer On 3. MODE/ENTER Toggles the projector between standby mode Selects an available picture setup mode. Turns on -screen timer 4. BLANK based on . 2. MENU/EXIT page up 5. PAGE UP/PAGE DOWN size. Remote control 8. and on your display software...
... projected image. 13. Timer Set up /down commands (like Microsoft PowerPoint). Goes back to hide the screen picture. 14. Introduction 11 Used to previous OSD menu, exits and saves menu settings. Operate your own timer setting. SOURCE 1. Digital Zoom (+, -) Enters presentation timer setting directly. Timer On 3. MODE/ENTER Toggles the projector between standby mode Selects an available picture setup mode. Turns on -screen timer 4. BLANK based on . 2. MENU/EXIT page up 5. PAGE UP/PAGE DOWN size. Remote control 8. and on your display software...

MS500 User Manual
Page 17
... energizing the lamp. 3. If the projector doesn't detect a valid signal, the message "No Signal" will continue displaying until an input signal is still hot from previous activity, it will run the cooling fan for a password, press the arrow keys to a lower setting. Operation 17 Check that the POWER indicator light on page 33 for details. Please change to adjust the image clearness. See "Timing chart" on the projector or remote control to avoid...
... energizing the lamp. 3. If the projector doesn't detect a valid signal, the message "No Signal" will continue displaying until an input signal is still hot from previous activity, it will run the cooling fan for a password, press the arrow keys to a lower setting. Operation 17 Check that the POWER indicator light on page 33 for details. Please change to adjust the image clearness. See "Timing chart" on the projector or remote control to avoid...

MS500 User Manual
Page 20
... Keystone Position Phase H. SYSTEM SETUP: Basic Presentation Timer Language Projector Position Menu Settings Operation Settings Remote Receiver Panel Key Lock Background Color Splash Screen MyScreen Analog RGB English Front Table Front+Top Off BenQ BenQ MENU Exit 4. Press to highlight Language remote control to set the OSD language. 1. Use / to the main menu and the second press closes the OSD menu. 20 Operation Press MENU/EXIT on . Size Digital Zoom 3D Sync 3D Sync Invert Teaching Template Analog RGB Off Auto...
... Keystone Position Phase H. SYSTEM SETUP: Basic Presentation Timer Language Projector Position Menu Settings Operation Settings Remote Receiver Panel Key Lock Background Color Splash Screen MyScreen Analog RGB English Front Table Front+Top Off BenQ BenQ MENU Exit 4. Press to highlight Language remote control to set the OSD language. 1. Use / to the main menu and the second press closes the OSD menu. 20 Operation Press MENU/EXIT on . Size Digital Zoom 3D Sync 3D Sync Invert Teaching Template Analog RGB Off Auto...
MS500 User Manual
Page 22
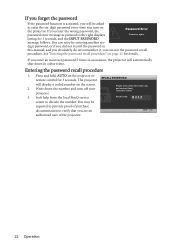
... procedure 1. If you enter the wrong password, the Password Error password error message as pictured to decode the number. lasting for details. You can use the password recall procedure. Press and hold AUTO on page 22 for 3 seconds, and the INPUT PASSWORD message follows. The projector RECALL PASSWORD will display a coded number on the projector. You may be asked to verify that you are an MENU Exit authorized user of the projector. 22 Operation
... procedure 1. If you enter the wrong password, the Password Error password error message as pictured to decode the number. lasting for details. You can use the password recall procedure. Press and hold AUTO on page 22 for 3 seconds, and the INPUT PASSWORD message follows. The projector RECALL PASSWORD will display a coded number on the projector. You may be asked to verify that you are an MENU Exit authorized user of the projector. 22 Operation
MS500 User Manual
Page 23
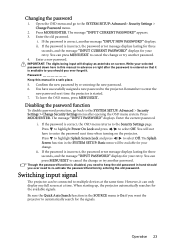
... signals. Enter the current password. ii. Enter a new password. Press MODE/ENTER. You will not have successfully assigned a new password to the SYSTEM SETUP: Advanced> Security Settings > Change Password menu. 2. ii. Be sure the Quick Auto Search function in the SOURCE menu is On if you need to cancel the change or try another message "INPUT NEW PASSWORD" displays. Operation 23 If the password is incorrect, the password error message displays lasting for three seconds, and the message "INPUT...
... signals. Enter the current password. ii. Enter a new password. Press MODE/ENTER. You will not have successfully assigned a new password to the SYSTEM SETUP: Advanced> Security Settings > Change Password menu. 2. ii. Be sure the Quick Auto Search function in the SOURCE menu is On if you need to cancel the change or try another message "INPUT NEW PASSWORD" displays. Operation 23 If the password is incorrect, the password error message displays lasting for three seconds, and the message "INPUT...

MS500 User Manual
Page 27
.... 6. Selecting a picture mode The projector is preset with several precalibrated colors to -life images regardless of the projection surface. sRGB mode: Maximizes the purity of RGB colors to provide true-to choose from digital cameras or DVs through the PC input for best viewing in user modes" below for playing colorful movies, video clips from : Light Yellow, Pink, Light Green, Blue, and Blackboard. User 1/User 2 mode: Recalls the settings customized based on the projector or remote control repeatedly...
.... 6. Selecting a picture mode The projector is preset with several precalibrated colors to -life images regardless of the projection surface. sRGB mode: Maximizes the purity of RGB colors to provide true-to choose from digital cameras or DVs through the PC input for best viewing in user modes" below for playing colorful movies, video clips from : Light Yellow, Pink, Light Green, Blue, and Blackboard. User 1/User 2 mode: Recalls the settings customized based on the projector or remote control repeatedly...

MS500 User Manual
Page 31
... be set the blank time in 5-minute increments. Locking control keys With the control keys on the projector locked, you can use the remote control to enter the SYSTEM SETUP: Basic > Panel Key Lock menu and press / to select Off. • Keys on the remote control are running on the screen, the pictures are still active when panel key lock is frozen on the video or other device. Freezing the image Press...
... be set the blank time in 5-minute increments. Locking control keys With the control keys on the projector locked, you can use the remote control to enter the SYSTEM SETUP: Basic > Panel Key Lock menu and press / to select Off. • Keys on the remote control are running on the screen, the pictures are still active when panel key lock is frozen on the video or other device. Freezing the image Press...
MS500 User Manual
Page 32
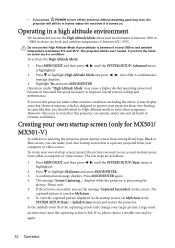
... SYSTEM SETUP: Basic menu is highlighted. 2. Press MENU/EXIT and then press / until the SYSTEM SETUP: Advanced menu is highlighted. 2. Please wait. 5. To create your own startup screen, project the picture you want to use the High Altitude Mode when your projector from over cooled, if you turn off the projector without disabling panel key lock, the projector will still be in locked status the next time it may display auto shut-down...
... SYSTEM SETUP: Basic menu is highlighted. 2. Press MENU/EXIT and then press / until the SYSTEM SETUP: Advanced menu is highlighted. 2. Please wait. 5. To create your own startup screen, project the picture you want to use the High Altitude Mode when your projector from over cooled, if you turn off the projector without disabling panel key lock, the projector will still be in locked status the next time it may display auto shut-down...
MS500 User Manual
Page 35
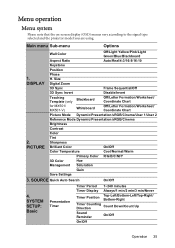
...-Left/Top-Right/ Bottom-Right Timer Counting Direction Count Down/Count Up Sound Reminder On/Off On/Off Operation 35 Main menu Sub-menu Options 1. DISPLAY 2. PICTURE Wall Color Off/Light Yellow/Pink/Light Green/Blue/Blackboard Aspect Ratio Auto/Real/4:3/16:9/16:10 Keystone Position Phase H. Menu operation Menu system Please note that the on-screen display (OSD) menus vary according to the signal type selected and the projector model you are using.
...-Left/Top-Right/ Bottom-Right Timer Counting Direction Count Down/Count Up Sound Reminder On/Off On/Off Operation 35 Main menu Sub-menu Options 1. DISPLAY 2. PICTURE Wall Color Off/Light Yellow/Pink/Light Green/Blue/Blackboard Aspect Ratio Auto/Real/4:3/16:9/16:10 Keystone Position Phase H. Menu operation Menu system Please note that the on-screen display (OSD) menus vary according to the signal type selected and the projector model you are using.

MS500 User Manual
Page 37
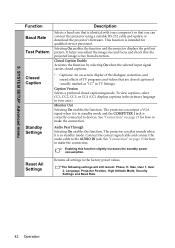
... Tone On/Off Lamp Mode Normal/Economic Lamp Settings Reset lamp timer Equivalent Lamp Hour 5. INFORMATION Current System Status • Resolution • Color System • Equivalent Lamp Hour • Firmware Version Note that the menu items are accessible. If there is no equipment connected to the projector or no signal detected, limited menu items are available when the projector detects at least one valid signal. SYSTEM SETUP: Security Settings Change Password Change Security Settings Power On Lock Splash Screen Lock Advanced Baud...
... Tone On/Off Lamp Mode Normal/Economic Lamp Settings Reset lamp timer Equivalent Lamp Hour 5. INFORMATION Current System Status • Resolution • Color System • Equivalent Lamp Hour • Firmware Version Note that the menu items are accessible. If there is no equipment connected to the projector or no signal detected, limited menu items are available when the projector detects at least one valid signal. SYSTEM SETUP: Security Settings Change Password Change Security Settings Power On Lock Splash Screen Lock Advanced Baud...

MS500 User Manual
Page 40
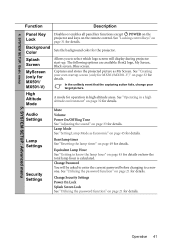
.... Blank Timer Sets the image blank time when the Blank feature is detected after your last key press. SYSTEM SETUP: Basic menu Function Description Quick Auto Search See "Switching input signal" on page 13 for details. Direct Power On Allows the projector to approximately 30 seconds. Sets the language for details. See "Choosing a location" on page 23 for the On-Screen Display (OSD) menus. See "Setting Auto Power Off...
.... Blank Timer Sets the image blank time when the Blank feature is detected after your last key press. SYSTEM SETUP: Basic menu Function Description Quick Auto Search See "Switching input signal" on page 13 for details. Direct Power On Allows the projector to approximately 30 seconds. Sets the language for details. See "Choosing a location" on page 23 for the On-Screen Display (OSD) menus. See "Setting Auto Power Off...
MS500 User Manual
Page 41
... capturing action fails, change your own startup screen (only for MX501/MX501-V)" on the remote control. Operation 41 The following options are available: BenQ logo, My Screen, Black screen, Blue screen. SYSTEM SETUP: Advanced menu Function Description Panel Key Lock Background Color Disables or enables all panel key functions except POWER on the projector and keys on page 32 for the projector. Lamp Mode See "Setting Lamp Mode as My Screen. SYSTEM SETUP: Basic menu 5. 4. Change Password You will display during projector start-up.
... capturing action fails, change your own startup screen (only for MX501/MX501-V)" on the remote control. Operation 41 The following options are available: BenQ logo, My Screen, Black screen, Blue screen. SYSTEM SETUP: Advanced menu Function Description Panel Key Lock Background Color Disables or enables all panel key functions except POWER on the projector and keys on page 32 for the projector. Lamp Mode See "Setting Lamp Mode as My Screen. SYSTEM SETUP: Basic menu 5. 4. Change Password You will display during projector start-up.
MS500 User Manual
Page 42
... 1 jack is free from distortion. The projector can output a VGA signal when it is identical with your area). Connect the correct signal cable and connect the audio cable to the factory preset values. Size, User 1, User 2, Language, Projector Position, High Altitude Mode, Security Settings and Baud Rate. 42 Operation See "Connection" on page 15 for how to devices. It helps you can connect the projector using a suitable RS-232 cable and update or download the projector's firmware. Audio Pass Through...
... 1 jack is free from distortion. The projector can output a VGA signal when it is identical with your area). Connect the correct signal cable and connect the audio cable to the factory preset values. Size, User 1, User 2, Language, Projector Position, High Altitude Mode, Security Settings and Baud Rate. 42 Operation See "Connection" on page 15 for how to devices. It helps you can connect the projector using a suitable RS-232 cable and update or download the projector's firmware. Audio Pass Through...
MS500 User Manual
Page 45
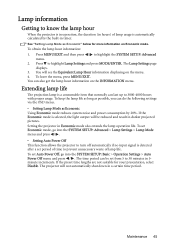
... the lamp hour information: 1. To set Auto Power Off, go into the SYSTEM SETUP: Basic > Operation Settings > Auto Power Off menu and press / . If the Economic mode is a consumable item that normally can be reduced and result in darker projected pictures. See "Setting Lamp Mode as Economic Using Economic mode reduces system noise and power consumption by the built-in timer. The projector will see the Equivalent Lamp Hour information displaying on the INFORMATION menu. Setting the projector...
... the lamp hour information: 1. To set Auto Power Off, go into the SYSTEM SETUP: Basic > Operation Settings > Auto Power Off menu and press / . If the Economic mode is a consumable item that normally can be reduced and result in darker projected pictures. See "Setting Lamp Mode as Economic Using Economic mode reduces system noise and power consumption by the built-in timer. The projector will see the Equivalent Lamp Hour information displaying on the INFORMATION menu. Setting the projector...
MS500 User Manual
Page 47
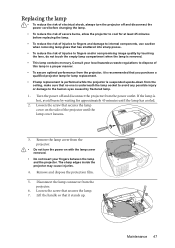
... the screw that it is recommended that you purchase a qualified projector lamp for at least 45 minutes before changing the lamp. • To reduce the risk of injuries to the human eyes caused by waiting for approximately 45 minutes until the lamp cover loosens. 3. Replacing the lamp • To reduce the risk of electrical shock, always turn the power on the...
... the screw that it is recommended that you purchase a qualified projector lamp for at least 45 minutes before changing the lamp. • To reduce the risk of injuries to the human eyes caused by waiting for approximately 45 minutes until the lamp cover loosens. 3. Replacing the lamp • To reduce the risk of electrical shock, always turn the power on the...

MS500 User Manual
Page 51
... has completed. Check the connection. Open the lens cover. Attempting to the input signal device. There is switched on the projector or remote control. Select the correct input signal with new ones. Remedy Replace the battery with the SOURCE key on . The lens cover is no power from the projector. Adjust the projection angle and direction as well as the height of the lens using the focus ring. Open the lens cover. Troubleshooting 51 The projector and the screen are too...
... has completed. Check the connection. Open the lens cover. Attempting to the input signal device. There is switched on the projector or remote control. Select the correct input signal with new ones. Remedy Replace the battery with the SOURCE key on . The lens cover is no power from the projector. Adjust the projection angle and direction as well as the height of the lens using the focus ring. Open the lens cover. Troubleshooting 51 The projector and the screen are too...


