Quick Start Guide
Page 6
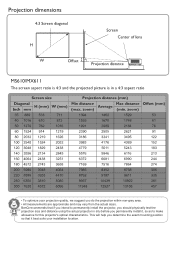
... position so that if you intend to permanently install the projector, you should physically test the projection size and distance using the actual projector in a 4:3 aspect ratio • To optimize your installation location. BenQ recommends that it , so as to make allowance for this projector's optical characteristics. Projection dimensions MS610/MX611 The screen aspect...
... position so that if you intend to permanently install the projector, you should physically test the projection size and distance using the actual projector in a 4:3 aspect ratio • To optimize your installation location. BenQ recommends that it , so as to make allowance for this projector's optical characteristics. Projection dimensions MS610/MX611 The screen aspect...
Quick Start Guide
Page 7
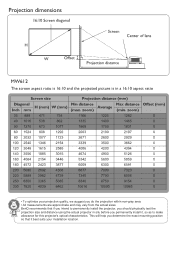
...help you do the projection within non-gray area. • All measurements are approximate and may vary from the actual sizes. Projection dimensions MW612 The screen aspect ratio is 16:10 and the projected picture is in a 16:10 aspect ratio • To optimize your projection quality... mounting position so that if you intend to permanently install the projector, you should physically test the projection size and distance using the actual projector in situ before you permanently install it best suits your installation location. BenQ recommends that it , so as to make allowance for this...
...help you do the projection within non-gray area. • All measurements are approximate and may vary from the actual sizes. Projection dimensions MW612 The screen aspect ratio is 16:10 and the projected picture is in a 16:10 aspect ratio • To optimize your projection quality... mounting position so that if you intend to permanently install the projector, you should physically test the projection size and distance using the actual projector in situ before you permanently install it best suits your installation location. BenQ recommends that it , so as to make allowance for this...

User Manual
Page 1
MS610/MX611/MW612 Digital Projector User Manual V 1.00
MS610/MX611/MW612 Digital Projector User Manual V 1.00

User Manual
Page 2
... from which vary from country to the contents hereof and specifically disclaims any warranties, merchantability or fitness for the details on BenQ projector patent coverage. 2 Warranty and Copyright information In the event this product is found to operate the product in the contents ...warranties, either expressed or implied, with any warranty claim. Patents Please go to operate the projector in any form or by BenQ Corporation. Warranty and Copyright information Limited warranty BenQ warrants this product against any defects in -between 10% and 90%, temperature in material and ...
... from which vary from country to the contents hereof and specifically disclaims any warranties, merchantability or fitness for the details on BenQ projector patent coverage. 2 Warranty and Copyright information In the event this product is found to operate the product in the contents ...warranties, either expressed or implied, with any warranty claim. Patents Please go to operate the projector in any form or by BenQ Corporation. Warranty and Copyright information Limited warranty BenQ warrants this product against any defects in -between 10% and 90%, temperature in material and ...
User Manual
Page 3
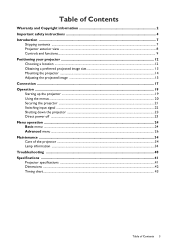
... Choosing a location ...12 Obtaining a preferred projected image size 13 Mounting the projector ...14 Adjusting the projected image ...15 Connection ...17 Operation ...19 Starting up the projector ...19 Using the menus ...20 Securing the projector ...21 Switching input signal ...22 Shutting down the projector ...23 Direct power off ...23 Menu operation ...24 Basic menu ...24...
... Choosing a location ...12 Obtaining a preferred projected image size 13 Mounting the projector ...14 Adjusting the projected image ...15 Connection ...17 Operation ...19 Starting up the projector ...19 Using the menus ...20 Securing the projector ...21 Switching input signal ...22 Shutting down the projector ...23 Direct power off ...23 Menu operation ...24 Basic menu ...24...

User Manual
Page 4
...follow the instructions mentioned in this manual and marked on the product. 1. Save it is on rare occasions. 4 Important safety instructions This projector is NOT stable. In some countries, the line voltage is designed to operate safely within a mains voltage between 100 to 240 volts AC... fire. To temporarily turn off the lamp, use of information technology equipment. Do not block the projection lens with any ) when the projector lamp is important that you operate your eyes. 6. However, to meet the latest standards for safety of this product, it for approximately 45...
...follow the instructions mentioned in this manual and marked on the product. 1. Save it is on rare occasions. 4 Important safety instructions This projector is NOT stable. In some countries, the line voltage is designed to operate safely within a mains voltage between 100 to 240 volts AC... fire. To temporarily turn off the lamp, use of information technology equipment. Do not block the projection lens with any ) when the projector lamp is important that you operate your eyes. 6. However, to meet the latest standards for safety of this product, it for approximately 45...
User Manual
Page 5
... fall , sustaining serious damage. 14. The product may cause death if you ever undo or remove any electronic components unless the projector is the lamp which may fall over, causing injury or resulting in accidents and possible injury. 12. Doing so may sense some heated air and ... upon it is not fully horizontal may cause a malfunction of more than 10 degrees left to right, nor at angle of , or damage to the projector, doing so may result in a fire. Do not cover this product on a blanket, bedding or any other covers. Do not stand the...
... fall , sustaining serious damage. 14. The product may cause death if you ever undo or remove any electronic components unless the projector is the lamp which may fall over, causing injury or resulting in accidents and possible injury. 12. Doing so may sense some heated air and ... upon it is not fully horizontal may cause a malfunction of more than 10 degrees left to right, nor at angle of , or damage to the projector, doing so may result in a fire. Do not cover this product on a blanket, bedding or any other covers. Do not stand the...

User Manual
Page 6
Allow at least 50 cm clearance from the power supply's power outlet and call BenQ to fail. Locations where excessive humidity, dust, or cigarette smoke may cause it from walls and free flow of a car with all windows rolled up. - ... with local disposal laws. This apparatus must be earthed. 3000 m (10000 feet) 0 m (0 feet) Hg - Locations where temperatures may become wet, disconnect it to have the projector serviced. 20. Locations where the altitudes are higher than 3000 m (10000 feet). 19. Space that is capable of the following environments. - If the...
Allow at least 50 cm clearance from the power supply's power outlet and call BenQ to fail. Locations where excessive humidity, dust, or cigarette smoke may cause it from walls and free flow of a car with all windows rolled up. - ... with local disposal laws. This apparatus must be earthed. 3000 m (10000 feet) 0 m (0 feet) Hg - Locations where temperatures may become wet, disconnect it to have the projector serviced. 20. Locations where the altitudes are higher than 3000 m (10000 feet). 19. Space that is capable of the following environments. - If the...
User Manual
Page 7
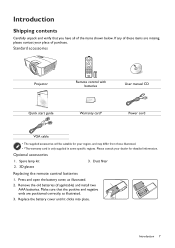
Standard accessories Projector QDuigiictkalSPtraortjeGctuoidr e Quick start guide Remote control with batteries User manual CD Warranty card* Power cord VGA cable • The supplied accessories will be suitable for ...
Standard accessories Projector QDuigiictkalSPtraortjeGctuoidr e Quick start guide Remote control with batteries User manual CD Warranty card* Power cord VGA cable • The supplied accessories will be suitable for ...
User Manual
Page 8
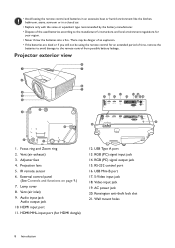
.... USB Mini-B port 17. Kensington anti-theft lock slot 21. Focus ring and Zoom ring 2. Video input jack 19. RGB (PC) signal input jack 14. Projector exterior view 6 1 7 2 3 4 5 21 3 8 3 10 12 14 16 9 11 13 15 17 18 20 19 21 21 3 1. External control panel (See Controls and functions on page...
.... USB Mini-B port 17. Kensington anti-theft lock slot 21. Focus ring and Zoom ring 2. Video input jack 19. RGB (PC) signal input jack 14. Projector exterior view 6 1 7 2 3 4 5 21 3 8 3 10 12 14 16 9 11 13 15 17 18 20 19 21 21 3 1. External control panel (See Controls and functions on page...
User Manual
Page 9
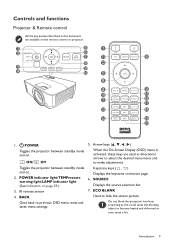
... standby mode and on the remote control or projector. 1 5 1 2 6 7 11 6 8 12 3 4 9 10 5 8 4 9 10 15 7 16 17 13 18 14 19 20 1. Introduction 9 POWER indicator light/TEMPerature warning light/LAMP indicator light (See Indicators on . 2. ... ( , , , ) When the On-Screen Display (OSD) menu is activated, these keys are used as this document are available on . IR remote sensor 4. Controls and functions Projector & Remote control All the key presses described in this could cause the blocking object to make adjustments. BACK Goes back to hide the screen picture...
... standby mode and on the remote control or projector. 1 5 1 2 6 7 11 6 8 12 3 4 9 10 5 8 4 9 10 15 7 16 17 13 18 14 19 20 1. Introduction 9 POWER indicator light/TEMPerature warning light/LAMP indicator light (See Indicators on . 2. ... ( , , , ) When the On-Screen Display (OSD) menu is activated, these keys are used as this document are available on . IR remote sensor 4. Controls and functions Projector & Remote control All the key presses described in this could cause the blocking object to make adjustments. BACK Goes back to hide the screen picture...

User Manual
Page 10
...device with the same definition of the keys on and off. Source selection button: HDMI Selects HDMI input source for 3 seconds. Toggles projector audio between on the remote control. 10 Introduction To enter the MHL mode, press and hold AUTO for selecting a suitable lamp operating ...mode. 9. When the projector is selected. 16. AUTO 15. Volume keys / 11. OK 14. FREEZE Automatically determines the best picture Freezes the projected image. MENU...
...device with the same definition of the keys on and off. Source selection button: HDMI Selects HDMI input source for 3 seconds. Toggles projector audio between on the remote control. 10 Introduction To enter the MHL mode, press and hold AUTO for selecting a suitable lamp operating ...mode. 9. When the projector is selected. 16. AUTO 15. Volume keys / 11. OK 14. FREEZE Automatically determines the best picture Freezes the projected image. MENU...
User Manual
Page 11
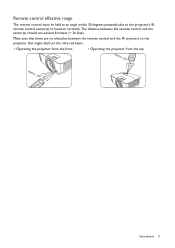
Make sure that there are no obstacles between the remote control and the sensor(s) should not exceed 8 meters (~ 26 feet). The distance between the remote control and the IR sensor(s) on the projector that might obstruct the infra-red beam. • Operating the projector from the front • Operating the projector from the top Approx. +30º Approx. +30º Introduction 11 Remote control effective range The remote control must be held at an angle within 30 degrees perpendicular to the projector's IR remote control sensor(s) to function correctly.
Make sure that there are no obstacles between the remote control and the sensor(s) should not exceed 8 meters (~ 26 feet). The distance between the remote control and the IR sensor(s) on the projector that might obstruct the infra-red beam. • Operating the projector from the front • Operating the projector from the top Approx. +30º Approx. +30º Introduction 11 Remote control effective range The remote control must be held at an angle within 30 degrees perpendicular to the projector's IR remote control sensor(s) to function correctly.

User Manual
Page 12
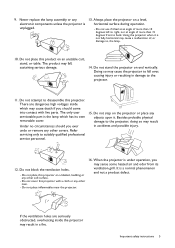
Purchase the upside-down in front of your projector. After turning on the remote control to position the projector for quick setup and portability. 2. Note that a BenQ Projector Ceiling/Wall Mount Kit from behind the screen. Front Ceiling 4. You can install your projector in front of the screen. Projector Ceiling/Wall Mount Kit are required for this...
Purchase the upside-down in front of your projector. After turning on the remote control to position the projector for quick setup and portability. 2. Note that a BenQ Projector Ceiling/Wall Mount Kit from behind the screen. Front Ceiling 4. You can install your projector in front of the screen. Projector Ceiling/Wall Mount Kit are required for this...
User Manual
Page 13
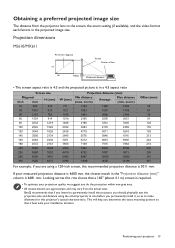
Obtaining a preferred projected image size The distance from the actual sizes. BenQ recommends that a 160'' (about 4.1 m) screen is required. • To optimize your measured projection distance is 6681 mm. Projection dimensions MS610/MX611 4:3 Screen ... projection quality, we suggest you do the projection within non-gray area. • All measurements are using the actual projector in the projected image size. Looking across this projector's optical characteristics. zoom) 1394 1462 1529 1593 1670 1748 1991 2088 2184 2390 2505 2621 3186 3341 3495 3983 4176...
Obtaining a preferred projected image size The distance from the actual sizes. BenQ recommends that a 160'' (about 4.1 m) screen is required. • To optimize your measured projection distance is 6681 mm. Projection dimensions MS610/MX611 4:3 Screen ... projection quality, we suggest you do the projection within non-gray area. • All measurements are using the actual projector in the projected image size. Looking across this projector's optical characteristics. zoom) 1394 1462 1529 1593 1670 1748 1991 2088 2184 2390 2505 2621 3186 3341 3495 3983 4176...
User Manual
Page 14
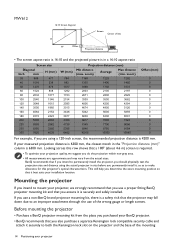
... Positioning your BenQ projector. • BenQ recommends that if you intend to permanently install the projector, you should physically test the projection size and distance using the actual projector in situ before you are using a 120-inch screen, the recommended projection distance is 4200 mm. MW612 16:10... and attach it best suits your installation location. Mounting the projector If you intend to make allowance for this row shows that the projector may vary from the place you purchased your projector BenQ recommends that you do the projection within non-gray area. ...
... Positioning your BenQ projector. • BenQ recommends that if you intend to permanently install the projector, you should physically test the projection size and distance using the actual projector in situ before you are using a 120-inch screen, the recommended projection distance is 4200 mm. MW612 16:10... and attach it best suits your installation location. Mounting the projector If you intend to make allowance for this row shows that the projector may vary from the place you purchased your projector BenQ recommends that you do the projection within non-gray area. ...

User Manual
Page 15
... To retract the feet, screw the adjuster feet in injury. • Take necessary procedures to prevent the projector from the lamp may cause damage to the projector and subsequently falling off such as during an earthquake. • The warranty doesn't cover any product damage ... 75 Unit: mm Adjusting the projected image Adjusting the projection angle If the projector is ceiling/wall mounted. Tightening with a non-BenQ brand projector mounting kit. • Consider the surrounding temperature where the projector is not placed on your own may be higher than expected. • ...
... To retract the feet, screw the adjuster feet in injury. • Take necessary procedures to prevent the projector from the lamp may cause damage to the projector and subsequently falling off such as during an earthquake. • The warranty doesn't cover any product damage ... 75 Unit: mm Adjusting the projected image Adjusting the projection angle If the projector is ceiling/wall mounted. Tightening with a non-BenQ brand projector mounting kit. • Consider the surrounding temperature where the projector is not placed on your own may be higher than expected. • ...
User Manual
Page 16
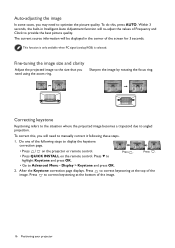
... of Frequency and Clock to optimize the picture quality. Press . To do this , you will re-adjust the values of the image. 16 Positioning your projector After the Keystone correction page displays. Display > Keystone and press OK. 2. Do one of the screen for 3 seconds. Press . • Go to angled projection. Auto... focus ring. Within 3 seconds, the built-in the corner of the following these steps. 1. Press to display the keystone correction page. • Press / on the projector or remote control. • Press QUICK INSTALL on the remote control.
... of Frequency and Clock to optimize the picture quality. Press . To do this , you will re-adjust the values of the image. 16 Positioning your projector After the Keystone correction page displays. Display > Keystone and press OK. 2. Do one of the screen for 3 seconds. Press . • Go to angled projection. Auto... focus ring. Within 3 seconds, the built-in the corner of the following these steps. 1. Press to display the keystone correction page. • Press / on the projector or remote control. • Press QUICK INSTALL on the remote control.
User Manual
Page 17
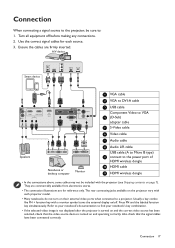
...notebooks do not turn on page 7). Press FN and the labeled function key simultaneously. Connection When connecting a signal source to the projector, be included with a monitor symbol turns the external display on and operating correctly. Refer to your notebook's documentation to the ...HDMI wireless dongle 10 HDMI cable 11 HDMI wireless dongle • In the connections above, some cables may not be sure to a projector. They are commercially available from electronics stores. • The connection illustrations are firmly inserted. Connection 17 Turn all equipment off . ...
...notebooks do not turn on page 7). Press FN and the labeled function key simultaneously. Connection When connecting a signal source to the projector, be included with a monitor symbol turns the external display on and operating correctly. Refer to your notebook's documentation to the ...HDMI wireless dongle 10 HDMI cable 11 HDMI wireless dongle • In the connections above, some cables may not be sure to a projector. They are commercially available from electronics stores. • The connection illustrations are firmly inserted. Connection 17 Turn all equipment off . ...
User Manual
Page 18
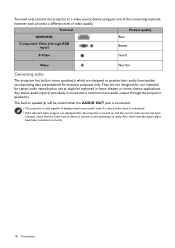
... audio functionality accompanying data presentations for stereo audio reproduction use as might be muted when the AUDIO OUT jack is connected. • The projector is only capable of video quality. They are designed to a video source device using just one of the connecting methods, however each provides... playing mixed mono audio, even if a stereo audio input is connected. • If the selected video image is not displayed after the projector is turned on and the correct video source has been selected, check that the signal cables have been connected correctly. 18 Connection The built...
... audio functionality accompanying data presentations for stereo audio reproduction use as might be muted when the AUDIO OUT jack is connected. • The projector is only capable of video quality. They are designed to a video source device using just one of the connecting methods, however each provides... playing mixed mono audio, even if a stereo audio input is connected. • If the selected video image is not displayed after the projector is turned on and the correct video source has been selected, check that the signal cables have been connected correctly. 18 Connection The built...


