User Manual
Page 3
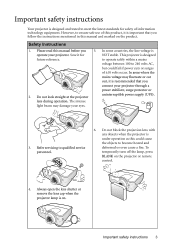
... become heated and deformed or even cause a fire. Do not block the projection lens with any objects when the projector is on the projector or remote control. 4. Important safety instructions 3 Safety Instructions 1. to operate safely within a mains voltage between 100 to 240 volts AC, but could cause the objects to qualified service...
... become heated and deformed or even cause a fire. Do not block the projection lens with any objects when the projector is on the projector or remote control. 4. Important safety instructions 3 Safety Instructions 1. to operate safely within a mains voltage between 100 to 240 volts AC, but could cause the objects to qualified service...
User Manual
Page 8
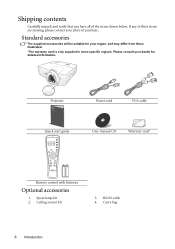
... some specific regions. Please consult your place of the items shown below. Projector Power cord VGA cable Quick start guide User manual CD Warranty card* Remote control with batteries Optional accessories 1. Ceiling mount kit 3. Shipping contents Carefully unpack and verify that you have all of purchase. Carry bag 8 Introduction Standard accessories The...
... some specific regions. Please consult your place of the items shown below. Projector Power cord VGA cable Quick start guide User manual CD Warranty card* Remote control with batteries Optional accessories 1. Ceiling mount kit 3. Shipping contents Carefully unpack and verify that you have all of purchase. Carry bag 8 Introduction Standard accessories The...
User Manual
Page 11
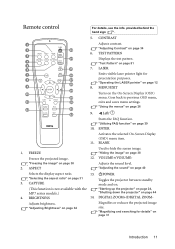
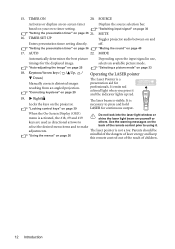
... saves menu settings. DIGITAL ZOOM+/DIGITAL ZOOM- provided behind the hand sign . 5. "Using the menus" on page 34 Magnifies or reduces the projected image size. Remote control For details, see the info. LASER 7 16 Emits visible laser pointer light for details" on the On-Screen Display (OSD) 18 menu. "Hiding the image...
... saves menu settings. DIGITAL ZOOM+/DIGITAL ZOOM- provided behind the hand sign . 5. "Using the menus" on page 34 Magnifies or reduces the projected image size. Remote control For details, see the info. LASER 7 16 Emits visible laser pointer light for details" on the On-Screen Display (OSD) 18 menu. "Hiding the image...
User Manual
Page 12
.... AUTO 22. It is a presentation aid for professionals. Parents should be mindful of the dangers of laser energy and keep this remote control out of the reach of the remote control prior to make back of children. 12 Introduction MUTE 16. Keystone/Arrow keys ( / Up, / Down) Manually corrects distorted images...press it . See the warning messages on the select the desired menu items and to using it and the indicator lights up red. "Locking control keys" on page 36 21. "Using the menus" on your own timer setting. based on page 26 The laser pointer is visible. "...
.... AUTO 22. It is a presentation aid for professionals. Parents should be mindful of the dangers of laser energy and keep this remote control out of the reach of the remote control prior to make back of children. 12 Introduction MUTE 16. Keystone/Arrow keys ( / Up, / Down) Manually corrects distorted images...press it . See the warning messages on the select the desired menu items and to using it and the indicator lights up red. "Locking control keys" on page 36 21. "Using the menus" on your own timer setting. based on page 26 The laser pointer is visible. "...

User Manual
Page 13
...(-) goes to the manufacturer's instructions and local environment regulations for an extended period of the projector. The distance between the remote control and the IR sensors on the front and the back of time, remove the batteries to avoid damage to function correctly... angle within 30 degrees perpendicular to the projector's IR remote control sensors to the remote control from the rear Approx. +15° Approx. +15° Replacing the remote control batteries 1. Remote control effective range Infra-Red (IR) remote control sensors are located on the projector that there are no...
...(-) goes to the manufacturer's instructions and local environment regulations for an extended period of the projector. The distance between the remote control and the IR sensors on the front and the back of time, remove the batteries to avoid damage to function correctly... angle within 30 degrees perpendicular to the projector's IR remote control sensors to the remote control from the rear Approx. +15° Approx. +15° Replacing the remote control batteries 1. Remote control effective range Infra-Red (IR) remote control sensors are located on the projector that there are no...
User Manual
Page 24
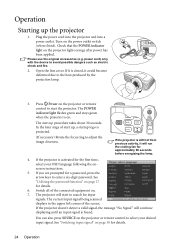
Operation Starting up procedure takes about 30 seconds. Check that the POWER indicator light on the projector or remote control to start up, a startup logo is found. Open the lens cover. In the later stage of the connected equipment on page 27 for ...If the projector is still hot from previous activity, it will run the cooling fan for details. 6. See "Switching input signal" on the projector or remote control to adjust the image clearness. Please use the original accessories (e.g. Switch all of start the projector. If the projector doesn't detect a valid signal, the ...
Operation Starting up procedure takes about 30 seconds. Check that the POWER indicator light on the projector or remote control to start up, a startup logo is found. Open the lens cover. In the later stage of the connected equipment on page 27 for ...If the projector is still hot from previous activity, it will run the cooling fan for details. 6. See "Switching input signal" on the projector or remote control to adjust the image clearness. Please use the original accessories (e.g. Switch all of start the projector. If the projector doesn't detect a valid signal, the ...
User Manual
Page 25
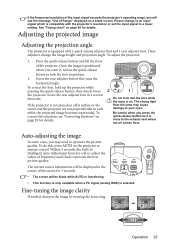
... the projector. To do this situation, see the message "Out of Range" displayed on a blank screen. To correct this , press AUTO on the projector or remote control. Within 3 seconds, the built-in a reverse direction. If the frequency/resolution of the input signal exceeds the projector's operating range, you will see "Correcting keystone...
... the projector. To do this situation, see the message "Out of Range" displayed on a blank screen. To correct this , press AUTO on the projector or remote control. Within 3 seconds, the built-in a reverse direction. If the frequency/resolution of the input signal exceeds the projector's operating range, you will see "Correcting keystone...
User Manual
Page 26
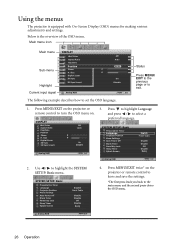
... Position Phase H. Status Press MENU/ EXIT to the previous page or to select a preferred language. Press MENU/EXIT on the projector or remote control to leave and save the settings. *The first press leads you back to highlight the SYSTEM SETUP: Basic menu. Press MENU/EXIT twice*... Language Projector Position Menu Settings Auto Power Off Blank Timer Panel Key Lock Sleep Timer Splash Screen English Front Table Disable Disable Off Disable BenQ 4. Size Digital Zoom 3D Sync 3D Sync Invert Analog RGB Off Auto 0 0 On Disable MENU Exit SYSTEM SETUP: Basic Presentation Timer...
... Position Phase H. Status Press MENU/ EXIT to the previous page or to select a preferred language. Press MENU/EXIT on the projector or remote control to leave and save the settings. *The first press leads you back to highlight the SYSTEM SETUP: Basic menu. Press MENU/EXIT twice*... Language Projector Position Menu Settings Auto Power Off Blank Timer Panel Key Lock Sleep Timer Splash Screen English Front Table Disable Disable Off Disable BenQ 4. Size Digital Zoom 3D Sync 3D Sync Invert Analog RGB Off Auto 0 0 On Disable MENU Exit SYSTEM SETUP: Basic Presentation Timer...
User Manual
Page 28
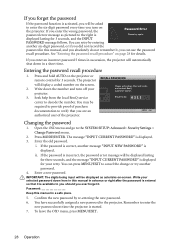
...RECALL PASSWORD will be displayed lasting for three seconds, and the message "INPUT CURRENT PASSWORD" is displayed. 3. Seek help from the local BenQ service Please write down the number and turn on the projector. The message "INPUT CURRENT PASSWORD" is displayed for details. IMPORTANT: The...entering the new password. 6. If you enter the wrong password, the Password Error password error message as asterisks on the projector or remote control for 3 seconds, and the INPUT PASSWORD message follows. Enter the old password. You can press MENU/EXIT to cancel the change ...
...RECALL PASSWORD will be displayed lasting for three seconds, and the message "INPUT CURRENT PASSWORD" is displayed. 3. Seek help from the local BenQ service Please write down the number and turn on the projector. The message "INPUT CURRENT PASSWORD" is displayed for details. IMPORTANT: The...entering the new password. 6. If you enter the wrong password, the Password Error password error message as asterisks on the projector or remote control for 3 seconds, and the INPUT PASSWORD message follows. Enter the old password. You can press MENU/EXIT to cancel the change ...
User Manual
Page 29
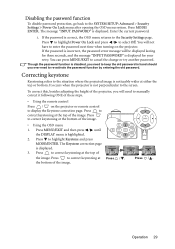
... to the SYSTEM SETUP: Advanced > Security Settings > Power On Lock menu after opening the OSD menu system. the bottom of these steps. • Using the remote control Press / on the projector. Press MODE/ ENTER. You will need to enter the password next time when turning on the projector or... remote control to correct keystoning at the top of the image. It occurs when the projector is disabled, you need to keep the old password in hand ...
... to the SYSTEM SETUP: Advanced > Security Settings > Power On Lock menu after opening the OSD menu system. the bottom of these steps. • Using the remote control Press / on the projector. Press MODE/ ENTER. You will need to enter the password next time when turning on the projector or... remote control to correct keystoning at the top of the image. It occurs when the projector is disabled, you need to keep the old password in hand ...

User Manual
Page 30
... and press / to search for the signals. Press SOURCE on page 31 for the available signals. See "Selecting the aspect ratio" on the projector or remote control. To do this projector is highlighted. 2. Switching input signal The projector can be displayed at the corner of the screen for seconds. Press / until the...
... and press / to search for the signals. Press SOURCE on page 31 for the available signals. See "Selecting the aspect ratio" on the projector or remote control. To do this projector is highlighted. 2. Switching input signal The projector can be displayed at the corner of the screen for seconds. Press / until the...

User Manual
Page 31
... ratio (no matter what aspect the source is highlighted. 2. to navigate the picture. 5. the DISPLAY menu is ): • Using the remote control 1. Press Digital Zoom+ to magnify the center of the picture, press MODE/ENTER to switch back to the zoom in 16:9 ratio. When...for details. Press the key repeatedly until The picture can further magnify the picture while searching for navigating the picture. • Using the remote control 1. Press MENU/EXIT and then press / until the picture size is highlighted. The Zoom bar is restored to show the current setting...
... ratio (no matter what aspect the source is highlighted. 2. to navigate the picture. 5. the DISPLAY menu is ): • Using the remote control 1. Press Digital Zoom+ to magnify the center of the picture, press MODE/ENTER to switch back to the zoom in 16:9 ratio. When...for details. Press the key repeatedly until The picture can further magnify the picture while searching for navigating the picture. • Using the remote control 1. Press MENU/EXIT and then press / until the picture size is highlighted. The Zoom bar is restored to show the current setting...
User Manual
Page 33
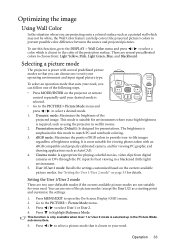
... the image Using Wall Color In the situation where you can follow one of the following steps. • Press MODE/ENTER on the projector or remote control repeatedly until your desired mode is required, such as using the projector in well lit rooms. 2. Press MENU/EXIT to select User 1 or User 2. 4. To...
... the image Using Wall Color In the situation where you can follow one of the following steps. • Press MODE/ENTER on the projector or remote control repeatedly until your desired mode is required, such as using the projector in well lit rooms. 2. Press MENU/EXIT to select User 1 or User 2. 4. To...
User Manual
Page 34
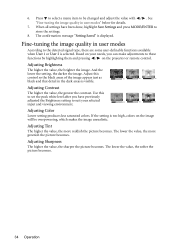
...confirmation message "Setting Saved" is visible. +30 +50 +70 Adjusting Contrast The higher the value, the greater the contrast. Use this control so the black areas of the image appear just as black and that detail in the dark areas is displayed. Adjust this to set the...the detected signal type, there are some user-definable functions available when User 1 or User 2 is too high, colors on the projector or remote control. Based on your selected input and viewing environment. +30 +50 +70 Adjusting Color Lower setting produces less saturated colors. Adjusting Sharpness The ...
...confirmation message "Setting Saved" is visible. +30 +50 +70 Adjusting Contrast The higher the value, the greater the contrast. Use this control so the black areas of the image appear just as black and that detail in the dark areas is displayed. Adjust this to set the...the detected signal type, there are some user-definable functions available when User 1 or User 2 is too high, colors on the projector or remote control. Based on your selected input and viewing environment. +30 +50 +70 Adjusting Color Lower setting produces less saturated colors. Adjusting Sharpness The ...
User Manual
Page 35
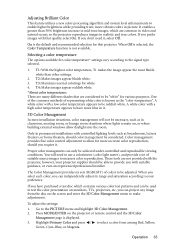
...external windows allow for more vibrant colors in classroom, meeting room, or lounge room situations where lights remain on the projector or remote control and the 3D Color Management page is not available. T1: With the highest color temperature, T1 makes the image appear the... in video and natural scenes, so the projector reproduces images in permanent installations with a low color temperature appears to be achieved under controlled and reproducible viewing conditions. Selecting a color temperature The options available for white. 4. A white color with suitable guidance, or even ...
...external windows allow for more vibrant colors in classroom, meeting room, or lounge room situations where lights remain on the projector or remote control and the 3D Color Management page is not available. T1: With the highest color temperature, T1 makes the image appear the... in video and natural scenes, so the projector reproduces images in permanent installations with a low color temperature appears to be achieved under controlled and reproducible viewing conditions. Selecting a color temperature The options available for white. 4. A white color with suitable guidance, or even ...

User Manual
Page 36
... 5-minute increments. Please refer to the illustration to the right for other . Every adjustment made all of time can indicate the presentation time on the remote control or go to the SYSTEM SETUP: Basic > Presentation Timer menu and press MODE/ENTER to select its values to the image immediately. 7. Press MENU/EXIT...
... 5-minute increments. Please refer to the illustration to the right for other . Every adjustment made all of time can indicate the presentation time on the remote control or go to the SYSTEM SETUP: Basic > Presentation Timer menu and press MODE/ENTER to select its values to the image immediately. 7. Press MENU/EXIT...

User Manual
Page 37
... message "Timer is Off " appearing on the screen. The timer starts counting when the timer is off the timer by following steps: • Using the remote control Press Timer On and press / to the preset time. Go to use the Timer On key? Press MODE/ENTER. How to the SYSTEM SETUP: Basic... > Presentation Timer menu and highlight Off. Timer On is a multi-functional key. • If the presentation timer is on the projector or remote control to activate sound reminder by pressing / .
... message "Timer is Off " appearing on the screen. The timer starts counting when the timer is off the timer by following steps: • Using the remote control Press Timer On and press / to the preset time. Go to use the Timer On key? Press MODE/ENTER. How to the SYSTEM SETUP: Basic... > Presentation Timer menu and highlight Off. Timer On is a multi-functional key. • If the presentation timer is on the projector or remote control to activate sound reminder by pressing / .

User Manual
Page 38
...the audience's full attention to the presenter, you can use BLANK on the projector or remote control to let the projector return the image automatically after a period of the keys on the projector or remote control to freeze the image. The length of time can still be displayed in 5-minute increments.... 5 to become heated and deformed or even cause a fire. 38 Operation To release the function, press any key on the projector or remote control. When this could cause the blocking object to 30 minutes in the upper left corner of the screen while the image is frozen onscreen. ...
...the audience's full attention to the presenter, you can use BLANK on the projector or remote control to let the projector return the image automatically after a period of the keys on the projector or remote control to freeze the image. The length of time can still be displayed in 5-minute increments.... 5 to become heated and deformed or even cause a fire. 38 Operation To release the function, press any key on the projector or remote control. When this could cause the blocking object to 30 minutes in the upper left corner of the screen while the image is frozen onscreen. ...

User Manual
Page 39
... projector without disabling panel key lock, the projector will operate except Power. 1. To release panel key lock, press and hold / on the remote control are still active when panel key lock is enabled. • If you press Power to select a problem and press MODE/ENTER for 3 ... highlight the INFORMATION menu. 2. You can prevent your projector settings from being changed accidentally (by pressing / on the projector or remote control or press MENU/EXIT to open the OSD menu and press / to problems regarding image quality, installation, special feature operation and service information...
... projector without disabling panel key lock, the projector will operate except Power. 1. To release panel key lock, press and hold / on the remote control are still active when panel key lock is enabled. • If you press Power to select a problem and press MODE/ENTER for 3 ... highlight the INFORMATION menu. 2. You can prevent your projector settings from being changed accidentally (by pressing / on the projector or remote control or press MENU/EXIT to open the OSD menu and press / to problems regarding image quality, installation, special feature operation and service information...

User Manual
Page 40
... how the audio input is designed to the projector audio input. If you use this projector can operate under such a condition. See "Connection" on the remote control, or: 1. Highlight Mute and press / to change Power On/Off Ring Tone is between 1500 m -3000 m above , it may cause a higher decibel operating noise level...
... how the audio input is designed to the projector audio input. If you use this projector can operate under such a condition. See "Connection" on the remote control, or: 1. Highlight Mute and press / to change Power On/Off Ring Tone is between 1500 m -3000 m above , it may cause a higher decibel operating noise level...

