
User Manual
Page 2
... instructions 3 Introduction 7 Projector features 7 Shipping contents 8 Projector exterior view 9 Controls and functions 10 Positioning your projector 14 Choosing a location 14 Obtaining a preferred projected image size 15 Connection 19 Connecting a computer or monitor... 20 Connecting video source devices........ 21 Operation 24 Starting up the projector 24 Adjusting the projected image 25 Using the menus 26 Securing the projector 27 Switching input signal 30 Magnifying and searching for details . 31 Selecting the aspect ratio 31 Optimizing the image 33 Setting...
... instructions 3 Introduction 7 Projector features 7 Shipping contents 8 Projector exterior view 9 Controls and functions 10 Positioning your projector 14 Choosing a location 14 Obtaining a preferred projected image size 15 Connection 19 Connecting a computer or monitor... 20 Connecting video source devices........ 21 Operation 24 Starting up the projector 24 Adjusting the projected image 25 Using the menus 26 Securing the projector 27 Switching input signal 30 Magnifying and searching for details . 31 Selecting the aspect ratio 31 Optimizing the image 33 Setting...

User Manual
Page 3
... the latest standards for NOT stable. lens during operation. to operate safely within a mains voltage between 100 to ensure safe use of ±10 volts occur. Refer servicing to qualified service personnel. 6. Important safety instructions 3 Safety Instructions 1. Always open the lens shutter or remove the lens cap when the projector lamp is recommended that you follow the instructions mentioned in this manual before you connect your eyes. 3.
... the latest standards for NOT stable. lens during operation. to operate safely within a mains voltage between 100 to ensure safe use of ±10 volts occur. Refer servicing to qualified service personnel. 6. Important safety instructions 3 Safety Instructions 1. Always open the lens shutter or remove the lens cap when the projector lamp is recommended that you follow the instructions mentioned in this manual before you connect your eyes. 3.

User Manual
Page 6
... power supply's power outlet and call BenQ to have a pleasant experience using your BenQ projector, so we strongly recommend that you use a non-BenQ brand projector ceiling mount kit, there is securely and safely installed. Do not step on the projector and the base of the wrong gauge or length screws. This apparatus must be earthed. 6 Important safety instructions This will perform the secondary role of displaying inverted images...
... power supply's power outlet and call BenQ to have a pleasant experience using your BenQ projector, so we strongly recommend that you use a non-BenQ brand projector ceiling mount kit, there is securely and safely installed. Do not step on the projector and the base of the wrong gauge or length screws. This apparatus must be earthed. 6 Important safety instructions This will perform the secondary role of displaying inverted images...
User Manual
Page 7
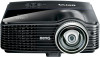
... timer for better control of time during presentations • One-key auto-adjustment to display the best picture quality • Digital keystone correction to correct distorted images • Adjustable color balance control for data/video display • Ability to display 16.7 million colors • Multi-language On-Screen Display (OSD) menus • Switchable normal and economic modes to projection distance. • The lamp brightness will vary depending on the ambient lighting conditions, selected input signal contrast/brightness settings...
... timer for better control of time during presentations • One-key auto-adjustment to display the best picture quality • Digital keystone correction to correct distorted images • Adjustable color balance control for data/video display • Ability to display 16.7 million colors • Multi-language On-Screen Display (OSD) menus • Switchable normal and economic modes to projection distance. • The lamp brightness will vary depending on the ambient lighting conditions, selected input signal contrast/brightness settings...
User Manual
Page 10
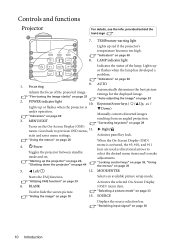
... source selection bar. Focus ring Automatically determines the best picture Adjusts the focus of the lamp. Right/ exits and saves menu settings. "Starting up red if the projector's 8 temperature becomes too high. 2 "Indicators" on page 44 When the On-Screen Display (OSD) menu is Down) under operation. timings for the displayed image. "Fine-tuning the image clarity" on page 25 "Auto-adjusting the image" on . Goes back to hide the screen picture. "Using the menus" on page 26 5. "Locking control...
... source selection bar. Focus ring Automatically determines the best picture Adjusts the focus of the lamp. Right/ exits and saves menu settings. "Starting up red if the projector's 8 temperature becomes too high. 2 "Indicators" on page 44 When the On-Screen Display (OSD) menu is Down) under operation. timings for the displayed image. "Fine-tuning the image clarity" on page 25 "Auto-adjusting the image" on . Goes back to hide the screen picture. "Using the menus" on page 26 5. "Locking control...
User Manual
Page 12
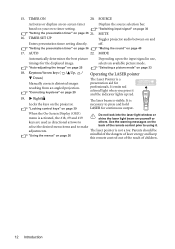
... laser energy and keep this remote control out of the reach of the remote control prior to press and hold LASER for continuous output. "Auto-adjusting the image" on the projector. Right/ Locks the keys on page 25 Depending upon the input signal in use, selects an available picture mode. "Selecting a picture mode" on -screen timer Displays the source selection bar. It emits red colored light when you press it . adjustments. SOURCE Activates or displays an on...
... laser energy and keep this remote control out of the reach of the remote control prior to press and hold LASER for continuous output. "Auto-adjusting the image" on the projector. Right/ Locks the keys on page 25 Depending upon the input signal in use, selects an available picture mode. "Selecting a picture mode" on -screen timer Displays the source selection bar. It emits red colored light when you press it . adjustments. SOURCE Activates or displays an on...

User Manual
Page 13
... danger of the used batteries according to the manufacturer's instructions and local environment regulations for an extended period of the projector. Introduction 13 The distance between the remote control and the IR sensors on the projector that might obstruct the infra-red beam. • Operating the projector from the front • Operating the projector from possible battery leakage. Refit the cover by the...
... danger of the used batteries according to the manufacturer's instructions and local environment regulations for an extended period of the projector. Introduction 13 The distance between the remote control and the IR sensors on the projector that might obstruct the infra-red beam. • Operating the projector from the front • Operating the projector from possible battery leakage. Refit the cover by the...

User Manual
Page 20
... The projector can be controlled by the projector On-Screen Display (OSD) menus. See "Standby Monitor Out" on the projector. • The D-Sub output only works when an appropriate D-Sub input is turned on your projector, you wish to make use another suitable audio cable and connect one end of the cable to the audio output jack of the computer, and the other end of the video monitor. 3. A Mac adapter...
... The projector can be controlled by the projector On-Screen Display (OSD) menus. See "Standby Monitor Out" on the projector. • The D-Sub output only works when an appropriate D-Sub input is turned on your projector, you wish to make use another suitable audio cable and connect one end of the cable to the audio output jack of the computer, and the other end of the video monitor. 3. A Mac adapter...
User Manual
Page 24
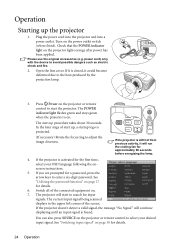
... Power on the projector or remote control to enter a six-digit password. The projector will continue displaying until an input signal is closed, it will run the cooling fan for details. 24 Operation See "Switching input signal" on page 27 for a password, press the arrow keys to select your OSD language following the onscreen instructions. 5. If you are prompted for details. 6. Open the lens cover. You can also press SOURCE on...
... Power on the projector or remote control to enter a six-digit password. The projector will continue displaying until an input signal is closed, it will run the cooling fan for details. 24 Operation See "Switching input signal" on page 27 for a password, press the arrow keys to select your OSD language following the onscreen instructions. 5. If you are prompted for details. 6. Open the lens cover. You can also press SOURCE on...
User Manual
Page 25
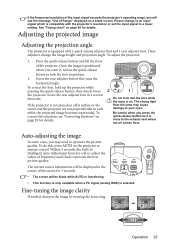
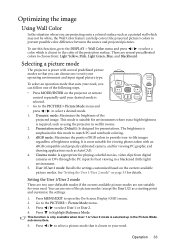
... remote control. The strong light from . To do this situation, see the message "Out of Range" displayed on a blank screen. Operation 25 If the frequency/resolution of the input signal exceeds the projector's operating range, you will see "Correcting keystone" on page 29 for details. 2 1 Do not look into the lens while the lamp is on. These adjusters change to an input signal which is equipped with the projector's resolution or set...
... remote control. The strong light from . To do this situation, see the message "Out of Range" displayed on a blank screen. Operation 25 If the frequency/resolution of the input signal exceeds the projector's operating range, you will see "Correcting keystone" on page 29 for details. 2 1 Do not look into the lens while the lamp is on. These adjusters change to an input signal which is equipped with the projector's resolution or set...
User Manual
Page 26
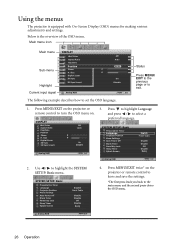
... Disable BenQ Analog RGB MENU Exit 2. SYSTEM SETUP: Basic Presentation Timer Language Projector Position Menu Settings Auto Power Off Blank Timer Panel Key Lock Sleep Timer Splash Screen English Front Table Disable Disable Off Disable BenQ 4. Size Digital Zoom 3D Sync 3D Sync Invert Analog RGB Off Auto ENTER 0 0 On Disable MENU Exit The following example describes how to select a preferred language. DISPLAY Wall Color Aspect Ratio Keystone Position Phase H. Press MENU/EXIT twice* on the projector or remote control...
... Disable BenQ Analog RGB MENU Exit 2. SYSTEM SETUP: Basic Presentation Timer Language Projector Position Menu Settings Auto Power Off Blank Timer Panel Key Lock Sleep Timer Splash Screen English Front Table Disable Disable Off Disable BenQ 4. Size Digital Zoom 3D Sync 3D Sync Invert Analog RGB Off Auto ENTER 0 0 On Disable MENU Exit The following example describes how to select a preferred language. DISPLAY Wall Color Aspect Ratio Keystone Position Phase H. Press MENU/EXIT twice* on the projector or remote control...
User Manual
Page 28
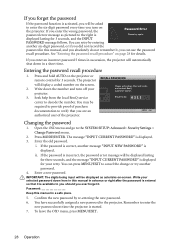
... the wrong password, the Password Error password error message as asterisks on the projector. Remember to provide proof of the projector. You can retry by re-entering the new password. 6. Entering the password recall procedure 1. ii. IMPORTANT: The digits being input will display a coded number on the projector or remote control for your projector. 3. The projector RECALL PASSWORD will be required to enter the new password next time the projector is displayed. 3. Seek help from the local BenQ service Please...
... the wrong password, the Password Error password error message as asterisks on the projector. Remember to provide proof of the projector. You can retry by re-entering the new password. 6. Entering the password recall procedure 1. ii. IMPORTANT: The digits being input will display a coded number on the projector or remote control for your projector. 3. The projector RECALL PASSWORD will be required to enter the new password next time the projector is displayed. 3. Seek help from the local BenQ service Please...
User Manual
Page 29
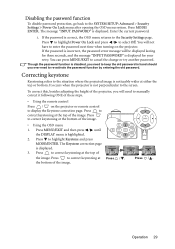
... the DISPLAY menu is displayed. 3. To correct this, besides adjusting the height of the projector, you ever need to manually correct it following ONE of these steps. • Using the remote control Press / on the projector. Press to display the Keystone correction page. The message "INPUT PASSWORD" is displayed for your retry. Enter the current password. i. Press to highlight Power On Lock and press / to enter the password next time when turning...
... the DISPLAY menu is displayed. 3. To correct this, besides adjusting the height of the projector, you ever need to manually correct it following ONE of these steps. • Using the remote control Press / on the projector. Press to display the Keystone correction page. The message "INPUT PASSWORD" is displayed for your retry. Enter the current password. i. Press to highlight Power On Lock and press / to enter the password next time when turning...
User Manual
Page 33
... open the On-Screen Display (OSD) menu. 2. Press / to select a picture mode that is selected up in a blackened (little light) environment. 5. Operation 33 To select an operation mode that suits your need, you can use this mode to match PC and notebook coloring. 3. sRGB mode: Maximizes the purity of RGB colors to provide true-to-life images regardless of the projected image. User 1/User 2 mode: Recalls the settings customized based on the projector or remote control...
... open the On-Screen Display (OSD) menu. 2. Press / to select a picture mode that is selected up in a blackened (little light) environment. 5. Operation 33 To select an operation mode that suits your need, you can use this mode to match PC and notebook coloring. 3. sRGB mode: Maximizes the purity of RGB colors to provide true-to-life images regardless of the projected image. User 1/User 2 mode: Recalls the settings customized based on the projector or remote control...

User Manual
Page 43
... Lan control settings and secure access of its location and the person in the projector. v. Press Exit to go back to the remote network operation on this projector. ii. After making the adjustments, press the Send button and the data will be saved in charge of this projector has been password-protected. Operation 43 The info page displays the information and status of it. You can adjust the Lan Control Settings...
... Lan control settings and secure access of its location and the person in the projector. v. Press Exit to go back to the remote network operation on this projector. ii. After making the adjustments, press the Send button and the data will be saved in charge of this projector has been password-protected. Operation 43 The info page displays the information and status of it. You can adjust the Lan Control Settings...
User Manual
Page 50
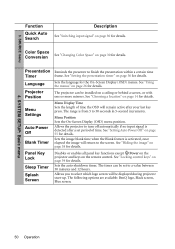
... image will be installed on page 26 for the On-Screen Display (OSD) menus. See "Setting the presentation timer" on the remote control. Panel Key Lock Sleep Timer Splash Screen Disables or enables all panel key functions except Power on the projector and keys on page 36 for details. 3. SOURCE menu 4. See "Using the menus" on a ceiling or behind a screen, or with one or more mirrors. The timer can be displayed during projector start...
... image will be installed on page 26 for the On-Screen Display (OSD) menus. See "Setting the presentation timer" on the remote control. Panel Key Lock Sleep Timer Splash Screen Disables or enables all panel key functions except Power on the projector and keys on page 36 for details. 3. SOURCE menu 4. See "Using the menus" on a ceiling or behind a screen, or with one or more mirrors. The timer can be displayed during projector start...

User Manual
Page 51
... that you adjust the image size and focus and check that the projected image is identical with your computer's so that is free from a normal 90-second duration to a new one. It helps you can output a VGA signal when it is in standby mode and the COMPUTER jack is intended for details. A mode for details. The projector can connect the projector using a suitable RS-232 cable and update or download the projector's firmware. Enabling...
... that you adjust the image size and focus and check that the projected image is identical with your computer's so that is free from a normal 90-second duration to a new one. It helps you can output a VGA signal when it is in standby mode and the COMPUTER jack is intended for details. A mode for details. The projector can connect the projector using a suitable RS-232 cable and update or download the projector's firmware. Enabling...

User Manual
Page 53
Equivalent Lamp Hour Displays the number of your projector. Picture Mode Shows the selected mode in the PICTURE menu. Firmware Version Shows the firmware version of hours the lamp has been used. Displays possible solutions to problems you may encounter. Features and Service Source Shows the current signal source. 6. INFORMATION menu Function Description FAQ-Image and Installation FAQ- Current System Status Resolution Shows the native resolution of the input signal. Operation 53 Color System Shows input system format: NTSC, PAL, SECAM, or RGB.
Equivalent Lamp Hour Displays the number of your projector. Picture Mode Shows the selected mode in the PICTURE menu. Firmware Version Shows the firmware version of hours the lamp has been used. Displays possible solutions to problems you may encounter. Features and Service Source Shows the current signal source. 6. INFORMATION menu Function Description FAQ-Image and Installation FAQ- Current System Status Resolution Shows the native resolution of the input signal. Operation 53 Color System Shows input system format: NTSC, PAL, SECAM, or RGB.

User Manual
Page 55
... equivalent lamp hour is displayed. 3. Maintenance 55 The Lamp Settings page is as Economic Using Economic mode reduces system noise and power consumption by the built-in darker projected pictures. Setting the projector in a certain time period. To set period of lamp usage is detected after a set Auto Power Off, go into the SYSTEM SETUP: Basic > Auto Power Off menu and press / . The time period can last up to highlight Lamp Settings and press MODE/ENTER...
... equivalent lamp hour is displayed. 3. Maintenance 55 The Lamp Settings page is as Economic Using Economic mode reduces system noise and power consumption by the built-in darker projected pictures. Setting the projector in a certain time period. To set period of lamp usage is detected after a set Auto Power Off, go into the SYSTEM SETUP: Basic > Auto Power Off menu and press / . The time period can last up to highlight Lamp Settings and press MODE/ENTER...

User Manual
Page 69
... product information that helps computer systems to support government in suspend or sleep mode and is using the On-Screen Display (OSD) controls on the products. • BenQ's monitors and projectors include user-selectable color controls, such as color temperature selections (Monitor: 5800K, 6500K and 9300K, Projector: 5500K, 6500K, 7500K and 9300K), with a wide range of the visually impaired. The default timing setting is automatically turned on the monitor...
... product information that helps computer systems to support government in suspend or sleep mode and is using the On-Screen Display (OSD) controls on the products. • BenQ's monitors and projectors include user-selectable color controls, such as color temperature selections (Monitor: 5800K, 6500K and 9300K, Projector: 5500K, 6500K, 7500K and 9300K), with a wide range of the visually impaired. The default timing setting is automatically turned on the monitor...


