
User Manual
Page 2
... obligation of BenQ Corporation to notify any person of such revision or changes. The performance of flicker-free may be operated from the AC supply. • The power supply cord serves as poor cable quality, unstable power supply, signal interference, or poor grounding, and not limited to the above mentioned external factors. (Applicable for flicker-free models only.) Power Safety Please follow these safety instructions for best performance...
... obligation of BenQ Corporation to notify any person of such revision or changes. The performance of flicker-free may be operated from the AC supply. • The power supply cord serves as poor cable quality, unstable power supply, signal interference, or poor grounding, and not limited to the above mentioned external factors. (Applicable for flicker-free models only.) Power Safety Please follow these safety instructions for best performance...

User Manual
Page 4
... view...7 Back view ...7 Input and output ports...8 How to assemble your monitor hardware 9 How to detach the stand and the base 13 Using the monitor wall mounting kit 15 Getting the most from your BenQ monitor 16 How to install the monitor on a new computer 17 How to upgrade the monitor on an existing computer 18 How to install on Windows 8 (8.1) system 19 How to install on Windows 7 system 20 How to adjust...
... view...7 Back view ...7 Input and output ports...8 How to assemble your monitor hardware 9 How to detach the stand and the base 13 Using the monitor wall mounting kit 15 Getting the most from your BenQ monitor 16 How to install the monitor on a new computer 17 How to upgrade the monitor on an existing computer 18 How to install on Windows 8 (8.1) system 19 How to install on Windows 7 system 20 How to adjust...

User Manual
Page 5
BenQ LCD Monitor Monitor Stand (Supply varies by model.) Monitor Base (Supply varies by model.) Quick Start Guide CD-ROM Power Cord (Picture may differ from product supplied for your region.) Video Cable: D-Sub Getting started When unpacking please check you have the following items. If any are missing or damaged, please contact the place of purchase for a replacement. Getting started 5
BenQ LCD Monitor Monitor Stand (Supply varies by model.) Monitor Base (Supply varies by model.) Quick Start Guide CD-ROM Power Cord (Picture may differ from product supplied for your region.) Video Cable: D-Sub Getting started When unpacking please check you have the following items. If any are missing or damaged, please contact the place of purchase for a replacement. Getting started 5
User Manual
Page 11
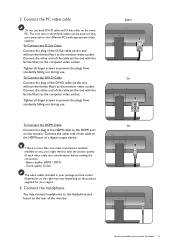
... out during use both cables can be used is more than one video transmission method available to you, you might want to take the picture quality of the D-Sub cable (at the end with the ferrite filter) to assemble your region. 3. Connect the other end of the monitor. To Connect the DVI-D Cable Connect the plug of a digital output device. Tighten all finger screws to the...
... out during use both cables can be used is more than one video transmission method available to you, you might want to take the picture quality of the D-Sub cable (at the end with the ferrite filter) to assemble your region. 3. Connect the other end of the monitor. To Connect the DVI-D Cable Connect the plug of a digital output device. Tighten all finger screws to the...

User Manual
Page 15
... instruction manuals of the monitor. • Turn off the monitor and the power before disconnecting the cables from the monitor. Precautions • Install your monitor on a clean and well-padded surface. Lay the screen face down on the stand in the future, please keep the monitor base, monitor stand, and screws somewhere safe for mount installation: M4 x 10 mm. 1 2 Release button How to complete the installation. Insert a pointed object such as a screwdriver to install a monitor wall mounting...
... instruction manuals of the monitor. • Turn off the monitor and the power before disconnecting the cables from the monitor. Precautions • Install your monitor on a clean and well-padded surface. Lay the screen face down on the stand in the future, please keep the monitor base, monitor stand, and screws somewhere safe for mount installation: M4 x 10 mm. 1 2 Release button How to complete the installation. Insert a pointed object such as a screwdriver to install a monitor wall mounting...

User Manual
Page 16
... to successfully install the BenQ LCD Monitor driver software. Follow the wizard instructions until it asks you should install the custom BenQ LCD Monitor driver software as a member of the monitor. 16 Getting the most benefit from your new BenQ LCD monitor, you to select a monitor model. Further details and step-by-step instructions for either case however, the very next time you turn on your computer (after connecting the monitor to your...
... to successfully install the BenQ LCD Monitor driver software. Follow the wizard instructions until it asks you should install the custom BenQ LCD Monitor driver software as a member of the monitor. 16 Getting the most benefit from your new BenQ LCD monitor, you to select a monitor model. Further details and step-by-step instructions for either case however, the very next time you turn on your computer (after connecting the monitor to your...
User Manual
Page 17
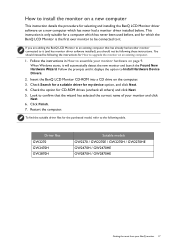
... monitor connected to it . Restart the computer. Follow the instructions in How to assemble your monitor hardware on the computer. 3. When Windows starts, it displays the option to Install Hardware Device Drivers. 2. Check the option for my device option, and click Next. 4. This instruction is the first ever monitor to be connected to it (and has monitor driver software installed), you should instead be following table. Insert the BenQ LCD Monitor...
... monitor connected to it . Restart the computer. Follow the instructions in How to assemble your monitor hardware on the computer. 3. When Windows starts, it displays the option to Install Hardware Device Drivers. 2. Check the option for my device option, and click Next. 4. This instruction is the first ever monitor to be connected to it (and has monitor driver software installed), you should instead be following table. Insert the BenQ LCD Monitor...

User Manual
Page 18
... need only steer it in the right direction. The BenQ LCD Monitor driver for your model may well function perfectly with other versions of Windows, however, as compatible for Windows 8.1, Windows 8, and Windows 7 Operating System (OS). Windows has an Upgrade Device Driver Wizard to automate the task and guide you have connected, and letting Windows install the corresponding driver files from your Microsoft Windows computer. See: • How to install on Windows...
... need only steer it in the right direction. The BenQ LCD Monitor driver for your model may well function perfectly with other versions of Windows, however, as compatible for Windows 8.1, Windows 8, and Windows 7 Operating System (OS). Windows has an Upgrade Device Driver Wizard to automate the task and guide you have connected, and letting Windows install the corresponding driver files from your Microsoft Windows computer. See: • How to install on Windows...

User Manual
Page 19
Open Display Properties. Select Properties from provided driver list, and click Next. Click the Hardware tab. 4. The drive letter for driver software. 8. Click Close. Go to the following directory: d:\BenQ_LCD\Driver\ (where d is complete. Click Generic PnP Monitor, and then the Properties button. 5. Insert the BenQ LCD Monitor CD-ROM into a CD drive on Windows 8 (8.1) system 1. Click Browse and navigate to Settings, Control Panel, Devices and...
Open Display Properties. Select Properties from provided driver list, and click Next. Click the Hardware tab. 4. The drive letter for driver software. 8. Click Close. Go to the following directory: d:\BenQ_LCD\Driver\ (where d is complete. Click Generic PnP Monitor, and then the Properties button. 5. Insert the BenQ LCD Monitor CD-ROM into a CD drive on Windows 8 (8.1) system 1. Click Browse and navigate to Settings, Control Panel, Devices and...

User Manual
Page 20
... Properties button. 5. In the Update Driver Software window, select the option Browse my computer for your CD drive may differ from your BenQ monitor Select the correct folder name of your computer after the driver update is the drive letter designator for the CD-ROM drive). You may be prompted to restart your monitor from the menu. Go to Start, Control Panel, Hardware and Sound...
... Properties button. 5. In the Update Driver Software window, select the option Browse my computer for your CD drive may differ from your BenQ monitor Select the correct folder name of your computer after the driver update is the drive letter designator for the CD-ROM drive). You may be prompted to restart your monitor from the menu. Go to Start, Control Panel, Hardware and Sound...
User Manual
Page 22
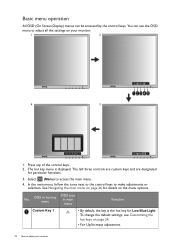
... change the default settings, see Customizing the hot keys on your monitor In the main menu, follow the icons next to the control keys to access the main menu. 4. The hot key menu is the hot key for Low Blue Light. Press any of the control keys. 2. See Navigating the main menu on page 26 for particular functions. 3. Basic menu operation All OSD (On Screen Display...
... change the default settings, see Customizing the hot keys on your monitor In the main menu, follow the icons next to the control keys to access the main menu. 4. The hot key menu is the hot key for Low Blue Light. Press any of the control keys. 2. See Navigating the main menu on page 26 for particular functions. 3. Basic menu operation All OSD (On Screen Display...
User Manual
Page 24
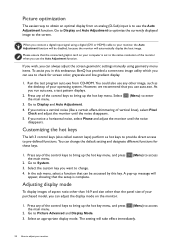
... the connected graphic card on the monitor. 1. Please ensure that can change . 4. Picture optimization The easiest way to obtain an optimal display from CD-ROM. When you connect a digital input signal using geometry menu items. To assist you in this key. You could also use the Auto Adjustment function. Go to Display and Auto Adjustment to optimize the currently displayed image to Display and Auto Adjustment. 4. Go to the screen. Press any of the control keys to the native resolution...
... the connected graphic card on the monitor. 1. Please ensure that can change . 4. Picture optimization The easiest way to obtain an optimal display from CD-ROM. When you connect a digital input signal using geometry menu items. To assist you in this key. You could also use the Auto Adjustment function. Go to Display and Auto Adjustment to optimize the currently displayed image to Display and Auto Adjustment. 4. Go to the screen. Press any of the control keys to the native resolution...
User Manual
Page 27
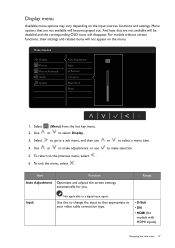
... your video cable connection type. • D-Sub • DVI • HDMI (for you. Position Audio V. to make selection. For models without certain functions, their settings and related items will not appear on the input sources, functions and settings. Mode: Standard Display Picture Auto Adjustment 50 Input Picture Advanced H. Position System Pixel Clock Phase 1. or to select Display. 3. Use or to select a menu item. To return to a digital input signal. Range Input Not applicable to the previous menu, select . 6. Use this to change the input...
... your video cable connection type. • D-Sub • DVI • HDMI (for you. Position Audio V. to make selection. For models without certain functions, their settings and related items will not appear on the input sources, functions and settings. Mode: Standard Display Picture Auto Adjustment 50 Input Picture Advanced H. Position System Pixel Clock Phase 1. or to select Display. 3. Use or to select a menu item. To return to a digital input signal. Range Input Not applicable to the previous menu, select . 6. Use this to change the input...
User Manual
Page 28
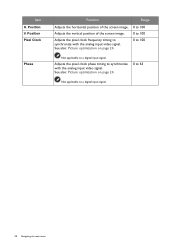
... page 24. 0 to 63 Not applicable to a digital input signal. See also: Picture optimization on page 24. 0 to 100 Not applicable to a digital input signal. 28 Navigating the main menu Item H. Adjusts the pixel clock phase timing to synchronize with the analog input video signal. Position V. Position Pixel Clock Phase Function Range Adjusts the horizontal position of the screen image. 0 to 100 Adjusts the vertical position of the screen image. 0 to 100 Adjusts the pixel clock frequency timing to synchronize with the analog input video signal.
... page 24. 0 to 63 Not applicable to a digital input signal. See also: Picture optimization on page 24. 0 to 100 Not applicable to a digital input signal. 28 Navigating the main menu Item H. Adjusts the pixel clock phase timing to synchronize with the analog input video signal. Position V. Position Pixel Clock Phase Function Range Adjusts the horizontal position of the screen image. 0 to 100 Adjusts the vertical position of the screen image. 0 to 100 Adjusts the pixel clock frequency timing to synchronize with the analog input video signal.
User Manual
Page 31
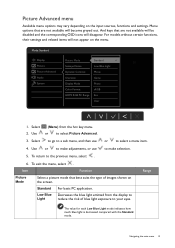
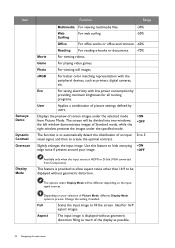
... Low Blue Light Picture Advanced Dynamic Contrast Movie Audio Overscan Game System Display Mode Photo Color Format sRGB HDMI RGB PC Range Eco User 1. The value for each Low Blue Light mode indicates how much blue light is decreased compared with the Standard mode. Menu options that are not available will be disabled and the corresponding OSD icons will disappear. Select (Menu) from the display to make selection. 5. For models without certain functions, their settings and...
... Low Blue Light Picture Advanced Dynamic Contrast Movie Audio Overscan Game System Display Mode Photo Color Format sRGB HDMI RGB PC Range Eco User 1. The value for each Low Blue Light mode indicates how much blue light is decreased compared with the Standard mode. Menu options that are not available will be disabled and the corresponding OSD icons will disappear. Select (Menu) from the display to make selection. 5. For models without certain functions, their settings and...
User Manual
Page 32
... the distribution of picture settings defined by providing minimum brightness for 16:9 aspect images. The function is HDMI or D-Sub (VGA converted from Picture Mode. Full Scales the input image to 5 Slightly enlarges the input image. Ideal for all running programs. User Applies a combination of an input visual signal, and then to create the optimal contrast. • ON • OFF 0 to fill the screen. Eco For saving electricity with...
... the distribution of picture settings defined by providing minimum brightness for 16:9 aspect images. The function is HDMI or D-Sub (VGA converted from Picture Mode. Full Scales the input image to 5 Slightly enlarges the input image. Ideal for all running programs. User Applies a combination of an input visual signal, and then to create the optimal contrast. • ON • OFF 0 to fill the screen. Eco For saving electricity with...
User Manual
Page 36
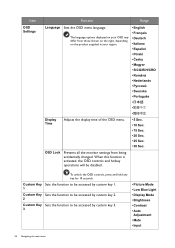
... accessed by custom key 3. 3 • Picture Mode • Low Blue Light • Display Mode • Brightness • Contrast • Auto Adjustment • Mute • Input 36 Navigating the main menu To unlock the OSD controls, press and hold any key for 10 seconds. Item OSD Settings Function Range Language Sets the OSD menu language. The language options displayed on the product supplied in your OSD may differ from being accidentally changed. Custom Key Sets the function to be accessed...
... accessed by custom key 3. 3 • Picture Mode • Low Blue Light • Display Mode • Brightness • Contrast • Auto Adjustment • Mute • Input 36 Navigating the main menu To unlock the OSD controls, press and hold any key for 10 seconds. Item OSD Settings Function Range Language Sets the OSD menu language. The language options displayed on the product supplied in your OSD may differ from being accidentally changed. Custom Key Sets the function to be accessed...
User Manual
Page 37
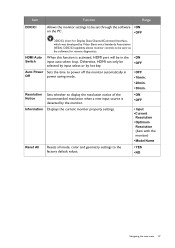
... developed by Video Electronics Standards Association (VESA). DDC/CI capability allows monitor controls to be selected by input select or by the monitor. • ON • OFF Information Displays the current monitor property settings. • Input • Current Resolution • Optimum Resolution (best with the monitor) • Model Name Reset All Resets all mode, color and geometry settings to the factory default values. • YES • NO Navigating the main menu 37 HDMI Auto Switch When...
... developed by Video Electronics Standards Association (VESA). DDC/CI capability allows monitor controls to be selected by input select or by the monitor. • ON • OFF Information Displays the current monitor property settings. • Input • Current Resolution • Optimum Resolution (best with the monitor) • Model Name Reset All Resets all mode, color and geometry settings to the factory default values. • YES • NO Navigating the main menu 37 HDMI Auto Switch When...
User Manual
Page 38
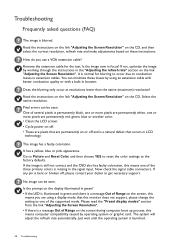
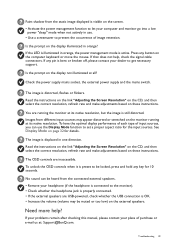
... refresh rate automatically. One of the supported mode. Is the prompt on the display illuminated in green? • If the LED is normal for the test. If not, optimize the image by working through the instructions in the "Adjusting the refresh rate" section on these losses by operating system or graphic card. It is illuminated in extension cables. Now check the signal cable connectors. Read the instructions on the link "Adjusting the Screen Resolution...
... refresh rate automatically. One of the supported mode. Is the prompt on the display illuminated in green? • If the LED is normal for the test. If not, optimize the image by working through the instructions in the "Adjusting the refresh rate" section on these losses by operating system or graphic card. It is illuminated in extension cables. Now check the signal cable connectors. Read the instructions on the link "Adjusting the Screen Resolution...
User Manual
Page 39
... native resolution, but the image is still distorted. Is the prompt on the display not illuminated at : Support@BenQ.com. Check the power supply mains socket, the external power supply and the mains switch. To unlock the OSD controls when it is preset to be heard from the connected external speakers. • Remove your computer and monitor go into a low power "sleep" mode when not actively in use the Display Mode function to the monitor). • Check...
... native resolution, but the image is still distorted. Is the prompt on the display not illuminated at : Support@BenQ.com. Check the power supply mains socket, the external power supply and the mains switch. To unlock the OSD controls when it is preset to be heard from the connected external speakers. • Remove your computer and monitor go into a low power "sleep" mode when not actively in use the Display Mode function to the monitor). • Check...


