
GL60 Series User Manual
Page 15
... new (or different) hardware, and will determine which you connect and install your BenQ monitor 15 Furthermore, if your computer is connected to a network which has security access requirements, network policy settings may prevent you from installing software on your Windows computer, you must be logged ...driver software as a member of the purchased model, refer to the specification label on the BenQ LCD Monitor CD-ROM. Getting the most from your BenQ monitor To gain the most from your BenQ LCD Monitor will launch its Found New Hardware wizard. In either an automatic (new) ...
... new (or different) hardware, and will determine which you connect and install your BenQ monitor 15 Furthermore, if your computer is connected to a network which has security access requirements, network policy settings may prevent you from installing software on your Windows computer, you must be logged ...driver software as a member of the purchased model, refer to the specification label on the BenQ LCD Monitor CD-ROM. Getting the most from your BenQ monitor To gain the most from your BenQ LCD Monitor will launch its Found New Hardware wizard. In either an automatic (new) ...
GL60 Series User Manual
Page 18
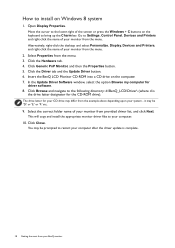
... the menu. Click Generic PnP Monitor, and then the Properties button. 5. This will copy and install the appropriate monitor driver files to Settings, Control Panel, Devices and Printers and right-click the name of your monitor from provided driver list, and click Next. Go to your... monitor from the menu. 3. Select Properties from the menu. 2. Click the Hardware tab. 4. Insert the BenQ LCD Monitor CD-ROM into a CD drive on Windows 8 system 1. Click Browse and navigate to restart your system - The drive letter for driver software...
... the menu. Click Generic PnP Monitor, and then the Properties button. 5. This will copy and install the appropriate monitor driver files to Settings, Control Panel, Devices and Printers and right-click the name of your monitor from provided driver list, and click Next. Go to your... monitor from the menu. 3. Select Properties from the menu. 2. Click the Hardware tab. 4. Insert the BenQ LCD Monitor CD-ROM into a CD drive on Windows 8 system 1. Click Browse and navigate to restart your system - The drive letter for driver software...
GL60 Series User Manual
Page 21
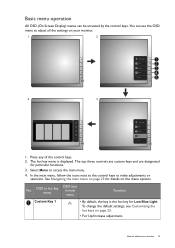
The top three controls are custom keys and are designated for details on page 25 for particular functions. 3. No. To change the default settings, see Customizing the hot keys on your monitor 21 The hot key menu is the hot key for Low Blue Light. How to access the ... adjustments or selection. Press any of the control keys. 2. In the main menu, follow the icons next to the control keys to adjust all the settings on page 23. • For Up/Increase adjustment.
The top three controls are custom keys and are designated for details on page 25 for particular functions. 3. No. To change the default settings, see Customizing the hot keys on your monitor 21 The hot key menu is the hot key for Low Blue Light. How to access the ... adjustments or selection. Press any of the control keys. 2. In the main menu, follow the icons next to the control keys to adjust all the settings on page 23. • For Up/Increase adjustment.

GL60 Series User Manual
Page 22
To change the default settings, see Customizing the hot keys on page 23. • Enters sub menus. • Selects menu items. Menu • Activates the main menu. • Returns to ...adjust your monitor The hot keys only operate while the main menu is the hot key for Input. To change the default settings, see Customizing the hot keys on page 23. • For Down/Decrease adjustment. Exit Exits OSD menu. • OSD = On Screen Display. Custom Key 3 •...
To change the default settings, see Customizing the hot keys on page 23. • Enters sub menus. • Selects menu items. Menu • Activates the main menu. • Returns to ...adjust your monitor The hot keys only operate while the main menu is the hot key for Input. To change the default settings, see Customizing the hot keys on page 23. • For Down/Decrease adjustment. Exit Exits OSD menu. • OSD = On Screen Display. Custom Key 3 •...
GL60 Series User Manual
Page 23
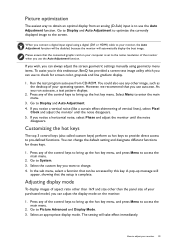
... To assist you in this key. You could also use any of the control keys to bring up message will be accessed by this endeavour, BenQ has provided a screen test image utility which you notice a horizontal noise, select Phase and adjust the monitor until the noise disappears. 5. If ... than 16:9 and size other image, such as hot keys to provide direct access to pre-defined functions. If you want to change the default setting and designate different functions for screen color, grayscale and line gradient display. 1. Select the custom key you notice a vertical noise (like a curtain ...
... To assist you in this key. You could also use any of the control keys to bring up message will be accessed by this endeavour, BenQ has provided a screen test image utility which you notice a horizontal noise, select Phase and adjust the monitor until the noise disappears. 5. If ... than 16:9 and size other image, such as hot keys to provide direct access to pre-defined functions. If you want to change the default setting and designate different functions for screen color, grayscale and line gradient display. 1. Select the custom key you notice a vertical noise (like a curtain ...
GL60 Series User Manual
Page 25
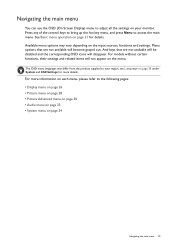
...33 • System menu on page 34 Navigating the main menu 25 Available menu options may differ from the product supplied to adjust all the settings on your region, see Language on each menu, please refer to access the main menu. See Basic menu operation on page 21 for more ...information on page 35 under System and OSD Settings for details. Menu options that are not available will become grayed out. For more details. The OSD menu languages may vary depending on the menu...
...33 • System menu on page 34 Navigating the main menu 25 Available menu options may differ from the product supplied to adjust all the settings on your region, see Language on each menu, please refer to access the main menu. See Basic menu operation on page 21 for more ...information on page 35 under System and OSD Settings for details. Menu options that are not available will become grayed out. For more details. The OSD menu languages may vary depending on the menu...
GL60 Series User Manual
Page 26
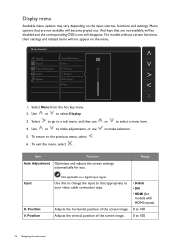
... for models with HDMI inputs) 0 to 100 0 to make adjustments, or use 4. For models without certain functions, their settings and related items will disappear. Position Audio V. to 100 26 Navigating the main menu Use or to the previous menu, select . 6. Position V. And ... change the input to that are not available will be disabled and the corresponding OSD icons will not appear on the input sources, functions and settings. Select to go to a digital input signal. To exit the menu, select . Display menu Available menu options may vary depending on the menu. ...
... for models with HDMI inputs) 0 to 100 0 to make adjustments, or use 4. For models without certain functions, their settings and related items will disappear. Position Audio V. to 100 26 Navigating the main menu Use or to the previous menu, select . 6. Position V. And ... change the input to that are not available will be disabled and the corresponding OSD icons will not appear on the input sources, functions and settings. Select to go to a digital input signal. To exit the menu, select . Display menu Available menu options may vary depending on the menu. ...
GL60 Series User Manual
Page 28
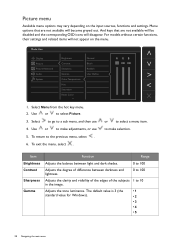
Select to go to make adjustments, or use 4. to a sub menu, and then use 5. For models without certain functions, their settings and related items will not appear on the input sources, functions and settings. Use or to 10 in the image. Item Brightness Contrast Sharpness Gamma Function Range Adjusts the balance between light...
Select to go to make adjustments, or use 4. to a sub menu, and then use 5. For models without certain functions, their settings and related items will not appear on the input sources, functions and settings. Use or to 10 in the image. Item Brightness Contrast Sharpness Gamma Function Range Adjusts the balance between light...
GL60 Series User Manual
Page 29
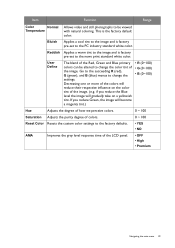
... purity degree of the LCD panel. • OFF • High • Premium Navigating the main menu 29 Reset Color Resets the custom color settings to change the settings. if you reduce Green, the image will gradually take on the color tint of the image. Reddish Applies a warm tint to the image and... is factory pre-set to change the color tint of the image. (e.g. User Define The blend of the Red, Green and Blue primary colors can be viewed with natural...
... purity degree of the LCD panel. • OFF • High • Premium Navigating the main menu 29 Reset Color Resets the custom color settings to change the settings. if you reduce Green, the image will gradually take on the color tint of the image. Reddish Applies a warm tint to the image and... is factory pre-set to change the color tint of the image. (e.g. User Define The blend of the Red, Green and Blue primary colors can be viewed with natural...

GL60 Series User Manual
Page 30
...from the hot key menu. 2. Menu options that are not available will not appear on the screen. For models without certain functions, their settings and related items will become grayed out. Use or to make adjustments, or use or to your eyes. To return to select Picture Advanced... For viewing videos. 30 Navigating the main menu Picture Advanced menu Available menu options may vary depending on the input sources, functions and settings. Standard For basic PC application. Movie The value for each Low Blue Light mode indicates how much blue light is decreased compared with ...
...from the hot key menu. 2. Menu options that are not available will not appear on the screen. For models without certain functions, their settings and related items will become grayed out. Use or to make adjustments, or use or to your eyes. To return to select Picture Advanced... For viewing videos. 30 Navigating the main menu Picture Advanced menu Available menu options may vary depending on the input sources, functions and settings. Standard For basic PC application. Movie The value for each Low Blue Light mode indicates how much blue light is decreased compared with ...
GL60 Series User Manual
Page 31
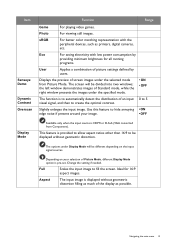
...Mode Available only when the input source is to hide annoying • ON edge noise if present around your selection of picture settings defined by providing minimum brightness for 16:9 aspect images. Full Scales the input image to create the optimal contrast. Ideal for ...displayed without geometric distortion. Eco For saving electricity with the peripheral devices, such as possible. Aspect The input image is pre-set. Item Senseye Demo Dynamic Contrast Overscan Function Range Game For playing video games. Use this feature to automatically detect the distribution...
...Mode Available only when the input source is to hide annoying • ON edge noise if present around your selection of picture settings defined by providing minimum brightness for 16:9 aspect images. Full Scales the input image to create the optimal contrast. Ideal for ...displayed without geometric distortion. Eco For saving electricity with the peripheral devices, such as possible. Aspect The input image is pre-set. Item Senseye Demo Dynamic Contrast Overscan Function Range Game For playing video games. Use this feature to automatically detect the distribution...
GL60 Series User Manual
Page 32
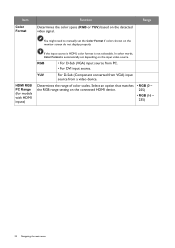
... PC. • For DVI input source. HDMI RGB PC Range (for models with HDMI inputs) If the input source is HDMI, color format is automatically set the Color Format if colors shown on the connected HDMI device. • RGB (0 ~ 255) • RGB (16 ~ 235) 32 Navigating the main menu Item Color... Format Function Determines the color space (RGB or YUV) based on the input video source. Select an option that matches the RGB range setting on the monitor screen do not display properly. Range You might need to manually...
... PC. • For DVI input source. HDMI RGB PC Range (for models with HDMI inputs) If the input source is HDMI, color format is automatically set the Color Format if colors shown on the connected HDMI device. • RGB (0 ~ 255) • RGB (16 ~ 235) 32 Navigating the main menu Item Color... Format Function Determines the color space (RGB or YUV) based on the input video source. Select an option that matches the RGB range setting on the monitor screen do not display properly. Range You might need to manually...
GL60 Series User Manual
Page 33
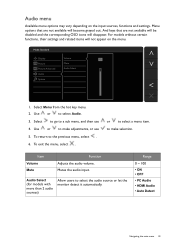
..., and then use 5. or to the previous menu, select . 6. Mutes the audio input. For models without certain functions, their settings and related items will not appear on the input sources, functions and settings. To return to select a menu item. Item Volume Mute Function Adjusts the audio volume. Range 0 ~ 100 • ON •...
..., and then use 5. or to the previous menu, select . 6. Mutes the audio input. For models without certain functions, their settings and related items will not appear on the input sources, functions and settings. To return to select a menu item. Item Volume Mute Function Adjusts the audio volume. Range 0 ~ 100 • ON •...
GL60 Series User Manual
Page 34
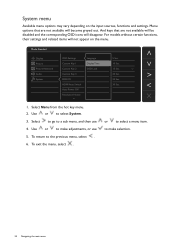
Menu options that are not available will not appear on the input sources, functions and settings. Mode: Standard Display Picture Picture Advanced Audio System OSD Settings Custom Key 1 Custom Key 2 Custom Key 3 DDC/CI HDMI Auto Switch Auto Power Off Resolution Notice Language Display Time OSD Lock 5 Sec. ...10 Sec. 15 Sec. 20 Sec. 25 Sec. 30 Sec. 1. To return to select System. 3. For models without certain functions, their settings and related items will become grayed out. Use or to the previous menu, select . 6. Use or to make adjustments, or use 4. or to a sub ...
Menu options that are not available will not appear on the input sources, functions and settings. Mode: Standard Display Picture Picture Advanced Audio System OSD Settings Custom Key 1 Custom Key 2 Custom Key 3 DDC/CI HDMI Auto Switch Auto Power Off Resolution Notice Language Display Time OSD Lock 5 Sec. ...10 Sec. 15 Sec. 20 Sec. 25 Sec. 30 Sec. 1. To return to select System. 3. For models without certain functions, their settings and related items will become grayed out. Use or to the previous menu, select . 6. Use or to make adjustments, or use 4. or to a sub ...
GL60 Series User Manual
Page 35
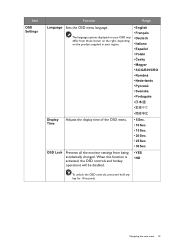
... The language options displayed on the product supplied in your OSD may differ from being accidentally changed. Item OSD Settings Function Range Language Sets the OSD menu language. OSD Lock Prevents all the monitor settings from those shown on the right, depending on your region. • English • Français • Deutsch...
... The language options displayed on the product supplied in your OSD may differ from being accidentally changed. Item OSD Settings Function Range Language Sets the OSD menu language. OSD Lock Prevents all the monitor settings from those shown on the right, depending on your region. • English • Français • Deutsch...
GL60 Series User Manual
Page 36
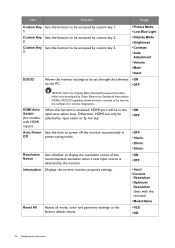
...; Input • Current Resolution • Optimum Resolution (best with HDMI inputs) When this function is activated, HDMI port will be set through the software • ON on the PC. • OFF DDC/CI, short for Display Data Channel/Command Interface, which was developed by Video ... Association (VESA). DDC/CI capability allows monitor controls to be selected by input select or by hot key. • ON • OFF Auto Power Sets the time to power off the monitor automatically in the input auto select loop. HDMI Auto Switch (for remote diagnostics. Otherwise, HDMI can only be...
...; Input • Current Resolution • Optimum Resolution (best with HDMI inputs) When this function is activated, HDMI port will be set through the software • ON on the PC. • OFF DDC/CI, short for Display Data Channel/Command Interface, which was developed by Video ... Association (VESA). DDC/CI capability allows monitor controls to be selected by input select or by hot key. • ON • OFF Auto Power Sets the time to power off the monitor automatically in the input auto select loop. HDMI Auto Switch (for remote diagnostics. Otherwise, HDMI can only be...

GL60 Series User Manual
Page 37
You can minimize these instructions. Go to Picture and Reset Color, and then choose YES to reset the color settings to conduction losses in the "Adjusting the refresh rate" section on the screen, this means you use a VGA extension cable? Remove the extension cable ...has a faulty coloration. If any pin is still not correct and the OSD also has faulty coloration, this monitor does not support, please change the setting to get necessary support. Select the native resolution. How do you are permanently on or off . • These are pixels that are using an extension...
You can minimize these instructions. Go to Picture and Reset Color, and then choose YES to reset the color settings to conduction losses in the "Adjusting the refresh rate" section on the screen, this means you use a VGA extension cable? Remove the extension cable ...has a faulty coloration. If any pin is still not correct and the OSD also has faulty coloration, this monitor does not support, please change the setting to get necessary support. Select the native resolution. How do you are permanently on or off . • These are pixels that are using an extension...
GL60 Series User Manual
Page 38
... function to prevent the occurrence of image retention. Images from the connected external speakers (for 10 seconds. No sound can use . • Use a screensaver to set a proper aspect ratio for details. Press any pin is active. The image is OK. • Increase the volume (volume may appear distorted or stretched on...
... function to prevent the occurrence of image retention. Images from the connected external speakers (for 10 seconds. No sound can use . • Use a screensaver to set a proper aspect ratio for details. Press any pin is active. The image is OK. • Increase the volume (volume may appear distorted or stretched on...

