
GL60 Series User Manual
Page 15
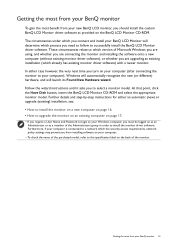
...network which already has existing monitor driver software) with a newer monitor. The circumstances under which process you from installing software on the BenQ LCD Monitor CD-ROM. These circumstances relate to which version of Microsoft Windows you are using, and whether you are connecting the ...(without existing monitor driver software), or whether you are upgrading an existing installation (which has security access requirements, network policy settings may prevent you need to follow to the specification label on the back of the monitor. Getting the most benefit from your new...
...network which already has existing monitor driver software) with a newer monitor. The circumstances under which process you from installing software on the BenQ LCD Monitor CD-ROM. These circumstances relate to which version of Microsoft Windows you are using, and whether you are connecting the ...(without existing monitor driver software), or whether you are upgrading an existing installation (which has security access requirements, network policy settings may prevent you need to follow to the specification label on the back of the monitor. Getting the most benefit from your new...
GL60 Series User Manual
Page 18
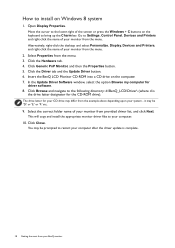
... Charm bar. Alternatively, right-click the desktop and select Personalize, Display, Devices and Printers, and right-click the name of your BenQ monitor Insert the BenQ LCD Monitor CD-ROM into a CD drive on the keyboard to the lower-right of your monitor from the menu. Select Properties... update is the drive letter designator for driver software. 8. The drive letter for your CD drive may be prompted to your system - How to Settings, Control Panel, Devices and Printers and right-click the name of the screen or press the Windows + C buttons on the computer. 7. Open ...
... Charm bar. Alternatively, right-click the desktop and select Personalize, Display, Devices and Printers, and right-click the name of your BenQ monitor Insert the BenQ LCD Monitor CD-ROM into a CD drive on the keyboard to the lower-right of your monitor from the menu. Select Properties... update is the drive letter designator for driver software. 8. The drive letter for your CD drive may be prompted to your system - How to Settings, Control Panel, Devices and Printers and right-click the name of the screen or press the Windows + C buttons on the computer. 7. Open ...
GL60 Series User Manual
Page 21
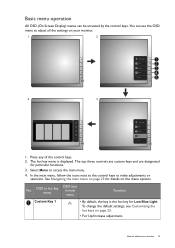
... Blue Light. In the main menu, follow the icons next to the control keys to access the main menu. 4. How to adjust all the settings on the menu options. The top three controls are custom keys and are designated for details on your monitor 21 See Navigating the main menu... OSD menu to adjust your monitor. 1 2 Low Blue Light Input Volume Menu Exit 4 3 Low Blue Light Input Volume Menu Exit 1. To change the default settings, see Customizing the hot keys on page 23. • For Up/Increase adjustment. OSD in hot key menu OSD icon in main menu Function Custom...
... Blue Light. In the main menu, follow the icons next to the control keys to access the main menu. 4. How to adjust all the settings on the menu options. The top three controls are custom keys and are designated for details on your monitor 21 See Navigating the main menu... OSD menu to adjust your monitor. 1 2 Low Blue Light Input Volume Menu Exit 4 3 Low Blue Light Input Volume Menu Exit 1. To change the default settings, see Customizing the hot keys on page 23. • For Up/Increase adjustment. OSD in hot key menu OSD icon in main menu Function Custom...

GL60 Series User Manual
Page 22
... Custom Key 2 • By default, the key is the hot key for 10 seconds. 22 How to the previous menu. To change the default settings, see Customizing the hot keys on page 23. • Enters sub menus. • Selects menu items. Menu • Activates the main menu.... • Returns to adjust your monitor No. To change the default settings, see Customizing the hot keys on page 23. • For Down/Decrease adjustment. Custom Key 3 • By default, the key is not currently ...
... Custom Key 2 • By default, the key is the hot key for 10 seconds. 22 How to the previous menu. To change the default settings, see Customizing the hot keys on page 23. • Enters sub menus. • Selects menu items. Menu • Activates the main menu.... • Returns to adjust your monitor No. To change the default settings, see Customizing the hot keys on page 23. • For Down/Decrease adjustment. Custom Key 3 • By default, the key is not currently ...
GL60 Series User Manual
Page 23
If you wish, you can always adjust the screen geometric settings manually using a digital (DVI or HDMI) cable to your monitor, the Auto Adjustment function will be accessed by this endeavour, BenQ has provided a screen test image utility which you in this key. However, we recommend that the ... of vertical lines), select Pixel Clock and adjust the monitor until the noise disappears. Please ensure that you want to change the default setting and designate different functions for screen color, grayscale and line gradient display. 1. Press any of the control keys to bring up the ...
If you wish, you can always adjust the screen geometric settings manually using a digital (DVI or HDMI) cable to your monitor, the Auto Adjustment function will be accessed by this endeavour, BenQ has provided a screen test image utility which you in this key. However, we recommend that the ... of vertical lines), select Pixel Clock and adjust the monitor until the noise disappears. Please ensure that you want to change the default setting and designate different functions for screen color, grayscale and line gradient display. 1. Press any of the control keys to bring up the ...
GL60 Series User Manual
Page 25
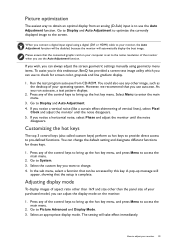
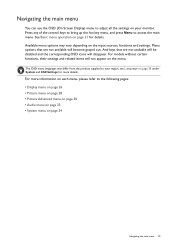
... Basic menu operation on the menu. For models without certain functions, their settings and related items will not appear on page 21 for more information on... page 30 • Audio menu on page 33 • System menu on the input sources, functions and settings. The OSD menu languages may vary depending on page 34 Navigating the main menu 25 Navigating the main menu ...You can use the OSD (On Screen Display) menu to adjust all the settings on page 35 under System and OSD Settings for details. Available menu options may differ from the product supplied to access the main...
... Basic menu operation on the menu. For models without certain functions, their settings and related items will not appear on page 21 for more information on... page 30 • Audio menu on page 33 • System menu on the input sources, functions and settings. The OSD menu languages may vary depending on page 34 Navigating the main menu 25 Navigating the main menu ...You can use the OSD (On Screen Display) menu to adjust all the settings on page 35 under System and OSD Settings for details. Available menu options may differ from the product supplied to access the main...
GL60 Series User Manual
Page 26
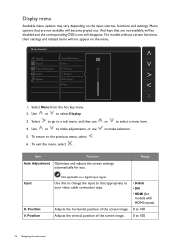
... related items will not appear on the input sources, functions and settings. Position Audio V. Use or to select a menu item. Range Input H. Adjusts the horizontal position of the screen image. • D-Sub • DVI • HDMI (for ... to change the input to that appropriate to a digital input signal. to make adjustments, or use 4. Item Auto Adjustment Function Optimizes and adjusts the screen settings automatically for models with HDMI inputs) 0 to 100 0 to the previous menu, select . 6.
... related items will not appear on the input sources, functions and settings. Position Audio V. Use or to select a menu item. Range Input H. Adjusts the horizontal position of the screen image. • D-Sub • DVI • HDMI (for ... to change the input to that appropriate to a digital input signal. to make adjustments, or use 4. Item Auto Adjustment Function Optimizes and adjusts the screen settings automatically for models with HDMI inputs) 0 to 100 0 to the previous menu, select . 6.
GL60 Series User Manual
Page 28
... available will be disabled and the corresponding OSD icons will become grayed out. For models without certain functions, their settings and related items will not appear on the input sources, functions and settings. Use or to make selection. Select to go to 10 in the image. To return to select a menu item...
... available will be disabled and the corresponding OSD icons will become grayed out. For models without certain functions, their settings and related items will not appear on the input sources, functions and settings. Use or to make selection. Select to go to 10 in the image. To return to select a menu item...
GL60 Series User Manual
Page 29
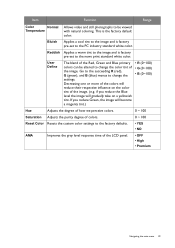
... the news print standard white color. Bluish Applies a cool tint to the image and is factory pre-set to the PC industry standard white color. Go to the succeeding R (red), G (green), and B (blue) menus to change the color tint of the image. Decreasing ...; High • Premium Navigating the main menu 29 Item Function Range Color Normal Temperature Allows video and still photographs to be altered to change the settings. User Define The blend of how we perceive colors. This is the factory default color. Reset Color Resets the custom color...
... the news print standard white color. Bluish Applies a cool tint to the image and is factory pre-set to the PC industry standard white color. Go to the succeeding R (red), G (green), and B (blue) menus to change the color tint of the image. Decreasing ...; High • Premium Navigating the main menu 29 Item Function Range Color Normal Temperature Allows video and still photographs to be altered to change the settings. User Define The blend of how we perceive colors. This is the factory default color. Reset Color Resets the custom color...

GL60 Series User Manual
Page 30
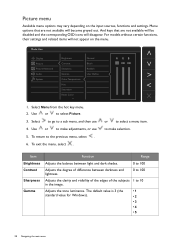
... Select a picture mode that are not available will be disabled and the corresponding OSD icons will disappear. For models without certain functions, their settings and related items will become grayed out. Multimedia For viewing multimedia files. -30% Web Surfing For web surfing. -50% Office For office..., or use or to select a menu item. 4. And keys that are not available will not appear on the input sources, functions and settings. Select to go to a sub menu, and then use to select Picture Advanced. 3. Picture Advanced menu Available menu options may vary depending ...
... Select a picture mode that are not available will be disabled and the corresponding OSD icons will disappear. For models without certain functions, their settings and related items will become grayed out. Multimedia For viewing multimedia files. -30% Web Surfing For web surfing. -50% Office For office..., or use or to select a menu item. 4. And keys that are not available will not appear on the input sources, functions and settings. Select to go to a sub menu, and then use to select Picture Advanced. 3. Picture Advanced menu Available menu options may vary depending ...
GL60 Series User Manual
Page 31
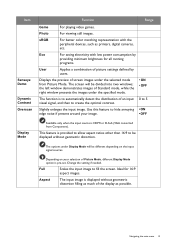
... under the specified mode. • ON • OFF The function is HDMI or D-Sub (VGA converted from Picture Mode. Change the setting if needed. Navigating the main menu 31 Ideal for all running programs. User Applies a combination of Standard mode, while the right window presents...two windows; Item Senseye Demo Dynamic Contrast Overscan Function Range Game For playing video games. the left window demonstrates images of picture settings defined by users. Aspect The input image is provided to allow aspect ratios other than 16:9 to fill the screen. The screen...
... under the specified mode. • ON • OFF The function is HDMI or D-Sub (VGA converted from Picture Mode. Change the setting if needed. Navigating the main menu 31 Ideal for all running programs. User Applies a combination of Standard mode, while the right window presents...two windows; Item Senseye Demo Dynamic Contrast Overscan Function Range Game For playing video games. the left window demonstrates images of picture settings defined by users. Aspect The input image is provided to allow aspect ratios other than 16:9 to fill the screen. The screen...
GL60 Series User Manual
Page 32
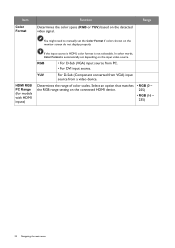
.... Determines the range of color scales. HDMI RGB PC Range (for models with HDMI inputs) If the input source is HDMI, color format is automatically set the Color Format if colors shown on the input video source. YUV For D-Sub (Component converted from VGA) input source from PC. • For DVI... YUV) based on the connected HDMI device. • RGB (0 ~ 255) • RGB (16 ~ 235) 32 Navigating the main menu Range You might need to manually set depending on the monitor screen do not display properly. Select an option that matches the RGB range...
.... Determines the range of color scales. HDMI RGB PC Range (for models with HDMI inputs) If the input source is HDMI, color format is automatically set the Color Format if colors shown on the input video source. YUV For D-Sub (Component converted from VGA) input source from PC. • For DVI... YUV) based on the connected HDMI device. • RGB (0 ~ 255) • RGB (16 ~ 235) 32 Navigating the main menu Range You might need to manually set depending on the monitor screen do not display properly. Select an option that matches the RGB range...
GL60 Series User Manual
Page 33
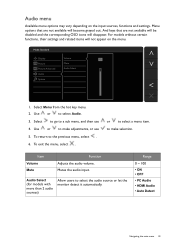
... 0 ~ 100 • ON • OFF • PC Audio • HDMI Audio • Auto Detect Navigating the main menu 33 For models without certain functions, their settings and related items will disappear. Mutes the audio input. Audio menu Available menu options may vary depending on the menu. Use or to the previous... select Audio. 3. And keys that are not available will be disabled and the corresponding OSD icons will not appear on the input sources, functions and settings. Item Volume Mute Function Adjusts the audio volume.
... 0 ~ 100 • ON • OFF • PC Audio • HDMI Audio • Auto Detect Navigating the main menu 33 For models without certain functions, their settings and related items will disappear. Mutes the audio input. Audio menu Available menu options may vary depending on the menu. Use or to the previous... select Audio. 3. And keys that are not available will be disabled and the corresponding OSD icons will not appear on the input sources, functions and settings. Item Volume Mute Function Adjusts the audio volume.
GL60 Series User Manual
Page 34
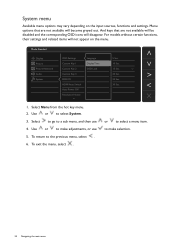
Menu options that are not available will become grayed out. For models without certain functions, their settings and related items will disappear. Mode: Standard Display Picture Picture Advanced Audio System OSD Settings Custom Key 1 Custom Key 2 Custom Key 3 DDC/CI HDMI Auto Switch Auto Power Off Resolution Notice... the menu. And keys that are not available will be disabled and the corresponding OSD icons will not appear on the input sources, functions and settings. Use or to a sub menu, and then use 5. to select a menu item. or to make adjustments, or use 4. Select Menu ...
Menu options that are not available will become grayed out. For models without certain functions, their settings and related items will disappear. Mode: Standard Display Picture Picture Advanced Audio System OSD Settings Custom Key 1 Custom Key 2 Custom Key 3 DDC/CI HDMI Auto Switch Auto Power Off Resolution Notice... the menu. And keys that are not available will be disabled and the corresponding OSD icons will not appear on the input sources, functions and settings. Use or to a sub menu, and then use 5. to select a menu item. or to make adjustments, or use 4. Select Menu ...
GL60 Series User Manual
Page 35
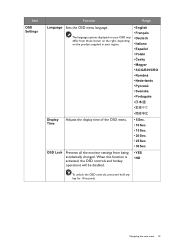
OSD Lock Prevents all the monitor settings from those shown on the right, depending on the product supplied in your region. • English • Français • Deutsch • Italiano • ... of the OSD menu. • 5 Sec. • 10 Sec. • 15 Sec. • 20 Sec. • 25 Sec. • 30 Sec. Item OSD Settings Function Range Language Sets the OSD menu language. When this function is activated, the OSD controls and hotkey operations will be disabled. • YES • NO To unlock...
OSD Lock Prevents all the monitor settings from those shown on the right, depending on the product supplied in your region. • English • Français • Deutsch • Italiano • ... of the OSD menu. • 5 Sec. • 10 Sec. • 15 Sec. • 20 Sec. • 25 Sec. • 30 Sec. Item OSD Settings Function Range Language Sets the OSD menu language. When this function is activated, the OSD controls and hotkey operations will be disabled. • YES • NO To unlock...
GL60 Series User Manual
Page 36
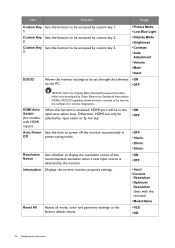
.... Otherwise, HDMI can only be selected by input select or by the monitor. • ON • OFF Information Displays the current monitor property settings. • Input • Current Resolution • Optimum Resolution (best with HDMI inputs) When this function is detected by hot key. •...Display Mode • Brightness • Contrast • Auto Adjustment • Volume • Mute • Input DDC/CI Allows the monitor settings to be sent via the software for remote diagnostics. HDMI Auto Switch (for models with the monitor) • Model Name Reset All Resets ...
.... Otherwise, HDMI can only be selected by input select or by the monitor. • ON • OFF Information Displays the current monitor property settings. • Input • Current Resolution • Optimum Resolution (best with HDMI inputs) When this function is detected by hot key. •...Display Mode • Brightness • Contrast • Auto Adjustment • Volume • Mute • Input DDC/CI Allows the monitor settings to be sent via the software for remote diagnostics. HDMI Auto Switch (for models with the monitor) • Model Name Reset All Resets ...
GL60 Series User Manual
Page 37
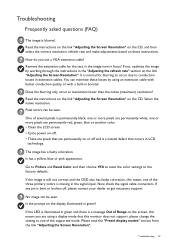
...on the CD. Is the image now in the signal input. Go to Picture and Reset Color, and then choose YES to reset the color settings to get necessary support. Troubleshooting 37 Troubleshooting Frequently asked questions (FAQ) The image is missing in focus? If not, optimize the image by using... a display mode that are pixels that this monitor does not support, please change the setting to conduction losses in booster. Remove the extension cable for blurring to occur due to one of the supported mode. You can be seen. ...
...on the CD. Is the image now in the signal input. Go to Picture and Reset Color, and then choose YES to reset the color settings to get necessary support. Troubleshooting 37 Troubleshooting Frequently asked questions (FAQ) The image is missing in focus? If not, optimize the image by using... a display mode that are pixels that this monitor does not support, please change the setting to conduction losses in booster. Remove the extension cable for blurring to occur due to one of the supported mode. You can be seen. ...
GL60 Series User Manual
Page 38
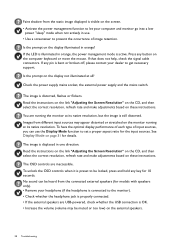
... is illuminated in one direction. Is the prompt on the computer keyboard or move the mouse. No sound can use the Display Mode function to set a proper aspect ratio for details. The image is preset to prevent the occurrence of input sources, you can be heard from different input sources may...
... is illuminated in one direction. Is the prompt on the computer keyboard or move the mouse. No sound can use the Display Mode function to set a proper aspect ratio for details. The image is preset to prevent the occurrence of input sources, you can be heard from different input sources may...

