

User Manual
Page 2
... type of power available, consult your monitor from the AC supply. • The power supply cord serves as a power disconnect device for your monitor Power Safety • The AC plug isolates this publication and to make changes from the type of power indicated on the back or top of the above mentioned misuse or other risks. Please follow these safety instructions for best performance, and...
... type of power available, consult your monitor from the AC supply. • The power supply cord serves as a power disconnect device for your monitor Power Safety • The AC plug isolates this publication and to make changes from the type of power indicated on the back or top of the above mentioned misuse or other risks. Please follow these safety instructions for best performance, and...
User Manual
Page 3
... to install the monitor on a new computer 12 How to upgrade the monitor on an existing computer 13 How to install on Windows 7 system 14 How to install on Windows Vista systems 15 How to install on Windows XP system 16 Picture optimization ...17 How to adjust your monitor 18 The control panel ...18 Hot key mode ...19 Main menu mode ...20 Troubleshooting ...32 Frequently asked questions (FAQ 32 Need more help...
... to install the monitor on a new computer 12 How to upgrade the monitor on an existing computer 13 How to install on Windows 7 system 14 How to install on Windows Vista systems 15 How to install on Windows XP system 16 Picture optimization ...17 How to adjust your monitor 18 The control panel ...18 Hot key mode ...19 Main menu mode ...20 Troubleshooting ...32 Frequently asked questions (FAQ 32 Need more help...
User Manual
Page 7
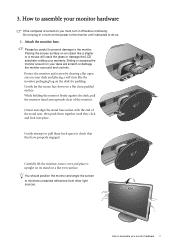
... not plug-in or turn it upright on its stand on a flat clean padded surface. Protect the monitor and screen by clearing a flat open area on your monitor hardware If the computer is turned on you must turn -on the desk for padding. Orient and align the stand base socket with the end of the monitor. Gently attempt to pull them together until instructed to check that...
... not plug-in or turn it upright on its stand on a flat clean padded surface. Protect the monitor and screen by clearing a flat open area on your monitor hardware If the computer is turned on you must turn -on the desk for padding. Orient and align the stand base socket with the end of the monitor. Gently attempt to pull them together until instructed to check that...

User Manual
Page 9
Plug the other end of the monitor. How to install the monitor software. Turn on the monitor by pressing the power button on . 4. Connect-to and turn it on the right of the power cord into a power outlet and turn -on page 11 to assemble your monitor hardware 9 Turn on the computer too, and follow the instructions in Section 4: Getting the most from product supplied for your BenQ monitor on the power. Picture may differ from your region.
Plug the other end of the monitor. How to install the monitor software. Turn on the monitor by pressing the power button on . 4. Connect-to and turn it on the right of the power cord into a power outlet and turn -on page 11 to assemble your monitor hardware 9 Turn on the computer too, and follow the instructions in Section 4: Getting the most from product supplied for your BenQ monitor on the power. Picture may differ from your region.

User Manual
Page 11
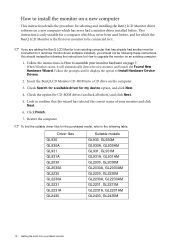
... BenQ color LCD flat screen monitor, you should install the custom BenQ LCD Monitor driver software as provided on as an Administrator or as a member of Microsoft Windows you are using, and whether you are connecting the monitor and installing the software onto a new computer (without existing monitor driver software), or whether you are upgrading an existing installation (which process you connect and install your BenQ monitor 11 The circumstances under which you need to follow to install the monitor driver software...
... BenQ color LCD flat screen monitor, you should install the custom BenQ LCD Monitor driver software as provided on as an Administrator or as a member of Microsoft Windows you are using, and whether you are connecting the monitor and installing the software onto a new computer (without existing monitor driver software), or whether you are upgrading an existing installation (which process you connect and install your BenQ monitor 11 The circumstances under which you need to follow to install the monitor driver software...
User Manual
Page 12
... your BenQ monitor Insert the BenQ LCD Monitor CD-ROM into a CD drive on page 7. Check the option for my device option, and click Next. 4. To find the suitable driver files for the purchased model, refer to the following the instructions for How to upgrade the monitor on an existing computer. 1. If you should instead be connected to it displays the option to Install...
... your BenQ monitor Insert the BenQ LCD Monitor CD-ROM into a CD drive on page 7. Check the option for my device option, and click Next. 4. To find the suitable driver files for the purchased model, refer to the following the instructions for How to upgrade the monitor on an existing computer. 1. If you should instead be connected to it displays the option to Install...

User Manual
Page 13
... to upgrade the monitor on an existing computer This instruction details the procedure for manually updating the existing monitor driver software on page 15. • How to automate the task and guide you have connected, and letting Windows install the corresponding driver files from your BenQ monitor 13 The BenQ LCD Monitor driver for your model may well function perfectly with other versions of Windows, however, as compatible for Windows XP, Windows Vista, and Windows...
... to upgrade the monitor on an existing computer This instruction details the procedure for manually updating the existing monitor driver software on page 15. • How to automate the task and guide you have connected, and letting Windows install the corresponding driver files from your BenQ monitor 13 The BenQ LCD Monitor driver for your model may well function perfectly with other versions of Windows, however, as compatible for Windows XP, Windows Vista, and Windows...
User Manual
Page 14
... to Start, Control Panel, Hardware and Sound, Devices and Printers and right-click the name of your system - Click the Driver tab and the Update Driver button. 5. In the Update Driver Software window, select the option Browse my computer for your CD drive may differ from the example above depending upon your monitor from the menu. 2. it may be 'D:' or 'E:' or 'F:' etc. 8. Insert the BenQ LCD Monitor...
... to Start, Control Panel, Hardware and Sound, Devices and Printers and right-click the name of your system - Click the Driver tab and the Update Driver button. 5. In the Update Driver Software window, select the option Browse my computer for your CD drive may differ from the example above depending upon your monitor from the menu. 2. it may be 'D:' or 'E:' or 'F:' etc. 8. Insert the BenQ LCD Monitor...

User Manual
Page 15
... Advanced Settings button. Click Continue in the prompted User Account Control window. 5. Click the Driver tab and the Update Driver button. 6. Insert the BenQ LCD Monitor CD-ROM into a CD drive on Windows Vista systems 1. The drive letter for driver software. 8. Click Close. Right-click the desktop and select Personalize from the Personalize appearance and sounds window. Select Display Settings from the popup menu. Open Display Settings. Click Browse and navigate to your BenQ monitor...
... Advanced Settings button. Click Continue in the prompted User Account Control window. 5. Click the Driver tab and the Update Driver button. 6. Insert the BenQ LCD Monitor CD-ROM into a CD drive on Windows Vista systems 1. The drive letter for driver software. 8. Click Close. Right-click the desktop and select Personalize from the Personalize appearance and sounds window. Select Display Settings from the popup menu. Open Display Settings. Click Browse and navigate to your BenQ monitor...
User Manual
Page 16
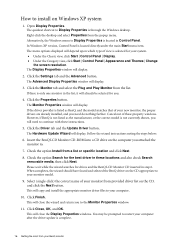
... these instructions. 5. The Hardware Update Wizard will display. 3. Check the option Search for drives and the BenQ LCD Monitor CD inserted in Control Panel. Click Finish. Open Display Properties. Cancel out of view is not currently shown, you will copy and install the appropriate monitor driver files to Display Properties is located in step 6. This will need do nothing further. The Advanced Display Properties window will display. Click the Monitor tab...
... these instructions. 5. The Hardware Update Wizard will display. 3. Check the option Search for drives and the BenQ LCD Monitor CD inserted in Control Panel. Click Finish. Open Display Properties. Cancel out of view is not currently shown, you will copy and install the appropriate monitor driver files to Display Properties is located in step 6. This will need do nothing further. The Advanced Display Properties window will display. Click the Monitor tab...

User Manual
Page 17
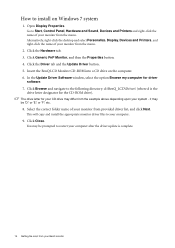
..., BenQ has provided a screen test image utility which you notice a horizontal noise, press the or keys to select Pixel Clock and press the ENTER key. If you can always adjust the screen geometric settings manually using a digital (DVI) cable to the screen. However, we recommend that the connected graphic card on the monitor. 3. As you use auto.exe. Press the MENU key to enter the menu. 5. Use the or keys to select DISPLAY...
..., BenQ has provided a screen test image utility which you notice a horizontal noise, press the or keys to select Pixel Clock and press the ENTER key. If you can always adjust the screen geometric settings manually using a digital (DVI) cable to the screen. However, we recommend that the connected graphic card on the monitor. 3. As you use auto.exe. Press the MENU key to enter the menu. 5. Use the or keys to select DISPLAY...

User Manual
Page 18
... currently displaying. How to adjust your monitor AUTO: Adjusts vertical position, phase, horizontal position and pixel clock automatically. 2. Hot key displays will display a graduated scale for Input. 6. The key is the hot key for Display Mode. 4. /Mode key: For Down/Decrease adjustment. Power: Turns the power on page 19. 18 How to the previous menu or exit OSD. 3. /Display Mode key: For Up/Increase adjustment. OSD = On Screen Display. See Hot key mode on or off. MENU key: Activates OSD main menu...
... currently displaying. How to adjust your monitor AUTO: Adjusts vertical position, phase, horizontal position and pixel clock automatically. 2. Hot key displays will display a graduated scale for Input. 6. The key is the hot key for Display Mode. 4. /Mode key: For Down/Decrease adjustment. Power: Turns the power on page 19. 18 How to the previous menu or exit OSD. 3. /Display Mode key: For Up/Increase adjustment. OSD = On Screen Display. See Hot key mode on or off. MENU key: Activates OSD main menu...
User Manual
Page 20
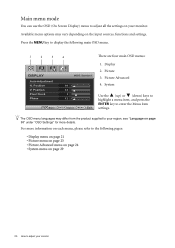
... ENTER key to your region, see "Language on your monitor Position V. Picture Advanced 4. Main menu mode You can use the OSD (On Screen Display) menu to adjust all the settings on page 30" under "OSD Settings" for more information on the input sources, functions and settings. Press the MENU key to display the following pages: • Display menu on page 21 • Picture menu on page 23 • Picture Advanced menu on page 24 • System...
... ENTER key to your region, see "Language on your monitor Position V. Picture Advanced 4. Main menu mode You can use the OSD (On Screen Display) menu to adjust all the settings on page 30" under "OSD Settings" for more information on the input sources, functions and settings. Press the MENU key to display the following pages: • Display menu on page 21 • Picture menu on page 23 • Picture Advanced menu on page 24 • System...

User Manual
Page 21
... Position V. The AUTO key is a 'hot key' for you connect a digital video output using a digital (DVI) cable to make adjustment. Move ENTER Select MENU Exit 4. DISPLAY Auto Adjustment H. Press the or keys to select DISPLAY and then press the ENTER key to select that item. Press the or keys to move the highlight to a menu item and then press the ENTER key to enter the menu. 3. Item Auto Adjustment Function Optimizes...
... Position V. The AUTO key is a 'hot key' for you connect a digital video output using a digital (DVI) cable to make adjustment. Move ENTER Select MENU Exit 4. DISPLAY Auto Adjustment H. Press the or keys to select DISPLAY and then press the ENTER key to select that item. Press the or keys to move the highlight to a menu item and then press the ENTER key to enter the menu. 3. Item Auto Adjustment Function Optimizes...
User Manual
Page 24
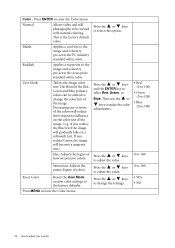
... tint to the image and is factory pre-set to leave the Color menu. if you reduce Green, the image will become a magenta tint.) Hue: Adjusts the degree of the Red, Green and Blue primary colors can be viewed with natural coloring. Press the or keys to the news print standard white color. Reset Color Resets the User Mode custom color settings to make the color adjustments. Then use the or keys to the factory defaults. Press the or...
... tint to the image and is factory pre-set to leave the Color menu. if you reduce Green, the image will become a magenta tint.) Hue: Adjusts the degree of the Red, Green and Blue primary colors can be viewed with natural coloring. Press the or keys to the news print standard white color. Reset Color Resets the User Mode custom color settings to make the color adjustments. Then use the or keys to the factory defaults. Press the or...

User Manual
Page 25
... that best suits the type of images shown on the input sources, functions and settings. 1. Press the or keys to move the highlight to a menu item and then press the ENTER key to adjust your monitor 25 Picture Advanced menu Available menu options may vary depending on the screen. • Standard - for playing video games. • Photo - PICTURE ADVANCED Picture Mode Senseye Demo Dynamic Contrast 5 Display Mode Color Format MODE: Standard...
... that best suits the type of images shown on the input sources, functions and settings. 1. Press the or keys to move the highlight to a menu item and then press the ENTER key to adjust your monitor 25 Picture Advanced menu Available menu options may vary depending on the screen. • Standard - for playing video games. • Photo - PICTURE ADVANCED Picture Mode Senseye Demo Dynamic Contrast 5 Display Mode Color Format MODE: Standard...

User Manual
Page 29
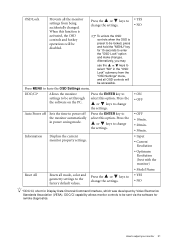
... that item. 4. SYSTEM Input OSD Settings DDC/CI Auto Power off Information Reset All Move MODE: Standard DVI OFF MENU Exit 2. Operation Range Press the or keys to • DVI change the input to your monitor 29 Press the or keys to the previous menu, press the MENU button. Item Input Function Use this to display the main menu. Press the MENU key to change the settings. • D-sub (VGA) Analog-only models do not have the...
... that item. 4. SYSTEM Input OSD Settings DDC/CI Auto Power off Information Reset All Move MODE: Standard DVI OFF MENU Exit 2. Operation Range Press the or keys to • DVI change the input to your monitor 29 Press the or keys to the previous menu, press the MENU button. Item Input Function Use this to display the main menu. Press the MENU key to change the settings. • D-sub (VGA) Analog-only models do not have the...
User Manual
Page 31
... the "OSD Lock" submenu from being accidentally changed. Information Displays the current monitor property settings. Press the or keys to select "NO" in power saving mode. Alternatively, you may use the or keys to change the settings. • YES • NO • ON • OFF • OFF • 10min. • 20min. • 30min. • Input • Current Resolution • Optimum Resolution (best with the monitor) • Model Name...
... the "OSD Lock" submenu from being accidentally changed. Information Displays the current monitor property settings. Press the or keys to select "NO" in power saving mode. Alternatively, you may use the or keys to change the settings. • YES • NO • ON • OFF • OFF • 10min. • 20min. • 30min. • Input • Current Resolution • Optimum Resolution (best with the monitor) • Model Name...

User Manual
Page 32
... using a display mode that are pixels that this monitor does not support, please change the setting to get necessary support. Read the instructions on the link "Adjusting the Screen Resolution" on or off and is missing in the signal input. If the image is still not correct and the OSD also has faulty coloration, this means you use . • Use a screensaver to the factory defaults. Faint shadow from the link "Adjusting the Screen Resolution". Select MENU > PICTURE > Color > Reset Color...
... using a display mode that are pixels that this monitor does not support, please change the setting to get necessary support. Read the instructions on the link "Adjusting the Screen Resolution" on or off and is missing in the signal input. If the image is still not correct and the OSD also has faulty coloration, this means you use . • Use a screensaver to the factory defaults. Faint shadow from the link "Adjusting the Screen Resolution". Select MENU > PICTURE > Color > Reset Color...

User Manual
Page 33
... "OSD Lock" submenu from different input sources may use the "Display Mode" function to select "NO" in one direction: Read the instructions on the link "Adjusting the Screen Resolution" on the CD, and then select the correct resolution, refresh rate and make adjustments based on these instructions. Need more help , check the signal cable connectors. If the LED is illuminated in orange? Is the prompt on the display illuminated in orange, the power management mode is distorted, flashes or flickers...
... "OSD Lock" submenu from different input sources may use the "Display Mode" function to select "NO" in one direction: Read the instructions on the link "Adjusting the Screen Resolution" on the CD, and then select the correct resolution, refresh rate and make adjustments based on these instructions. Need more help , check the signal cable connectors. If the LED is illuminated in orange? Is the prompt on the display illuminated in orange, the power management mode is distorted, flashes or flickers...


