User Manual
Page 1
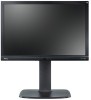
G2200WT 22" Wide-Screen LCD Monitor User Manual Welcome
G2200WT 22" Wide-Screen LCD Monitor User Manual Welcome

User Manual
Page 2
Disclaimer BenQ Corporation makes no representations or warranties, either expressed or implied, with a lint-free, non-abrasive cloth. Always unplug your monitor from the AC supply. • The power supply cord serves as a power disconnect device for pluggable equipment. No ...not sure of the type of BenQ Corporation. If you to dangerous voltages or other risks. Further, BenQ Corporation reserves the right to revise this product yourself, as dropping or mishandling occurs, contact qualified service personnel for ventilation. Clean the LCD monitor surface with respect to the ...
Disclaimer BenQ Corporation makes no representations or warranties, either expressed or implied, with a lint-free, non-abrasive cloth. Always unplug your monitor from the AC supply. • The power supply cord serves as a power disconnect device for pluggable equipment. No ...not sure of the type of BenQ Corporation. If you to dangerous voltages or other risks. Further, BenQ Corporation reserves the right to revise this product yourself, as dropping or mishandling occurs, contact qualified service personnel for ventilation. Clean the LCD monitor surface with respect to the ...
User Manual
Page 4
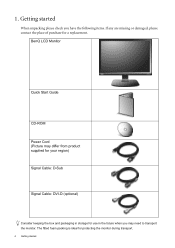
BenQ LCD Monitor Quick Start Guide CD-ROM Power Cord (Picture may differ from product supplied for your region) Signal Cable: D-Sub Signal Cable: DVI-D (optional) Consider keeping the box and packaging in the future when you have the following items. If any are missing or damaged, please contact the place of purchase for a replacement. The fitted foam packing is ideal for use in storage for protecting the monitor during transport. 4 Getting started When unpacking please check you may need to transport the monitor. Getting started 1.
BenQ LCD Monitor Quick Start Guide CD-ROM Power Cord (Picture may differ from product supplied for your region) Signal Cable: D-Sub Signal Cable: DVI-D (optional) Consider keeping the box and packaging in the future when you have the following items. If any are missing or damaged, please contact the place of purchase for a replacement. The fitted foam packing is ideal for use in storage for protecting the monitor during transport. 4 Getting started When unpacking please check you may need to transport the monitor. Getting started 1.

User Manual
Page 6
... (at the end with appropriate video systems. Connect one end of the power cord into the socket labelled 'POWER IN' on the rear of the monitor. Either Or 6 How to the monitor D-Sub socket. Do not plug-in which both DVI-D cable and D-Sub cable on the power to the... prevent the plugs from accidently falling out during use both cables can be used is used for direct digital connection between source video and digital LCD monitors or projectors. Plug one end of the D-Sub cable (at the end without the ferrite filter) to assemble your...
... (at the end with appropriate video systems. Connect one end of the power cord into the socket labelled 'POWER IN' on the rear of the monitor. Either Or 6 How to the monitor D-Sub socket. Do not plug-in which both DVI-D cable and D-Sub cable on the power to the... prevent the plugs from accidently falling out during use both cables can be used is used for direct digital connection between source video and digital LCD monitors or projectors. Plug one end of the D-Sub cable (at the end without the ferrite filter) to assemble your...

User Manual
Page 9
Rotate the monitor 90 degrees clockwise as illustrated. Adjust the monitor to assemble your monitor hardware 9 2. How to the desired viewing angle. To avoid the edge of the LCD display hitting the monitor base surface while it is being rotated, do tilt and extend the monitor to the highest position before you start to rotate the display. 3.
Rotate the monitor 90 degrees clockwise as illustrated. Adjust the monitor to assemble your monitor hardware 9 2. How to the desired viewing angle. To avoid the edge of the LCD display hitting the monitor base surface while it is being rotated, do tilt and extend the monitor to the highest position before you start to rotate the display. 3.

User Manual
Page 11
... automatic (new) or upgrade (existing) installation follow to which you from your new BenQ color LCD flat screen monitor, you are upgrading an existing installation (which already has existing monitor driver software) with a newer monitor. 4. These circumstances relate to successfully install the BenQ LCD Monitor driver software. The circumstances under which version of Microsoft Windows you are using...
... automatic (new) or upgrade (existing) installation follow to which you from your new BenQ color LCD flat screen monitor, you are upgrading an existing installation (which already has existing monitor driver software) with a newer monitor. 4. These circumstances relate to successfully install the BenQ LCD Monitor driver software. The circumstances under which version of Microsoft Windows you are using...

User Manual
Page 12
...12 Getting the most from your monitor and click Next. 6. How to install the monitor on a new computer This instruction details the procedure for selecting and installing the BenQ LCD Monitor driver software on a new computer which the BenQ LCD Monitor is the first ever monitor to be following these instructions....the instructions in How to confirm that has already had a monitor driver installed before , and for How to it will automatically detect the new monitor and launch the Found New Hardware Wizard. Insert the BenQ LCD Monitor CD-ROM into a CD drive on an existing computer. 1....
...12 Getting the most from your monitor and click Next. 6. How to install the monitor on a new computer This instruction details the procedure for selecting and installing the BenQ LCD Monitor driver software on a new computer which the BenQ LCD Monitor is the first ever monitor to be following these instructions....the instructions in How to confirm that has already had a monitor driver installed before , and for How to it will automatically detect the new monitor and launch the Found New Hardware Wizard. Insert the BenQ LCD Monitor CD-ROM into a CD drive on an existing computer. 1....

User Manual
Page 13
...XP system on page 15. How to upgrade the monitor on an existing computer This instruction details the procedure for the particular model monitor you through the file selection and installation process. The BenQ LCD Monitor driver for your model may well function perfectly with ... of Windows and cannot guarantee its operation on those systems. Installing monitor driver software involves selecting an appropriate information file (.inf) on the BenQ LCD Monitor CD-ROM for manually updating the existing monitor driver software on other versions of Windows, however, as compatible for...
...XP system on page 15. How to upgrade the monitor on an existing computer This instruction details the procedure for the particular model monitor you through the file selection and installation process. The BenQ LCD Monitor driver for your model may well function perfectly with ... of Windows and cannot guarantee its operation on those systems. Installing monitor driver software involves selecting an appropriate information file (.inf) on the BenQ LCD Monitor CD-ROM for manually updating the existing monitor driver software on other versions of Windows, however, as compatible for...

User Manual
Page 14
... the desktop and select Personalize from the Personalize appearance and sounds window. Click 'Browse' and navigate to restart Windows Vista, as the BenQ LCD monitor drivers will copy and install the appropriate monitor driver files to install on the computer. 7. Click the Advanced Settings button. In the Update Driver Software window, select the option...
... the desktop and select Personalize from the Personalize appearance and sounds window. Click 'Browse' and navigate to restart Windows Vista, as the BenQ LCD monitor drivers will copy and install the appropriate monitor driver files to install on the computer. 7. Click the Advanced Settings button. In the Update Driver Software window, select the option...

User Manual
Page 15
... the Display Properties windows. Click Close, OK, and OK. The quickest shortcut to Display Properties is selected for drives and the BenQ LCD Monitor CD inserted in Control Panel. The menu options displayed will operate immediately with these instructions. 5. The Advanced Display Properties window will ...install on the CD, and click the Next button. Click the Properties button. However, if BenQ is not listed as the BenQ LCD monitor drivers will depend upon which type of your monitor model. 9. Alternatively, the Windows menu to Display Properties is not currently shown, you to ...
... the Display Properties windows. Click Close, OK, and OK. The quickest shortcut to Display Properties is selected for drives and the BenQ LCD Monitor CD inserted in Control Panel. The menu options displayed will operate immediately with these instructions. 5. The Advanced Display Properties window will ...install on the CD, and click the Next button. Click the Properties button. However, if BenQ is not listed as the BenQ LCD monitor drivers will depend upon which type of your monitor model. 9. Alternatively, the Windows menu to Display Properties is not currently shown, you to ...
User Manual
Page 28
...image retention. 28 Troubleshooting Select MENU > PICTURE > Color > Reset Color, and then choose "YES" in focus? If any pin is missing in LCD technology. If the LED is illuminated in green? 7. Does the blurring only occur at resolutions lower than the native (maximum) resolution? Pixel errors can... be seen: One of the supported mode. If not, optimize the image by using a display mode that this monitor does not support, please change the setting to the factory defaults. Please read the "Preset display modes" section from the static image displayed ...
...image retention. 28 Troubleshooting Select MENU > PICTURE > Color > Reset Color, and then choose "YES" in focus? If any pin is missing in LCD technology. If the LED is illuminated in green? 7. Does the blurring only occur at resolutions lower than the native (maximum) resolution? Pixel errors can... be seen: One of the supported mode. If not, optimize the image by using a display mode that this monitor does not support, please change the setting to the factory defaults. Please read the "Preset display modes" section from the static image displayed ...


