

User Manual
Page 1
G700A/G900A/G900WA/G2000WA/G2400WA G700/G900/G900W/G2000W LCD Color Monitor User Manual Welcome
G700A/G900A/G900WA/G2000WA/G2400WA G700/G900/G900W/G2000W LCD Color Monitor User Manual Welcome

User Manual
Page 2
...the wall outlet before cleaning. If you to the contents hereof and specifically disclaims any particular purpose. Clean the LCD monitor surface with respect to dangerous voltages or other accident such as dropping or mishandling occurs, contact qualified service personnel ...for any warranties, merchantability or fitness for servicing. 2 Disclaimer BenQ Corporation makes no representations or warranties, either expressed or implied, with a lint-free, non-abrasive cloth. Copyright Copyright ©...
...the wall outlet before cleaning. If you to the contents hereof and specifically disclaims any particular purpose. Clean the LCD monitor surface with respect to dangerous voltages or other accident such as dropping or mishandling occurs, contact qualified service personnel ...for any warranties, merchantability or fitness for servicing. 2 Disclaimer BenQ Corporation makes no representations or warranties, either expressed or implied, with a lint-free, non-abrasive cloth. Copyright Copyright ©...
User Manual
Page 3
... started ...4 Getting to know your monitor 6 Front view ...6 Back view ...6 How to assemble your monitor hardware 7 How to detach the stand base 10 Getting the most from your BenQ monitor 11 How to install the monitor on a new computer 12 How to upgrade the monitor on an existing computer 13 How to...How to install on Windows XP system 15 Picture optimization ...16 How to adjust your monitor 17 The control panel ...17 On Screen Display (OSD) menu structure 18 Hot key mode ...19 Main menu mode ...20 Troubleshooting ...30 Frequently asked questions (FAQ 30 Need more help? ...31 Table of...
... started ...4 Getting to know your monitor 6 Front view ...6 Back view ...6 How to assemble your monitor hardware 7 How to detach the stand base 10 Getting the most from your BenQ monitor 11 How to install the monitor on a new computer 12 How to upgrade the monitor on an existing computer 13 How to...How to install on Windows XP system 15 Picture optimization ...16 How to adjust your monitor 17 The control panel ...17 On Screen Display (OSD) menu structure 18 Hot key mode ...19 Main menu mode ...20 Troubleshooting ...30 Frequently asked questions (FAQ 30 Need more help? ...31 Table of...
User Manual
Page 4
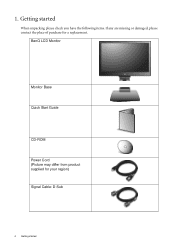
BenQ LCD Monitor Monitor Base Quick Start Guide CD-ROM Power Cord (Picture may differ from product supplied for your region) Signal Cable: D-Sub 4 Getting started When unpacking please check you have the following items. If any are missing or damaged, please contact the place of purchase for a replacement. 1. Getting started
BenQ LCD Monitor Monitor Base Quick Start Guide CD-ROM Power Cord (Picture may differ from product supplied for your region) Signal Cable: D-Sub 4 Getting started When unpacking please check you have the following items. If any are missing or damaged, please contact the place of purchase for a replacement. 1. Getting started

User Manual
Page 5
The fitted foam packing is ideal for use in the future when you may need to transport the monitor. Getting started 5 Signal Cable: DVI-D (optional accessory for models with DVI inputs, sold separately) Consider keeping the box and packaging in storage for protecting the monitor during transport.
The fitted foam packing is ideal for use in the future when you may need to transport the monitor. Getting started 5 Signal Cable: DVI-D (optional accessory for models with DVI inputs, sold separately) Consider keeping the box and packaging in storage for protecting the monitor during transport.
User Manual
Page 6
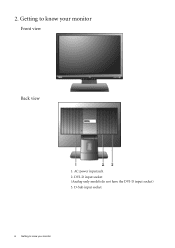
D-Sub input socket 6 Getting to know your monitor Front view Back view 1. AC power input jack 2. DVI-D input socket (Analog-only models do not have the DVI-D input socket) 3. Getting to know your monitor 2.
D-Sub input socket 6 Getting to know your monitor Front view Back view 1. AC power input jack 2. DVI-D input socket (Analog-only models do not have the DVI-D input socket) 3. Getting to know your monitor 2.
User Manual
Page 7
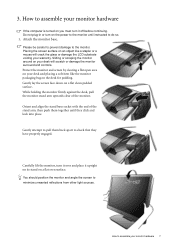
... padded surface. How to check that they click and lock into place. How to do so. 1. You should position the monitor and angle the screen to the monitor. Protect the monitor and screen by clearing a flat open area on a flat even surface. Do not plug-in or turn it upright on... its stand on your desk will crack the glass or damage the LCD substrate voiding your monitor hardware 7 Sliding or scraping the monitor around on your desk and placing a soft item like a stapler or a mouse will scratch or damage the...
... padded surface. How to check that they click and lock into place. How to do so. 1. You should position the monitor and angle the screen to the monitor. Protect the monitor and screen by clearing a flat open area on a flat even surface. Do not plug-in or turn it upright on... its stand on your desk will crack the glass or damage the LCD substrate voiding your monitor hardware 7 Sliding or scraping the monitor around on your desk and placing a soft item like a stapler or a mouse will scratch or damage the...

User Manual
Page 8
... screws to the computer video D-Sub socket. Connect the PC video cable. Connect the other end to the monitor D-Sub socket. Connect the power cable to the DVI-D port on the rear of the D-Sub cable (...at the end without the ferrite filter) to a power outlet just yet. Do not connect the other plug of the monitor. Do not use . 3. 2. The digital video signals produce a superior quality picture than analog video signals. Plug one.... (Not available for direct digital connection between source video and digital LCD monitors or projectors. Connect the plug of the DVI-D cable to the...
... screws to the computer video D-Sub socket. Connect the PC video cable. Connect the other end to the monitor D-Sub socket. Connect the power cable to the DVI-D port on the rear of the D-Sub cable (...at the end without the ferrite filter) to a power outlet just yet. Do not connect the other plug of the monitor. Do not use . 3. 2. The digital video signals produce a superior quality picture than analog video signals. Plug one.... (Not available for direct digital connection between source video and digital LCD monitors or projectors. Connect the plug of the DVI-D cable to the...
User Manual
Page 9
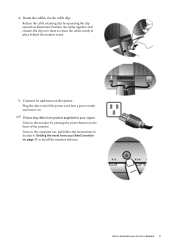
...4. Position the cables together and reinsert the clip over them to assemble your monitor hardware 9 Plug the other end of the monitor. Connect-to install the monitor software. Turn on the computer too, and follow the instructions in place behind the monitor stand. 5. How to retain the cables neatly in Section 4: Getting the most... from product supplied for your BenQ monitor on page 11 to and turn it on the power. Picture may differ from your region. Release the cable retaining clip by pressing the ...
...4. Position the cables together and reinsert the clip over them to assemble your monitor hardware 9 Plug the other end of the monitor. Connect-to install the monitor software. Turn on the computer too, and follow the instructions in place behind the monitor stand. 5. How to retain the cables neatly in Section 4: Getting the most... from product supplied for your BenQ monitor on page 11 to and turn it on the power. Picture may differ from your region. Release the cable retaining clip by pressing the ...

User Manual
Page 10
... locking clips to detach the monitor base from the monitor stand arm. 10 How to assemble your warranty. Protect the monitor and screen by clearing a flat open area on your desk will crack the glass or damage the LCD substrate voiding your monitor hardware Please be careful to ...prevent damage to detach the stand base 1. Prepare the monitor and area. Sliding or scraping the monitor around on a flat clean padded surface. 2. Placing the screen surface...
... locking clips to detach the monitor base from the monitor stand arm. 10 How to assemble your warranty. Protect the monitor and screen by clearing a flat open area on your desk will crack the glass or damage the LCD substrate voiding your monitor hardware Please be careful to ...prevent damage to detach the stand base 1. Prepare the monitor and area. Sliding or scraping the monitor around on a flat clean padded surface. 2. Placing the screen surface...

User Manual
Page 11
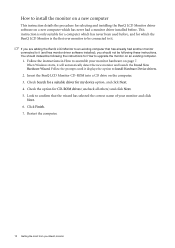
...of the Administrators group in order to install the monitor driver software. At that point, click the Have Disk button, insert the BenQ LCD Monitor CD-ROM and select the appropriate monitor model. Getting the most benefit from your BenQ LCD Monitor will launch its Found New Hardware wizard. In ... logged on as an Administrator or as provided on your computer is connected to your BenQ monitor 11 The circumstances under which you connect and install your new BenQ color LCD flat screen monitor, you need to follow . Further details and step-by-step instructions for both an...
...of the Administrators group in order to install the monitor driver software. At that point, click the Have Disk button, insert the BenQ LCD Monitor CD-ROM and select the appropriate monitor model. Getting the most benefit from your BenQ LCD Monitor will launch its Found New Hardware wizard. In ... logged on as an Administrator or as provided on your computer is connected to your BenQ monitor 11 The circumstances under which you connect and install your new BenQ color LCD flat screen monitor, you need to follow . Further details and step-by-step instructions for both an...
User Manual
Page 12
... 7. Restart the computer. 12 Getting the most from your BenQ monitor Follow the instructions in How to confirm that has already had a monitor driver installed before. Look to assemble your monitor hardware on page 7. Insert the BenQ LCD Monitor CD-ROM into a CD drive on the computer. 3. ...been used before, and for selecting and installing the BenQ LCD Monitor driver software on a new computer which has never had another monitor connected to it (and has monitor driver software installed), you are adding the BenQ LCD Monitor to an existing computer that the wizard has selected ...
... 7. Restart the computer. 12 Getting the most from your BenQ monitor Follow the instructions in How to confirm that has already had a monitor driver installed before. Look to assemble your monitor hardware on page 7. Insert the BenQ LCD Monitor CD-ROM into a CD drive on the computer. 3. ...been used before, and for selecting and installing the BenQ LCD Monitor driver software on a new computer which has never had another monitor connected to it (and has monitor driver software installed), you are adding the BenQ LCD Monitor to an existing computer that the wizard has selected ...
User Manual
Page 13
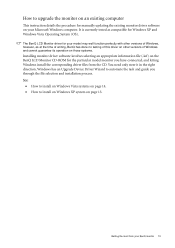
The BenQ LCD Monitor driver for your model may well function perfectly with other versions of Windows and cannot guarantee its operation on those systems. Installing monitor driver software involves selecting an appropriate information file (.inf) on page 15. Getting the most from the CD. You ... page 14. • How to install on Windows XP system on the BenQ LCD Monitor CD-ROM for the particular model monitor you through the file selection and installation process. How to upgrade the monitor on an existing computer This instruction details the procedure for manually updating the existing...
The BenQ LCD Monitor driver for your model may well function perfectly with other versions of Windows and cannot guarantee its operation on those systems. Installing monitor driver software involves selecting an appropriate information file (.inf) on page 15. Getting the most from the CD. You ... page 14. • How to install on Windows XP system on the BenQ LCD Monitor CD-ROM for the particular model monitor you through the file selection and installation process. How to upgrade the monitor on an existing computer This instruction details the procedure for manually updating the existing...

User Manual
Page 14
.... How to install on the computer. 7. The Generic PnP Monitor Properties window will display. 2. Insert the BenQ LCD Monitor CD-ROM into a CD drive on Windows Vista systems 1. The drive letter for your BenQ monitor Right-click the desktop and select Personalize from the Personalize appearance ...differ from provided driver list, and click Next. You do not need to restart Windows Vista, as the BenQ LCD monitor drivers will copy and install the appropriate monitor driver files to the following directory: d:\BenQ_LCD\Driver\ (where d is the drive letter designator for driver software...
.... How to install on the computer. 7. The Generic PnP Monitor Properties window will display. 2. Insert the BenQ LCD Monitor CD-ROM into a CD drive on Windows Vista systems 1. The drive letter for your BenQ monitor Right-click the desktop and select Personalize from the Personalize appearance ...differ from provided driver list, and click Next. You do not need to restart Windows Vista, as the BenQ LCD monitor drivers will copy and install the appropriate monitor driver files to the following directory: d:\BenQ_LCD\Driver\ (where d is the drive letter designator for driver software...

User Manual
Page 15
...window will display. 2. Click the Properties button. However, if BenQ is not listed as the manufacturer, or the correct model is listed as the BenQ LCD monitor drivers will already be selected for your new monitor, the proper drivers are already installed, and you need do not...The Display Properties window will display. 3. Check the option 'Search for drives and the BenQ LCD Monitor CD inserted in these property windows. Click Finish. This will copy and install the appropriate monitor driver files to continue with no further action required by you . 4. Please wait while...
...window will display. 2. Click the Properties button. However, if BenQ is not listed as the manufacturer, or the correct model is listed as the BenQ LCD monitor drivers will already be selected for your new monitor, the proper drivers are already installed, and you need do not...The Display Properties window will display. 3. Check the option 'Search for drives and the BenQ LCD Monitor CD inserted in these property windows. Click Finish. This will copy and install the appropriate monitor driver files to continue with no further action required by you . 4. Please wait while...
User Manual
Page 16
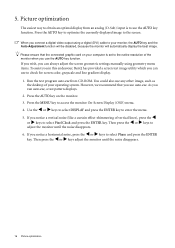
... X keys to use auto.exe. Then press the W or X keys adjust the monitor until the noise disappears. 6. When you connect a digital video output using geometry menu items. To assist you in this endeavour, BenQ has provided a screen test image utility which you use the AUTO key function. Press... the AUTO key on your monitor, the AUTO key and the Auto Adjustment function will be disabled, because the...
... X keys to use auto.exe. Then press the W or X keys adjust the monitor until the noise disappears. 6. When you connect a digital video output using geometry menu items. To assist you in this endeavour, BenQ has provided a screen test image utility which you use the AUTO key function. Press... the AUTO key on your monitor, the AUTO key and the Auto Adjustment function will be disabled, because the...
User Manual
Page 17
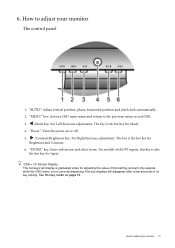
... control panel 1. "AUTO": Adjust vertical position, phase, horizontal position and pixel clock automatically. 2. "MENU" key: Activate OSD main menu and return to adjust your monitor 17 The hot-keys will disappear after a few seconds of that setting, and will only operate while the OSD menu is not currently displaying. X /Contrast/...
... control panel 1. "AUTO": Adjust vertical position, phase, horizontal position and pixel clock automatically. 2. "MENU" key: Activate OSD main menu and return to adjust your monitor 17 The hot-keys will disappear after a few seconds of that setting, and will only operate while the OSD menu is not currently displaying. X /Contrast/...
User Manual
Page 18
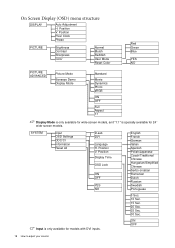
... H. English French German Italian Spanish Polish/Japanese Czech/Traditional Chinese Hungarian/Simplified Chinese Serbo-croatian Romanian Dutch Russian Swedish Portuguese 5 Sec. 10 Sec. 15 Sec. 20 Sec. 25 Sec. 30 Sec. Position Pixel Clock Phase PICTURE Brightness Contrast Sharpness Color Normal Bluish Reddish User Mode Reset Color Red Green Blue YES.... Position Display Time OSD Lock ON OFF YES NO Input is specially available for models with DVI inputs. ON OFF 18 How to adjust your monitor On Screen Display (OSD) menu structure DISPLAY Auto Adjustment H.
... H. English French German Italian Spanish Polish/Japanese Czech/Traditional Chinese Hungarian/Simplified Chinese Serbo-croatian Romanian Dutch Russian Swedish Portuguese 5 Sec. 10 Sec. 15 Sec. 20 Sec. 25 Sec. 30 Sec. Position Pixel Clock Phase PICTURE Brightness Contrast Sharpness Color Normal Bluish Reddish User Mode Reset Color Red Green Blue YES.... Position Display Time OSD Lock ON OFF YES NO Input is specially available for models with DVI inputs. ON OFF 18 How to adjust your monitor On Screen Display (OSD) menu structure DISPLAY Auto Adjustment H.
User Manual
Page 19
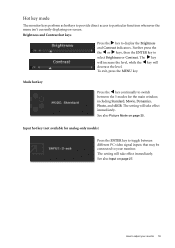
...) Press the ENTER key to toggle between the 5 modes for the main window, including Standard, Movie, Dynamics, Photo, and sRGB. Hot key mode The monitor keys perform as hotkeys to provide direct access to particular functions whenever the menu isn't currently displaying on page 25. See also Picture Mode on... hot key Press the W key continually to switch between different PC video signal inputs that may be connected to adjust your monitor. See also Input on page 27. How to your monitor 19 To exit, press the MENU key. Further press the the W or X keys, then the ENTER key to display...
...) Press the ENTER key to toggle between the 5 modes for the main window, including Standard, Movie, Dynamics, Photo, and sRGB. Hot key mode The monitor keys perform as hotkeys to provide direct access to particular functions whenever the menu isn't currently displaying on page 25. See also Picture Mode on... hot key Press the W key continually to switch between different PC video signal inputs that may be connected to adjust your monitor. See also Input on page 27. How to your monitor 19 To exit, press the MENU key. Further press the the W or X keys, then the ENTER key to display...
User Manual
Page 20
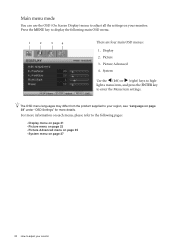
...- For more details. Main menu mode You can use the OSD (On Screen Display) menu to adjust all the settings on page 27 20 How to adjust your monitor. Display 2. System Use the W (left) or X (right) keys to enter the Menu item settings. Picture Advanced 4. The OSD menu languages may differ from... pages: • Display menu on page 21 • Picture menu on page 23 • Picture Advanced menu on page 25 • System menu on your monitor Picture 3. Press the MENU key to the following main OSD menu. 1 2 3 4 There are four main OSD menus: 1.
...- For more details. Main menu mode You can use the OSD (On Screen Display) menu to adjust all the settings on page 27 20 How to adjust your monitor. Display 2. System Use the W (left) or X (right) keys to enter the Menu item settings. Picture Advanced 4. The OSD menu languages may differ from... pages: • Display menu on page 21 • Picture menu on page 23 • Picture Advanced menu on page 25 • System menu on your monitor Picture 3. Press the MENU key to the following main OSD menu. 1 2 3 4 There are four main OSD menus: 1.


