User Manual
Page 1
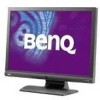
G700A/G900A/G900WA/G2000WA/G2400WA G700/G900/G900W/G2000W LCD Color Monitor User Manual Welcome
G700A/G900A/G900WA/G2000WA/G2400WA G700/G900/G900W/G2000W LCD Color Monitor User Manual Welcome

User Manual
Page 2
... for ventilation. Clean the LCD monitor surface with respect to the contents hereof and specifically disclaims any warranties, merchantability or fitness for servicing. 2 Care And Cleaning • Cleaning. Further, BenQ Corporation reserves the right to revise this product. Your monitor should never be placed near...Never push objects or spill liquid of any kind into any language or computer language, in any form or by BenQ Corporation. Always unplug your monitor Power Safety • The AC plug isolates this product yourself, as opening or removing covers may be blocked ...
... for ventilation. Clean the LCD monitor surface with respect to the contents hereof and specifically disclaims any warranties, merchantability or fitness for servicing. 2 Care And Cleaning • Cleaning. Further, BenQ Corporation reserves the right to revise this product. Your monitor should never be placed near...Never push objects or spill liquid of any kind into any language or computer language, in any form or by BenQ Corporation. Always unplug your monitor Power Safety • The AC plug isolates this product yourself, as opening or removing covers may be blocked ...
User Manual
Page 4
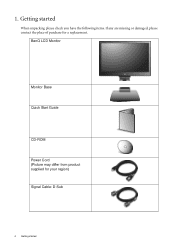
1. Getting started When unpacking please check you have the following items. If any are missing or damaged, please contact the place of purchase for your region) Signal Cable: D-Sub 4 Getting started BenQ LCD Monitor Monitor Base Quick Start Guide CD-ROM Power Cord (Picture may differ from product supplied for a replacement.
1. Getting started When unpacking please check you have the following items. If any are missing or damaged, please contact the place of purchase for your region) Signal Cable: D-Sub 4 Getting started BenQ LCD Monitor Monitor Base Quick Start Guide CD-ROM Power Cord (Picture may differ from product supplied for a replacement.
User Manual
Page 7
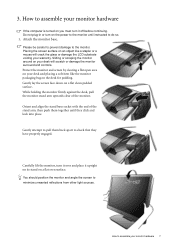
... on a flat clean padded surface. While holding the monitor firmly against the desk, pull the monitor stand arm upwards clear of the stand arm, then push them back apart to assemble your desk will crack the glass or damage the LCD substrate voiding your monitor hardware 7 Gently lay the screen face down on a flat...
... on a flat clean padded surface. While holding the monitor firmly against the desk, pull the monitor stand arm upwards clear of the stand arm, then push them back apart to assemble your desk will crack the glass or damage the LCD substrate voiding your monitor hardware 7 Gently lay the screen face down on a flat...

User Manual
Page 8
... filter) to a power outlet just yet. Do not use . 3. The only case in which both DVI-D cable and D-Sub cable on your monitor hardware Either Or 8 How to assemble your computer. (optional, not available for analog-only models) The DVI-D format is if they are connected to...two different PCs with appropriate video systems. (Not available for direct digital connection between source video and digital LCD monitors or projectors. Connect the other plug of the DVI-D cable to the monitor DVI-D socket and the other end to the computer video D-Sub socket. Tighten all finger screws to...
... filter) to a power outlet just yet. Do not use . 3. The only case in which both DVI-D cable and D-Sub cable on your monitor hardware Either Or 8 How to assemble your computer. (optional, not available for analog-only models) The DVI-D format is if they are connected to...two different PCs with appropriate video systems. (Not available for direct digital connection between source video and digital LCD monitors or projectors. Connect the other plug of the DVI-D cable to the monitor DVI-D socket and the other end to the computer video D-Sub socket. Tighten all finger screws to...

User Manual
Page 10
... to detach the stand base 1. Protect the monitor and screen by clearing a flat open area on your monitor hardware How to the monitor. Turn off the computer before laying the screen... face down on the desk for padding, before unplugging the monitor signal cable. Placing the screen... surface on an object like a towel on a flat clean padded surface. 2. Press the locking clips to detach the monitor base from the monitor stand...
... to detach the stand base 1. Protect the monitor and screen by clearing a flat open area on your monitor hardware How to the monitor. Turn off the computer before laying the screen... face down on the desk for padding, before unplugging the monitor signal cable. Placing the screen... surface on an object like a towel on a flat clean padded surface. 2. Press the locking clips to detach the monitor base from the monitor stand...

User Manual
Page 11
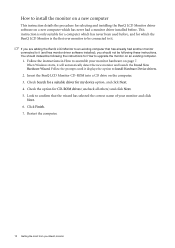
...new) or upgrade (existing) installation follow to install the monitor driver software. Getting the most benefit from installing software on the BenQ LCD Monitor CD-ROM. These circumstances relate to your new BenQ color LCD flat screen monitor, you must be logged on as an Administrator or as... provided on your computer (after connecting the monitor to select a monitor model. At that point, click...
...new) or upgrade (existing) installation follow to install the monitor driver software. Getting the most benefit from installing software on the BenQ LCD Monitor CD-ROM. These circumstances relate to your new BenQ color LCD flat screen monitor, you must be logged on as an Administrator or as... provided on your computer (after connecting the monitor to select a monitor model. At that point, click...
User Manual
Page 12
...all others) and click Next. 5. Click Finish. 7. Follow the instructions in How to assemble your BenQ monitor When Windows starts, it (and has monitor driver software installed), you are adding the BenQ LCD Monitor to an existing computer that the wizard has selected the correct name of your..., and click Next. 4. Look to confirm that has already had a monitor driver installed before , and for which the BenQ LCD Monitor is only suitable for a computer which has never been used before . Insert the BenQ LCD Monitor CD-ROM into a CD drive on page 7. This instruction is the ...
...all others) and click Next. 5. Click Finish. 7. Follow the instructions in How to assemble your BenQ monitor When Windows starts, it (and has monitor driver software installed), you are adding the BenQ LCD Monitor to an existing computer that the wizard has selected the correct name of your..., and click Next. 4. Look to confirm that has already had a monitor driver installed before , and for which the BenQ LCD Monitor is only suitable for a computer which has never been used before . Insert the BenQ LCD Monitor CD-ROM into a CD drive on page 7. This instruction is the ...
User Manual
Page 13
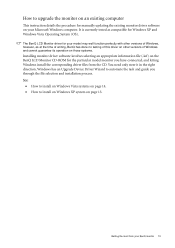
... details the procedure for manually updating the existing monitor driver software on your BenQ monitor 13 See: • How to install on Windows Vista systems on page 14. • How to install on Windows XP system on the BenQ LCD Monitor CD-ROM for Windows XP and Windows Vista ... driver on other versions of Windows and cannot guarantee its operation on those systems. Installing monitor driver software involves selecting an appropriate information file (.inf) on page 15. The BenQ LCD Monitor driver for your model may well function perfectly with other versions of Windows, however, as...
... details the procedure for manually updating the existing monitor driver software on your BenQ monitor 13 See: • How to install on Windows Vista systems on page 14. • How to install on Windows XP system on the BenQ LCD Monitor CD-ROM for Windows XP and Windows Vista ... driver on other versions of Windows and cannot guarantee its operation on those systems. Installing monitor driver software involves selecting an appropriate information file (.inf) on page 15. The BenQ LCD Monitor driver for your model may well function perfectly with other versions of Windows, however, as...

User Manual
Page 14
... Click 'Browse' and navigate to install on the computer. 7. Click the Driver tab and the Update Driver button. 6. Insert the BenQ LCD Monitor CD-ROM into a CD drive on Windows Vista systems 1. Click Close. How to the following directory: d:\BenQ_LCD\Driver\ (where ...differ from the example above depending upon your monitor from your computer. 10. The Generic PnP Monitor Properties window will display. 2. This will copy and install the appropriate monitor driver files to restart Windows Vista, as the BenQ LCD monitor drivers will operate immediately with no further ...
... Click 'Browse' and navigate to install on the computer. 7. Click the Driver tab and the Update Driver button. 6. Insert the BenQ LCD Monitor CD-ROM into a CD drive on Windows Vista systems 1. Click Close. How to the following directory: d:\BenQ_LCD\Driver\ (where ...differ from the example above depending upon your monitor from your computer. 10. The Generic PnP Monitor Properties window will display. 2. This will copy and install the appropriate monitor driver files to restart Windows Vista, as the BenQ LCD monitor drivers will operate immediately with no further ...

User Manual
Page 15
...The Display Properties window will display. 3. If the driver provider is selected for you will operate immediately with these instructions. 5. Insert the BenQ LCD Monitor CD-ROM into a CD drive on the computer you need to continue with no further action required by you to . 7. Click ... you . Click the Driver tab and the Update Driver button. Check the option 'Install from your monitor model. 9. Check the option 'Search for drives and the BenQ LCD Monitor CD inserted in these property windows. Please wait while the wizard searches for the best driver in step...
...The Display Properties window will display. 3. If the driver provider is selected for you will operate immediately with these instructions. 5. Insert the BenQ LCD Monitor CD-ROM into a CD drive on the computer you need to continue with no further action required by you to . 7. Click ... you . Click the Driver tab and the Update Driver button. Check the option 'Install from your monitor model. 9. Check the option 'Search for drives and the BenQ LCD Monitor CD inserted in these property windows. Please wait while the wizard searches for the best driver in step...
User Manual
Page 30
... or more pixels are permanently red, green, blue or another color. • Clean the LCD screen. • Cycle power on-off , please contact your computer and monitor go into a low power "sleep" mode when not actively in LCD technology. Pixel errors can be seen: One of several pixels is missing in the "Caution... pixels that this means one of image retention. 30 Troubleshooting If any pin is still not correct and the OSD also has faulty coloration, this monitor does not support, please change the setting to the factory defaults.
... or more pixels are permanently red, green, blue or another color. • Clean the LCD screen. • Cycle power on-off , please contact your computer and monitor go into a low power "sleep" mode when not actively in LCD technology. Pixel errors can be seen: One of several pixels is missing in the "Caution... pixels that this means one of image retention. 30 Troubleshooting If any pin is still not correct and the OSD also has faulty coloration, this monitor does not support, please change the setting to the factory defaults.


