

User Manual
Page 2
... monitor from the AC supply. • The power supply cord serves as a power disconnect device for ventilation. Clean the LCD monitor surface with respect to service this product. If you to notify any kind into this product yourself, as opening or removing covers may be placed near or over a radiator or heat source, or in a built-in any form or by BenQ Corporation. Disclaimer BenQ Corporation makes...
... monitor from the AC supply. • The power supply cord serves as a power disconnect device for ventilation. Clean the LCD monitor surface with respect to service this product. If you to notify any kind into this product yourself, as opening or removing covers may be placed near or over a radiator or heat source, or in a built-in any form or by BenQ Corporation. Disclaimer BenQ Corporation makes...
User Manual
Page 3
... computer 19 How to install on Windows Vista systems 20 How to install on Windows XP system 21 How to adjust the screen resolution 22 How to adjust the screen refresh rate 23 Picture optimization ...24 How to adjust your monitor 25 The control panel ...25 On Screen Display (OSD) menu structure 26 Hot key mode ...28 Main menu mode ...31 Troubleshooting ...46 Frequently asked questions (FAQ 46 Need more help? ...47 Supported PC Timings ...48 Specifications ...49 Table of...
... computer 19 How to install on Windows Vista systems 20 How to install on Windows XP system 21 How to adjust the screen resolution 22 How to adjust the screen refresh rate 23 Picture optimization ...24 How to adjust your monitor 25 The control panel ...25 On Screen Display (OSD) menu structure 26 Hot key mode ...28 Main menu mode ...31 Troubleshooting ...46 Frequently asked questions (FAQ 46 Need more help? ...47 Supported PC Timings ...48 Specifications ...49 Table of...

User Manual
Page 12
Connect the other end of keys on page 16 to install the monitor software. If the monitor is locked in Section 4: Getting the most from product supplied for your region. 9. Picture may differ from your monitor hardware The stand can be extended vertically up and extend the stand to 130mm. Adjusting the monitor height and angle To adjust the monitor height Gently lift the display up to the desired height. Turn on...
Connect the other end of keys on page 16 to install the monitor software. If the monitor is locked in Section 4: Getting the most from product supplied for your region. 9. Picture may differ from your monitor hardware The stand can be extended vertically up and extend the stand to 130mm. Adjusting the monitor height and angle To adjust the monitor height Gently lift the display up to the desired height. Turn on...

User Manual
Page 13
... LCD monitor also supports portrait viewing orientation, allowing you will see a Pivot Software Control icon, , displaying in the system tray. To cancel this action, choose Rotate 0 degree, . 4. How to assemble your specific desktop application without needing to scroll down. After restarting your system, you to fit your monitor hardware 13 Execute START_PIVOT.EXE from the attached CD first. Turn the power off and keep...
... LCD monitor also supports portrait viewing orientation, allowing you will see a Pivot Software Control icon, , displaying in the system tray. To cancel this action, choose Rotate 0 degree, . 4. How to assemble your specific desktop application without needing to scroll down. After restarting your system, you to fit your monitor hardware 13 Execute START_PIVOT.EXE from the attached CD first. Turn the power off and keep...
User Manual
Page 16
... utilizes the latest LCD display technology currently available - You could use access for the device, you have to successfully install the BenQ LCD Monitor driver software. Windows XP and later comes with a newer monitor. If your USB device was accompanied by -step instructions for connection to Plug-and-Play with USB, Windows, and your BenQ LCD Monitor will determine which already has existing monitor driver software) with integrated USB support. All you need to work. To gain...
... utilizes the latest LCD display technology currently available - You could use access for the device, you have to successfully install the BenQ LCD Monitor driver software. Windows XP and later comes with a newer monitor. If your USB device was accompanied by -step instructions for connection to Plug-and-Play with USB, Windows, and your BenQ LCD Monitor will determine which already has existing monitor driver software) with integrated USB support. All you need to work. To gain...

User Manual
Page 18
... another monitor connected to assemble your BenQ monitor This instruction is only suitable for a computer which has never been used before, and for which the BenQ LCD Monitor is the first ever monitor to be following these instructions. Click Finish. 7. Look to install the monitor on the computer. 3. Follow the prompts until it . You should not be following the instructions for selecting and installing the BenQ LCD Monitor driver software on...
... another monitor connected to assemble your BenQ monitor This instruction is only suitable for a computer which has never been used before, and for which the BenQ LCD Monitor is the first ever monitor to be following these instructions. Click Finish. 7. Look to install the monitor on the computer. 3. Follow the prompts until it . You should not be following the instructions for selecting and installing the BenQ LCD Monitor driver software on...

User Manual
Page 19
See: • How to install on Windows Vista systems on page 20. • How to upgrade the monitor on an existing computer This instruction details the procedure for manually updating the existing monitor driver software on your BenQ monitor 19 You need only steer it in the right direction. Getting the most from the CD. It is currently tested as at the time of...
See: • How to install on Windows Vista systems on page 20. • How to upgrade the monitor on an existing computer This instruction details the procedure for manually updating the existing monitor driver software on your BenQ monitor 19 You need only steer it in the right direction. Getting the most from the CD. It is currently tested as at the time of...
User Manual
Page 20
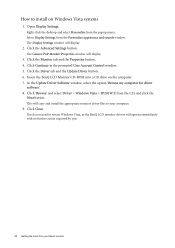
The Display Settings window will copy and install the appropriate monitor driver files to your BenQ monitor In the Update Driver Software window, select the option 'Browse my computer for driver software'. 8. Click Continue in the prompted User Account Control window. 5. Select Display Settings from the popup menu. Click the Monitor tab and the Properties button. 4. This will display. 2. Click Close. You do not need to restart Windows Vista, as the BenQ LCD monitor drivers will display. 3. Right-click the desktop...
The Display Settings window will copy and install the appropriate monitor driver files to your BenQ monitor In the Update Driver Software window, select the option 'Browse my computer for driver software'. 8. Click Continue in the prompted User Account Control window. 5. Select Display Settings from the popup menu. Click the Monitor tab and the Properties button. 4. This will display. 2. Click Close. You do not need to restart Windows Vista, as the BenQ LCD monitor drivers will display. 3. Right-click the desktop...

User Manual
Page 21
... the correct model is selected for your CD drive may be selected for your system. • Under the Classic view, click Start | Control Panel | Display. • Under the Category view, click Start | Control Panel | Appearance and Themes | Change the screen resolution. Insert the BenQ LCD Monitor CD-ROM into a CD drive on Windows XP system 1. When completes, the wizard should have found and selected the BenQ driver on the...
... the correct model is selected for your CD drive may be selected for your system. • Under the Classic view, click Start | Control Panel | Display. • Under the Category view, click Start | Control Panel | Appearance and Themes | Change the screen resolution. Insert the BenQ LCD Monitor CD-ROM into a CD drive on Windows XP system 1. When completes, the wizard should have found and selected the BenQ driver on the...
User Manual
Page 22
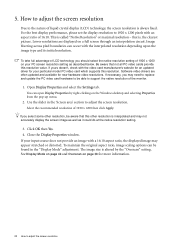
... monitor. 1. Open Display Properties and select the Settings tab. See Display Mode on page 43 and Overscan on a full screen through an interpolation circuit. If your input source does not provide an image with the video card manufacturer's website for an updated driver for more information. 22 How to adjust the screen resolution. This is always fixed. Close the Display Properties window. The image size is interpolated and may not accurately display the screen image...
... monitor. 1. Open Display Properties and select the Settings tab. See Display Mode on page 43 and Overscan on a full screen through an interpolation circuit. If your input source does not provide an image with the video card manufacturer's website for an updated driver for more information. 22 How to adjust the screen resolution. This is always fixed. Close the Display Properties window. The image size is interpolated and may not accurately display the screen image...
User Manual
Page 23
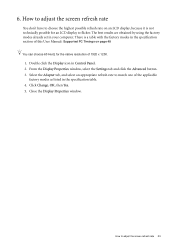
... Hertz for an LCD display to adjust the screen refresh rate 23 How to flicker. Double click the Display icon in your computer. From the Display Properties window, select the Settings tab and click the Advanced button. 3. Click Change, OK, then Yes. 5. There is not technically possible for the native resolution of 1920 x 1200. 1. Close the Display Properties window. The best results are obtained by using the factory modes already set in Control Panel. 2.
... Hertz for an LCD display to adjust the screen refresh rate 23 How to flicker. Double click the Display icon in your computer. From the Display Properties window, select the Settings tab and click the Advanced button. 3. Click Change, OK, then Yes. 5. There is not technically possible for the native resolution of 1920 x 1200. 1. Close the Display Properties window. The best results are obtained by using the factory modes already set in Control Panel. 2.

User Manual
Page 24
... the connected graphic card on the monitor. 3. Press the MENU key to adjust the monitor until the noise disappears. 24 Picture optimization If you notice a horizontal noise, press the t or u keys to check for screen color, grayscale and line gradient display. 1. If you notice a vertical noise (like a curtain effect-shimmering of your monitor, the i key and the Auto Adjustment function will be disabled, because the monitor will automatically display the best image. Then...
... the connected graphic card on the monitor. 3. Press the MENU key to adjust the monitor until the noise disappears. 24 Picture optimization If you notice a horizontal noise, press the t or u keys to check for screen color, grayscale and line gradient display. 1. If you notice a vertical noise (like a curtain effect-shimmering of your monitor, the i key and the Auto Adjustment function will be disabled, because the monitor will automatically display the best image. Then...

User Manual
Page 25
... (Picture-in-Picture) function and selecting a video input source for the main window, or swap the input signals between different modes, including Standard, Movie, Dynamics, Photo, and sRGB. 7. "MENU/EXIT" key: Activate OSD main menu and return to your monitor for the PIP window. 3. "PerfectMotion" key: Activate the PerfectMotion function. 8. How to adjust your monitor The control panel 1. How to adjust your monitor 25 "i key": Adjust vertical position, phase, horizontal position and pixel clock automatically. OSD = On Screen Display.
... (Picture-in-Picture) function and selecting a video input source for the main window, or swap the input signals between different modes, including Standard, Movie, Dynamics, Photo, and sRGB. 7. "MENU/EXIT" key: Activate OSD main menu and return to your monitor for the PIP window. 3. "PerfectMotion" key: Activate the PerfectMotion function. 8. How to adjust your monitor The control panel 1. How to adjust your monitor 25 "i key": Adjust vertical position, phase, horizontal position and pixel clock automatically. OSD = On Screen Display.

User Manual
Page 28
... supports digital televisions (DTV), set the PIP input source. Further press the t key to increase or the u key to decrease the screen brightness, and press the MENU key to display the Contrast indicator. The setting will last around 3 seconds. The HDMI connector on -screen. This command can bring up a window from other connectors, an HDMI connector can watch images from 1 computer graphic/PC video source (D-sub, DVI, HDMI*, or Component) and 1 video source (Composite or S-video). Brightness...
... supports digital televisions (DTV), set the PIP input source. Further press the t key to increase or the u key to decrease the screen brightness, and press the MENU key to display the Contrast indicator. The setting will last around 3 seconds. The HDMI connector on -screen. This command can bring up a window from other connectors, an HDMI connector can watch images from 1 computer graphic/PC video source (D-sub, DVI, HDMI*, or Component) and 1 video source (Composite or S-video). Brightness...

User Manual
Page 32
... u keys to the previous menu, press the MENU key. The current picture mode is a 'hot-key' for you connect a digital video output using a digital (DVI) cable to your monitor, the i key and the Auto Adjustment function will be disabled. 32 How to select this function. Display menu 1. Item Auto Adjustment Function Optimizes and adjusts the screen settings automatically for this option and make adjustments or selections. 5. Range When you . To return to make adjustment. Operation Press the ENTER...
... u keys to the previous menu, press the MENU key. The current picture mode is a 'hot-key' for you connect a digital video output using a digital (DVI) cable to your monitor, the i key and the Auto Adjustment function will be disabled. 32 How to select this function. Display menu 1. Item Auto Adjustment Function Optimizes and adjusts the screen settings automatically for this option and make adjustments or selections. 5. Range When you . To return to make adjustment. Operation Press the ENTER...

User Manual
Page 38
... from Picture Mode. however, when the input source is HDMI, the default setting is ON by default; Selects to activate PerfectMotion* to change the settings. The higher value, the better the improvement in ghosting effect, yet flicker may be divided into two windows; The screen will turn PerfectMotion off. *BenQ's PerfectMotion technology is D-Sub or DVI-D. the left window demonstrates images of 0 will be noticeable in pursuit of viewing...
... from Picture Mode. however, when the input source is HDMI, the default setting is ON by default; Selects to activate PerfectMotion* to change the settings. The higher value, the better the improvement in ghosting effect, yet flicker may be divided into two windows; The screen will turn PerfectMotion off. *BenQ's PerfectMotion technology is D-Sub or DVI-D. the left window demonstrates images of 0 will be noticeable in pursuit of viewing...

User Manual
Page 46
... are pixels that are using an extension cable with better conduction quality or with a built-in green? Now check the signal cable connectors. Does the blurring only occur at resolutions lower than the native (maximum) resolution? If any pin is bent or broken off and is normal for the test. 9. Remove the extension cable for blurring to occur due to the factory defaults. Select MENU > PICTURE > Color > Reset Color, and...
... are pixels that are using an extension cable with better conduction quality or with a built-in green? Now check the signal cable connectors. Does the blurring only occur at resolutions lower than the native (maximum) resolution? If any pin is bent or broken off and is normal for the test. 9. Remove the extension cable for blurring to occur due to the factory defaults. Select MENU > PICTURE > Color > Reset Color, and...

User Manual
Page 47
... the How to get necessary support. Check the power supply mains socket, the external power supply and the mains switch. If the LED is illuminated in the "OSD Lock" submenu from different input sources may use the t or u keys to adjust the screen resolution on page 22 section and then select the correct resolution, refresh rate and make adjustments based on these instructions. If that does not help ? The image is bent or broken off...
... the How to get necessary support. Check the power supply mains socket, the external power supply and the mains switch. If the LED is illuminated in the "OSD Lock" submenu from different input sources may use the t or u keys to adjust the screen resolution on page 22 section and then select the correct resolution, refresh rate and make adjustments based on these instructions. If that does not help ? The image is bent or broken off...
User Manual
Page 48
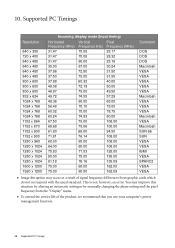
... x 1024 1600 x 1200 1920 x 1200 Incoming display mode (Input timing) Horizontal Vertical Pixel Frequency (KHz) Frequency (Hz) Frequency (MHz) 31.47 70.08 25.17 31....VESA SPARC2 VESA VESA • Image disruption may improve this situation by altering an automatic setting or by manually changing the phase setting and the pixel frequency from the "Display" menu. • To extend the service life of signal frequency differences from graphic cards which do not correspond with the usual standard. You may occur as a result of the product, we recommend that you use your computer's power...
... x 1024 1600 x 1200 1920 x 1200 Incoming display mode (Input timing) Horizontal Vertical Pixel Frequency (KHz) Frequency (Hz) Frequency (MHz) 31.47 70.08 25.17 31....VESA SPARC2 VESA VESA • Image disruption may improve this situation by altering an automatic setting or by manually changing the phase setting and the pixel frequency from the "Display" menu. • To extend the service life of signal frequency differences from graphic cards which do not correspond with the usual standard. You may occur as a result of the product, we recommend that you use your computer's power...

User Manual
Page 50
... be displayed on your LCD monitor. It generally takes longer for the display of multiple black frames between the many gray levels or colors that make up ) Swivel (left/right) Height adjustment Pivot Dimensions (H x W x D) Weight TCO 03, TCO 06, TÜV/Ergonomics, TÜV/GS, FCC Class B, ISO 13406-2, VCCI, CB Report, CE, C-Tick, BSMI, Fimko, GOST, CSA, CCC, MIC Automatic switched mode power supply...
... be displayed on your LCD monitor. It generally takes longer for the display of multiple black frames between the many gray levels or colors that make up ) Swivel (left/right) Height adjustment Pivot Dimensions (H x W x D) Weight TCO 03, TCO 06, TÜV/Ergonomics, TÜV/GS, FCC Class B, ISO 13406-2, VCCI, CB Report, CE, C-Tick, BSMI, Fimko, GOST, CSA, CCC, MIC Automatic switched mode power supply...


