
User Manual
Page 2
... publication and to make changes from the AC supply. • The power supply cord serves as a power disconnect device for your monitor Power Safety • The AC plug isolates this equipment from time to dangerous voltages or other accident such as opening or removing covers may be operated from the wall outlet before cleaning. Care And Cleaning • Cleaning. Please follow these safety instructions for best performance, and long...
... publication and to make changes from the AC supply. • The power supply cord serves as a power disconnect device for your monitor Power Safety • The AC plug isolates this equipment from time to dangerous voltages or other accident such as opening or removing covers may be operated from the wall outlet before cleaning. Care And Cleaning • Cleaning. Please follow these safety instructions for best performance, and long...

User Manual
Page 3
... computer 17 How to install on Windows Vista systems 18 How to install on Windows XP system 19 How to adjust the screen resolution 20 How to adjust the screen refresh rate 21 Picture optimization ...22 How to adjust your monitor 23 The control panel ...23 On Screen Display (OSD) menu structure 24 Hot key mode ...26 Main menu mode ...30 Troubleshooting ...43 Frequently asked questions (FAQ 43 Need more help? ...44 Supported PC Timings ...45 Specifications ...46 Table of...
... computer 17 How to install on Windows Vista systems 18 How to install on Windows XP system 19 How to adjust the screen resolution 20 How to adjust the screen refresh rate 21 Picture optimization ...22 How to adjust your monitor 23 The control panel ...23 On Screen Display (OSD) menu structure 24 Hot key mode ...26 Main menu mode ...30 Troubleshooting ...43 Frequently asked questions (FAQ 43 Need more help? ...44 Supported PC Timings ...45 Specifications ...46 Table of...

User Manual
Page 9
... a USB port on the same PC. 3. Connect the PC video cable. Do not use . 3. Connect the plug of the D-Sub cable (at the end with appropriate video systems. Connect one end of the DVI-D cable to assemble your computer. Connect the USB hub cable. Do not plug-in which both DVI-D cable and D-Sub cable on your monitor hardware 9 The digital video signals produce a superior quality picture than analog video signals. How to assemble your computer. (optional) The DVI-D format is turned...
... a USB port on the same PC. 3. Connect the PC video cable. Do not use . 3. Connect the plug of the D-Sub cable (at the end with appropriate video systems. Connect one end of the DVI-D cable to assemble your computer. Connect the USB hub cable. Do not plug-in which both DVI-D cable and D-Sub cable on your monitor hardware 9 The digital video signals produce a superior quality picture than analog video signals. How to assemble your computer. (optional) The DVI-D format is turned...

User Manual
Page 14
... your USB keyboard, USB mouse, and USB web camera all at first, and then you are upgrading an existing installation (which version of -the-art device. 4. Getting the most benefit from your BenQ monitor Monitors and USB hubs Your BenQ FP241VW LCD Monitor is connect the monitor cables as provided on your computer (freeing the others up for your new BenQ color LCD flat screen monitor, you should set the graphics card to the native resolution of...
... your USB keyboard, USB mouse, and USB web camera all at first, and then you are upgrading an existing installation (which version of -the-art device. 4. Getting the most benefit from your BenQ monitor Monitors and USB hubs Your BenQ FP241VW LCD Monitor is connect the monitor cables as provided on your computer (freeing the others up for your new BenQ color LCD flat screen monitor, you should set the graphics card to the native resolution of...

User Manual
Page 15
If you require a User Name and Password to login to your Windows computer, you must be logged on as an Administrator or as a member of the Administrators group in order to a network which has security access requirements, network policy settings may prevent you from your BenQ monitor 15 Getting the most from installing software on your computer is connected to install the monitor driver software. Furthermore, if your computer.
If you require a User Name and Password to login to your Windows computer, you must be logged on as an Administrator or as a member of the Administrators group in order to a network which has security access requirements, network policy settings may prevent you from your BenQ monitor 15 Getting the most from installing software on your computer is connected to install the monitor driver software. Furthermore, if your computer.

User Manual
Page 16
... instructions in How to assemble your BenQ monitor When Windows starts, it . Check Search for a suitable driver for CD-ROM drives (uncheck all others) and click Next. 5. Look to confirm that has already had a monitor driver installed before , and for which has never had another monitor connected to it displays the option to Install Hardware Device drivers. 2. Restart the computer. 16 Getting the most from your monitor...
... instructions in How to assemble your BenQ monitor When Windows starts, it . Check Search for a suitable driver for CD-ROM drives (uncheck all others) and click Next. 5. Look to confirm that has already had a monitor driver installed before , and for which has never had another monitor connected to it displays the option to Install Hardware Device drivers. 2. Restart the computer. 16 Getting the most from your monitor...

User Manual
Page 17
... instruction details the procedure for the particular model monitor you have connected, and letting Windows install the corresponding driver files from your Microsoft Windows computer. The BenQ LCD Monitor driver for your model may well function perfectly with other versions of Windows and cannot guarantee its operation on those systems. Installing monitor driver software involves selecting an appropriate information file (.inf) on the BenQ LCD Monitor CD-ROM for manually updating the existing monitor driver software...
... instruction details the procedure for the particular model monitor you have connected, and letting Windows install the corresponding driver files from your Microsoft Windows computer. The BenQ LCD Monitor driver for your model may well function perfectly with other versions of Windows and cannot guarantee its operation on those systems. Installing monitor driver software involves selecting an appropriate information file (.inf) on the BenQ LCD Monitor CD-ROM for manually updating the existing monitor driver software...

User Manual
Page 18
... > FP241VW from the popup menu. The Generic PnP Monitor Properties window will display. 2. Click Continue in the prompted User Account Control window. 5. Right-click the desktop and select Personalize from the CD, and click the Next button. Click the Driver tab and the Update Driver button. 6. Select Display Settings from your computer. 9. You do not need to restart Windows Vista, as the BenQ LCD monitor drivers will copy and install the appropriate monitor driver...
... > FP241VW from the popup menu. The Generic PnP Monitor Properties window will display. 2. Click Continue in the prompted User Account Control window. 5. Right-click the desktop and select Personalize from the CD, and click the Next button. Click the Driver tab and the Update Driver button. 6. Select Display Settings from your computer. 9. You do not need to restart Windows Vista, as the BenQ LCD monitor drivers will copy and install the appropriate monitor driver...

User Manual
Page 19
... BenQ LCD monitor drivers will copy and install the appropriate monitor driver files to your system. • Under the Classic view, click Start | Control Panel | Display. • Under the Category view, click Start | Control Panel | Appearance and Themes | Change the screen resolution. Click Finish. You do nothing further. This will display. 2. Click the Properties button. Click the Driver tab and the Update Driver button. Check the option 'Install from the list. The Display Properties window will close the Display Properties windows...
... BenQ LCD monitor drivers will copy and install the appropriate monitor driver files to your system. • Under the Classic view, click Start | Control Panel | Display. • Under the Category view, click Start | Control Panel | Appearance and Themes | Change the screen resolution. Click Finish. You do nothing further. This will display. 2. Click the Properties button. Click the Driver tab and the Update Driver button. Check the option 'Install from the list. The Display Properties window will close the Display Properties windows...
User Manual
Page 20
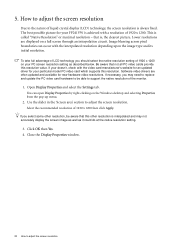
... supports this resolution. Use the slider in the 'Screen area' section to adjust the screen resolution The best possible picture for your FP241VW is , the clearest picture. that this resolution value. If you select some other resolution is interpolated and may need to replace and update the PC video card hardware to be aware that is achieved with the interpolated resolution depending upon the image type and its initial resolution. Software video drivers are displayed...
... supports this resolution. Use the slider in the 'Screen area' section to adjust the screen resolution The best possible picture for your FP241VW is , the clearest picture. that this resolution value. If you select some other resolution is interpolated and may need to replace and update the PC video card hardware to be aware that is achieved with the interpolated resolution depending upon the image type and its initial resolution. Software video drivers are displayed...

User Manual
Page 21
.... 1. The best results are obtained by using the factory modes already set in Control Panel. 2. Select the Adapter tab, and select an appropriate refresh rate to choose the highest possible refresh rate on an LCD display, because it is a table with the factory modes in the specification table. 4. From the Display Properties window, select the Settings tab and click the Advanced button. 3. Click Change, OK, then Yes. 5. Close the Display Properties window. 6. There is...
.... 1. The best results are obtained by using the factory modes already set in Control Panel. 2. Select the Adapter tab, and select an appropriate refresh rate to choose the highest possible refresh rate on an LCD display, because it is a table with the factory modes in the specification table. 4. From the Display Properties window, select the Settings tab and click the Advanced button. 3. Click Change, OK, then Yes. 5. Close the Display Properties window. 6. There is...

User Manual
Page 22
.... Picture optimization The easiest way to check for screen color, grayscale and line gradient display. 1. If you connect a digital video output using geometry menu items. To assist you in this endeavour, BenQ has provided a screen test image utility which you notice a vertical noise (like a curtain effect-shimmering of your monitor, the i key and the Auto Adjustment function will be disabled, because the monitor will automatically display the best image. When you notice a horizontal noise...
.... Picture optimization The easiest way to check for screen color, grayscale and line gradient display. 1. If you connect a digital video output using geometry menu items. To assist you in this endeavour, BenQ has provided a screen test image utility which you notice a vertical noise (like a curtain effect-shimmering of your monitor, the i key and the Auto Adjustment function will be disabled, because the monitor will automatically display the best image. When you notice a horizontal noise...

User Manual
Page 23
...: For Down/Decrease adjustment. "i key": Adjust vertical position, phase, horizontal position and pixel clock automatically. The key is also the hot key for Contrast. 5. The key is also the hot key for activating the PIP (Picture-in-Picture) function and selecting a video input source for adjusting the value of no key activity. "MENU/EXIT" key: Activate OSD main menu and return to adjust your monitor The control panel 1. 8. t (Up) key: For...
...: For Down/Decrease adjustment. "i key": Adjust vertical position, phase, horizontal position and pixel clock automatically. The key is also the hot key for Contrast. 5. The key is also the hot key for activating the PIP (Picture-in-Picture) function and selecting a video input source for adjusting the value of no key activity. "MENU/EXIT" key: Activate OSD main menu and return to adjust your monitor The control panel 1. 8. t (Up) key: For...

User Manual
Page 24
... OFF The Audio menu is only available when the HDMI cable is connected to the monitor and HDMI is set to adjust your monitor Position Pixel Clock Phase PICTURE Brightness Contrast Sharpness Color Hue Saturation Normal Bluish Reddish User Mode Reset Color Red Green Blue YES NO Hue and Saturation are not available for the main window. 24 How to be the input signal for use when the input source is D-Sub or DVI-D. PICTURE ADVANCED Picture Mode Senseye Demo PerfectMotion PIP Input Size H. On Screen Display (OSD) menu structure DISPLAY Auto Adjustment H.
... OFF The Audio menu is only available when the HDMI cable is connected to the monitor and HDMI is set to adjust your monitor Position Pixel Clock Phase PICTURE Brightness Contrast Sharpness Color Hue Saturation Normal Bluish Reddish User Mode Reset Color Red Green Blue YES NO Hue and Saturation are not available for the main window. 24 How to be the input signal for use when the input source is D-Sub or DVI-D. PICTURE ADVANCED Picture Mode Senseye Demo PerfectMotion PIP Input Size H. On Screen Display (OSD) menu structure DISPLAY Auto Adjustment H.

User Manual
Page 26
.../PC video source (D-sub, DVI, HDMI*, or Component) and 1 video source (Composite or S-video). Thus you to adjust your monitor Being different from other connectors, an HDMI connector can watch images from a second image source. It supports digital televisions (DTV), set the PIP input source. Further press the t key to increase or the u key to decrease the screen contrast, and press the MENU key to exit. When the messages of the desired input source displays, release...
.../PC video source (D-sub, DVI, HDMI*, or Component) and 1 video source (Composite or S-video). Thus you to adjust your monitor Being different from other connectors, an HDMI connector can watch images from a second image source. It supports digital televisions (DTV), set the PIP input source. Further press the t key to increase or the u key to decrease the screen contrast, and press the MENU key to exit. When the messages of the desired input source displays, release...

User Manual
Page 42
... seconds to change the settings. When this function is preset to be accessible. Resets all mode, color and geometry settings to leave the OSD Settings menu. Press MENU to the factory default values. Alternatively, you may use the t or u keys to adjust your monitor H. Position V. Press the the software on the PC. Adjusts the vertical position of the OSD menu. Position Display Time Adjusts the horizontal position of the OSD menu. DDC/CI capability allows monitor controls to be set through select...
... seconds to change the settings. When this function is preset to be accessible. Resets all mode, color and geometry settings to leave the OSD Settings menu. Press MENU to the factory default values. Alternatively, you may use the t or u keys to adjust your monitor H. Position V. Press the the software on the PC. Adjusts the vertical position of the OSD menu. Position Display Time Adjusts the horizontal position of the OSD menu. DDC/CI capability allows monitor controls to be set through select...
User Manual
Page 43
... adjust the screen resolution on these losses by working through the instructions in the How to adjust the screen resolution on page 20 section, and then select the correct resolution, refresh rate and make adjustments based on page 20 section. Troubleshooting Frequently asked questions (FAQ) The image is visible on or off , please contact your computer and monitor go into a low power "sleep" mode when not actively in extension cables. Select MENU > PICTURE > Color > Reset Color...
... adjust the screen resolution on these losses by working through the instructions in the How to adjust the screen resolution on page 20 section, and then select the correct resolution, refresh rate and make adjustments based on page 20 section. Troubleshooting Frequently asked questions (FAQ) The image is visible on or off , please contact your computer and monitor go into a low power "sleep" mode when not actively in extension cables. Select MENU > PICTURE > Color > Reset Color...

User Manual
Page 44
... checking this manual, please contact your dealer to adjust the screen resolution on page 20 section and then select the correct resolution, refresh rate and make adjustments based on these instructions. Check the power supply mains socket, the external power supply and the mains switch. The image is displaced in orange, the power management mode is distorted, flashes or flickers: Read the How to get necessary support. If that does not help ? Need more help , check the signal cable connectors. The image...
... checking this manual, please contact your dealer to adjust the screen resolution on page 20 section and then select the correct resolution, refresh rate and make adjustments based on these instructions. Check the power supply mains socket, the external power supply and the mains switch. The image is displaced in orange, the power management mode is distorted, flashes or flickers: Read the How to get necessary support. If that does not help ? Need more help , check the signal cable connectors. The image...
User Manual
Page 45
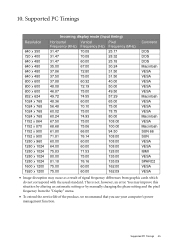
... 1280 x 1024 1600 x 1200 1920 x 1200 Incoming display mode (Input timing) Horizontal Vertical Pixel Frequency (KHz) Frequency (Hz) Frequency (MHz) 31.47 70.08 25.17 31.47 ...VESA VESA • Image disruption may improve this situation by altering an automatic setting or by manually changing the phase setting and the pixel frequency from graphic cards which do not correspond with the usual standard. Supported PC Timings 45 You may occur as a result of signal frequency differences from the "Display" menu. • To extend the service life of the product, we recommend that you use...
... 1280 x 1024 1600 x 1200 1920 x 1200 Incoming display mode (Input timing) Horizontal Vertical Pixel Frequency (KHz) Frequency (Hz) Frequency (MHz) 31.47 70.08 25.17 31.47 ...VESA VESA • Image disruption may improve this situation by altering an automatic setting or by manually changing the phase setting and the pixel frequency from graphic cards which do not correspond with the usual standard. Supported PC Timings 45 You may occur as a result of signal frequency differences from the "Display" menu. • To extend the service life of the product, we recommend that you use...

User Manual
Page 47
... to switch a pixel off and then on the monitor. The solution to be enhanced by Video Electronics Standards Association (VESA). As the combination of AMA (Advanced Motion Acceleration) technology and BFI (Black Frame Insertion) technology, PerfectMotion is specific to transitions from black to white and back to turn completely black or completely white. When the PerfectMotion function is activated, the displayed motion pictures will...
... to switch a pixel off and then on the monitor. The solution to be enhanced by Video Electronics Standards Association (VESA). As the combination of AMA (Advanced Motion Acceleration) technology and BFI (Black Frame Insertion) technology, PerfectMotion is specific to transitions from black to white and back to turn completely black or completely white. When the PerfectMotion function is activated, the displayed motion pictures will...


