
Safety Warning and Notice
Page 2
... compatible with a (multi-outlet) extension cord. Always turn off the monitor before turning on the product has been altered, deleted, removed or made by unauthorized service organizations or persons. Damage caused by improper storage of the user if problems (such as antenna, Cable TV) outside the monitor. Defects caused by unauthorized use the original accessories (e.g. Note that the power cord is connected...
... compatible with a (multi-outlet) extension cord. Always turn off the monitor before turning on the product has been altered, deleted, removed or made by unauthorized service organizations or persons. Damage caused by improper storage of the user if problems (such as antenna, Cable TV) outside the monitor. Defects caused by unauthorized use the original accessories (e.g. Note that the power cord is connected...
Resolution file
Page 1
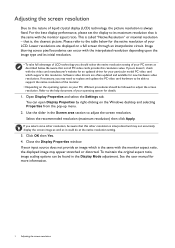
... aspect ratio, image scaling options can open Display Properties by right-clicking on a full screen through an interpolation circuit. that this resolution value. Please refer to the table below . Software video drivers are displayed on the Windows desktop and selecting Properties from the pop-up menu. 2. Adjusting the screen resolution Due to the nature of liquid crystal display (LCD) technology, the picture resolution is , the clearest picture. Open Display Properties and...
... aspect ratio, image scaling options can open Display Properties by right-clicking on a full screen through an interpolation circuit. that this resolution value. Please refer to the table below . Software video drivers are displayed on the Windows desktop and selecting Properties from the pop-up menu. 2. Adjusting the screen resolution Due to the nature of liquid crystal display (LCD) technology, the picture resolution is , the clearest picture. Open Display Properties and...
Resolution file
Page 2
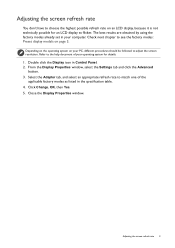
... an LCD display to flicker. Double click the Display icon in your PC, different procedures should be followed to adjust the screen resolution. Close the Display Properties window. From the Display Properties window, select the Settings tab and click the Advanced button. 3. Adjusting the screen refresh rate 2 The best results are obtained by using the factory modes already set in Control Panel. 2. Select the Adapter tab, and select an appropriate refresh rate to see the factory modes: Preset display models on...
... an LCD display to flicker. Double click the Display icon in your PC, different procedures should be followed to adjust the screen resolution. Close the Display Properties window. From the Display Properties window, select the Settings tab and click the Advanced button. 3. Adjusting the screen refresh rate 2 The best results are obtained by using the factory modes already set in Control Panel. 2. Select the Adapter tab, and select an appropriate refresh rate to see the factory modes: Preset display models on...
Resolution file
Page 4
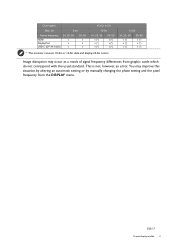
... frequency 24, 25, 30 HDMI v DisplayPort v USB-C (DP Alt mode) v 50, 60 v v v YCbCr 4:2:0 10 bit 24, 25, 30 v (*) v (*) v (*) 50, 60 v (*) v (*) v (*) *: The monitor receives 10-bit or 12-bit data and displays 8-bit colors. 12 bit 24, 25, 30 50, 60 v (*) v (*) v (*) v (*) v (*) v (*) Image disruption may improve this situation by altering an automatic setting or by manually changing the phase setting and the pixel frequency from graphic cards...
... frequency 24, 25, 30 HDMI v DisplayPort v USB-C (DP Alt mode) v 50, 60 v v v YCbCr 4:2:0 10 bit 24, 25, 30 v (*) v (*) v (*) 50, 60 v (*) v (*) v (*) *: The monitor receives 10-bit or 12-bit data and displays 8-bit colors. 12 bit 24, 25, 30 50, 60 v (*) v (*) v (*) v (*) v (*) v (*) Image disruption may improve this situation by altering an automatic setting or by manually changing the phase setting and the pixel frequency from graphic cards...
User Manual
Page 4
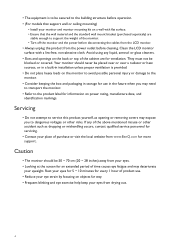
... may need to transport the monitor. • Refer to the product label for information on power rating, manufacture date, and identification markings. Caution • The monitor should never be placed near or over a radiator or heat sources, or in a built-in installation unless proper ventilation is to be blocked or covered. Clean the LCD monitor surface with flat surface. • Ensure that support wall...
... may need to transport the monitor. • Refer to the product label for information on power rating, manufacture date, and identification markings. Caution • The monitor should never be placed near or over a radiator or heat sources, or in a built-in installation unless proper ventilation is to be blocked or covered. Clean the LCD monitor surface with flat surface. • Ensure that support wall...
User Manual
Page 5
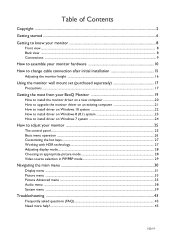
... to install driver on Windows 7 system 24 How to adjust your monitor 25 The control panel ...25 Basic menu operation ...26 Customizing the hot keys...27 Working with HDR technology...27 Adjusting display mode...28 Choosing an appropriate picture mode 28 Video source selection in PIP/PBP mode 29 Navigating the main menu ...30 Display menu ...31 Picture menu ...33 Picture Advanced menu ...35 Audio menu ...38 System menu ...39 Troubleshooting ...43 Frequently asked questions (FAQ)...43 Need more help...
... to install driver on Windows 7 system 24 How to adjust your monitor 25 The control panel ...25 Basic menu operation ...26 Customizing the hot keys...27 Working with HDR technology...27 Adjusting display mode...28 Choosing an appropriate picture mode 28 Video source selection in PIP/PBP mode 29 Navigating the main menu ...30 Display menu ...31 Picture menu ...33 Picture Advanced menu ...35 Audio menu ...38 System menu ...39 Troubleshooting ...43 Frequently asked questions (FAQ)...43 Need more help...
User Manual
Page 10
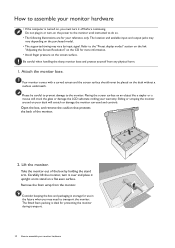
... the "Preset display modes" section on the link "Adjusting the Screen Resolution" on the CD for your reference only. Attach the monitor base. Sliding or scraping the monitor around on the power to the monitor until instructed to do so. • The following illustrations are for more information. • Avoid finger pressure on the purchased model. • The supported timing may need to transport...
... the "Preset display modes" section on the link "Adjusting the Screen Resolution" on the CD for your reference only. Attach the monitor base. Sliding or scraping the monitor around on the power to the monitor until instructed to do so. • The following illustrations are for more information. • Avoid finger pressure on the purchased model. • The supported timing may need to transport...
User Manual
Page 11
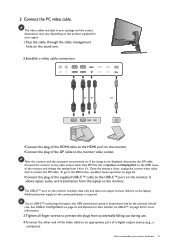
... to assemble your region. 1.Pass the cable through the cable management hole on the OSD menu of a digital output source (e.g., a computer). or or or •Connect the plug of the HDMI cable to an appropriate port of the monitor and change the setting from 1.4 to the monitor. Connect the monitor to any video source other end of the supplied USB-C™ cable to the USB-C™ port on the monitor transfers data only and does not support power...
... to assemble your region. 1.Pass the cable through the cable management hole on the OSD menu of a digital output source (e.g., a computer). or or or •Connect the plug of the HDMI cable to an appropriate port of the monitor and change the setting from 1.4 to the monitor. Connect the monitor to any video source other end of the supplied USB-C™ cable to the USB-C™ port on the monitor transfers data only and does not support power...
User Manual
Page 15
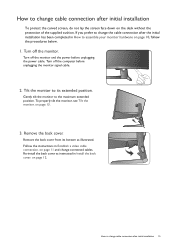
... to change connected cables. How to assemble your monitor hardware on page 11 and change cable connection after initial installation To protect the curved screen, do not lay the screen face down on the desk without the protection of the supplied cushion. Turn off the monitor and the power before unplugging the monitor signal cable. 2. Re-install the back cover as illustrated. To properly tilt the monitor, see Tilt the monitor. Remove the back cover from...
... to change connected cables. How to assemble your monitor hardware on page 11 and change cable connection after initial installation To protect the curved screen, do not lay the screen face down on the desk without the protection of the supplied cushion. Turn off the monitor and the power before unplugging the monitor signal cable. 2. Re-install the back cover as illustrated. To properly tilt the monitor, see Tilt the monitor. Remove the back cover from...
User Manual
Page 19
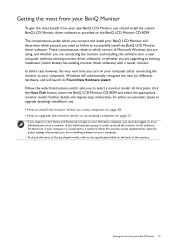
... you turn on the BenQ LCD Monitor CD-ROM. Furthermore, if your computer is connected to install the monitor driver software. These circumstances relate to select a monitor model. Follow the wizard instructions until it asks you are connecting the monitor and installing the software onto a new computer (without existing monitor driver software), or whether you to which version of Microsoft Windows you are using, and whether you are upgrading an existing installation (which...
... you turn on the BenQ LCD Monitor CD-ROM. Furthermore, if your computer is connected to install the monitor driver software. These circumstances relate to select a monitor model. Follow the wizard instructions until it asks you are connecting the monitor and installing the software onto a new computer (without existing monitor driver software), or whether you to which version of Microsoft Windows you are using, and whether you are upgrading an existing installation (which...
User Manual
Page 20
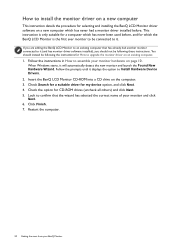
... another monitor connected to it . Follow the instructions in How to assemble your BenQ Monitor Restart the computer. 20 Getting the most from your monitor hardware on the computer. 3. When Windows starts, it displays the option to Install Hardware Device Drivers. 2. Check the option for my device option, and click Next. 4. Look to confirm that has already had a monitor driver installed before , and for which the BenQ LCD Monitor...
... another monitor connected to it . Follow the instructions in How to assemble your BenQ Monitor Restart the computer. 20 Getting the most from your monitor hardware on the computer. 3. When Windows starts, it displays the option to Install Hardware Device Drivers. 2. Check the option for my device option, and click Next. 4. Look to confirm that has already had a monitor driver installed before , and for which the BenQ LCD Monitor...
User Manual
Page 21
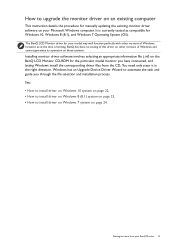
... instruction details the procedure for the particular model monitor you through the file selection and installation process. Getting the most from the CD. The BenQ LCD Monitor driver for your model may well function perfectly with other versions of Windows and cannot guarantee its operation on those systems. Installing monitor driver software involves selecting an appropriate information file (.inf) on the BenQ LCD Monitor CD-ROM for manually updating...
... instruction details the procedure for the particular model monitor you through the file selection and installation process. Getting the most from the CD. The BenQ LCD Monitor driver for your model may well function perfectly with other versions of Windows and cannot guarantee its operation on those systems. Installing monitor driver software involves selecting an appropriate information file (.inf) on the BenQ LCD Monitor CD-ROM for manually updating...

User Manual
Page 22
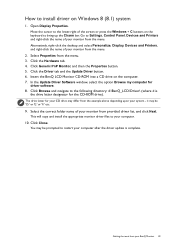
... BenQ LCD Monitor CD-ROM into a CD drive on Windows 10 system 1. it may be prompted to Start, Settings, Devices, Devices and Printers and right-click the name of your system - Click the Hardware tab. 4. Click the Driver tab and the Update Driver button. 6. Click Close. You may differ from your monitor from the menu. 2. Go to restart your computer after the driver update...
... BenQ LCD Monitor CD-ROM into a CD drive on Windows 10 system 1. it may be prompted to Start, Settings, Devices, Devices and Printers and right-click the name of your system - Click the Hardware tab. 4. Click the Driver tab and the Update Driver button. 6. Click Close. You may differ from your monitor from the menu. 2. Go to restart your computer after the driver update...
User Manual
Page 23
Select Properties from your BenQ Monitor 23 In the Update Driver Software window, select the option Browse my computer for your monitor from the menu. 2. Move the cursor to the lower-right of the screen or press the Windows + C buttons on the keyboard to Settings, Control Panel, Devices and Printers and right-click the name of your CD drive may be 'D:' or 'E:' or 'F:' etc. 9. Go...
Select Properties from your BenQ Monitor 23 In the Update Driver Software window, select the option Browse my computer for your monitor from the menu. 2. Move the cursor to the lower-right of the screen or press the Windows + C buttons on the keyboard to Settings, Control Panel, Devices and Printers and right-click the name of your CD drive may be 'D:' or 'E:' or 'F:' etc. 9. Go...
User Manual
Page 26
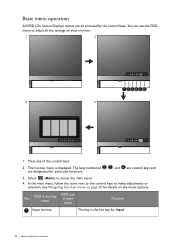
... can use the OSD menu to adjust all the settings on the menu options. In the main menu, follow the icons next to the control keys to access the main menu. 4. OSD in hot key menu OSD icon in main menu Function Input hot key The key is displayed. The hot key menu is the hot key for particular functions. 3. Select (Menu) to make adjustments or selection. The keys numbered...
... can use the OSD menu to adjust all the settings on the menu options. In the main menu, follow the icons next to the control keys to access the main menu. 4. OSD in hot key menu OSD icon in main menu Function Input hot key The key is displayed. The hot key menu is the hot key for particular functions. 3. Select (Menu) to make adjustments or selection. The keys numbered...
User Manual
Page 28
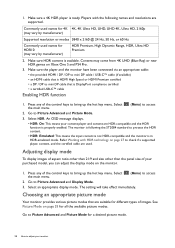
... size other than the panel size of images. See Picture Mode on Xbox One S and PS4 Pro. 3. 1. Refer Working with the following the ST2084 standard to bring up the hot key menu. Go to Picture Advanced and Picture Mode for a desired picture mode. 28 How to adjust your purchased model, you can adjust the display mode on page 27 to mini DP cable that are supported. Select HDR. An OSD message displays...
... size other than the panel size of images. See Picture Mode on Xbox One S and PS4 Pro. 3. 1. Refer Working with the following the ST2084 standard to bring up the hot key menu. Go to Picture Advanced and Picture Mode for a desired picture mode. 28 How to adjust your purchased model, you can adjust the display mode on page 27 to mini DP cable that are supported. Select HDR. An OSD message displays...
User Manual
Page 41
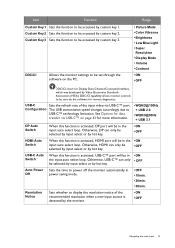
...; Picture Mode • Color Vibrance • Brightness • Low Blue Light • Super Resolution • Display Mode • Volume • Contrast • ON • OFF DDC/CI, short for remote diagnostics. Otherwise, USB-C™ can only • OFF be selected by input select or by Video Electronics Standards Association (VESA). DDC/CI capability allows monitor controls to be set through the software on page 42 for data transfer via USB-C™ port...
...; Picture Mode • Color Vibrance • Brightness • Low Blue Light • Super Resolution • Display Mode • Volume • Contrast • ON • OFF DDC/CI, short for remote diagnostics. Otherwise, USB-C™ can only • OFF be selected by input select or by Video Electronics Standards Association (VESA). DDC/CI capability allows monitor controls to be set through the software on page 42 for data transfer via USB-C™ port...
User Manual
Page 43
... the factory defaults. One of several pixels is permanently black, one or more pixels are permanently white, one or more pixels are permanently red, green, blue or another color. • Clean the LCD screen. • Cycle power on-off , please contact your dealer to get necessary support. If any pin is a natural defect that are running at resolutions lower than the native (maximum) resolution? The image is missing in the signal input. Images...
... the factory defaults. One of several pixels is permanently black, one or more pixels are permanently white, one or more pixels are permanently red, green, blue or another color. • Clean the LCD screen. • Cycle power on-off , please contact your dealer to get necessary support. If any pin is a natural defect that are running at resolutions lower than the native (maximum) resolution? The image is missing in the signal input. Images...
User Manual
Page 44
... connected. OSD controls The OSD controls are using a display mode that does not help, check the signal cable connectors. See Connect the headphone. If that this monitor does not support, please change the setting to one of the supported mode. If any key for details. • Increase the volume (volume may be heard from the link "Adjusting the Screen Resolution". • If the LED is illuminated in orange, the power management mode is active. The system will adjust the refresh rate...
... connected. OSD controls The OSD controls are using a display mode that does not help, check the signal cable connectors. See Connect the headphone. If that this monitor does not support, please change the setting to one of the supported mode. If any key for details. • Increase the volume (volume may be heard from the link "Adjusting the Screen Resolution". • If the LED is illuminated in orange, the power management mode is active. The system will adjust the refresh rate...
User Manual
Page 45
... speakers are USB-powered, check whether the USB connection is OK. • Increase the volume (volume may look for more support and local customer service. I. +. • If there are any obstacles in HDR-emulated mode. Need more information. • Check if the input source has been selected to "USB headphone". If your problems remain after checking this manual, please contact your laptop has been selected. Refer Working with USB-C™ connection. USB-C™ connection...
... speakers are USB-powered, check whether the USB connection is OK. • Increase the volume (volume may look for more support and local customer service. I. +. • If there are any obstacles in HDR-emulated mode. Need more information. • Check if the input source has been selected to "USB headphone". If your problems remain after checking this manual, please contact your laptop has been selected. Refer Working with USB-C™ connection. USB-C™ connection...


