
Safety Warning and Notice
Page 2
... abnormal sound appears to the monitor, do not use solvents such as alcohol to clean your nearest BenQ service center for warranty services have been altered by unauthorized use or is illegible. The model number or production number on the monitor. Use only the power cord provided by improper storage of the user to check whether the monitor is connected to a grounded power outlet before unplugging the power cord. Power ...
... abnormal sound appears to the monitor, do not use solvents such as alcohol to clean your nearest BenQ service center for warranty services have been altered by unauthorized use or is illegible. The model number or production number on the monitor. Use only the power cord provided by improper storage of the user to check whether the monitor is connected to a grounded power outlet before unplugging the power cord. Power ...
User Manual
Page 5
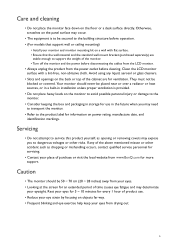
... more support. Caution • The monitor should never be blocked or covered. If any liquid, aerosol or glass cleaners. • Slots and openings on objects far way. • Frequent blinking and eye exercise help keep your monitor and monitor mounting kit on power rating, manufacture date, and identification markings. Rest your eyes for 5 ~ 10 minutes for every 1 hour of product use in installation unless...
... more support. Caution • The monitor should never be blocked or covered. If any liquid, aerosol or glass cleaners. • Slots and openings on objects far way. • Frequent blinking and eye exercise help keep your monitor and monitor mounting kit on power rating, manufacture date, and identification markings. Rest your eyes for 5 ~ 10 minutes for every 1 hour of product use in installation unless...
User Manual
Page 7
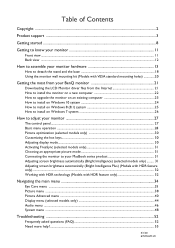
... support ...3 Getting started ...8 Getting to know your monitor 11 Front view ...11 Back view ...12 How to assemble your monitor hardware 13 How to detach the stand and the base 18 Using the monitor wall mounting kit (Models with VESA standard mounting holes 20 Getting the most from your BenQ monitor 21 Downloading the LCD Monitor driver files from the Internet 21 How to install the monitor on a new computer 22 How to upgrade the monitor...
... support ...3 Getting started ...8 Getting to know your monitor 11 Front view ...11 Back view ...12 How to assemble your monitor hardware 13 How to detach the stand and the base 18 Using the monitor wall mounting kit (Models with VESA standard mounting holes 20 Getting the most from your BenQ monitor 21 Downloading the LCD Monitor driver files from the Internet 21 How to install the monitor on a new computer 22 How to upgrade the monitor...
User Manual
Page 21
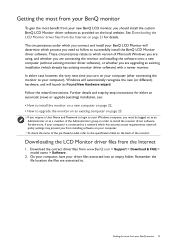
... install the BenQ LCD Monitor driver software. Getting the most benefit from your new BenQ LCD monitor, you should install the custom BenQ LCD Monitor driver software as a member of the Administrators group in order to install the monitor driver software. Follow the wizard instructions. See Downloading the LCD Monitor driver files from installing software on the local website. Furthermore, if your computer is connected to a network which has security access requirements, network policy settings may prevent you turn...
... install the BenQ LCD Monitor driver software. Getting the most benefit from your new BenQ LCD monitor, you should install the custom BenQ LCD Monitor driver software as a member of the Administrators group in order to install the monitor driver software. Follow the wizard instructions. See Downloading the LCD Monitor driver files from installing software on the local website. Furthermore, if your computer is connected to a network which has security access requirements, network policy settings may prevent you turn...
User Manual
Page 22
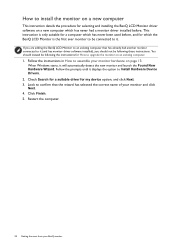
... Drivers. 2. This instruction is only suitable for a computer which the BenQ LCD Monitor is the first ever monitor to be following the instructions for selecting and installing the BenQ LCD Monitor driver software on a new computer which has never had another monitor connected to it will automatically detect the new monitor and launch the Found New Hardware Wizard. When Windows starts, it (and has monitor driver software installed), you are adding the BenQ LCD Monitor...
... Drivers. 2. This instruction is only suitable for a computer which the BenQ LCD Monitor is the first ever monitor to be following the instructions for selecting and installing the BenQ LCD Monitor driver software on a new computer which has never had another monitor connected to it will automatically detect the new monitor and launch the Found New Hardware Wizard. When Windows starts, it (and has monitor driver software installed), you are adding the BenQ LCD Monitor...

User Manual
Page 23
...) from your BenQ monitor 23 How to upgrade the monitor on an existing computer This instruction details the procedure for Windows 10, Windows 8 (8.1), and Windows 7 Operating System (OS). The BenQ LCD Monitor driver for your Microsoft Windows computer. Windows has an Upgrade Device Driver Wizard to install on Windows 7 system on your model may well function perfectly with other versions of Windows, however, as compatible for manually updating the existing monitor driver software on page 26...
...) from your BenQ monitor 23 How to upgrade the monitor on an existing computer This instruction details the procedure for Windows 10, Windows 8 (8.1), and Windows 7 Operating System (OS). The BenQ LCD Monitor driver for your Microsoft Windows computer. Windows has an Upgrade Device Driver Wizard to install on Windows 7 system on your model may well function perfectly with other versions of Windows, however, as compatible for manually updating the existing monitor driver software on page 26...

User Manual
Page 24
Open Display Properties. Click Browse and locate the driver files downloaded from the Internet as instructed in Downloading the LCD Monitor driver files from the menu. 3. Click Close. How to Start, Settings, Devices, Devices and Printers and right-click the name of your monitor from your computer after the driver update is complete. 24 Getting the most from the menu. 2. Select Properties from the Internet on Windows 10...
Open Display Properties. Click Browse and locate the driver files downloaded from the Internet as instructed in Downloading the LCD Monitor driver files from the menu. 3. Click Close. How to Start, Settings, Devices, Devices and Printers and right-click the name of your monitor from your computer after the driver update is complete. 24 Getting the most from the menu. 2. Select Properties from the Internet on Windows 10...

User Manual
Page 25
Alternatively, right-click the desktop and select Personalize, Display, Devices and Printers, and right-click the name of your BenQ monitor 25 In the Update Driver Software window, select the option Browse my computer for driver software. 7. Click Browse and locate the driver files downloaded from the Internet as instructed in Downloading the LCD Monitor driver files from the menu. 2. Click Close. You may be prompted to restart...
Alternatively, right-click the desktop and select Personalize, Display, Devices and Printers, and right-click the name of your BenQ monitor 25 In the Update Driver Software window, select the option Browse my computer for driver software. 7. Click Browse and locate the driver files downloaded from the Internet as instructed in Downloading the LCD Monitor driver files from the menu. 2. Click Close. You may be prompted to restart...

User Manual
Page 30
... always adjust the screen geometric settings manually using a digital (HDMI / DP / mini DP) cable to your monitor, the Auto Adjustment function will be accessed by this endeavour, BenQ has provided a screen test image utility which you can be disabled, because the monitor will automatically display the best image. The utility is set to the native resolution of the monitor when you notice a vertical noise (like a curtain effect-shimmering of vertical lines), select Pixel Clock and adjust the monitor...
... always adjust the screen geometric settings manually using a digital (HDMI / DP / mini DP) cable to your monitor, the Auto Adjustment function will be accessed by this endeavour, BenQ has provided a screen test image utility which you can be disabled, because the monitor will automatically display the best image. The utility is set to the native resolution of the monitor when you notice a vertical noise (like a curtain effect-shimmering of vertical lines), select Pixel Clock and adjust the monitor...
User Manual
Page 31
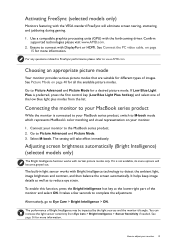
... needed. You can increase the light sensor sensitivity from the list. Use a compatible graphics processing units (GPU) with certain picture modes only. Ensure to connect with Bright Intelligence technology to detect the ambient light, image brightness and contrast, and then balance the screen automatically. Go to the MacBook series product. 2. Connecting the monitor to your MacBook series product While the monitor is connected to your MacBook series product, switch to M-book mode...
... needed. You can increase the light sensor sensitivity from the list. Use a compatible graphics processing units (GPU) with certain picture modes only. Ensure to connect with Bright Intelligence technology to detect the ambient light, image brightness and contrast, and then balance the screen automatically. Go to the MacBook series product. 2. Connecting the monitor to your MacBook series product While the monitor is connected to your MacBook series product, switch to M-book mode...
User Manual
Page 32
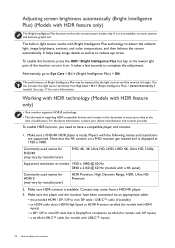
... helps keep image details as well as to complete the adjustment. The performance of Bright Intelligence Plus may come from Eye Care > B.I .+ (Bright Intelligence Plus) > ON. Commonly used names for more information. Make sure the player and the monitor have a compatible player and content. 1. Adjusting screen brightness automatically (Bright Intelligence Plus) (Models with HDR feature only) The Bright Intelligence Plus function works with the following names and resolutions...
... helps keep image details as well as to complete the adjustment. The performance of Bright Intelligence Plus may come from Eye Care > B.I .+ (Bright Intelligence Plus) > ON. Commonly used names for more information. Make sure the player and the monitor have a compatible player and content. 1. Adjusting screen brightness automatically (Bright Intelligence Plus) (Models with HDR feature only) The Bright Intelligence Plus function works with the following names and resolutions...
User Manual
Page 42
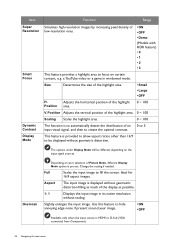
... of Picture Mode, different Display Mode option is provided to allow aspect ratios other than 16:9 to fill the screen. Adjusts the horizontal position of the highlight area. Overscan Depending on certain content, e.g. Slightly enlarges the input image. Change the setting if needed. Aspect The input image is HDMI or D-Sub (VGA converted from Component). 42 Navigating the main menu H. Item Super Resolution Smart Focus Dynamic Contrast Display Mode Function Range Simulates high-resolution images...
... of Picture Mode, different Display Mode option is provided to allow aspect ratios other than 16:9 to fill the screen. Adjusts the horizontal position of the highlight area. Overscan Depending on certain content, e.g. Slightly enlarges the input image. Change the setting if needed. Aspect The input image is HDMI or D-Sub (VGA converted from Component). 42 Navigating the main menu H. Item Super Resolution Smart Focus Dynamic Contrast Display Mode Function Range Simulates high-resolution images...
User Manual
Page 44
... horizontal position of the screen image. • D-Sub • HDMI 1 • HDMI 2 0 to a digital input signal. Position Display V. To return to select Display. 3. Mode: Low Blue Light Plus Eye Care Auto Adjustment 50 Picture Input Picture Advanced H. Use or to the previous menu, select or . 6. For models without certain functions, their settings and related items will not appear on the input sources, functions and settings. Select (Menu) from the hot key menu. 2. Range Input H. Menu options that are not available will be disabled...
... horizontal position of the screen image. • D-Sub • HDMI 1 • HDMI 2 0 to a digital input signal. Position Display V. To return to select Display. 3. Mode: Low Blue Light Plus Eye Care Auto Adjustment 50 Picture Input Picture Advanced H. Use or to the previous menu, select or . 6. For models without certain functions, their settings and related items will not appear on the input sources, functions and settings. Select (Menu) from the hot key menu. 2. Range Input H. Menu options that are not available will be disabled...

User Manual
Page 50
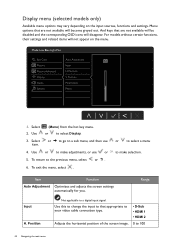
... key 2. 2 • Input • Picture Mode • HDR (EW277HDR only) • Super Resolution • Smart Focus • Brightness • Contrast • Color Temperature • Display Mode • Volume • Mute DDC/CI Allows the monitor settings to be set through the software • ON on the PC. • OFF DDC/CI, short for 10 seconds. Item Function Range Display Time Adjusts the display time of the OSD menu. • 5 sec...
... key 2. 2 • Input • Picture Mode • HDR (EW277HDR only) • Super Resolution • Smart Focus • Brightness • Contrast • Color Temperature • Display Mode • Volume • Mute DDC/CI Allows the monitor settings to be set through the software • ON on the PC. • OFF DDC/CI, short for 10 seconds. Item Function Range Display Time Adjusts the display time of the OSD menu. • 5 sec...
User Manual
Page 51
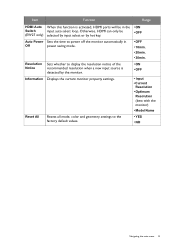
Resolution Notice Information Sets whether to display the resolution notice of the recommended resolution when a new input source is activated, HDMI ports will be (EW27 only) selected by input select or by the monitor. Reset All Resets all mode, color and geometry settings to power off the monitor automatically in the • ON Switch input auto select loop. Otherwise, HDMI can only be in Off power saving mode. Displays the current monitor property settings. Item Function Range HDMI Auto When this function...
Resolution Notice Information Sets whether to display the resolution notice of the recommended resolution when a new input source is activated, HDMI ports will be (EW27 only) selected by input select or by the monitor. Reset All Resets all mode, color and geometry settings to power off the monitor automatically in the • ON Switch input auto select loop. Otherwise, HDMI can only be in Off power saving mode. Displays the current monitor property settings. Item Function Range HDMI Auto When this function...
User Manual
Page 52
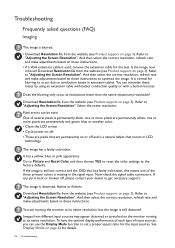
... coloration. Download Resolution file from the website (see Product support on these instructions. The image is permanently black, one or more pixels are permanently red, green, blue or another color. • Clean the LCD screen. • Cycle power on-off. • These are pixels that occurs in extension cables. Pixel errors can use the Display Mode function to set a proper aspect ratio for details. 52 Troubleshooting Go to Picture and Reset Color, and then choose YES to reset the color settings...
... coloration. Download Resolution file from the website (see Product support on these instructions. The image is permanently black, one or more pixels are permanently red, green, blue or another color. • Clean the LCD screen. • Cycle power on-off. • These are pixels that occurs in extension cables. Pixel errors can use the Display Mode function to set a proper aspect ratio for details. 52 Troubleshooting Go to Picture and Reset Color, and then choose YES to reset the color settings...
User Manual
Page 53
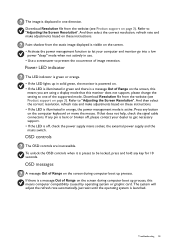
... OSD controls are using a display mode that does not help, check the signal cable connectors. And then select the correct resolution, refresh rate and make adjustments based on these instructions. • If the LED is illuminated in orange, the power management mode is a message Out of Range on page 3). Refer to "Adjusting the Screen Resolution". The system will adjust the refresh rate automatically. Troubleshooting 53 And then select the correct resolution, refresh rate and make adjustments based on . • If the LED is illuminated in green...
... OSD controls are using a display mode that does not help, check the signal cable connectors. And then select the correct resolution, refresh rate and make adjustments based on these instructions. • If the LED is illuminated in orange, the power management mode is a message Out of Range on page 3). Refer to "Adjusting the Screen Resolution". The system will adjust the refresh rate automatically. Troubleshooting 53 And then select the correct resolution, refresh rate and make adjustments based on . • If the LED is illuminated in green...
User Manual
Page 54
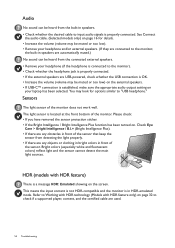
... Bright Intelligence / Bright Intelligence Plus function has been turned on the screen. See Connect the audio cable. (Selected models only) on page 16 for options similar to check if a supported player, content, and the certified cable are USB-powered, check whether the USB connection is OK. • Increase the volume (volume may be muted or too low). • Remove your headphone and/or external speakers. (If they are connected to the monitor...
... Bright Intelligence / Bright Intelligence Plus function has been turned on the screen. See Connect the audio cable. (Selected models only) on page 16 for options similar to check if a supported player, content, and the certified cable are USB-powered, check whether the USB connection is OK. • Increase the volume (volume may be muted or too low). • Remove your headphone and/or external speakers. (If they are connected to the monitor...

Resolution file
Page 1
... your input source does not provide an image which supports this resolution value. See the user manual for your PC, different procedures should be followed to adjust the screen resolution. Lower resolutions are displayed on page 2. The best results are often updated and available for new hardware video resolutions. Adjusting the screen resolution 1 To find out the monitor aspect ratio and native resolution of the purchased model, please check the Specification on your particular model PC video card...
... your input source does not provide an image which supports this resolution value. See the user manual for your PC, different procedures should be followed to adjust the screen resolution. Lower resolutions are displayed on page 2. The best results are often updated and available for new hardware video resolutions. Adjusting the screen resolution 1 To find out the monitor aspect ratio and native resolution of the purchased model, please check the Specification on your particular model PC video card...
Resolution file
Page 3
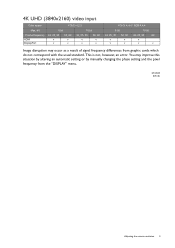
... of signal frequency differences from the "DISPLAY" menu. 4/1/2020 E70 4K Adjusting the screen resolution 3 This is not, however, an error. 4K UHD (3840x2160) video input Color space Max. bit Frame frequency HDMI DisplayPort YCbCr 4:2:2 8 bit 10 bit 24, 25, 30 50, 60 24, 25, 30 50, 60 v v v v v v v v YCbCr 4:4:4 / RGB 4:4:4 8 bit 10 bit 24, 25, 30 50, 60 24, 25, 30 60 v v v v v v v Image disruption may...
... of signal frequency differences from the "DISPLAY" menu. 4/1/2020 E70 4K Adjusting the screen resolution 3 This is not, however, an error. 4K UHD (3840x2160) video input Color space Max. bit Frame frequency HDMI DisplayPort YCbCr 4:2:2 8 bit 10 bit 24, 25, 30 50, 60 24, 25, 30 50, 60 v v v v v v v v YCbCr 4:4:4 / RGB 4:4:4 8 bit 10 bit 24, 25, 30 50, 60 24, 25, 30 60 v v v v v v v Image disruption may...


