

Safety Warning and Notice
Page 2
... power cord is unplugged before cleaning your monitor Use a monitor cleaner and a soft cloth to check whether the monitor is compatible with a (multi-outlet) extension cord. Always turn off the monitor before turning on the product has been altered, deleted, removed or made illegible. Repairs, modifications, or alterations have been made by unauthorized service organizations or persons. Damage caused by BenQ. Never use...
... power cord is unplugged before cleaning your monitor Use a monitor cleaner and a soft cloth to check whether the monitor is compatible with a (multi-outlet) extension cord. Always turn off the monitor before turning on the product has been altered, deleted, removed or made illegible. Repairs, modifications, or alterations have been made by unauthorized service organizations or persons. Damage caused by BenQ. Never use...
Resolution file
Page 1
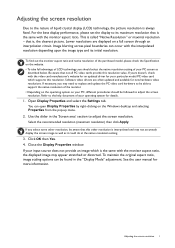
... picture. Image blurring across pixel boundaries can be found in the 'Screen area' section to adjust the screen resolution. Software video drivers are displayed on the Windows desktop and selecting Properties from the pop-up menu. 2. If necessary, you select some other resolution is the same with the video card manufacturer's website for an updated driver for details. 1. If your input source does not provide an image which supports this resolution value. Lower resolutions...
... picture. Image blurring across pixel boundaries can be found in the 'Screen area' section to adjust the screen resolution. Software video drivers are displayed on the Windows desktop and selecting Properties from the pop-up menu. 2. If necessary, you select some other resolution is the same with the video card manufacturer's website for an updated driver for details. 1. If your input source does not provide an image which supports this resolution value. Lower resolutions...
Resolution file
Page 2
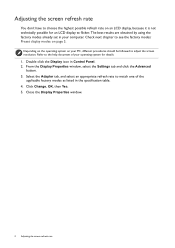
... PC, different procedures should be followed to see the factory modes: Preset display modes on your computer. From the Display Properties window, select the Settings tab and click the Advanced button. 3. Check next chapter to adjust the screen resolution. Close the Display Properties window. 2 Adjusting the screen refresh rate Depending on the operating system on page 3. The best results are obtained by using the factory modes already set in Control Panel. 2. Click Change, OK, then Yes. 5.
... PC, different procedures should be followed to see the factory modes: Preset display modes on your computer. From the Display Properties window, select the Settings tab and click the Advanced button. 3. Check next chapter to adjust the screen resolution. Close the Display Properties window. 2 Adjusting the screen refresh rate Depending on the operating system on page 3. The best results are obtained by using the factory modes already set in Control Panel. 2. Click Change, OK, then Yes. 5.
Resolution file
Page 4
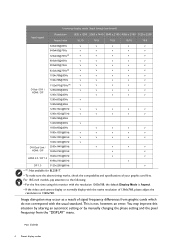
... the native resolution of 1366x768, please adjust the resolution to the following: • For the first time using this situation by altering an automatic setting or by manually changing the phase setting and the pixel frequency from graphic cards which do not correspond with the usual standard. Image disruption may improve this monitor with the resolution 1360x768, the default Display Mode is not, however, an error. Incoming display mode (Input timing) (continued) Input signal Resolution...
... the native resolution of 1366x768, please adjust the resolution to the following: • For the first time using this situation by altering an automatic setting or by manually changing the phase setting and the pixel frequency from graphic cards which do not correspond with the usual standard. Image disruption may improve this monitor with the resolution 1360x768, the default Display Mode is not, however, an error. Incoming display mode (Input timing) (continued) Input signal Resolution...
User Manual
Page 5
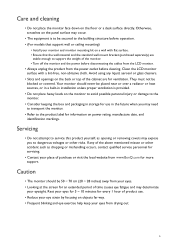
... or other risks. Clean the LCD monitor surface with flat surface. • Ensure that support wall or ceiling mounting) • Install your place of purchase or visit the local website from the power outlet before disconnecting the cables from the LCD monitor. • Always unplug the product from www.BenQ.com for servicing. • Contact your monitor and monitor mounting kit on a wall with a lint-free, non-abrasive cloth...
... or other risks. Clean the LCD monitor surface with flat surface. • Ensure that support wall or ceiling mounting) • Install your place of purchase or visit the local website from the power outlet before disconnecting the cables from the LCD monitor. • Always unplug the product from www.BenQ.com for servicing. • Contact your monitor and monitor mounting kit on a wall with a lint-free, non-abrasive cloth...
User Manual
Page 7
... support ...3 Getting started ...8 Getting to know your monitor 11 Front view ...11 Back view ...12 How to assemble your monitor hardware 13 How to detach the stand and the base 18 Using the monitor wall mounting kit (Models with VESA standard mounting holes 20 Getting the most from your BenQ monitor 21 Downloading the LCD Monitor driver files from the Internet 21 How to install the monitor on a new computer 22 How to upgrade the monitor...
... support ...3 Getting started ...8 Getting to know your monitor 11 Front view ...11 Back view ...12 How to assemble your monitor hardware 13 How to detach the stand and the base 18 Using the monitor wall mounting kit (Models with VESA standard mounting holes 20 Getting the most from your BenQ monitor 21 Downloading the LCD Monitor driver files from the Internet 21 How to install the monitor on a new computer 22 How to upgrade the monitor...
User Manual
Page 21
... policy settings may prevent you turn on the back of the monitor. Download the correct driver files from the Internet 1. These circumstances relate to which process you need to follow to . Follow the wizard instructions. Downloading the LCD Monitor driver files from www.BenQ.com > Support > Download & FAQ > model name > Software. 2. Remember the file location the files are upgrading an existing installation (which you connect and install your BenQ LCD Monitor will launch...
... policy settings may prevent you turn on the back of the monitor. Download the correct driver files from the Internet 1. These circumstances relate to which process you need to follow to . Follow the wizard instructions. Downloading the LCD Monitor driver files from www.BenQ.com > Support > Download & FAQ > model name > Software. 2. Remember the file location the files are upgrading an existing installation (which you connect and install your BenQ LCD Monitor will launch...
User Manual
Page 22
... been used before . Check Search for a suitable driver for How to upgrade the monitor on an existing computer. 1. When Windows starts, it displays the option to confirm that has already had a monitor driver installed before , and for which the BenQ LCD Monitor is only suitable for a computer which has never had another monitor connected to it (and has monitor driver software installed), you should instead be following these instructions. This instruction is...
... been used before . Check Search for a suitable driver for How to upgrade the monitor on an existing computer. 1. When Windows starts, it displays the option to confirm that has already had a monitor driver installed before , and for which the BenQ LCD Monitor is only suitable for a computer which has never had another monitor connected to it (and has monitor driver software installed), you should instead be following these instructions. This instruction is...

User Manual
Page 23
...; How to install on Windows 8 (8.1) system on page 25 • How to automate the task and guide you have connected, and letting Windows install the corresponding driver files. Windows has an Upgrade Device Driver Wizard to install on Windows 7 system on your BenQ monitor 23 The BenQ LCD Monitor driver for your model may well function perfectly with other versions of Windows, however, as compatible for manually updating the existing monitor driver software on page 26...
...; How to install on Windows 8 (8.1) system on page 25 • How to automate the task and guide you have connected, and letting Windows install the corresponding driver files. Windows has an Upgrade Device Driver Wizard to install on Windows 7 system on your BenQ monitor 23 The BenQ LCD Monitor driver for your model may well function perfectly with other versions of Windows, however, as compatible for manually updating the existing monitor driver software on page 26...

User Manual
Page 24
... driver update is complete. 24 Getting the most from your monitor from the menu. 2. Select Properties from the menu. 3. Click the Driver tab and the Update Driver button. 6. You may be prompted to install on page 21. 8. Open Display Properties. Go to Start, Settings, Devices, Devices and Printers and right-click the name of your BenQ monitor In the Update Driver Software window, select the option Browse my computer for driver software...
... driver update is complete. 24 Getting the most from your monitor from the menu. 2. Select Properties from the menu. 3. Click the Driver tab and the Update Driver button. 6. You may be prompted to install on page 21. 8. Open Display Properties. Go to Start, Settings, Devices, Devices and Printers and right-click the name of your BenQ monitor In the Update Driver Software window, select the option Browse my computer for driver software...

User Manual
Page 25
... tab. 4. Open Display Properties. In the Update Driver Software window, select the option Browse my computer for driver software. 7. How to Settings, Control Panel, Devices and Printers and right-click the name of your monitor from the menu. Click Generic PnP Monitor, and then the Properties button. 5. Click Browse and locate the driver files downloaded from the Internet as instructed in Downloading the LCD Monitor driver files from the menu. 3. Go to install on...
... tab. 4. Open Display Properties. In the Update Driver Software window, select the option Browse my computer for driver software. 7. How to Settings, Control Panel, Devices and Printers and right-click the name of your monitor from the menu. Click Generic PnP Monitor, and then the Properties button. 5. Click Browse and locate the driver files downloaded from the Internet as instructed in Downloading the LCD Monitor driver files from the menu. 3. Go to install on...

User Manual
Page 30
... always adjust the screen geometric settings manually using a digital (HDMI / DP / mini DP) cable to check for screen color, grayscale and line gradient display. See Product support on the monitor. 1. If you notice a vertical noise (like a curtain effect-shimmering of your purchased model, you use to your monitor Adjusting display mode To display images of aspect ratio other than 16:9 and size other image, such as hot keys to provide direct access to adjust your monitor, the Auto Adjustment...
... always adjust the screen geometric settings manually using a digital (HDMI / DP / mini DP) cable to check for screen color, grayscale and line gradient display. See Product support on the monitor. 1. If you notice a vertical noise (like a curtain effect-shimmering of your purchased model, you use to your monitor Adjusting display mode To display images of aspect ratio other than 16:9 and size other image, such as hot keys to provide direct access to adjust your monitor, the Auto Adjustment...
User Manual
Page 31
... effect immediately. Use a compatible graphics processing units (GPU) with certain picture modes only. Choosing an appropriate picture mode Your monitor provides various picture modes that are suitable for different types of the low blue light plus modes from Eye Care > Bright Intelligence > Sensor Sensitivity if needed. Go to reduce eye strain. Adjusting screen brightness automatically (Bright Intelligence) (selected models only) The Bright Intelligence function works with the forthcoming driver. It helps keep image details as...
... effect immediately. Use a compatible graphics processing units (GPU) with certain picture modes only. Choosing an appropriate picture mode Your monitor provides various picture modes that are suitable for different types of the low blue light plus modes from Eye Care > Bright Intelligence > Sensor Sensitivity if needed. Go to reduce eye strain. Adjusting screen brightness automatically (Bright Intelligence) (selected models only) The Bright Intelligence function works with the forthcoming driver. It helps keep image details as...
User Manual
Page 32
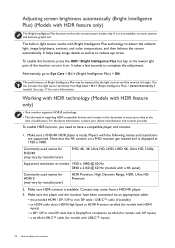
... the light sources and the monitor tilt angle. It takes a few seconds to reduce eye strain. Make sure the player and the monitor have a compatible player and content. 1. Adjusting screen brightness automatically (Bright Intelligence Plus) (Models with HDR feature only) The Bright Intelligence Plus function works with HDMI inputs) • a DP / DP to mini DP cable that is available. To enable HDR function, you need to have been connected...
... the light sources and the monitor tilt angle. It takes a few seconds to reduce eye strain. Make sure the player and the monitor have a compatible player and content. 1. Adjusting screen brightness automatically (Bright Intelligence Plus) (Models with HDR feature only) The Bright Intelligence Plus function works with HDMI inputs) • a DP / DP to mini DP cable that is available. To enable HDR function, you need to have been connected...
User Manual
Page 44
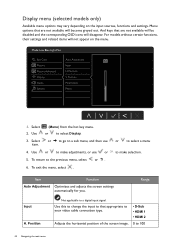
... exit the menu, select . To return to a digital input signal. Item Auto Adjustment Function Optimizes and adjusts the screen settings automatically for you. Use this to change the input to your video cable connection type. Position Display V. Position Not applicable to the previous menu, select or . 6. Position Audio Pixel Clock System Phase 1. Menu options that appropriate to that are not available will be disabled and the corresponding OSD icons will not appear on the input sources, functions and settings. Range Input H.
... exit the menu, select . To return to a digital input signal. Item Auto Adjustment Function Optimizes and adjusts the screen settings automatically for you. Use this to change the input to your video cable connection type. Position Display V. Position Not applicable to the previous menu, select or . 6. Position Audio Pixel Clock System Phase 1. Menu options that appropriate to that are not available will be disabled and the corresponding OSD icons will not appear on the input sources, functions and settings. Range Input H.

User Manual
Page 50
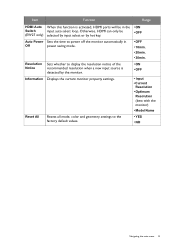
... via the software for remote diagnostics. To unlock the OSD controls, press and hold any key for Display Data Channel/Command Interface, which was developed by custom key 2. 2 • Input • Picture Mode • HDR (EW277HDR only) • Super Resolution • Smart Focus • Brightness • Contrast • Color Temperature • Display Mode • Volume • Mute DDC/CI Allows the monitor settings to be set through the software • ON...
... via the software for remote diagnostics. To unlock the OSD controls, press and hold any key for Display Data Channel/Command Interface, which was developed by custom key 2. 2 • Input • Picture Mode • HDR (EW277HDR only) • Super Resolution • Smart Focus • Brightness • Contrast • Color Temperature • Display Mode • Volume • Mute DDC/CI Allows the monitor settings to be set through the software • ON...
User Manual
Page 51
... input source is detected by the monitor. Displays the current monitor property settings. Resolution Notice Information Sets whether to power off the monitor automatically in the • ON Switch input auto select loop. Otherwise, HDMI can only be in Off power saving mode. Reset All Resets all mode, color and geometry settings to the factory default values. • OFF • 10min. • 20min. • 30min. • ON • OFF • Input • Current Resolution • Optimum Resolution (best...
... input source is detected by the monitor. Displays the current monitor property settings. Resolution Notice Information Sets whether to power off the monitor automatically in the • ON Switch input auto select loop. Otherwise, HDMI can only be in Off power saving mode. Reset All Resets all mode, color and geometry settings to the factory default values. • OFF • 10min. • 20min. • 30min. • ON • OFF • Input • Current Resolution • Optimum Resolution (best...
User Manual
Page 52
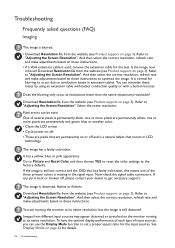
... white, one of input sources, you can use the Display Mode function to optimize the image. Refer to "Adjusting the Screen Resolution". Is the image now in LCD technology. Pixel errors can minimize these instructions to set a proper aspect ratio for blurring to occur due to "Adjusting the Screen Resolution". Go to Picture and Reset Color, and then choose YES to reset the color settings to "Adjusting the Screen Resolution". Refer to the factory defaults. Download Resolution file from the website (see Product support...
... white, one of input sources, you can use the Display Mode function to optimize the image. Refer to "Adjusting the Screen Resolution". Is the image now in LCD technology. Pixel errors can minimize these instructions to set a proper aspect ratio for blurring to occur due to "Adjusting the Screen Resolution". Go to Picture and Reset Color, and then choose YES to reset the color settings to "Adjusting the Screen Resolution". Refer to the factory defaults. Download Resolution file from the website (see Product support...
User Manual
Page 53
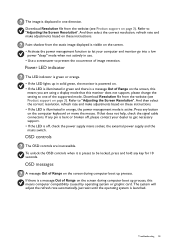
... to "Adjusting the Screen Resolution". Download Resolution file from the website (see Product support on the screen, this means you are inaccessible. Power LED indicator The LED indicator is a message Out of image retention. The system will adjust the refresh rate automatically. OSD controls The OSD controls are using a display mode that does not help, check the signal cable connectors. If there is green or orange. • If the LED lights up process, this monitor does not support, please change the setting to...
... to "Adjusting the Screen Resolution". Download Resolution file from the website (see Product support on the screen, this means you are inaccessible. Power LED indicator The LED indicator is a message Out of image retention. The system will adjust the refresh rate automatically. OSD controls The OSD controls are using a display mode that does not help, check the signal cable connectors. If there is green or orange. • If the LED lights up process, this monitor does not support, please change the setting to...
User Manual
Page 54
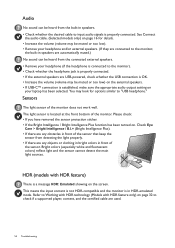
... audio output setting on the screen. Sensors The light sensor of the monitor. This means the input content is not HDR-compatible and the monitor is in speakers are automatically muted.) No sound can be muted or too low) on the external speakers. • If USB-C™ connection is properly connected. Bright colors (especially white and fluorescent colors) reflect light and the sensor cannot detect the main light sources. Check Eye Care > Bright...
... audio output setting on the screen. Sensors The light sensor of the monitor. This means the input content is not HDR-compatible and the monitor is in speakers are automatically muted.) No sound can be muted or too low) on the external speakers. • If USB-C™ connection is properly connected. Bright colors (especially white and fluorescent colors) reflect light and the sensor cannot detect the main light sources. Check Eye Care > Bright...


