User Manual
Page 3
... 3. Using the Plug-and-Play Router Setup 16 5. Recommended Web Browser Settings 88 11. Interactive Display 18 Informational Screens 18 Menu Screen 22 6. Manually Configuring Network Settings 83 10. Follow the Quick Installation Guide 15 Step 2: Set Up the N1 Vision - Using the Web-Based Advanced... User Interface 46 Changing LAN Settings 46 Viewing the DHCP Client List Page 48 Configuring the Wireless Network Settings 48 Setting WPA Security 57 Setting WEP Encryption 59 ...
... 3. Using the Plug-and-Play Router Setup 16 5. Recommended Web Browser Settings 88 11. Interactive Display 18 Informational Screens 18 Menu Screen 22 6. Manually Configuring Network Settings 83 10. Follow the Quick Installation Guide 15 Step 2: Set Up the N1 Vision - Using the Web-Based Advanced... User Interface 46 Changing LAN Settings 46 Viewing the DHCP Client List Page 48 Configuring the Wireless Network Settings 48 Setting WPA Security 57 Setting WEP Encryption 59 ...
User Manual
Page 5
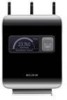
... - set up a Belkin 9 Wireless Network: • Mobility - choose from anywhere in your wireless range • Easy installation - Please be able to use your Belkin Home Network to: 4...N1 Wireless N1 Vision" on a networked laptop or desktop computer anywhere within your home 5 • Share resources, such as printers and gaming consoles • No cabling required - you'll no longer need a dedicated "computer 10 room"-now you can work on the next 3 page. section Introduction Thank you for purchasing the Belkin N1 Vision wireless router (the N1 1 Vision...
... - set up a Belkin 9 Wireless Network: • Mobility - choose from anywhere in your wireless range • Easy installation - Please be able to use your Belkin Home Network to: 4...N1 Wireless N1 Vision" on a networked laptop or desktop computer anywhere within your home 5 • Share resources, such as printers and gaming consoles • No cabling required - you'll no longer need a dedicated "computer 10 room"-now you can work on the next 3 page. section Introduction Thank you for purchasing the Belkin N1 Vision wireless router (the N1 1 Vision...
User Manual
Page 6
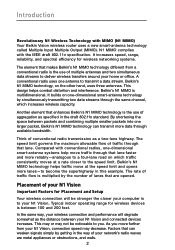
... in the draft 802.11n standard. Factors that enhances Belkin's N1 MIMO technology is the use of your N1 Vision Important Factors for wireless devices is multidimensional. Belkin's N1 MIMO is between your N1 Vision, connection speed may not be stronger the closer your computer... simultaneous data streams to your N1 Vision. The speed limit governs the maximum allowable flow of conventional radio transmission as the distance between 100 and 200 feet. Introduction Revolutionary N1 Wireless Technology with MIMO (N1 MIMO) Your Belkin Vision wireless router uses a new smart-antenna ...
... in the draft 802.11n standard. Factors that enhances Belkin's N1 MIMO technology is the use of your N1 Vision Important Factors for wireless devices is multidimensional. Belkin's N1 MIMO is between your N1 Vision, connection speed may not be stronger the closer your computer... simultaneous data streams to your N1 Vision. The speed limit governs the maximum allowable flow of conventional radio transmission as the distance between 100 and 200 feet. Introduction Revolutionary N1 Wireless Technology with MIMO (N1 MIMO) Your Belkin Vision wireless router uses a new smart-antenna ...
User Manual
Page 19
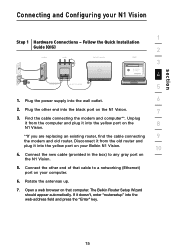
... and press the "Enter" key. 1 2 3 4 5 6 7 8 9 10 15 Find the cable connecting the modem and computer**. Disconnect it from the old router and plug it into the yellow port on the N1 Vision. 5. The Belkin Router Setup Wizard should appear automatically. If it into the black port on that cable to any gray port on your...
... and press the "Enter" key. 1 2 3 4 5 6 7 8 9 10 15 Find the cable connecting the modem and computer**. Disconnect it from the old router and plug it into the yellow port on the N1 Vision. 5. The Belkin Router Setup Wizard should appear automatically. If it into the black port on that cable to any gray port on your...
User Manual
Page 20
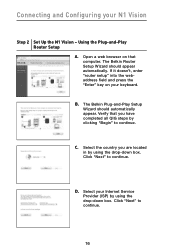
... Open a web browser on your N1 Vision Step 2 Set Up the N1 Vision - Click "Next" to continue. The Belkin Router Setup Wizard should automatically appear. Verify that computer. B. Select the country you have completed all QIG steps by clicking "Begin" to continue. 16 The Belkin Plug-and-Play Setup Wizard should ...appear automatically. C. Select your Internet Service Provider (ISP) by using the drop-down box. If it doesn't, enter "router setup" into the webaddress field and press the "Enter...
... Open a web browser on your N1 Vision Step 2 Set Up the N1 Vision - Click "Next" to continue. The Belkin Router Setup Wizard should automatically appear. Verify that computer. B. Select the country you have completed all QIG steps by clicking "Begin" to continue. 16 The Belkin Plug-and-Play Setup Wizard should ...appear automatically. C. Select your Internet Service Provider (ISP) by using the drop-down box. If it doesn't, enter "router setup" into the webaddress field and press the "Enter...

User Manual
Page 22
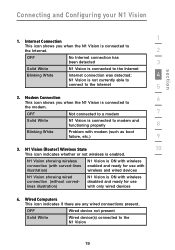
...information. These screens let you view your network status. The display can provide essential router-status information such as the state of the Internet connection to indicate that the N1 Vision is a powerful instrument for troubleshooting. Push the right key (>) or the left ...Startup" screen will appear. Information Screens After the N1 Vision has finished starting up state. Connecting and Configuring your N1 Vision Interactive Display The N1 Vision's interactive display is currently in the boot-up and the Plug-and-Play Router Setup process has been completed, the first in a...
...information. These screens let you view your network status. The display can provide essential router-status information such as the state of the Internet connection to indicate that the N1 Vision is a powerful instrument for troubleshooting. Push the right key (>) or the left ...Startup" screen will appear. Information Screens After the N1 Vision has finished starting up state. Connecting and Configuring your N1 Vision Interactive Display The N1 Vision's interactive display is currently in the boot-up and the Plug-and-Play Router Setup process has been completed, the first in a...
User Manual
Page 23
... devices 4. N1 Vision (Router) Wireless State 10 This icon indicates whether or not wireless is ON with wireless disabled and ready for use with modem (such as boot failure, etc.) 9 3. N1 Vision showing wireless connection (with curved-lines illustration) N1 Vision is ON with wireless enabled and ready for use with wireless and wired devices N1 Vision showing wired connection (without curvedlines illustration) N1 Vision is enabled...
... devices 4. N1 Vision (Router) Wireless State 10 This icon indicates whether or not wireless is ON with wireless disabled and ready for use with modem (such as boot failure, etc.) 9 3. N1 Vision showing wireless connection (with curved-lines illustration) N1 Vision is ON with wireless enabled and ready for use with wireless and wired devices N1 Vision showing wired connection (without curvedlines illustration) N1 Vision is enabled...
User Manual
Page 28
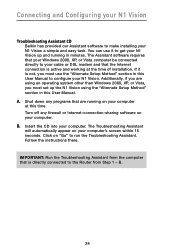
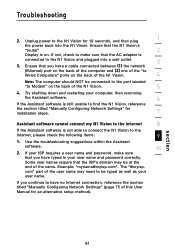
Additionally, if you are running in this time. Connecting and Configuring your N1 Vision Troubleshooting Assistant CD Belkin has provided our Assistant software to run the Troubleshooting Assistant. Click on your computer at the time of installation. If it to the Router from the computer that your Windows 2000, XP, or Vista computer be connected...
Additionally, if you are running in this time. Connecting and Configuring your N1 Vision Troubleshooting Assistant CD Belkin has provided our Assistant software to run the Troubleshooting Assistant. Click on your computer at the time of installation. If it to the Router from the computer that your Windows 2000, XP, or Vista computer be connected...
User Manual
Page 32
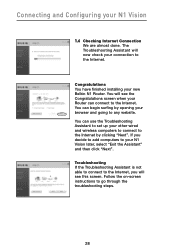
...this screen. Connecting and Configuring your connection to the Internet. Follow the on-screen instructions to your new Belkin N1 Router. If you will now check your N1 Vision 1.6 Checking Internet Connection We are almost done. You can connect to the Internet. The Troubleshooting Assistant will ... by opening your Router can begin surfing by clicking "Next". Congratulations You have finished installing your N1 Vision later, select "Exit the Assistant" and then click "Next". You can use the Troubleshooting Assistant to set up your other wired and wireless computers to connect ...
...this screen. Connecting and Configuring your connection to the Internet. Follow the on-screen instructions to your new Belkin N1 Router. If you will now check your N1 Vision 1.6 Checking Internet Connection We are almost done. You can connect to the Internet. The Troubleshooting Assistant will ... by opening your Router can begin surfing by clicking "Next". Congratulations You have finished installing your N1 Vision later, select "Exit the Assistant" and then click "Next". You can use the Troubleshooting Assistant to set up your other wired and wireless computers to connect ...
User Manual
Page 48
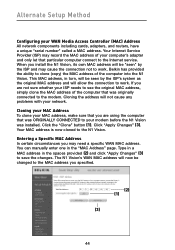
Belkin has provided the ability to the N1 Vision. Your MAC address is now cloned to clone (copy) the MAC address of the computer into the N1 Vision. Type in a MAC address in the spaces provided (2) and click "Apply Changes" (3) to work...your ISP needs to see the original MAC address, simply clone the MAC address of your network. The N1 Vision's WAN MAC address will not cause any problems with your computer's adapter and only let that was installed... (MAC) Address All network components including cards, adapters, and routers, have a unique "serial number" called a MAC address.
Belkin has provided the ability to the N1 Vision. Your MAC address is now cloned to clone (copy) the MAC address of the computer into the N1 Vision. Type in a MAC address in the spaces provided (2) and click "Apply Changes" (3) to work...your ISP needs to see the original MAC address, simply clone the MAC address of your network. The N1 Vision's WAN MAC address will not cause any problems with your computer's adapter and only let that was installed... (MAC) Address All network components including cards, adapters, and routers, have a unique "serial number" called a MAC address.
User Manual
Page 50
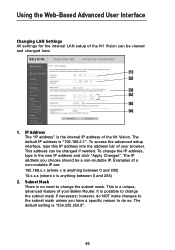
... mask. Using the Web-Based Advanced User Interface Changing LAN Settings All settings for the internal LAN setup of the N1 Vision can be changed here. (1) (2) (3) (4) (5) (6) 1. This address can be a non-routable IP. Subnet Mask There is the ...N1 Vision. This is anything between 0 and 255) 2. The IP address you have a specific reason to the subnet mask unless you choose should be viewed and changed if needed. Examples of a non-routable IP are: 192.168.x.x (where x is anything between 0 and 255) 10.x.x.x (where x is a unique, advanced feature of your Belkin Router...
... mask. Using the Web-Based Advanced User Interface Changing LAN Settings All settings for the internal LAN setup of the N1 Vision can be changed here. (1) (2) (3) (4) (5) (6) 1. This address can be a non-routable IP. Subnet Mask There is the ...N1 Vision. This is anything between 0 and 255) 2. The IP address you have a specific reason to the subnet mask unless you choose should be viewed and changed if needed. Examples of a non-routable IP are: 192.168.x.x (where x is anything between 0 and 255) 10.x.x.x (where x is a unique, advanced feature of your Belkin Router...
User Manual
Page 53
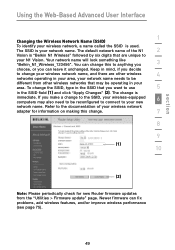
... Keep in your area, your network name needs to your N1 Vision. Refer to anything you 3 choose, or you decide to change . 7 8 9 (1) 10 (2) Note: Please periodically check for new Router firmware updates from other wireless 4 networks operating in mind, if you can leave it unchanged.... section Using the Web-Based Advanced User Interface 1 Changing the Wireless Network Name (SSID) To identify your wireless network, a name called the SSID is "Belkin N1 Wireless" followed by six digits that are other wireless networks that you make a change is your network name. If...
... Keep in your area, your network name needs to your N1 Vision. Refer to anything you 3 choose, or you decide to change . 7 8 9 (1) 10 (2) Note: Please periodically check for new Router firmware updates from other wireless 4 networks operating in mind, if you can leave it unchanged.... section Using the Web-Based Advanced User Interface 1 Changing the Wireless Network Name (SSID) To identify your wireless network, a name called the SSID is "Belkin N1 Wireless" followed by six digits that are other wireless networks that you make a change is your network name. If...
User Manual
Page 58
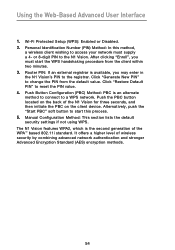
...or Disabled. 2. It offers a higher level of wireless security by combining advanced network authentication and stronger Advanced Encryption Standard (AES) encryption methods. 54 After clicking "Enroll", you may enter in the N1 Vision's PIN to the registrar. Router PIN: If an external registrar is an alternate method... to connect to change the PIN from the client within two minutes. 3. Click "Restore Default PIN" to the N1 Vision. or 8-digit PIN to reset the...
...or Disabled. 2. It offers a higher level of wireless security by combining advanced network authentication and stronger Advanced Encryption Standard (AES) encryption methods. 54 After clicking "Enroll", you may enter in the N1 Vision's PIN to the registrar. Router PIN: If an external registrar is an alternate method... to connect to change the PIN from the client within two minutes. 3. Click "Restore Default PIN" to the N1 Vision. or 8-digit PIN to reset the...

User Manual
Page 74
...Using the Web-Based Advanced User Interface Restarting the Router Sometimes it begins working improperly. The following message will appear. Click the "Restart Router" button. 2. Restarting the Router can take up to restart or reboot the Router if it may be restarted. The following message will... appear. If not, type in the Router's address (default = 192.168.2.1) into the navigation...
...Using the Web-Based Advanced User Interface Restarting the Router Sometimes it begins working improperly. The following message will appear. Click the "Restart Router" button. 2. Restarting the Router can take up to restart or reboot the Router if it may be restarted. The following message will... appear. If not, type in the Router's address (default = 192.168.2.1) into the navigation...

User Manual
Page 75
... Click the "Restore Defaults" button. 4 5 6 2. Click "OK". 7 8 9 3. It is recommended that you restore all of the settings in the Router's address (default = 192.168.2.1) into the navigation bar of the defaults. 3 1. The following message will appear. A 60-second countdown will be restored. It... can take up your browser. 71 It is important not to turn the power to the Router off during the restart. 4. The following message will appear. section Using the Web-Based Advanced User Interface 1 Restoring Factory Default Settings ...
... Click the "Restore Defaults" button. 4 5 6 2. Click "OK". 7 8 9 3. It is recommended that you restore all of the settings in the Router's address (default = 192.168.2.1) into the navigation bar of the defaults. 3 1. The following message will appear. A 60-second countdown will be restored. It... can take up your browser. 71 It is important not to turn the power to the Router off during the restart. 4. The following message will appear. section Using the Web-Based Advanced User Interface 1 Restoring Factory Default Settings ...

User Manual
Page 78
It will appear on the screen. Click "OK". 4. A 60-second countdown will take up to 60 seconds for the configuration restoration to continue. When the countdown reaches zero, the Router's configuration will appear. If not, type in the Router's address (default = 192.168.2.1) into the navigation bar of your browser. 74 Using the Web-Based Advanced User Interface 2. A reminder window will be asked if you want to complete. The Router home page should appear automatically. You will be restored. Click "OK". 3.
It will appear on the screen. Click "OK". 4. A 60-second countdown will take up to 60 seconds for the configuration restoration to continue. When the countdown reaches zero, the Router's configuration will appear. If not, type in the Router's address (default = 192.168.2.1) into the navigation bar of your browser. 74 Using the Web-Based Advanced User Interface 2. A reminder window will be asked if you want to complete. The Router home page should appear automatically. You will be restored. Click "OK". 3.
User Manual
Page 79
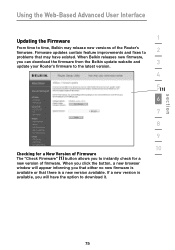
Checking for a new version of the Router's firmware. If a new version is available, you will appear informing you that either no new firmware is available or that may release new versions of firmware. When Belkin releases new firmware, you to download it. 1 2 3 4 5(1) 6 7 8 9 10 75 Firmware updates ... a new browser window will have existed. section Using the Web-Based Advanced User Interface Updating the Firmware From time to time, Belkin may have the option to instantly check for a New Version of Firmware The "Check Firmware" (1) button allows you can download the ...
Checking for a new version of the Router's firmware. If a new version is available, you will appear informing you that either no new firmware is available or that may release new versions of firmware. When Belkin releases new firmware, you to download it. 1 2 3 4 5(1) 6 7 8 9 10 75 Firmware updates ... a new browser window will have existed. section Using the Web-Based Advanced User Interface Updating the Firmware From time to time, Belkin may have the option to instantly check for a New Version of Firmware The "Check Firmware" (1) button allows you can download the ...

User Manual
Page 81
To update the firmware, follow the next steps 4 in "Updating the Router's Firmware". 5 Updating the N1 Vision's Firmware 6 1. Using the Web-Based Advanced User Interface 1 3. A window will see the following window. 2 Click "Close". Select the file by double-clicking on the file name. section 77 In the "Firmware Update" page, click 7 "Browse". When the save is complete, you will open that allows you to the firmware file you downloaded. The download of the firmware update file. 9 10 2. Browse to 8 select the location of the 3 firmware is complete.
To update the firmware, follow the next steps 4 in "Updating the Router's Firmware". 5 Updating the N1 Vision's Firmware 6 1. Using the Web-Based Advanced User Interface 1 3. A window will see the following window. 2 Click "Close". Select the file by double-clicking on the file name. section 77 In the "Firmware Update" page, click 7 "Browse". When the save is complete, you will open that allows you to the firmware file you downloaded. The download of the firmware update file. 9 10 2. Browse to 8 select the location of the 3 firmware is complete.
User Manual
Page 95
...myisp.com". com" part of the user name may be at the end of the N1 Vision. 4 Note: The computer should NOT be typed as well as your user name and password correctly. Ensure that the N1 Vision's "router" 2 Display is on. Use the troubleshooting suggestions within the Assistant software. 10 2. ... your ISP requires a user name and password, make sure that the AC adapter is not able to connect the N1 Vision to the N1 Vision and plugged into the N1 Vision. If your computer, then rerunning the Assistant software. 6 If the Assistant software is still unable to find the...
...myisp.com". com" part of the user name may be at the end of the N1 Vision. 4 Note: The computer should NOT be typed as well as your user name and password correctly. Ensure that the N1 Vision's "router" 2 Display is on. Use the troubleshooting suggestions within the Assistant software. 10 2. ... your ISP requires a user name and password, make sure that the AC adapter is not able to connect the N1 Vision to the N1 Vision and plugged into the N1 Vision. If your computer, then rerunning the Assistant software. 6 If the Assistant software is still unable to find the...

User Manual
Page 99
If you have 7 a list of "Available Networks"-those wireless networks it can connect to. 8 Does the name of your N1 Vision. They should be as follows: 3 • The "router" icon should be on. • The "radio wave" icon above the "router" icon should be on. 4 • The "modem" light should be on, and not blinking. •...
If you have 7 a list of "Available Networks"-those wireless networks it can connect to. 8 Does the name of your N1 Vision. They should be as follows: 3 • The "router" icon should be on. • The "radio wave" icon above the "router" icon should be on. 4 • The "modem" light should be on, and not blinking. •...

