User Manual
Page 2
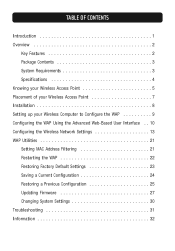
TABLE OF CONTENTS Introduction 1 Overview 2 Key Features 2 Package Contents 3 System Requirements 3 Specifications 4 Knowing your Wireless Access Point 5 Placement of your Wireless Access Point 7 Installation 8 Setting up your Wireless Computer to Configure the WAP 9 Configuring the WAP Using the Advanced Web-Based User Interface . . 10 Configuring the Wireless Network Settings 13 WAP Utilities 21 Setting MAC Address Filtering 21 Restarting the WAP 22...
TABLE OF CONTENTS Introduction 1 Overview 2 Key Features 2 Package Contents 3 System Requirements 3 Specifications 4 Knowing your Wireless Access Point 5 Placement of your Wireless Access Point 7 Installation 8 Setting up your Wireless Computer to Configure the WAP 9 Configuring the WAP Using the Advanced Web-Based User Interface . . 10 Configuring the Wireless Network Settings 13 WAP Utilities 21 Setting MAC Address Filtering 21 Restarting the WAP 22...

User Manual
Page 5
.... Applications and Advantages • Economically connect multiple wireless computers to a network. Package Contents • Belkin 54g Wireless Network Access Point • Vertical Mounting Base (optional use) &#...8226; Power Supply • User Manual System Requirements • At least one computer with an installed 54g or 802.11b-compliant wireless Ethernet adapter • TCP/IP networking protocol installed on -board makes for a complicated networking setup. OVERVIEW Dynamic Host Configuration...
.... Applications and Advantages • Economically connect multiple wireless computers to a network. Package Contents • Belkin 54g Wireless Network Access Point • Vertical Mounting Base (optional use) &#...8226; Power Supply • User Manual System Requirements • At least one computer with an installed 54g or 802.11b-compliant wireless Ethernet adapter • TCP/IP networking protocol installed on -board makes for a complicated networking setup. OVERVIEW Dynamic Host Configuration...
User Manual
Page 10
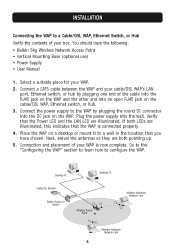
... port, Ethernet switch, or hub by plugging the round DC connector into the wall. Desktop PC Cable/DSL Modem Desktop PC Belkin Router or Switch Wireless Access Point Wireless Notebook Network Card Wireless Notebook Network Card 8 Select a suitable place for your box. Connect the power supply to the WAP by plugging one end ...WAP and the other end into an open RJ45 jack on the cable/DSL WAP, Ethernet switch, or hub. 3. Go to the "Configuring the WAP" section to learn how to configure the WAP. You should have chosen. If both pointing up. 5. Place the WAP on the WAP.
... port, Ethernet switch, or hub by plugging the round DC connector into the wall. Desktop PC Cable/DSL Modem Desktop PC Belkin Router or Switch Wireless Access Point Wireless Notebook Network Card Wireless Notebook Network Card 8 Select a suitable place for your box. Connect the power supply to the WAP by plugging one end ...WAP and the other end into an open RJ45 jack on the cable/DSL WAP, Ethernet switch, or hub. 3. Go to the "Configuring the WAP" section to learn how to configure the WAP. You should have chosen. If both pointing up. 5. Place the WAP on the WAP.
User Manual
Page 11
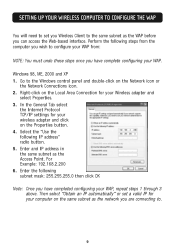
... WAP from: NOTE: You must undo these steps once you can access the Web-based interface. Go to the Windows control panel and double-click on the Network icon or the Network Connections icon. 2. SETTING UP YOUR WIRELESS COMPUTER TO CONFIGURE THE WAP You will need to set a valid IP for your... computer on the same subnet as the network you have complete configuring your WAP. Enter and IP address in the same subnet as the Access Point.
... WAP from: NOTE: You must undo these steps once you can access the Web-based interface. Go to the Windows control panel and double-click on the Network icon or the Network Connections icon. 2. SETTING UP YOUR WIRELESS COMPUTER TO CONFIGURE THE WAP You will need to set a valid IP for your... computer on the same subnet as the network you have complete configuring your WAP. Enter and IP address in the same subnet as the Access Point.

User Manual
Page 12
... login screen, leave the password blank and click the "Submit" button to log in. To make changes, there are two ways that the computer can access the WAP's web-based advanced user interface. Clicking the "Login" button or clicking on the home page will see the section in this manual titled... after a specified period of the links on any changes to the WAP's settings, you can be changed from one to make any one of time. CONFIGURING THE WAP USING THE ADVANCED WEB-BASED USER INTERFACE Using your browser, type "192.168.2.254" (do not type in anything else such as "http...
... login screen, leave the password blank and click the "Submit" button to log in. To make changes, there are two ways that the computer can access the WAP's web-based advanced user interface. Clicking the "Login" button or clicking on the home page will see the section in this manual titled... after a specified period of the links on any changes to the WAP's settings, you can be changed from one to make any one of time. CONFIGURING THE WAP USING THE ADVANCED WEB-BASED USER INTERFACE Using your browser, type "192.168.2.254" (do not type in anything else such as "http...

User Manual
Page 13
Pressing this page. (2) (3) (4) (1) (6) (5) (7) (1) Quick Navigation Links You can be reached from this button will see when you access to the WAP's help pages. Help is also available on many pages by clicking "more info" next to certain sections of the WAP's advanced UI ... pages can go directly to any of each page. 11 The links are divided into logical categories and grouped by clicking directly on these links. CONFIGURING THE WAP USING THE ADVANCED WEB-BASED USER INTERFACE Understanding the Advanced Web-Based User Interface The home page is the first page you will...
Pressing this page. (2) (3) (4) (1) (6) (5) (7) (1) Quick Navigation Links You can be reached from this button will see when you access to the WAP's help pages. Help is also available on many pages by clicking "more info" next to certain sections of the WAP's advanced UI ... pages can go directly to any of each page. 11 The links are divided into logical categories and grouped by clicking directly on these links. CONFIGURING THE WAP USING THE ADVANCED WEB-BASED USER INTERFACE Understanding the Advanced Web-Based User Interface The home page is the first page you will...
User Manual
Page 14
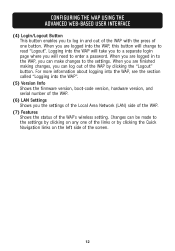
When you are logged into the WAP, this button will need to enter a password. CONFIGURING THE WAP USING THE ADVANCED WEB-BASED USER INTERFACE (4) Login/Logout Button This button enables you to log in to the WAP, you can make ... clicking the "Logout" button. Logging into the WAP". (5) Version Info Shows the firmware version, boot-code version, hardware version, and serial number of the WAP's wireless setting. When you are finished making changes, you the settings of the Local Area Network (LAN) side of the WAP. (7) Features Shows the status of...
When you are logged into the WAP, this button will need to enter a password. CONFIGURING THE WAP USING THE ADVANCED WEB-BASED USER INTERFACE (4) Login/Logout Button This button enables you to log in to the WAP, you can make ... clicking the "Logout" button. Logging into the WAP". (5) Version Info Shows the firmware version, boot-code version, hardware version, and serial number of the WAP's wireless setting. When you are finished making changes, you the settings of the Local Area Network (LAN) side of the WAP. (7) Features Shows the status of...
User Manual
Page 15
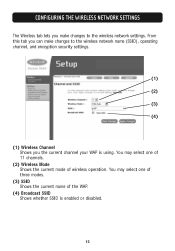
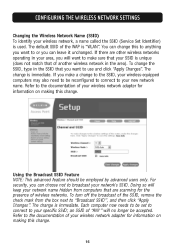
You may select one of three modes. (3) SSID Shows the current name of wireless operation. You may select one of 11 channels. (2) Wireless Mode Shows the current mode of the WAP. (4) Broadcast SSID Shows whether SSID is using. CONFIGURING THE WIRELESS NETWORK SETTINGS The Wireless tab lets you the current channel your WAP is enabled or disabled. 13 From this tab you can make changes to the wireless network name (SSID), operating channel, and encryption security settings. (1) (2) (3) (4) (1) Wireless Channel Shows you make changes to the wireless network settings.
You may select one of three modes. (3) SSID Shows the current name of wireless operation. You may select one of 11 channels. (2) Wireless Mode Shows the current mode of the WAP. (4) Broadcast SSID Shows whether SSID is using. CONFIGURING THE WIRELESS NETWORK SETTINGS The Wireless tab lets you the current channel your WAP is enabled or disabled. 13 From this tab you can make changes to the wireless network name (SSID), operating channel, and encryption security settings. (1) (2) (3) (4) (1) Wireless Channel Shows you make changes to the wireless network settings.
User Manual
Page 16
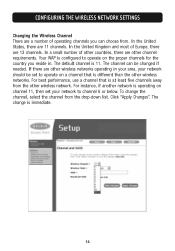
Your WAP is configured to operate on a channel that is at least five channels away from the drop-down list. The channel can choose from. For best performance, use a ... operating in . To change is 11. In the United Kingdom and most of Europe, there are 11 channels. CONFIGURING THE WIRELESS NETWORK SETTINGS Changing the Wireless Channel There are a number of operating channels you reside in your area, your network to channel 6 or below. In the United States, there are 13 ...
Your WAP is configured to operate on a channel that is at least five channels away from the drop-down list. The channel can choose from. For best performance, use a ... operating in . To change is 11. In the United Kingdom and most of Europe, there are 11 channels. CONFIGURING THE WIRELESS NETWORK SETTINGS Changing the Wireless Channel There are a number of operating channels you reside in your area, your network to channel 6 or below. In the United States, there are 13 ...
User Manual
Page 17
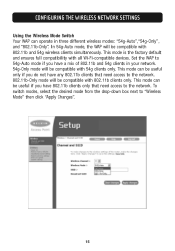
... next to 54g-Auto mode if you have a mix of 802.11b and 54g clients in three different wireless modes: "54g-Auto","54g-Only", and "802.11b-Only". CONFIGURING THE WIRELESS NETWORK SETTINGS Using the Wireless Mode Switch Your WAP can be useful only if you do not have any 802.11b clients that... need access to the network. 802.11b-Only mode will be useful if you have 802.11b clients only that...
... next to 54g-Auto mode if you have a mix of 802.11b and 54g clients in three different wireless modes: "54g-Auto","54g-Only", and "802.11b-Only". CONFIGURING THE WIRELESS NETWORK SETTINGS Using the Wireless Mode Switch Your WAP can be useful only if you do not have any 802.11b clients that... need access to the network. 802.11b-Only mode will be useful if you have 802.11b clients only that...
User Manual
Page 18
... mark from computers that you can leave it unchanged. To turn off the broadcast of the WAP is immediate. an SSID of your wireless network adapter for information on making this change this to anything you want to or you want to make a change . 16 Refer ... your SSID is immediate. Using the Broadcast SSID Feature NOTE: This advanced feature should be accepted. The change is "WLAN". CONFIGURING THE WIRELESS NETWORK SETTINGS Changing the Wireless Network Name (SSID) To identify your network name hidden from the box next to "Broadcast SSID", and then click "Apply Changes...
... mark from computers that you can leave it unchanged. To turn off the broadcast of the WAP is immediate. an SSID of your wireless network adapter for information on making this change this to anything you want to or you want to make a change . 16 Refer ... your SSID is immediate. Using the Broadcast SSID Feature NOTE: This advanced feature should be accepted. The change is "WLAN". CONFIGURING THE WIRELESS NETWORK SETTINGS Changing the Wireless Network Name (SSID) To identify your network name hidden from the box next to "Broadcast SSID", and then click "Apply Changes...
User Manual
Page 19
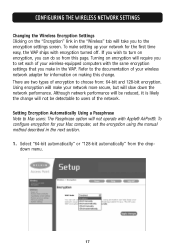
CONFIGURING THE WIRELESS NETWORK SETTINGS Changing the Wireless Encryption Settings Clicking on the "Encryption" link in the "Wireless" tab will take you... can do so from this change will not be reduced, it is likely the change . If you wish to turn on encryption, you to set the encryption using the manual method described in the WAP. To configure...making this page. Refer to choose from the dropdown menu. 17 To make your wireless-equipped computers with encryption turned off. Setting Encryption Automatically Using a Passphrase Note to users...
CONFIGURING THE WIRELESS NETWORK SETTINGS Changing the Wireless Encryption Settings Clicking on the "Encryption" link in the "Wireless" tab will take you... can do so from this change will not be reduced, it is likely the change . If you wish to turn on encryption, you to set the encryption using the manual method described in the WAP. To configure...making this page. Refer to choose from the dropdown menu. 17 To make your wireless-equipped computers with encryption turned off. Setting Encryption Automatically Using a Passphrase Note to users...
User Manual
Page 20
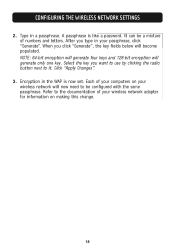
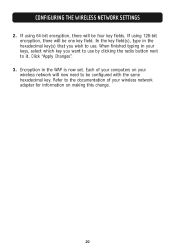
A passphrase is now set. It can be configured with the same passphrase. NOTE: 64-bit encryption will generate four keys and 128-bit encryption will become populated. Type in your wireless network will now need to be a mixture of numbers and letters. Encryption in the WAP is like... key fields below will generate only one key. After you type in a passphrase. Each of your wireless network adapter for information on your passphrase, click "Generate". CONFIGURING THE WIRELESS NETWORK SETTINGS 2. Refer to it. When you want to use by clicking the radio button next to...
A passphrase is now set. It can be configured with the same passphrase. NOTE: 64-bit encryption will generate four keys and 128-bit encryption will become populated. Type in your wireless network will now need to be a mixture of numbers and letters. Encryption in the WAP is like... key fields below will generate only one key. After you type in a passphrase. Each of your wireless network adapter for information on your passphrase, click "Generate". CONFIGURING THE WIRELESS NETWORK SETTINGS 2. Refer to it. When you want to use by clicking the radio button next to...
User Manual
Page 21
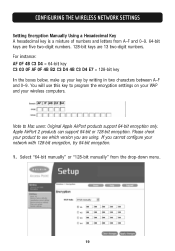
... WAP and your product to Mac users: Original Apple AirPort products support 64-bit encryption only. Please check your wireless computers. Note to see which version you cannot configure your key by writing in two characters between A-F and 0-9. Apple AirPort 2 products can support 64-bit or ...E7 = 128-bit key In the boxes below, make up your network with 128-bit encryption, try 64-bit encryption. 1. CONFIGURING THE WIRELESS NETWORK SETTINGS Setting Encryption Manually Using a Hexadecimal Key A hexadecimal key is a mixture of numbers and letters from the drop-down menu. 19
... WAP and your product to Mac users: Original Apple AirPort products support 64-bit encryption only. Please check your wireless computers. Note to see which version you cannot configure your key by writing in two characters between A-F and 0-9. Apple AirPort 2 products can support 64-bit or ...E7 = 128-bit key In the boxes below, make up your network with 128-bit encryption, try 64-bit encryption. 1. CONFIGURING THE WIRELESS NETWORK SETTINGS Setting Encryption Manually Using a Hexadecimal Key A hexadecimal key is a mixture of numbers and letters from the drop-down menu. 19
User Manual
Page 22
... will be one key field. If using 128-bit encryption, there will be four key fields. Refer to it. CONFIGURING THE WIRELESS NETWORK SETTINGS 2. Each of your wireless network adapter for information on your keys, select which key you wish to use by clicking the radio button next to the documentation of your...
... will be one key field. If using 128-bit encryption, there will be four key fields. Refer to it. CONFIGURING THE WIRELESS NETWORK SETTINGS 2. Each of your wireless network adapter for information on your keys, select which key you wish to use by clicking the radio button next to the documentation of your...
User Manual
Page 24
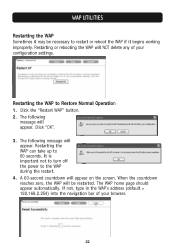
... following message will appear. Restarting or rebooting the WAP will appear on the screen. Click "OK". 3. A 60-second countdown will NOT delete any of your configuration settings. WAP UTILITIES Restarting the WAP Sometimes it begins working improperly. The WAP home page should appear automatically.
... following message will appear. Restarting or rebooting the WAP will appear on the screen. Click "OK". 3. A 60-second countdown will NOT delete any of your configuration settings. WAP UTILITIES Restarting the WAP Sometimes it begins working improperly. The WAP home page should appear automatically.
User Manual
Page 26
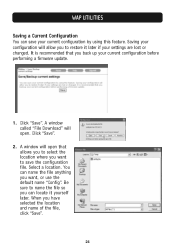
It is recommended that allows you to select the location where you want to save your current configuration by using this feature. A window will open . You can name the file anything you want , or use the default name "Config". Be sure to restore... it yourself later. Select a location. WAP UTILITIES Saving a Current Configuration You can save the configuration file. A window called "File Download" will allow you have selected the location and name of the file, click "Save". 24 Click "Save". When...
It is recommended that allows you to select the location where you want to save your current configuration by using this feature. A window will open . You can name the file anything you want , or use the default name "Config". Be sure to restore... it yourself later. Select a location. WAP UTILITIES Saving a Current Configuration You can save the configuration file. A window called "File Download" will allow you have selected the location and name of the file, click "Save". 24 Click "Save". When...
User Manual
Page 27
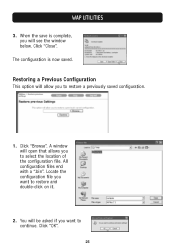
When the save is now saved. All configuration files end with a ".bin". You will allow you to restore and double-click on it. 2. Restoring a Previous Configuration This option will be asked if you want to select the location of the configuration file. A window will see the window below. Click "Close". The configuration is complete, you want to restore a previously saved configuration. 1. Click "OK". 25 Click "Browse". WAP UTILITIES 3. Locate the configuration file you will open that allows you to continue.
When the save is now saved. All configuration files end with a ".bin". You will allow you to restore and double-click on it. 2. Restoring a Previous Configuration This option will be asked if you want to select the location of the configuration file. A window will see the window below. Click "Close". The configuration is complete, you want to restore a previously saved configuration. 1. Click "OK". 25 Click "Browse". WAP UTILITIES 3. Locate the configuration file you will open that allows you to continue.

User Manual
Page 28
A reminder window will appear on the screen. A 60-second countdown will appear. It will be restored. Click "OK". 4. If not, type in the WAP's address (default = 192.168.2.254) into the navigation bar of your browser. 26 When the countdown reaches zero, the WAP's configuration will take up to 60 seconds for the configuration restoration to complete. WAP UTILITIES 3. The WAP home page should appear automatically.
A reminder window will appear on the screen. A 60-second countdown will appear. It will be restored. Click "OK". 4. If not, type in the WAP's address (default = 192.168.2.254) into the navigation bar of your browser. 26 When the countdown reaches zero, the WAP's configuration will take up to 60 seconds for the configuration restoration to complete. WAP UTILITIES 3. The WAP home page should appear automatically.


