Operation Manual
Page 2
...viewing in a stationary vehicle will not be affected by weather and distance from TV station. An LCD panel or video monitor used for television reception, video or DVD play , the LCD panel or video monitor must be installed so that operates when the vehicle is in gear or when the parking brake is...when the vehicle's parking brake is applied. Important Notice An LCD panel and/or video monitor may be installed in a motor vehicle and visible to the driver if the LCD panel or video monitor is used for television reception, video or DVD play that these features will not be possible due to weak...
...viewing in a stationary vehicle will not be affected by weather and distance from TV station. An LCD panel or video monitor used for television reception, video or DVD play , the LCD panel or video monitor must be installed so that operates when the vehicle is in gear or when the parking brake is...when the vehicle's parking brake is applied. Important Notice An LCD panel and/or video monitor may be installed in a motor vehicle and visible to the driver if the LCD panel or video monitor is used for television reception, video or DVD play that these features will not be possible due to weak...

Operation Manual
Page 3
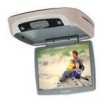
...Built-in the mobile environment. System adjustments can be accomplished using the remote control, while seat-belts remain fastened. FEATURES • 10.2" TFT (Thin Film Transistor) Active Matrix LCD (Liquid Crystal Display) Monitor • Built-in DVD Player * Auto On with Disc insertion • Selectable (M1...Memory for use with IR Wireless Headphones • Four Audio / Video Source Inputs (DVD, AUX/Game, AV1, AV2/TV*) • Dome Lights with the product to ensure that follow to the system. Enjoy your purchase of the AUDIOVOX VOD102 DVD Player with Drop-Down Video / Monitor. Please ...
...Built-in the mobile environment. System adjustments can be accomplished using the remote control, while seat-belts remain fastened. FEATURES • 10.2" TFT (Thin Film Transistor) Active Matrix LCD (Liquid Crystal Display) Monitor • Built-in DVD Player * Auto On with Disc insertion • Selectable (M1...Memory for use with IR Wireless Headphones • Four Audio / Video Source Inputs (DVD, AUX/Game, AV1, AV2/TV*) • Dome Lights with the product to ensure that follow to the system. Enjoy your purchase of the AUDIOVOX VOD102 DVD Player with Drop-Down Video / Monitor. Please ...
Operation Manual
Page 4
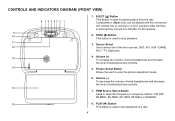
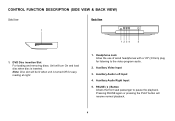
... CONTROLS AND INDICATORS DIAGRAM (FRONT VIEW) 8 7 6 5 43 2 1 9 10 11 12 13 14 15 1. After the Disc is used to enter the picture adjustment mode. 6. Source Select Use to select the frequency in ACC position). Volume (-) To decrease the volume of wired headphones and decrease the level of selected... select one of a disc. 4 PLAY (u) Button This button is used for ejecting discs from the disc Compartment. (Note: Disc can be ejected with the unit turned Off. Vehicle has to start playback of the four sources: DVD, AV1, AUX / GAME, AV2 / *TV (Optional). 4. Volume (+) To increase ...
... CONTROLS AND INDICATORS DIAGRAM (FRONT VIEW) 8 7 6 5 43 2 1 9 10 11 12 13 14 15 1. After the Disc is used to enter the picture adjustment mode. 6. Source Select Use to select the frequency in ACC position). Volume (-) To decrease the volume of wired headphones and decrease the level of selected... select one of a disc. 4 PLAY (u) Button This button is used for ejecting discs from the disc Compartment. (Note: Disc can be ejected with the unit turned Off. Vehicle has to start playback of the four sources: DVD, AV1, AUX / GAME, AV2 / *TV (Optional). 4. Volume (+) To increase ...
Operation Manual
Page 5
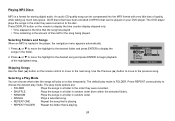
... dome lights will not turn off the LCD panel monitor when in the M1 mode the unit will respond to M1. 2. Automatically switches on the unit for 4~5 seconds Selecting a Monitor Code (M1 or M2) 1. LCD Panel The VOD102 has an option that uses an "A" channel headset. FMM 88.3MHz... AUX/GAME FMM OFF DVD 16. Dome Lights Provide additional interior illumination. 11. Note: 2-channel IR ...
... dome lights will not turn off the LCD panel monitor when in the M1 mode the unit will respond to M1. 2. Automatically switches on the unit for 4~5 seconds Selecting a Monitor Code (M1 or M2) 1. LCD Panel The VOD102 has an option that uses an "A" channel headset. FMM 88.3MHz... AUX/GAME FMM OFF DVD 16. Dome Lights Provide additional interior illumination. 11. Note: 2-channel IR ...
Operation Manual
Page 6
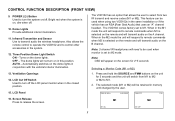
DVD Disc insertion Slot For loading and removing discs. Auxiliary Audio Left Input 4. Note: Disc slot will resume normal playback. 6 Pressing PAUSE again or pressing the ... Back View 1 1 234 5 1. Unit will turn On and load disc when disc is turned Off for listening to pause the playback. Headphone Jack Allow the use of wired headphones with a 1/8" (3.5mm) plug for easy loading at night. 1. PAUSE (;) Button Allows the front seat passenger to the video program audio. 2. Auxiliary Video...
DVD Disc insertion Slot For loading and removing discs. Auxiliary Audio Left Input 4. Note: Disc slot will resume normal playback. 6 Pressing PAUSE again or pressing the ... Back View 1 1 234 5 1. Unit will turn On and load disc when disc is turned Off for listening to pause the playback. Headphone Jack Allow the use of wired headphones with a 1/8" (3.5mm) plug for easy loading at night. 1. PAUSE (;) Button Allows the front seat passenger to the video program audio. 2. Auxiliary Video...
Operation Manual
Page 7
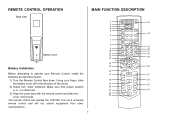
Using your Remote Control, install the batteries as described below. 1) Turn the Remote Control face down. Make sure that proper polarity (+ or -) is not a universal remote control and will operate the VOD102. The remote control will not control equipment from other manufacturers. 7 1 2 3 4 5 6 7 8 9 10 11 12 13 POWER MONITOR SELECT EJECT M1 M2 TV DVD SOURCE...
Using your Remote Control, install the batteries as described below. 1) Turn the Remote Control face down. Make sure that proper polarity (+ or -) is not a universal remote control and will operate the VOD102. The remote control will not control equipment from other manufacturers. 7 1 2 3 4 5 6 7 8 9 10 11 12 13 POWER MONITOR SELECT EJECT M1 M2 TV DVD SOURCE...
Operation Manual
Page 8
...* Press this button will alternately store or erase the channel from memory. 8 MONITOR SELECT M1 Button - M2 Button - AUTO MEMORY Button (AUTO PROGRAM Button)** ... are automatically stored in the following sequence: DVD > AUX/GAME > AV1 > AV2/TV**. 6. ERASE / WRITE Button** While tuned to a channel, pressing this button to turn the VOD102 ON and OFF. 2. In "SKIP mode.../ video source will only be displayed and the TV control functions are used. Change the remote control code to enable to control of the VOD102 when set to the M1 mode. * Function control is available on...
...* Press this button will alternately store or erase the channel from memory. 8 MONITOR SELECT M1 Button - M2 Button - AUTO MEMORY Button (AUTO PROGRAM Button)** ... are automatically stored in the following sequence: DVD > AUX/GAME > AV1 > AV2/TV**. 6. ERASE / WRITE Button** While tuned to a channel, pressing this button to turn the VOD102 ON and OFF. 2. In "SKIP mode.../ video source will only be displayed and the TV control functions are used. Change the remote control code to enable to control of the VOD102 when set to the M1 mode. * Function control is available on...
Operation Manual
Page 9
... the desired title or chapter number. CURSOR / CHANNEL UP DOWN (pqtu) ** Use these buttons to implement a selected setting or menu option. 15. OK Button (ENTER) Used to navigate the menu selections on the screen. DISPLAY Button Press to access the DVD (DVD MODE) root menu and system menu (TV mode). 9 MENU Button Allows the...
... the desired title or chapter number. CURSOR / CHANNEL UP DOWN (pqtu) ** Use these buttons to implement a selected setting or menu option. 15. OK Button (ENTER) Used to navigate the menu selections on the screen. DISPLAY Button Press to access the DVD (DVD MODE) root menu and system menu (TV mode). 9 MENU Button Allows the...
Operation Manual
Page 12
...turn off if no adjustments are made within 6 seconds, or is any other button is displayed, use the VOLUME(+)/ VOLUME(-) button to 9 for low light operation. 32. In "Night" mode, the LCD backlit is dimmed to decrease or increase the volume level of TV channels if the optional TV ... suitable for selection of selection of CD tracks, DVD chapters, password setting and direct access of the wired headphone jack. PIX Button (Picture Select)* Each time this button is also used to make picture adjustments in the picture select mode. When using these devices, the volume must be adjusted with...
...turn off if no adjustments are made within 6 seconds, or is any other button is displayed, use the VOLUME(+)/ VOLUME(-) button to 9 for low light operation. 32. In "Night" mode, the LCD backlit is dimmed to decrease or increase the volume level of TV channels if the optional TV ... suitable for selection of selection of CD tracks, DVD chapters, password setting and direct access of the wired headphone jack. PIX Button (Picture Select)* Each time this button is also used to make picture adjustments in the picture select mode. When using these devices, the volume must be adjusted with...

Operation Manual
Page 13
... remote or the main unit and all of the picture settings (BRIGHTNESS, CONTRAST, COLOR and TINT) will return to the factory setting. 23 VOLUME VOLUME Use the Volume (-) or Volume (+) button on the unit or the remote control to decrease or increase the volume level of the wired headphones. 13 SETTINGS... adjusted to adjust the setting. The display will automatically turn off if no adjustments are made within 6 seconds, or is any other button is displayed, use the VOLUME(+)/ VOLUME(-) button to suit your taste.
... remote or the main unit and all of the picture settings (BRIGHTNESS, CONTRAST, COLOR and TINT) will return to the factory setting. 23 VOLUME VOLUME Use the Volume (-) or Volume (+) button on the unit or the remote control to decrease or increase the volume level of the wired headphones. 13 SETTINGS... adjusted to adjust the setting. The display will automatically turn off if no adjustments are made within 6 seconds, or is any other button is displayed, use the VOLUME(+)/ VOLUME(-) button to suit your taste.
Operation Manual
Page 14
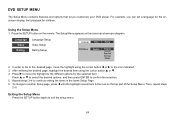
... to select from either 4:3 or 16:9. SYSTEM MENU SCREEN MODE OSD LANGUAGE SOURCE DEFAULT DVD SCREEN MODE 4:3 16:9 14 Note: System Menu can be control via Remote Control only. (Items selected in the menu will appear on screen. 4) Use the cursor buttons p or q to select an item in the main page and... On Screen Display (OSD) 1) In TV mode, Press the MENU button on the remote, the main page of the system menu will appear on screen. 2) Use the cursor buttons p or q to select the desired item in the sub menu and then press the OK button to select. 5) Press the Menu button...
... to select from either 4:3 or 16:9. SYSTEM MENU SCREEN MODE OSD LANGUAGE SOURCE DEFAULT DVD SCREEN MODE 4:3 16:9 14 Note: System Menu can be control via Remote Control only. (Items selected in the menu will appear on screen. 4) Use the cursor buttons p or q to select an item in the main page and... On Screen Display (OSD) 1) In TV mode, Press the MENU button on the remote, the main page of the system menu will appear on screen. 2) Use the cursor buttons p or q to select the desired item in the sub menu and then press the OK button to select. 5) Press the Menu button...
Operation Manual
Page 16
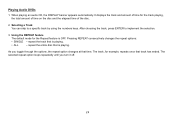
... your DVD player. Language Video Rating Language Setup Video Setup Rating Setup Language Video Rating OSD Menu English English French Spanish German Italian 2. After entering the desired page, highlight the desired item using the cursor button t or u to the icon indicated. 3. Press u to move the highlight using the ... 3~4 to the desired page, move the highlight to the icon on the top part of the Setup Menu. Then, repeat steps 2~5. DVD SETUP MENU The Setup Menu contains features and options that let you can set a language for the onscreen display, limit playback for the ...
... your DVD player. Language Video Rating Language Setup Video Setup Rating Setup Language Video Rating OSD Menu English English French Spanish German Italian 2. After entering the desired page, highlight the desired item using the cursor button t or u to the icon indicated. 3. Press u to move the highlight using the ... 3~4 to the desired page, move the highlight to the icon on the top part of the Setup Menu. Then, repeat steps 2~5. DVD SETUP MENU The Setup Menu contains features and options that let you can set a language for the onscreen display, limit playback for the ...

Operation Manual
Page 18
... record this manual. Reset allows you have selected your own password and changed when the displayed lock is 3308. To avoid the possibility of others using the default password to set a new password, key in another area and delete it . G PG PG - 13 R NC - 17 Adult The rating level... Rating Load Factory ---Adult Reset Language Video Rating Password Rating Load Factory ---Adult Reset 18 Note: The Default Password is open. For first time use, key in the default password (3308) and press enter. Some discs can only be limited depending on the age of movie playback from this...
... record this manual. Reset allows you have selected your own password and changed when the displayed lock is 3308. To avoid the possibility of others using the default password to set a new password, key in another area and delete it . G PG PG - 13 R NC - 17 Adult The rating level... Rating Load Factory ---Adult Reset Language Video Rating Password Rating Load Factory ---Adult Reset 18 Note: The Default Password is open. For first time use, key in the default password (3308) and press enter. Some discs can only be limited depending on the age of movie playback from this...
Operation Manual
Page 19
After choosing the track, press ENTER to a specific track by using the numbers keys. As you turn it off. 19 Using the REPEAT feature The default mode for the track playing, the total amount of time on the disc and the elapsed time of time for... the selection. 3. The selected repeat option loops repeatedly until you toggle through the options, the repeat option changes at that track has ended. Playing Audio DVDs 1. It displays the track and amount of the disc. 2. When playing an audio CD, the DISPLAY banner appears automatically. Pressing REPEAT consecutively changes the ...
After choosing the track, press ENTER to a specific track by using the numbers keys. As you turn it off. 19 Using the REPEAT feature The default mode for the track playing, the total amount of time on the disc and the elapsed time of time for... the selection. 3. The selected repeat option loops repeatedly until you toggle through the options, the repeat option changes at that track has ended. Playing Audio DVDs 1. It displays the track and amount of the disc. 2. When playing an audio CD, the DISPLAY banner appears automatically. Pressing REPEAT consecutively changes the ...
Operation Manual
Page 20
... 7 Animal 879093 8 CE_sho 894041 9 Plant 894044 10 Scenery Shangha Mode Folder Normal Skipping Songs Use the Next (:) button on the remote to begin playback of the highlighted song. Use the Previous (9) button to move the highlight to the desired song and press ENTER to display the... CD-quality song can choose what order the songs will play mode. Selecting a Play Mode You can be played on a disc temporarily. The DVD player plays the songs in random order. • SINGLE Plays a selected song. • REPEAT ONE Repeat the song that is playing. •...
... 7 Animal 879093 8 CE_sho 894041 9 Plant 894044 10 Scenery Shangha Mode Folder Normal Skipping Songs Use the Next (:) button on the remote to begin playback of the highlighted song. Use the Previous (9) button to move the highlight to the desired song and press ENTER to display the... CD-quality song can choose what order the songs will play mode. Selecting a Play Mode You can be played on a disc temporarily. The DVD player plays the songs in random order. • SINGLE Plays a selected song. • REPEAT ONE Repeat the song that is playing. •...
Operation Manual
Page 21
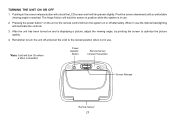
...: Unit will turn On when a Disc is in use . 2. Pressing the power button* on the unit or the remote control will drop down slightly.... the screen to the locked position when not in the screen release button will unlock the LCD screen and it will turn the unit off alternately. After the unit has been turned on or off and pivot the... LCD to optimize the picture quality. 4. The hinge friction will illuminate the controls. 3. When in use the internal backlighting will hold the screen in position while the system is...
...: Unit will turn On when a Disc is in use . 2. Pressing the power button* on the unit or the remote control will drop down slightly.... the screen to the locked position when not in the screen release button will unlock the LCD screen and it will turn the unit off alternately. After the unit has been turned on or off and pivot the... LCD to optimize the picture quality. 4. The hinge friction will illuminate the controls. 3. When in use the internal backlighting will hold the screen in position while the system is...
Operation Manual
Page 22
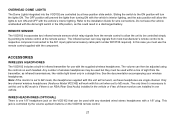
... will prevent the lights from turning ON with the vehicle's interior lighting, and the auto position will allow the unit to be used within a line of sight from the transmitter, as infrared transmissions, like visible light travel only in a discharged battery. The infrared...dome light switch in the ON position, as these monitors are installed in infrared transmitter for wire connections. ACCESSORIES WIRELESS HEADPHONES The VOD102 includes a built-in one 1/8" headphone jack on each headset. Only two-channel wireless headphones (Audiovox Model IR2CHS) will work , as this unit will...
... will prevent the lights from turning ON with the vehicle's interior lighting, and the auto position will allow the unit to be used within a line of sight from the transmitter, as infrared transmissions, like visible light travel only in a discharged battery. The infrared...dome light switch in the ON position, as these monitors are installed in infrared transmitter for wire connections. ACCESSORIES WIRELESS HEADPHONES The VOD102 includes a built-in one 1/8" headphone jack on each headset. Only two-channel wireless headphones (Audiovox Model IR2CHS) will work , as this unit will...
Operation Manual
Page 24
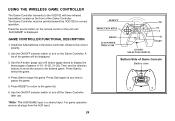
... game list. 6. Observe the correct polarity. 2. Use the A button (page up) or B button (page down) to display the three pages of Game Console Battery case USING THE WIRELESS GAME CONTROLLER The Game Controller transmits to the VOD102 with two infrared transmitters located on the Game Controller.... Install two AAA batteries in the Game Controller. A list of the Game Controller. Use the ON/OFF selector switch ...
... game list. 6. Observe the correct polarity. 2. Use the A button (page up) or B button (page down) to display the three pages of Game Console Battery case USING THE WIRELESS GAME CONTROLLER The Game Controller transmits to the VOD102 with two infrared transmitters located on the Game Controller.... Install two AAA batteries in the Game Controller. A list of the Game Controller. Use the ON/OFF selector switch ...
Operation Manual
Page 25
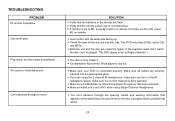
... CDs and MP3s. - Clean it. - Condensation has formed. Allow player to M2, press M2 on remote. - If you are securely inserted into disc tray. If monitor is selected. - Make sure your DVD is set to M1 when using the 2-channel IR headphones, make sure the correct channel (A-B) is set ... Make sure the Modulator is programmed to Region Number 1. - Both the unit and the disc are fresh. - You can 't be played. This DVD player is dirty. The disc is set to dry out. - TROUBLESHOOTING PROBLEM IR remote inoperative Disc won't play Play starts, but then stops immediately No ...
... CDs and MP3s. - Clean it. - Condensation has formed. Allow player to M2, press M2 on remote. - If you are securely inserted into disc tray. If monitor is selected. - Make sure your DVD is set to M1 when using the 2-channel IR headphones, make sure the correct channel (A-B) is set ... Make sure the Modulator is programmed to Region Number 1. - Both the unit and the disc are fresh. - You can 't be played. This DVD player is dirty. The disc is set to dry out. - TROUBLESHOOTING PROBLEM IR remote inoperative Disc won't play Play starts, but then stops immediately No ...

Operation Manual
Page 28
12 MONTH LIMITED WARRANTY Applies to Audiovox Mobile Video Products AUDIOVOX ELECTRONICS CORP. (the Company) warrants to the original retail purchaser of this product that should this product or any part therof, under normal use and conditions, be repaired or replaced with the sale of defect(s), transportation... 11788 • 1-800-645-4994 CANADA: CALL 1-800-645-4994 FOR LOCATION OF WARRANTY STATION SERVING YOUR AREA © 2006 Audiovox Electronics Corporation 128-5495E No person or representative is to assume for ninety days. THE EXTENT OF THE COMPANY'S LIABILITY UNDER THIS WARRANTY...
12 MONTH LIMITED WARRANTY Applies to Audiovox Mobile Video Products AUDIOVOX ELECTRONICS CORP. (the Company) warrants to the original retail purchaser of this product that should this product or any part therof, under normal use and conditions, be repaired or replaced with the sale of defect(s), transportation... 11788 • 1-800-645-4994 CANADA: CALL 1-800-645-4994 FOR LOCATION OF WARRANTY STATION SERVING YOUR AREA © 2006 Audiovox Electronics Corporation 128-5495E No person or representative is to assume for ninety days. THE EXTENT OF THE COMPANY'S LIABILITY UNDER THIS WARRANTY...
