Operation Manual
Page 1
VOD102 10.2" OVERHEAD LCD MONITOR WITH DVD PLAYER OPERATION MANUAL ® 128-7638
VOD102 10.2" OVERHEAD LCD MONITOR WITH DVD PLAYER OPERATION MANUAL ® 128-7638
Operation Manual
Page 2
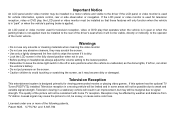
..., video or DVD play that these features will only function when the vehicle is used for vehicle information, system control, rear or side observation or navigation. The quality of the motor vehicle. An LCD panel or video monitor used for viewing prerecorded movies or playing video games. If this system has the optional TV Tuner (PODTVT2) installed: Television reception in a moving vehicle will not be installed so that operates...
..., video or DVD play that these features will only function when the vehicle is used for vehicle information, system control, rear or side observation or navigation. The quality of the motor vehicle. An LCD panel or video monitor used for viewing prerecorded movies or playing video games. If this system has the optional TV Tuner (PODTVT2) installed: Television reception in a moving vehicle will not be installed so that operates...

Operation Manual
Page 3
... allow children to unfasten seat-belts to change video media or make any adjustments to ensure that you and your family many years of the AUDIOVOX VOD102 DVD Player with Drop-Down Video / Monitor. Please note: Installation options vary, see the individual owner's manuals for use with IR Wireless Headphones • Four Audio / Video Source Inputs (DVD, AUX/Game, AV1, AV2/TV*) • Dome Lights with the product to the system...
... allow children to unfasten seat-belts to change video media or make any adjustments to ensure that you and your family many years of the AUDIOVOX VOD102 DVD Player with Drop-Down Video / Monitor. Please note: Installation options vary, see the individual owner's manuals for use with IR Wireless Headphones • Four Audio / Video Source Inputs (DVD, AUX/Game, AV1, AV2/TV*) • Dome Lights with the product to the system...
Operation Manual
Page 4
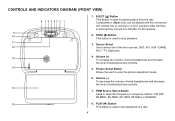
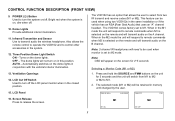
... frequency in ACC position). Source Select Use to enter the picture adjustment mode. 6. Volume (+) To increase the volume of wired headphones and increase the level of the four sources: DVD, AV1, AUX / GAME, AV2 / *TV (Optional). 4. PLAY (u) Button This button is removed the unit will turn Off after 15-20 seconds. 2. Volume (-) To decrease the volume of wired headphones and decrease the level of a disc. 4 CONTROLS AND INDICATORS DIAGRAM (FRONT VIEW) 8 7 6 5 43 2 1 9 10 11...
... frequency in ACC position). Source Select Use to enter the picture adjustment mode. 6. Volume (+) To increase the volume of wired headphones and increase the level of the four sources: DVD, AV1, AUX / GAME, AV2 / *TV (Optional). 4. PLAY (u) Button This button is removed the unit will turn Off after 15-20 seconds. 2. Volume (-) To decrease the volume of wired headphones and decrease the level of a disc. 4 CONTROLS AND INDICATORS DIAGRAM (FRONT VIEW) 8 7 6 5 43 2 1 9 10 11...
Operation Manual
Page 5
... memory until changed by the user. Ventilation Openings 14. OFF - CONTROL FUNCTION DESCRIPTION (FRONT VIEW) 9. AUTO - Note: OSD will be used when monitor is selected on in the closed position. 15. Bright red when the system is selected on the remote and will respond to turn the system on , dim when off. 10. LCD Cut Off Switch Used to remote commands when M2 is on /off the LCD panel monitor...
... memory until changed by the user. Ventilation Openings 14. OFF - CONTROL FUNCTION DESCRIPTION (FRONT VIEW) 9. AUTO - Note: OSD will be used when monitor is selected on in the closed position. 15. Bright red when the system is selected on the remote and will respond to turn the system on , dim when off. 10. LCD Cut Off Switch Used to remote commands when M2 is on /off the LCD panel monitor...
Operation Manual
Page 6
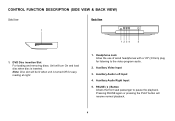
... playback. Auxiliary Video Input 3. Auxiliary Audio Right Input 5. PAUSE (;) Button Allows the front seat passenger to the video program audio. 2. Unit will be lit when unit is inserted. Auxiliary Audio Left Input 4. Pressing PAUSE again or pressing the PLAY button will resume normal playback. 6 Headphone Jack Allow the use of wired headphones with a 1/8" (3.5mm) plug for easy loading at night. 1. DVD Disc insertion Slot For loading and removing discs. CONTROL FUNCTION DESCRIPTION (SIDE VIEW & BACK VIEW) Side View Back View...
... playback. Auxiliary Video Input 3. Auxiliary Audio Right Input 5. PAUSE (;) Button Allows the front seat passenger to the video program audio. 2. Unit will be lit when unit is inserted. Auxiliary Audio Left Input 4. Pressing PAUSE again or pressing the PLAY button will resume normal playback. 6 Headphone Jack Allow the use of wired headphones with a 1/8" (3.5mm) plug for easy loading at night. 1. DVD Disc insertion Slot For loading and removing discs. CONTROL FUNCTION DESCRIPTION (SIDE VIEW & BACK VIEW) Side View Back View...
Operation Manual
Page 7
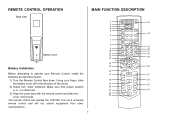
The remote control will not control equipment from other manufacturers. 7 1 2 3 4 5 6 7 8 9 10 11 12 13 POWER MONITOR SELECT EJECT M1 M2 TV DVD SOURCE 1 2 3 AUTO MEMORY 4 5 6 SKIP/ SEARCH 7 8 9 ERASE/ WRITE 0 VOLUME FMM CHANNEL DAY/ ON/OFF SELECT NIGHT PIX IRT RETURN DISPLAY ON/OFF MUTE 35 34 33 32 31 30 29 14 OK 15 28 MENU SETUP 16 17 REPEAT 27 AUDIO ZOOM 18 26 SUBTITLE A-B 19...
The remote control will not control equipment from other manufacturers. 7 1 2 3 4 5 6 7 8 9 10 11 12 13 POWER MONITOR SELECT EJECT M1 M2 TV DVD SOURCE 1 2 3 AUTO MEMORY 4 5 6 SKIP/ SEARCH 7 8 9 ERASE/ WRITE 0 VOLUME FMM CHANNEL DAY/ ON/OFF SELECT NIGHT PIX IRT RETURN DISPLAY ON/OFF MUTE 35 34 33 32 31 30 29 14 OK 15 28 MENU SETUP 16 17 REPEAT 27 AUDIO ZOOM 18 26 SUBTITLE A-B 19...
Operation Manual
Page 8
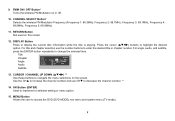
... remote control for TV functions. 4. SOURCE Button* Each time the button is pressed, the audio / video source will alternately store or erase the channel from memory. 8 SKIP / SEARCH Button** This button selects between SKIP and SEARCH mode. * Function control is available on the unit and the remote control. ** The TV Option will only be displayed and the TV control functions are used. MONITOR SELECT M1 Button - Change the remote control code to enable to the M2 mode. 3. AUTO MEMORY Button (AUTO PROGRAM Button)** When the AUTO MEMORY button is installed...
... remote control for TV functions. 4. SOURCE Button* Each time the button is pressed, the audio / video source will alternately store or erase the channel from memory. 8 SKIP / SEARCH Button** This button selects between SKIP and SEARCH mode. * Function control is available on the unit and the remote control. ** The TV Option will only be displayed and the TV control functions are used. MONITOR SELECT M1 Button - Change the remote control code to enable to the M2 mode. 3. AUTO MEMORY Button (AUTO PROGRAM Button)** When the AUTO MEMORY button is installed...
Operation Manual
Page 9
... setting or menu option. 15. Use the CHp to increase the channel number and use the number buttons to decrease the channel number. ** 14. Audio Subtitle 00:00:14 Chapter 1/1 Angle 1/1 1/1 5.1 Ch ENG Off Stop Subtitle 13. CURSOR / CHANNEL UP DOWN (pqtu) ** Use these buttons to display the current disc information while the disc is playing. DISPLAY Button Press to navigate the menu selections on the screen. CHANNEL SELECT Button* Selects...
... setting or menu option. 15. Use the CHp to increase the channel number and use the number buttons to decrease the channel number. ** 14. Audio Subtitle 00:00:14 Chapter 1/1 Angle 1/1 1/1 5.1 Ch ENG Off Stop Subtitle 13. CURSOR / CHANNEL UP DOWN (pqtu) ** Use these buttons to display the current disc information while the disc is playing. DISPLAY Button Press to navigate the menu selections on the screen. CHANNEL SELECT Button* Selects...
Operation Manual
Page 11
.... SETUP Button Press to display the Setup Menu which allows the user to mute the audio for wireless FMM and wired headphones. Pressing M1 then IRT ON/OFF will control the IR Transmitter for more information. 29. A-B Button Allow user to repeat the playback from point A to enlarge the picture when playing a DVD disc. ZOOM Button Press this button to change the DVD player options such as TV DISPLAY, OSD LANGUAGE, PARENTAL CONTROL...
.... SETUP Button Press to display the Setup Menu which allows the user to mute the audio for wireless FMM and wired headphones. Pressing M1 then IRT ON/OFF will control the IR Transmitter for more information. 29. A-B Button Allow user to repeat the playback from point A to enlarge the picture when playing a DVD disc. ZOOM Button Press this button to change the DVD player options such as TV DISPLAY, OSD LANGUAGE, PARENTAL CONTROL...
Operation Manual
Page 12
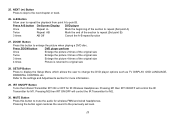
... eject the disc. 12 Once the desired adjustment bar is used to 9 for BRIGHTNESS, CONTRAST, COLOR, TINT or RESET. The display will not affect the volume of TV channels if the optional TV tuner (P/N PODTVT2) is pressed. 33. Note: The volume control will automatically turn off if no adjustments are made within 6 seconds, or is any other button is installed. 35. NUMBER Buttons Allow the user to enter numbers 0 to make picture adjustments...
... eject the disc. 12 Once the desired adjustment bar is used to 9 for BRIGHTNESS, CONTRAST, COLOR, TINT or RESET. The display will not affect the volume of TV channels if the optional TV tuner (P/N PODTVT2) is pressed. 33. Note: The volume control will automatically turn off if no adjustments are made within 6 seconds, or is any other button is installed. 35. NUMBER Buttons Allow the user to enter numbers 0 to make picture adjustments...

Operation Manual
Page 13
SETTINGS AND ADJUSTMENTS PICTURE ADJUSTMENTS When watching a program, the picture quality can be adjusted to decrease or increase the volume level of the wired headphones. 13 The display will automatically turn off if no adjustments are made within 6 seconds, or is any other button is displayed, use the VOLUME(+)/ VOLUME(-) button to adjust the setting. PIX (P) Button 1) Each time this button is pressed, the on screen picture adjustment displays the "adjustment bar" for BRIGHTNESS, CONTRAST, COLOR, TINT or RESET. 2) Once the desired adjustment bar...
SETTINGS AND ADJUSTMENTS PICTURE ADJUSTMENTS When watching a program, the picture quality can be adjusted to decrease or increase the volume level of the wired headphones. 13 The display will automatically turn off if no adjustments are made within 6 seconds, or is any other button is displayed, use the VOLUME(+)/ VOLUME(-) button to adjust the setting. PIX (P) Button 1) Each time this button is pressed, the on screen picture adjustment displays the "adjustment bar" for BRIGHTNESS, CONTRAST, COLOR, TINT or RESET. 2) Once the desired adjustment bar...
Operation Manual
Page 16
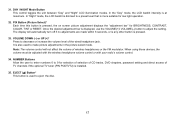
... the icon indicated. 3. Press the SETUP button on the screen as shown per diagram. DVD SETUP MENU The Setup Menu contains features and options that let you can set a language for the onscreen display, limit playback for the selected item. Press u to move the highlight using the cursor button p or q. 4. Exiting the Setup Menu Press the SETUP button again to the icon on the top part of the Setup Menu.
... the icon indicated. 3. Press the SETUP button on the screen as shown per diagram. DVD SETUP MENU The Setup Menu contains features and options that let you can set a language for the onscreen display, limit playback for the selected item. Press u to move the highlight using the cursor button p or q. 4. Exiting the Setup Menu Press the SETUP button again to the icon on the top part of the Setup Menu.
Operation Manual
Page 17
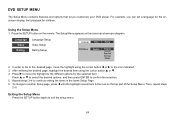
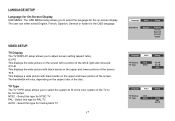
... Type 16:9 NTSC NTSC PAL AUTO VIDEO SETUP TV Display The TV DISPLAY setup allows you to adjust screen setting (aspect ratio). 4:3 PS This displays the wide picture on the screen with a portion of the left & right side removed. 4:3 LB This displays the wide picture with black bands on the upper and lower portions of the screen. 16:9 This displays a wide picture with black bands on the aspect ratio of...
... Type 16:9 NTSC NTSC PAL AUTO VIDEO SETUP TV Display The TV DISPLAY setup allows you to adjust screen setting (aspect ratio). 4:3 PS This displays the wide picture on the screen with a portion of the left & right side removed. 4:3 LB This displays the wide picture with black bands on the upper and lower portions of the screen. 16:9 This displays a wide picture with black bands on the aspect ratio of...

Operation Manual
Page 18
... control settings. G PG PG - 13 R NC - 17 Adult The rating level can record this manual. Reset allows you to reset all options to Adult. For first time use, key in a new four-digit password and press enter Load Factory The Load Factory - This password is always effective even after you have selected your own password and changed when the displayed lock is 3308. Language Video Rating Password...
... control settings. G PG PG - 13 R NC - 17 Adult The rating level can record this manual. Reset allows you to reset all options to Adult. For first time use, key in a new four-digit password and press enter Load Factory The Load Factory - This password is always effective even after you have selected your own password and changed when the displayed lock is 3308. Language Video Rating Password...
Operation Manual
Page 22
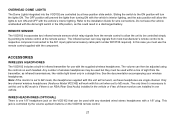
... the lights from the remote control to allow the lights to M2 mode. Only two-channel wireless headphones (Audiovox Model IR2CHS) will allow the unit to be used but they must use with a 1/8" plug. REMOTE SENSOR The VOD102 incorporates two infrared remote sensors which relay signals from turning ON with the dome light switch in the ON position, as these monitors are installed in a discharged battery. WIRED HEADPHONES (OPTIONAL) There is controlled by...
... the lights from the remote control to allow the lights to M2 mode. Only two-channel wireless headphones (Audiovox Model IR2CHS) will allow the unit to be used but they must use with a 1/8" plug. REMOTE SENSOR The VOD102 incorporates two infrared remote sensors which relay signals from turning ON with the dome light switch in the ON position, as these monitors are installed in a discharged battery. WIRED HEADPHONES (OPTIONAL) There is controlled by...
Operation Manual
Page 23
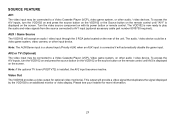
... input (Priority AUX) when an AUX input is now ready to play the audio and video signals from the source connected to AV1 input (optional accessory cable part number 8010730 required). To access the A/V inputs, turn the VOD102 on and press the source button on the VOD102 or the Source button on the screen. Video Out The VOD102 provides a video output for more information. 23 AUX / Game Source The VOD102 will accept an audio / video input through the 3 RCA jacks located on with its power button or remote control...
... input (Priority AUX) when an AUX input is now ready to play the audio and video signals from the source connected to AV1 input (optional accessory cable part number 8010730 required). To access the A/V inputs, turn the VOD102 on and press the source button on the VOD102 or the Source button on the screen. Video Out The VOD102 provides a video output for more information. 23 AUX / Game Source The VOD102 will accept an audio / video input through the 3 RCA jacks located on with its power button or remote control...
Operation Manual
Page 25
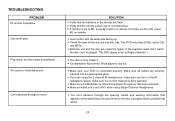
... - This DVD player is selected. - Condensation has formed. This DVD only plays DVDs, audio CDs and MP3s. - The disc is not obstructed. - Make sure the Modulator is connected properly. Verify that unit is set to dry out. - Make sure your DVD is ON and the proper Frequency has been selected. - If monitor is set to M2, press M2 on the IR headphone power, make sure you turn on remote...
... - This DVD player is selected. - Condensation has formed. This DVD only plays DVDs, audio CDs and MP3s. - The disc is not obstructed. - Make sure the Modulator is connected properly. Verify that unit is set to dry out. - Make sure your DVD is ON and the proper Frequency has been selected. - If monitor is set to M2, press M2 on the IR headphone power, make sure you turn on remote...
Operation Manual
Page 27
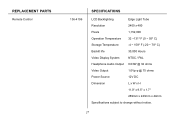
REPLACEMENT PARTS Remote Control 136-4196 SPECIFICATIONS LCD Backlighting Edge Light Tube Resolution 2400 x 480 Pixels 1,152,000 Operation Temperature 32 ~131º F (0 ~ 55º C) Storage Temperature -4 ~ 158º F (-20 ~ 70º C) Backlit life 30,000 Hours Video Display System NTSC / PAL Headphone Audio Output 0.03W @ 32 ohms Video Output 1.0Vp-p @ 75 ohms Power Source 12V DC Dimension L x W x H 11.0" x 9.5" x 1.7" 289mm x 243mm x 44mm Specifications subject to change without notice. 27
REPLACEMENT PARTS Remote Control 136-4196 SPECIFICATIONS LCD Backlighting Edge Light Tube Resolution 2400 x 480 Pixels 1,152,000 Operation Temperature 32 ~131º F (0 ~ 55º C) Storage Temperature -4 ~ 158º F (-20 ~ 70º C) Backlit life 30,000 Hours Video Display System NTSC / PAL Headphone Audio Output 0.03W @ 32 ohms Video Output 1.0Vp-p @ 75 ohms Power Source 12V DC Dimension L x W x H 11.0" x 9.5" x 1.7" 289mm x 243mm x 44mm Specifications subject to change without notice. 27

Operation Manual
Page 28
...the terms of this product. dated bill of sale), specification of defect(s), transportation prepaid, to the Company at the Company's option) without charge for parts and repair labor. ANY ACTION FOR BREACH OF ANY WARRANTY HEREUNDER ...LOCATION OF WARRANTY STATION SERVING YOUR AREA © 2006 Audiovox Electronics Corporation 128-5495E This Warranty does not extend to the elimination of externally generated static or noise, to correction of antenna problems, to costs incurred for installation, removal or reinstallation of the product, or to damage to digital memory cards, discs, speakers...
...the terms of this product. dated bill of sale), specification of defect(s), transportation prepaid, to the Company at the Company's option) without charge for parts and repair labor. ANY ACTION FOR BREACH OF ANY WARRANTY HEREUNDER ...LOCATION OF WARRANTY STATION SERVING YOUR AREA © 2006 Audiovox Electronics Corporation 128-5495E This Warranty does not extend to the elimination of externally generated static or noise, to correction of antenna problems, to costs incurred for installation, removal or reinstallation of the product, or to damage to digital memory cards, discs, speakers...


