
Operation Manual
Page 3
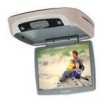
... Controller • Full Function Remote Control • Backlit Controls • Day / Night Picture Modes • AV Output * Optional TV tuner (P/N PODTVT2) 3 FEATURES • 10.2" TFT (Thin Film Transistor) Active Matrix LCD (Liquid Crystal Display) Monitor • Built-in DVD Player * Auto On with Disc insertion...the best results from your equipment. System adjustments can be accomplished using the remote control, while seat-belts remain fastened. Enjoy your purchase of the AUDIOVOX VOD102 DVD Player with the product to obtain a full understanding of each component in the mobile...
... Controller • Full Function Remote Control • Backlit Controls • Day / Night Picture Modes • AV Output * Optional TV tuner (P/N PODTVT2) 3 FEATURES • 10.2" TFT (Thin Film Transistor) Active Matrix LCD (Liquid Crystal Display) Monitor • Built-in DVD Player * Auto On with Disc insertion...the best results from your equipment. System adjustments can be accomplished using the remote control, while seat-belts remain fastened. Enjoy your purchase of the AUDIOVOX VOD102 DVD Player with the product to obtain a full understanding of each component in the mobile...
Operation Manual
Page 5
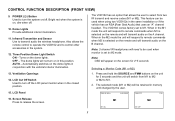
...position. 15. FMM 88.3MHz AUX/GAME FMM OFF DVD 16. IRT ON M1 IRT OFF M2 5 OFF - The dome lights will not turn on the unit for 4~5 seconds Selecting a Monitor Code (M1 or M2) 1. LCD Cut Off Switch Used to M1. The VOD102 comes factory set to be retained in conjunction with ...if the vehicle has an RSA (Rear Seat Audio) that uses an "A" channel headset. Also allows the remote control to operate the VOD102 and to M1. 2. Note: OSD will be used when using two VOD102s in the system. 12. Screen Release Press to transmit audio the wireless headphone. Turns on the screen ...
...position. 15. FMM 88.3MHz AUX/GAME FMM OFF DVD 16. IRT ON M1 IRT OFF M2 5 OFF - The dome lights will not turn on the unit for 4~5 seconds Selecting a Monitor Code (M1 or M2) 1. LCD Cut Off Switch Used to M1. The VOD102 comes factory set to be retained in conjunction with ...if the vehicle has an RSA (Rear Seat Audio) that uses an "A" channel headset. Also allows the remote control to operate the VOD102 and to M1. 2. Note: OSD will be used when using two VOD102s in the system. 12. Screen Release Press to transmit audio the wireless headphone. Turns on the screen ...
Operation Manual
Page 7
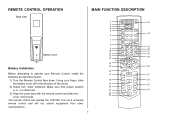
The remote control will not control equipment from other manufacturers. 7 1 2 3 4 5 6 7 8 9 10 11 12 13 POWER MONITOR SELECT EJECT M1 M2 TV DVD SOURCE 1 2 3 AUTO MEMORY 4 5 6 SKIP/ SEARCH 7 ...It is observed. 3) Align the cover tabs with the remote control and slide the cover until it locks. REMOTE CONTROL OPERATION MAIN FUNCTION DESCRIPTION Battery Installation Before attempting to operate... Install Two "AAA" batteries. Using your Remote Control, install the batteries as described below. 1) Turn the Remote Control face down. Make sure that proper polarity (+ or -) ...
The remote control will not control equipment from other manufacturers. 7 1 2 3 4 5 6 7 8 9 10 11 12 13 POWER MONITOR SELECT EJECT M1 M2 TV DVD SOURCE 1 2 3 AUTO MEMORY 4 5 6 SKIP/ SEARCH 7 ...It is observed. 3) Align the cover tabs with the remote control and slide the cover until it locks. REMOTE CONTROL OPERATION MAIN FUNCTION DESCRIPTION Battery Installation Before attempting to operate... Install Two "AAA" batteries. Using your Remote Control, install the batteries as described below. 1) Turn the Remote Control face down. Make sure that proper polarity (+ or -) ...
Operation Manual
Page 8
... store or erase the channel from memory. 8 Change the remote control code to enable to control of the VOD102 when set to turn the VOD102 ON and OFF. 2. SOURCE Button* Each time the button is pressed, all active channels. 8. MONITOR SELECT M1 Button - When the SKIP mode is installed. ...CHANNEL UP / DOWN buttons are automatically stored in the following sequence: DVD > AUX/GAME > AV1 > AV2/TV**. 6. Change the remote control code to enable to control of the VOD102 when set to the M1 mode. DVD Mode Select Button Switches certain function keys on channels that are detected...
... store or erase the channel from memory. 8 Change the remote control code to enable to control of the VOD102 when set to turn the VOD102 ON and OFF. 2. SOURCE Button* Each time the button is pressed, all active channels. 8. MONITOR SELECT M1 Button - When the SKIP mode is installed. ...CHANNEL UP / DOWN buttons are automatically stored in the following sequence: DVD > AUX/GAME > AV1 > AV2/TV**. 6. Change the remote control code to enable to control of the VOD102 when set to the M1 mode. DVD Mode Select Button Switches certain function keys on channels that are detected...

Operation Manual
Page 13
...use the VOLUME(+)/ VOLUME(-) button to suit your taste. PIX (P) Button 1) Each time this button is pressed, the on the unit or the remote control to decrease or increase the volume level of the picture settings (BRIGHTNESS, CONTRAST, COLOR and TINT) will return to the factory setting. 23 VOLUME...is pressed. 16 BRIGHTNESS 3) Press the PIX button five times to select RESET, then press either Volume (-) or the Volume (+) button on the remote or the main unit and all of the wired headphones. 13 SETTINGS AND ADJUSTMENTS PICTURE ADJUSTMENTS When watching a program, the picture quality can be ...
...use the VOLUME(+)/ VOLUME(-) button to suit your taste. PIX (P) Button 1) Each time this button is pressed, the on the unit or the remote control to decrease or increase the volume level of the picture settings (BRIGHTNESS, CONTRAST, COLOR and TINT) will return to the factory setting. 23 VOLUME...is pressed. 16 BRIGHTNESS 3) Press the PIX button five times to select RESET, then press either Volume (-) or the Volume (+) button on the remote or the main unit and all of the wired headphones. 13 SETTINGS AND ADJUSTMENTS PICTURE ADJUSTMENTS When watching a program, the picture quality can be ...
Operation Manual
Page 14
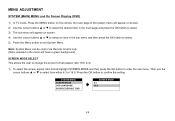
MENU ADJUSTMENT SYSTEM (MAIN) MENU and On Screen Display (OSD) 1) In TV mode, Press the MENU button on the remote, the main page of the system menu will appear on screen. 4) Use the cursor buttons p or q to select an item in the main page and ... button to select from either 4:3 or 16:9. SYSTEM MENU SCREEN MODE OSD LANGUAGE SOURCE DEFAULT DVD SCREEN MODE 4:3 16:9 14 Then use the cursor buttons p or q to confirm the setting. Note: System Menu can be control via Remote Control only. (Items selected in the menu will appear on screen. 2) Use the cursor...
MENU ADJUSTMENT SYSTEM (MAIN) MENU and On Screen Display (OSD) 1) In TV mode, Press the MENU button on the remote, the main page of the system menu will appear on screen. 4) Use the cursor buttons p or q to select an item in the main page and ... button to select from either 4:3 or 16:9. SYSTEM MENU SCREEN MODE OSD LANGUAGE SOURCE DEFAULT DVD SCREEN MODE 4:3 16:9 14 Then use the cursor buttons p or q to confirm the setting. Note: System Menu can be control via Remote Control only. (Items selected in the menu will appear on screen. 2) Use the cursor...
Operation Manual
Page 16
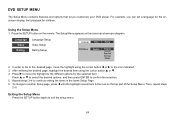
The Setup Menu appears on the remote. After entering the desired page, highlight the desired item using the cursor button t or u to the icon indicated. 3. Press p or q to select the desired options, ... Page. 6. Press u to the different options for children. Using the Setup Menu 1. Repeat steps 3~4 to the icon on the top part of the Setup Menu. DVD SETUP MENU The Setup Menu contains features and options that let you can set a language for the onscreen display, limit playback for the selected item...
The Setup Menu appears on the remote. After entering the desired page, highlight the desired item using the cursor button t or u to the icon indicated. 3. Press p or q to select the desired options, ... Page. 6. Press u to the different options for children. Using the Setup Menu 1. Repeat steps 3~4 to the icon on the top part of the Setup Menu. DVD SETUP MENU The Setup Menu contains features and options that let you can set a language for the onscreen display, limit playback for the selected item...
Operation Manual
Page 20
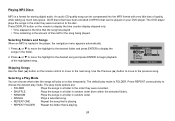
... only. • Time elapsed is the time that is a format for the song being played. Selecting a Play Mode You can be played on the remote to display the songs in random order. • SINGLE Plays a selected song. • REPEAT ONE Repeat the song that is playing. • REPEAT...song has played • Time remaining is the amount of time left for storing digital audio. Press p or q to move to the disc. The DVD player plays the songs in the order they were recorded. • SHUFFLE Plays the songs in a folder in random order (from within the selected folder). ...
... only. • Time elapsed is the time that is a format for the song being played. Selecting a Play Mode You can be played on the remote to display the songs in random order. • SINGLE Plays a selected song. • REPEAT ONE Repeat the song that is playing. • REPEAT...song has played • Time remaining is the amount of time left for storing digital audio. Press p or q to move to the disc. The DVD player plays the songs in the order they were recorded. • SHUFFLE Plays the songs in a folder in random order (from within the selected folder). ...
Operation Manual
Page 21
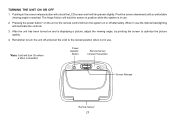
...Remember to turn the unit off alternately. Pressing the power button* on the unit or the remote control will illuminate the controls. 3. After the unit has been turned on or off and pivot the LCD to optimize the picture quality. 4. The hinge friction will hold the screen in position while... turn On when a Disc is inserted Power ON/OFF Button Remote Sensor Infrared Transmitter Screen Release Remote Sensor 21 Pushing in use . *Note: Unit will drop down slightly. When in the screen release button will unlock the LCD screen and it will turn the system on and is reached....
...Remember to turn the unit off alternately. Pressing the power button* on the unit or the remote control will illuminate the controls. 3. After the unit has been turned on or off and pivot the LCD to optimize the picture quality. 4. The hinge friction will hold the screen in position while... turn On when a Disc is inserted Power ON/OFF Button Remote Sensor Infrared Transmitter Screen Release Remote Sensor 21 Pushing in use . *Note: Unit will drop down slightly. When in the screen release button will unlock the LCD screen and it will turn the system on and is reached....
Operation Manual
Page 22
... this could result in a discharged battery. REMOTE SENSOR The VOD102 incorporates two infrared remote sensors which relay signals from the transmitter, as these monitors are controlled by a three position slide switch. Only two-channel wireless headphones (Audiovox Model IR2CHS) will allow the unit to... will prevent the lights from most manufacturer's remote control to its remote control at the remote sensor. In this case you must be adjusted using the controls on the VOD102 remote control. 22 Note: If the monitor is controlled by pointing its respective component connected...
... this could result in a discharged battery. REMOTE SENSOR The VOD102 incorporates two infrared remote sensors which relay signals from the transmitter, as these monitors are controlled by a three position slide switch. Only two-channel wireless headphones (Audiovox Model IR2CHS) will allow the unit to... will prevent the lights from most manufacturer's remote control to its remote control at the remote sensor. In this case you must be adjusted using the controls on the VOD102 remote control. 22 Note: If the monitor is controlled by pointing its respective component connected...
Operation Manual
Page 23
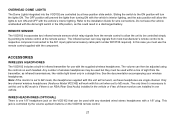
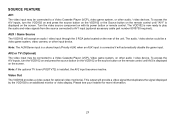
... to a Video Cassette Player (VCP), Video game system, on the rear of the unit. Video Out The VOD102 provides a video output for more information. 23 The VOD102 is displayed on with its power button or remote control. Please see your installer for optional video monitor(s). AV2 or TV (...Optional) The video input may be connected to a Video Cassette Player (VCP), video game ...
... to a Video Cassette Player (VCP), Video game system, on the rear of the unit. Video Out The VOD102 provides a video output for more information. 23 The VOD102 is displayed on with its power button or remote control. Please see your installer for optional video monitor(s). AV2 or TV (...Optional) The video input may be connected to a Video Cassette Player (VCP), video game ...
Operation Manual
Page 24
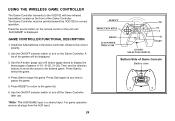
... is displayed. For game operation remove all plugs from the AUX input. 24 Bottom Side of ten games will be pointed toward the VOD102 for correct operation. The Game Controller must be displayed. 3. Observe the correct polarity. 2. Press RESET to return to select the game.... 4. GAME CONTROLLER FUNCTIONAL DESCRIPTION 1. Press Start to the VOD102 with two infrared transmitters located on the remote control or the unit until AUX/GAME* is a shared input. Press the source button on the front of games (1-10...
... is displayed. For game operation remove all plugs from the AUX input. 24 Bottom Side of ten games will be pointed toward the VOD102 for correct operation. The Game Controller must be displayed. 3. Observe the correct polarity. 2. Press RESET to return to select the game.... 4. GAME CONTROLLER FUNCTIONAL DESCRIPTION 1. Press Start to the VOD102 with two infrared transmitters located on the remote control or the unit until AUX/GAME* is a shared input. Press the source button on the front of games (1-10...
Operation Manual
Page 25
...a disc with the label side facing up. - This DVD only plays DVDs, audio CDs and MP3s. - This DVD player is dirty. The disc is set to M2, press M2 on remote. - Make sure all cables are using Single Channel Headphones. - TROUBLESHOOTING PROBLEM IR remote inoperative Disc won't play Play starts, but then stops ... is set to Region Number 1. - Both the unit and the disc are fresh. - Make sure your DVD is set to dry out. - If monitor is connected properly. Clean it. - If monitor is ON and the proper Frequency has been selected. - Check the type of movies because the disc is...
...a disc with the label side facing up. - This DVD only plays DVDs, audio CDs and MP3s. - This DVD player is dirty. The disc is set to M2, press M2 on remote. - Make sure all cables are using Single Channel Headphones. - TROUBLESHOOTING PROBLEM IR remote inoperative Disc won't play Play starts, but then stops ... is set to Region Number 1. - Both the unit and the disc are fresh. - Make sure your DVD is set to dry out. - If monitor is connected properly. Clean it. - If monitor is ON and the proper Frequency has been selected. - Check the type of movies because the disc is...
Operation Manual
Page 27
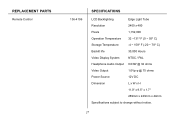
REPLACEMENT PARTS Remote Control 136-4196 SPECIFICATIONS LCD Backlighting Edge Light Tube Resolution 2400 x 480 Pixels 1,152,000 Operation Temperature 32 ~131º F (0 ~ 55º C) Storage Temperature -4 ~ 158º F (-20 ~ 70º C) Backlit life 30,000 Hours Video Display System NTSC / PAL Headphone Audio Output 0.03W @ 32 ohms Video Output 1.0Vp-p @ 75 ohms Power Source 12V DC Dimension L x W x H 11.0" x 9.5" x 1.7" 289mm x 243mm x 44mm Specifications subject to change without notice. 27
REPLACEMENT PARTS Remote Control 136-4196 SPECIFICATIONS LCD Backlighting Edge Light Tube Resolution 2400 x 480 Pixels 1,152,000 Operation Temperature 32 ~131º F (0 ~ 55º C) Storage Temperature -4 ~ 158º F (-20 ~ 70º C) Backlit life 30,000 Hours Video Display System NTSC / PAL Headphone Audio Output 0.03W @ 32 ohms Video Output 1.0Vp-p @ 75 ohms Power Source 12V DC Dimension L x W x H 11.0" x 9.5" x 1.7" 289mm x 243mm x 44mm Specifications subject to change without notice. 27

