Installation Manual
Page 14
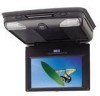
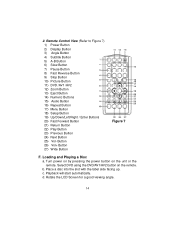
Rotate the LCD Screen for a good viewing angle. 14 Button 26) Vol+ Button 27) Wide Button Figure 7 F. Select DVD using the DVD/AV1/AV2 button on the unit or the remote. Loading and Playing a Disc a. Place a disc into the slot with the label side facing up. b. ... Button 4) Subtitle Button 5) A-B Button 6) Slow Button 7) Pause Button 8) Fast Reverse Button 9) Stop Button 10) Picture Button 11) DVD /AV1 /AV2 12) Zoom Button 13) Eject Button 14) Numeric Buttons 15) Audio Button 16) Repeat Button 17) Menu Button 18) Setup Button 19) Up/Down/Left/Right / Enter Buttons 20) Fast...
Rotate the LCD Screen for a good viewing angle. 14 Button 26) Vol+ Button 27) Wide Button Figure 7 F. Select DVD using the DVD/AV1/AV2 button on the unit or the remote. Loading and Playing a Disc a. Place a disc into the slot with the label side facing up. b. ... Button 4) Subtitle Button 5) A-B Button 6) Slow Button 7) Pause Button 8) Fast Reverse Button 9) Stop Button 10) Picture Button 11) DVD /AV1 /AV2 12) Zoom Button 13) Eject Button 14) Numeric Buttons 15) Audio Button 16) Repeat Button 17) Menu Button 18) Setup Button 19) Up/Down/Left/Right / Enter Buttons 20) Fast...
Installation Manual
Page 15
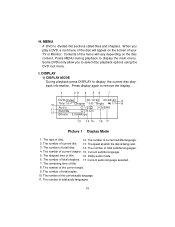
BASIC OPERATION POWER PLAY SLOW PAUSE STOP FORWARD REVERSE UP/DOWN/LEFT /RIGHT ENTER NUMBERS RETURN MENU REPEAT A-B DISPLAY ANGLE SUBTITLE AUDIO ZOOM SETUP DVD/AV1/AV2 EJECT PICTURE VOLUMEVOLUME+ SKIPSKIP+ Turn the unit on/off Start Playback Play at 1/2,1/4,1/8, 1/16 times normal speed Still Picture (1 time) Stop...disc information (title, chapter, track, time, etc.) Change the angles on the scene Select the subtitle language and turn it on/ off Select the audio language Enlarge an image to 2 or 3 times the original Display the setup menu to select and set items, and exit the setup menu. G. ...
BASIC OPERATION POWER PLAY SLOW PAUSE STOP FORWARD REVERSE UP/DOWN/LEFT /RIGHT ENTER NUMBERS RETURN MENU REPEAT A-B DISPLAY ANGLE SUBTITLE AUDIO ZOOM SETUP DVD/AV1/AV2 EJECT PICTURE VOLUMEVOLUME+ SKIPSKIP+ Turn the unit on/off Start Playback Play at 1/2,1/4,1/8, 1/16 times normal speed Still Picture (1 time) Stop...disc information (title, chapter, track, time, etc.) Change the angles on the scene Select the subtitle language and turn it on/ off Select the audio language Enlarge an image to 2 or 3 times the original Display the setup menu to select and set items, and exit the setup menu. G. ...
Installation Manual
Page 16
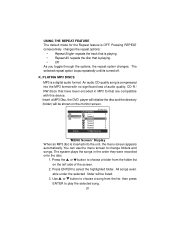
.... 4. The number of current title. 13. The remaining time of total audio languages. 16 The number of title. 8. When you to remove the display. Picture 1 Display Mode 1. The number of your TV or Monitor. The number of title. 16. The elapsed time of total chapters. 17... number of total titles. 14. I. The number of the current audio language. 11. Contents of current subtitle language. 2. The number of the menu will appear on the disc content. H. Some DVDs only allow you play a DVD, a root menu of the disc will vary depending on the screen...
.... 4. The number of current title. 13. The remaining time of total audio languages. 16 The number of title. 8. When you to remove the display. Picture 1 Display Mode 1. The number of your TV or Monitor. The number of title. 16. The elapsed time of total chapters. 17... number of total titles. 14. I. The number of the current audio language. 11. Contents of current subtitle language. 2. The number of the menu will appear on the disc content. H. Some DVDs only allow you play a DVD, a root menu of the disc will vary depending on the screen...
Installation Manual
Page 17
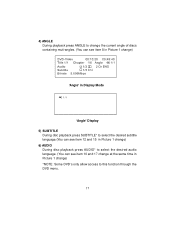
4) ANGLE During playback press ANGLE to change the current angle of discs containing muti-angles. (You can see item 8 in Picture 1 change) 'Angle' in Display Mode 1/1 'Angle' Display 5) SUBTITLE During disc playback press SUBTITLE* to select the desired subtitle language.(You can see item 12 and 15 in Picture 1 change) 6) AUDIO During disc playback press AUDIO* to select the desired audio language. (You can see item 10 and 17 change at the same time in Picture 1 change) *NOTE: Some DVD's only allow access to this function through the DVD menu. 17
4) ANGLE During playback press ANGLE to change the current angle of discs containing muti-angles. (You can see item 8 in Picture 1 change) 'Angle' in Display Mode 1/1 'Angle' Display 5) SUBTITLE During disc playback press SUBTITLE* to select the desired subtitle language.(You can see item 12 and 15 in Picture 1 change) 6) AUDIO During disc playback press AUDIO* to select the desired audio language. (You can see item 10 and 17 change at the same time in Picture 1 change) *NOTE: Some DVD's only allow access to this function through the DVD menu. 17
Installation Manual
Page 19
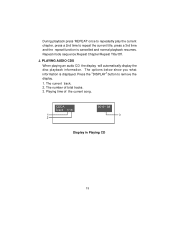
Repeat mode sequence:Repeat Chapter/Repeat Title/Off. Display in Playing CD 19 J. The current track. 2. Playing time of total tracks. 3. PLAYING AUDIO CDS When playing an audio CD the display will automatically display the disc playback information. Press the 'DISPLAY' button to repeat the current title, press a 3rd time and the repeat...
Repeat mode sequence:Repeat Chapter/Repeat Title/Off. Display in Playing CD 19 J. The current track. 2. Playing time of total tracks. 3. PLAYING AUDIO CDS When playing an audio CD the display will automatically display the disc playback information. Press the 'DISPLAY' button to repeat the current title, press a 3rd time and the repeat...
Installation Manual
Page 20
...this device. K. Press the or button to choose a folder from the list then press ENTER to choose a song from the folder list on the monitor screen. 'MENU Screen' Display When an MP3 disc is playing. • Off As you toggle through the options, the repeat option changes. Press ENTER... play the selected song. 20 repeats the disc that is compressed into the unit, the menu screen appears automatically. An audio CD-quality song is playing. • Repeat All- Insert a MP3 Disc, the DVD player will initialize the disc and the directory (folder) will be shown on the left side of...
...this device. K. Press the or button to choose a folder from the list then press ENTER to choose a song from the folder list on the monitor screen. 'MENU Screen' Display When an MP3 disc is playing. • Off As you toggle through the options, the repeat option changes. Press ENTER... play the selected song. 20 repeats the disc that is compressed into the unit, the menu screen appears automatically. An audio CD-quality song is playing. • Repeat All- Insert a MP3 Disc, the DVD player will initialize the disc and the directory (folder) will be shown on the left side of...
Installation Manual
Page 23
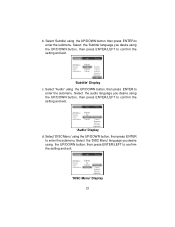
..., then press ENTER/LEFT to enter the submenu. Select 'DISC Menu' using the UP/DOWN button, then press ENTER to confirm the setting and exit. 'Audio' Display d. b. Select 'Subtitle' using the UP/DOWN button, then press ENTER/LEFT to enter the submenu. Select the 'Subtitle' language you desire using the UP.../DOWN button, then press ENTER/LEFT to enter the submenu. Select the audio language you desire using the UP/DOWN button, then press ENTER to confirm the setting and exit. 'Subtitle' Display c.
..., then press ENTER/LEFT to enter the submenu. Select 'DISC Menu' using the UP/DOWN button, then press ENTER to confirm the setting and exit. 'Audio' Display d. b. Select 'Subtitle' using the UP/DOWN button, then press ENTER/LEFT to enter the submenu. Select the 'Subtitle' language you desire using the UP.../DOWN button, then press ENTER/LEFT to enter the submenu. Select the audio language you desire using the UP/DOWN button, then press ENTER to confirm the setting and exit. 'Subtitle' Display c.
Installation Manual
Page 29
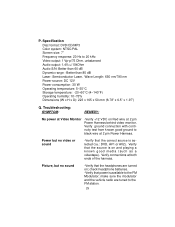
...that the correct source is selected (i.e.: DVD, AV1 or AV2). Verify connections at 2 pin Power Harness behind video monitor. Verify ground connection with continuity test from known good ground to 20 kHz Video output: 1 Vp-p/75 Ohm, unbalanced Audio output: 1.4Vrms/10kOhm Audio S/N: Better than 60 dB Dynamic range.../PAL Screen size: 7" Frequency response: 20 Hz to black wire at 2 pin Power Harness. Troubleshooting: SYMPTOM: REMEDY: No power at Video Monitor -Verify +12 VDC on and playing a known good media (such as a videotape). Picture, but no sound -Verify that power is on ...
...that the correct source is selected (i.e.: DVD, AV1 or AV2). Verify connections at 2 pin Power Harness behind video monitor. Verify ground connection with continuity test from known good ground to 20 kHz Video output: 1 Vp-p/75 Ohm, unbalanced Audio output: 1.4Vrms/10kOhm Audio S/N: Better than 60 dB Dynamic range.../PAL Screen size: 7" Frequency response: 20 Hz to black wire at 2 pin Power Harness. Troubleshooting: SYMPTOM: REMEDY: No power at Video Monitor -Verify +12 VDC on and playing a known good media (such as a videotape). Picture, but no sound -Verify that power is on ...
