Owners Manual
Page 5
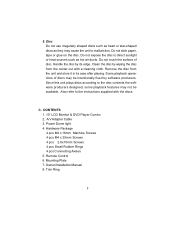
... 3. Mounting Plate 7. Trim Ring 5 Remove the disc from the center out with the discs. Also refer to malfunction. C. Remote Control 6. Do not stick paper, tape or glue on the disc. CONTENTS 1. 10" LCD Monitor & DVD Player Combo 2. 5. Do not expose the disc to direct sunlight or heat sources such as they may not be intentionally...
... 3. Mounting Plate 7. Trim Ring 5 Remove the disc from the center out with the discs. Also refer to malfunction. C. Remote Control 6. Do not stick paper, tape or glue on the disc. CONTENTS 1. 10" LCD Monitor & DVD Player Combo 2. 5. Do not expose the disc to direct sunlight or heat sources such as they may not be intentionally...
Owners Manual
Page 7
... all system functions. GENERAL INSTALLATION APPROACH: 1) Decide upon system configuration and options that will be installed (i.e.: what components, VCP, Tuner, RF Modulator/external amp, remote headphones, DVD, etc.). 2) Review all manuals to become familiar with electrical requirements and hook ups. 3) Decide upon mounting locations of all components and method of mounting. 4) Prep...
... all system functions. GENERAL INSTALLATION APPROACH: 1) Decide upon system configuration and options that will be installed (i.e.: what components, VCP, Tuner, RF Modulator/external amp, remote headphones, DVD, etc.). 2) Review all manuals to become familiar with electrical requirements and hook ups. 3) Decide upon mounting locations of all components and method of mounting. 4) Prep...
Owners Manual
Page 16
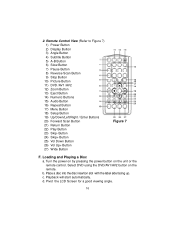
... 27) Wide Button Figure 7 F. c. Turn the power on by pressing the power button on the remote. Select DVD using the DVD/AV1/AV2 button on the unit or the remote control. b. Pivot the LCD Screen for a good viewing angle. 16 Remote Control View (Refer to Figure 7) 1) Power Button 2) Display Button 3) Angle Button 4) Subtitle Button 5) A-B Button 6) Slow...
... 27) Wide Button Figure 7 F. c. Turn the power on by pressing the power button on the remote. Select DVD using the DVD/AV1/AV2 button on the unit or the remote control. b. Pivot the LCD Screen for a good viewing angle. 16 Remote Control View (Refer to Figure 7) 1) Power Button 2) Display Button 3) Angle Button 4) Subtitle Button 5) A-B Button 6) Slow...
Owners Manual
Page 31
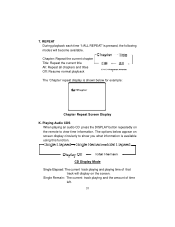
... the DISPLAY button repeatedly on screen display circularly to view time information. REPEAT During playback each time '1/ALL REPEAT' is shown below appear on the remote to show you what information is available using this function. CD Display Mode Single Elapsed: The current track playing and playing time of time left...
... the DISPLAY button repeatedly on screen display circularly to view time information. REPEAT During playback each time '1/ALL REPEAT' is shown below appear on the remote to show you what information is available using this function. CD Display Mode Single Elapsed: The current track playing and playing time of time left...
Owners Manual
Page 35
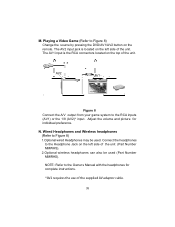
.... 35 Connect the headphones to the RCA inputs (AV1) or the 1/8 (AV2)* input. Playing a Video Game (Refer to Figure 8) Change the source by pressing the DVD/AV1/AV2 button on the top of the unit. The AV2 input jack is the RCA connectors located on the...
.... 35 Connect the headphones to the RCA inputs (AV1) or the 1/8 (AV2)* input. Playing a Video Game (Refer to Figure 8) Change the source by pressing the DVD/AV1/AV2 button on the top of the unit. The AV2 input jack is the RCA connectors located on the...

