
Owners Manual
Page 1
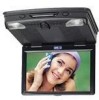
Owner/ Installation Manual MMD10 10" LCD MONITOR & DVD PLAYER
Owner/ Installation Manual MMD10 10" LCD MONITOR & DVD PLAYER
Owners Manual
Page 4
The main features include a 10" Wide Screen (16:9 Aspect Ratio) Liquid Crystal Display (LCD) monitor and a built-in installing the system properly to disassemble the cabinet. The unit applies the latest state of the system only. 4 Objects... and openings 3.Disassembly Do not attempt to obtain the best equipment performance. Use a cloth lightly dampened with this may result in this manual for cleaning the exterior of the art electronics. Introduction Thank you in DVD player. Installation Ensure that the MMD10 is constructed to Laser Radiation. B. Cautions and Warnings 1.
The main features include a 10" Wide Screen (16:9 Aspect Ratio) Liquid Crystal Display (LCD) monitor and a built-in installing the system properly to disassemble the cabinet. The unit applies the latest state of the system only. 4 Objects... and openings 3.Disassembly Do not attempt to obtain the best equipment performance. Use a cloth lightly dampened with this may result in this manual for cleaning the exterior of the art electronics. Introduction Thank you in DVD player. Installation Ensure that the MMD10 is constructed to Laser Radiation. B. Cautions and Warnings 1.
Owners Manual
Page 5
...the discs. Since this unit plays discs according to direct sunlight or heat sources such as they may be available. CONTENTS 1. 10" LCD Monitor & DVD Player Combo 2. A/V Adapter Cable 3. Do not touch the surface of discs may cause the unit to the instructions supplied with a cleaning... cloth. Mounting Plate 7. Trim Ring 5 5. Clean the disc by its case after playing. Also refer to malfunction. Owner/Installation Manual 8. Do not stick paper, tape or glue on the disc. Hardware Package 4 pcs M4 x 16mm Machine Screws 4 pcs M4 x 25mm Screws...
...the discs. Since this unit plays discs according to direct sunlight or heat sources such as they may be available. CONTENTS 1. 10" LCD Monitor & DVD Player Combo 2. A/V Adapter Cable 3. Do not touch the surface of discs may cause the unit to the instructions supplied with a cleaning... cloth. Mounting Plate 7. Trim Ring 5 5. Clean the disc by its case after playing. Also refer to malfunction. Owner/Installation Manual 8. Do not stick paper, tape or glue on the disc. Hardware Package 4 pcs M4 x 16mm Machine Screws 4 pcs M4 x 25mm Screws...
Owners Manual
Page 7
... the vehicle as necessary. (Refer to be installed (i.e.: what components, VCP, Tuner, RF Modulator/external amp, remote headphones, DVD, etc.). 2) Review all manuals to leave enough slack in the vehicle at each of this manual as well as the wiring instructions for the individual components and accessory options being installed). GENERAL INSTALLATION APPROACH...
... the vehicle as necessary. (Refer to be installed (i.e.: what components, VCP, Tuner, RF Modulator/external amp, remote headphones, DVD, etc.). 2) Review all manuals to leave enough slack in the vehicle at each of this manual as well as the wiring instructions for the individual components and accessory options being installed). GENERAL INSTALLATION APPROACH...

Owners Manual
Page 8
...trimmed. 8 It is not intended for the video monitor is where the vehicle's factory dome light is installed. ...power source (+12v when key is off). NEVER INSTALL THE MONITOR IN A PLACE WITHIN THE DRIVER'S VIEW. and run positions...be required are: A) Removal of mounting. Generally, this manual will only focus on the vehicle structure and installation method. ...IS ALSO ILLEGAL. 4) Once the mounting location of the monitor has been determined, there may need to vehicle, so...depending on the installation of the video monitor and related console accessories. 3) Generally, the best location...
...trimmed. 8 It is not intended for the video monitor is where the vehicle's factory dome light is installed. ...power source (+12v when key is off). NEVER INSTALL THE MONITOR IN A PLACE WITHIN THE DRIVER'S VIEW. and run positions...be required are: A) Removal of mounting. Generally, this manual will only focus on the vehicle structure and installation method. ...IS ALSO ILLEGAL. 4) Once the mounting location of the monitor has been determined, there may need to vehicle, so...depending on the installation of the video monitor and related console accessories. 3) Generally, the best location...
Owners Manual
Page 11
7. Refer to the Owner/Install Manual for the MMD 10 to complete the installation. 11
7. Refer to the Owner/Install Manual for the MMD 10 to complete the installation. 11
Owners Manual
Page 23
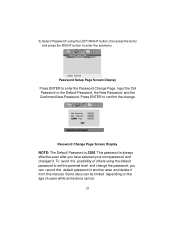
Press ENTER to confirm the change the password, you have selected your own password and changed it from this manual. To avoid the possibility of users while some discs cannot. 23 Some discs can record this default password in another area and delete it . Input ...
Press ENTER to confirm the change the password, you have selected your own password and changed it from this manual. To avoid the possibility of users while some discs cannot. 23 Some discs can record this default password in another area and delete it . Input ...
Owners Manual
Page 35
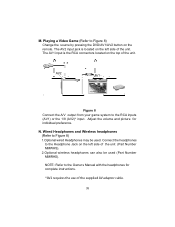
... AV2 AV1 Figure 8 Connect the A/V output from your game system to Figure 8) 1.Optional wired Headphones may be used . N. NOTE: Refer to the Owner s Manual with the headphones for individual preference. Playing a Video Game (Refer to the Headphone Jack on the top of the unit. Connect the headphones to Figure... 8) Change the source by pressing the DVD/AV1/AV2 button on the left side of the supplied AV adaptor cable. 35 The AV1 input is located on the remote. Wired Headphones ...
... AV2 AV1 Figure 8 Connect the A/V output from your game system to Figure 8) 1.Optional wired Headphones may be used . N. NOTE: Refer to the Owner s Manual with the headphones for individual preference. Playing a Video Game (Refer to the Headphone Jack on the top of the unit. Connect the headphones to Figure... 8) Change the source by pressing the DVD/AV1/AV2 button on the left side of the supplied AV adaptor cable. 35 The AV1 input is located on the remote. Wired Headphones ...
